- Introduction – The problem with linear workflows
- Quick Summary – Workflow Branching Features Breakdown
- What’s New – De-Linked Nodes and Go-To Triggers
- What’s Changed – Execution behavior and builder layout
- Why This Matters – Visual clarity, flexibility, and faster testing
- How to Use It – Build Workflow Branching in 6 Steps
- Pro Tips – Sticky notes, naming clusters, use cases
- FAQ – Common questions about Workflow Branching
- What It Means – Strategy shift for automation design
- Cleaner logic, modular automations, easier updates
- Conclusion – Evolve your automations visually
Introduction – The problem with linear workflows
Let’s be honest, linear workflows work fine… until they don’t. So we need to learn workflow branching.
As soon as you try to handle multiple outcomes, missed steps, or layered conditions, the standard straight-line structure turns into a headache. Every path gets jammed into one continuous thread, and what starts as a simple automation becomes a logic maze.
Sound familiar?
You’re not alone. Agencies everywhere have been duct-taping conditional actions and hacks just to get Workflow Branching to behave the way real businesses operate. It’s inefficient, hard to scale, and nearly impossible to audit later.
That’s exactly why GoHighLevel introduced de-linked nodes and Go-To triggers in the Advanced Builder. It’s workflow branching, done right.

With workflow branching now available in GoHighLevel’s Advanced Builder, you can design modular automations, reduce clutter, and test separate logic paths with ease. This upgrade gives agency owners the control to build smarter, cleaner, and faster Workflow Branching that adapt to real business logic.
Quick Summary – Workflow Branching Features Breakdown
Purpose: Showcase GoHighLevel’s new workflow branching tools designed for modular automation building and cleaner visual layouts.
Why It Matters: These features help agencies streamline logic, reduce Workflow Branching clutter, and scale automations faster without sacrificing clarity.
What You Get: De-Linked Nodes for side-by-side logic branches, Go-To Triggers for precise entry control, and full keyboard shortcut overlay for rapid editing.
Time to Complete: You can start Workflow Branching immediately, just switch to the Advanced Builder and follow a few setup steps.
Difficulty Level: Beginner-friendly for layout changes, with major efficiency gains for experienced automation builders.
Key Outcome: Smarter, faster, and more scalable Workflow Branching that are easier to update, troubleshoot, and delegate.
What’s New – De-Linked Nodes and Go-To Triggers
This update gives agencies what they’ve been asking for: visual freedom and modular logic inside the Advanced Workflow Builder.
De-Linked Nodes let you create completely independent action clusters on the same canvas. You can drag actions anywhere, without wiring them into the main Workflow Branching chain. No connections. No forced order. Just logic that stands on its own.
Automate marketing, manage leads, and grow faster with GoHighLevel.

Then comes the magic.
The dashed Go-To line acts like a shortcut. You can link your main Workflow Branching trigger to any standalone branch, launching multiple logic paths all on the same screen.
It’s like laying out different playbooks on the same field, each one runs independently without crossing paths.
Here’s what you get with this combo:
- Total layout control
- Branch-specific logic
- Fewer workflow hacks
This is the kind of update that makes scaling smarter, not harder.
What’s Changed – Execution behavior and builder layout
With the introduction of de-linked nodes and Go-To triggers, the way Workflow Branching behave, and how you build them, has fundamentally changed.
Execution-wise, each branch is now its own self-contained unit. Instead of one long chain where each step automatically leads to the next, branches only run when a trigger specifically tells them to. That means your “Missed Call” automation doesn’t need to share space with your “Form Submission” logic anymore. It also means no more “if/else” gymnastics to simulate parallel flows.
Builder layout has gone from cramped to clean. You can spread branches across the canvas, cluster related actions together, and even label or color-code them using sticky notes. There’s no pressure to force everything into one path. Want three separate workWorkflow Branching flows for three different scenarios? Lay them out side-by-side and trigger them independently.
It’s not just about looking better, it actually speeds up your build time, makes the logic easier to follow, and takes the pain out of debugging.
Why This Matters – Visual clarity, flexibility, and faster testing
If you’ve ever had to untangle a Workflow Branching low mid-campaign, you already know, visibility is everything.
This update turns your automations from a spaghetti mess into something that actually makes sense at a glance. With de-linked branches and Go-To triggers, you can lay out every possible outcome as its own distinct cluster. That means:
- No overlapping paths
- No buried logic
- No guesswork
It’s the difference between building with sticky notes on a whiteboard vs. scribbling in a notebook with no margins.
But the real win? Testing.
Now, you can isolate a branch, test it, and debug it without triggering unrelated actions. That’s massive for speed. It means fewer mistakes, faster rollouts, and easier team collaboration, because anyone jumping into the workflow can actually follow the logic.
And because every piece is modular, you can clone, tweak, or swap branches without touching the whole system.
How to Use It – Build Workflow Branching in 6 Steps
If you’ve ever built a workflow that turned into a confusing mess, de-linked nodes are your fix. You can now design clear, modular automation clusters that fire only when triggered, no more tangled chains. Here’s how to set it up fast:
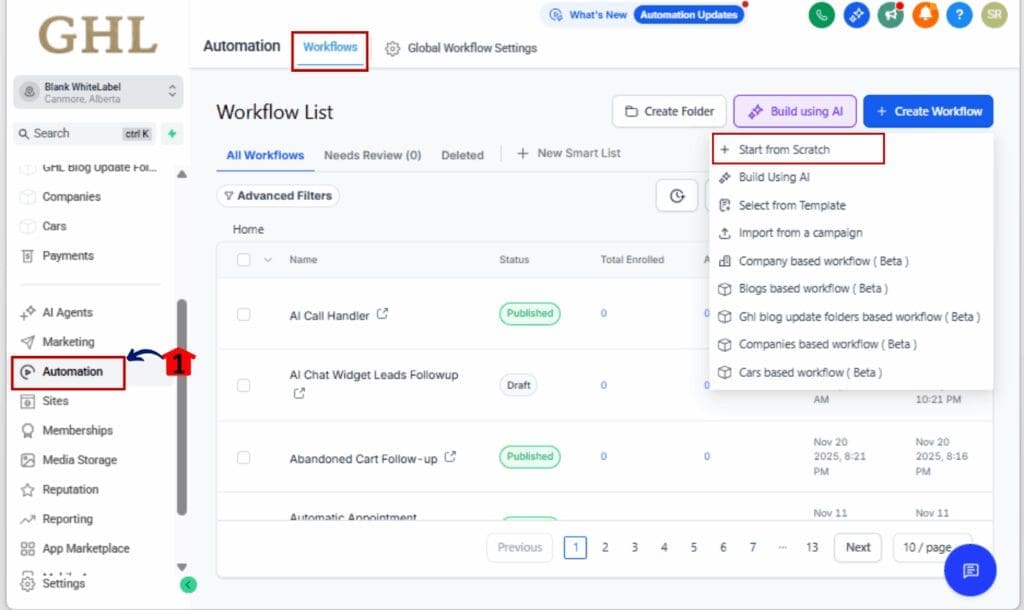
Step 01 – Open the Workflow in Advanced Builder
1.1 From your GHL account, go to the left-hand menu.
1.2 Click on Automation > Workflows.
1.3 Open an existing workflow or click +Create Workflow.
1.4 Ensure you’re using the Advanced Builder (not Standard).
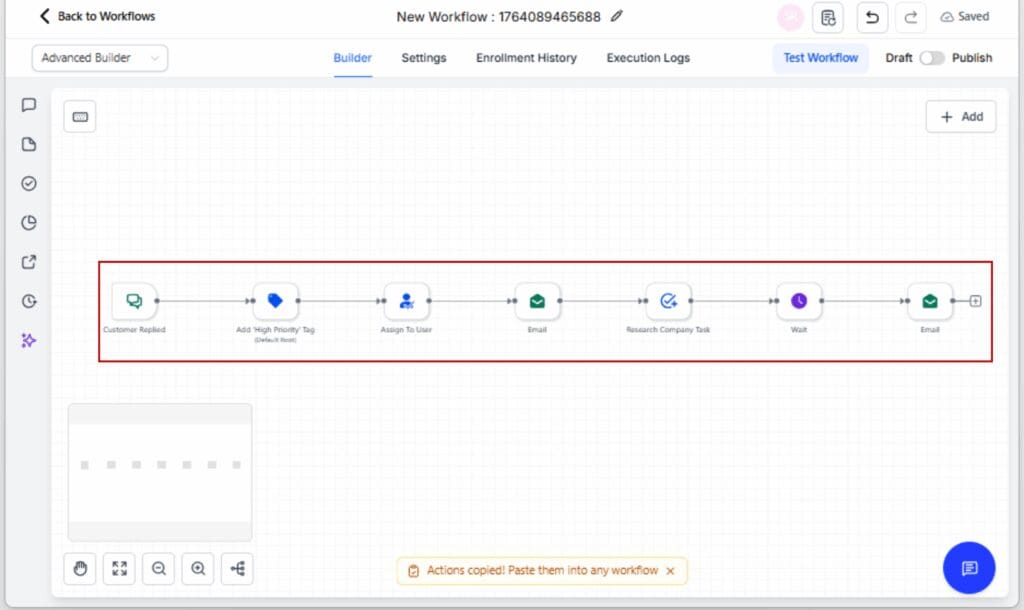
Step 02 – Add a De-Linked Node
2.1 Drag any action (Send SMS, Delay, Webhook, etc.) onto an empty area of the canvas.
2.2 Don’t connect it to the main workflow path, this node stands alone.
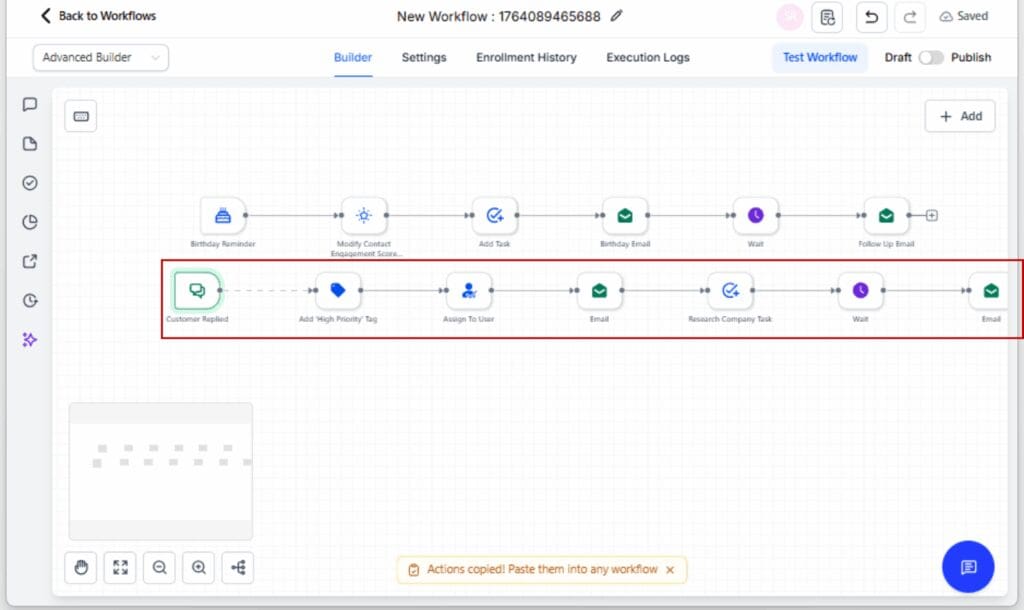
Step 03 – Connect a Trigger Using Go-To
3.1 Click on the workflow Trigger.
3.2 Use the dashed Go-To connection arrow and drag it to your de-linked node.
3.3 This defines when the isolated branch should run.
Step 04 – Build Out the Mini Branch
4.1 Add additional actions below or beside your de-linked node.
4.2 Build this path like a normal workflow, but keep it separate.
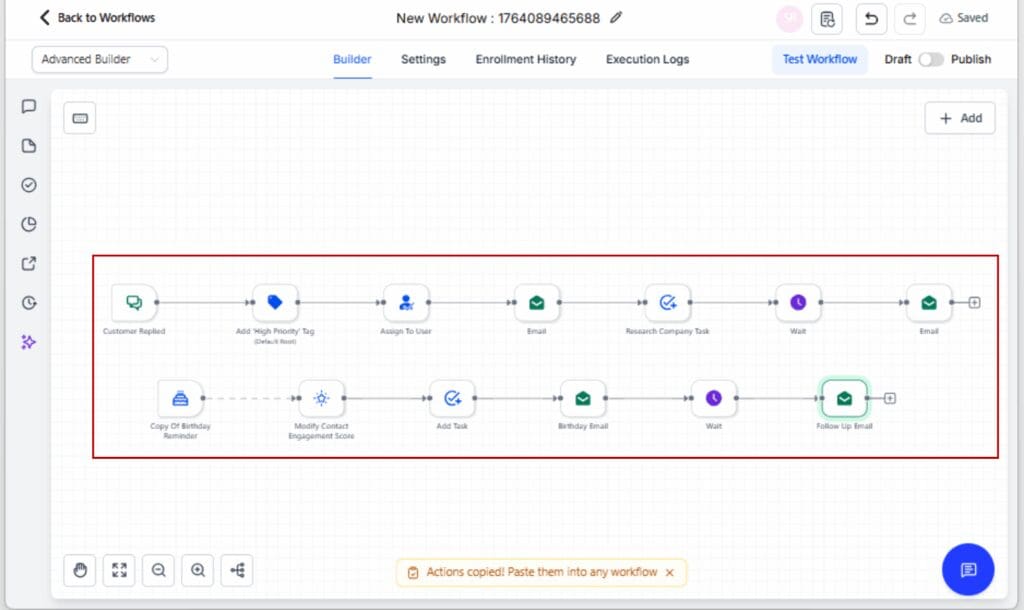
Step 05 – Organize Visually
5.1 Right-click and add Sticky Notes to label the branch.
5.2 Color-code nodes for clarity (right-click > Set Color).

Step 06 – Save, Test, and Publish
6.1 Click Save.
6.2 Run a test to confirm the branch triggers correctly.
6.3 Click Publish when satisfied.

You’ve just built a modular logic cluster that runs independently inside your workflow. Congrats, you’re now designing like a pro.
Pro Tips – Sticky notes, naming clusters, use cases
After adding a few standalone branches, it doesn’t take long before your workflow starts feeling crowded, unless you’re keeping it in check.
Here’s how to keep everything clear, efficient, and easy to scale:
Use Sticky Notes to Label Each Branch
Right-click on the canvas and drop a sticky note wherever it makes sense. Give each one a name that reflects what it does, like “No-Show Reminder,” “VIP Tag Follow-up,” or “Reactivation Sequence.” It makes your layout easier to read and saves your team from guessing.
Color-Code Your Logic
Use colors to organize your flow at a glance. Maybe blue for appointment flows, orange for follow-ups, and green for lead scoring. Right-click any action or sticky and assign a color. The more visual clarity, the faster you’ll spot what needs attention.
Create Plug-and-Play Logic Blocks
Build a few reusable mini-flows you can drop into any automation. Think of things like:
- A 3-step appointment reminder
- Missed call follow-up with callback link
- Cold lead reactivation drip
You can duplicate these, tweak the content, and snap them into new workflows without starting from scratch every time.
Keep Each Branch Tight
If a branch starts turning into a mess, don’t be afraid to split it up. Breaking things down keeps your workflow easier to follow and way less frustrating to fix.
FAQ – Common questions about Workflow Branching
What It Means – Strategy shift for automation design
This update isn’t just about making the builder look nicer, it fundamentally changes how you approach automation strategy inside GoHighLevel.
Here’s what that shift looks like:
From Linear to Modular Thinking
You don’t have to string everything together anymore. Now, you can build smaller, focused pieces of logic that live on their own. Each one can be edited, reused, or handed off without digging through a huge workflow.
Faster Scaling for Agencies
Need to replicate a logic path for another client or campaign? Copy a cluster, change a few messages, and reattach it via a Go-To trigger. This modular approach makes your agency faster, more consistent, and scalable across niches and industries.
Cleaner Handoffs and Training
Junior team members no longer have to decode a massive, twisted workflow. With clear branches and sticky notes, it’s easy to assign one part of the logic to a teammate without risking the whole system. That means more team productivity, less burnout, and fewer “Hey, can you fix this broken node?” Slack messages.
Smarter Testing and Iteration
If your no-show sequence needs work, you can zero in on just that part. Want to update how quickly VIP leads get followed up? Head straight to that cluster and make changes without affecting the rest of your flow.
The old way of building workflows was functional. This new way? It’s strategic.
Cleaner logic, modular automations, easier updates
Once you start using de-linked nodes and workflow , you’ll notice the benefits almost immediately, especially if you’ve built more than a handful of GHL automations.
Cleaner Logic Visuals
Gone are the days of endless strings of actions and overlapping arrows. With this update, each logical path can live in its own corner of the canvas. That makes it easier to scan, easier to explain to clients, and way easier to debug.
Modular Automations
Each mini-branch becomes its own micro-system. That means you can reuse, clone, and update branches without disrupting everything else. This is especially powerful for agencies running similar workflows across multiple sub-accounts or industries.
Easier Updates and Handoffs
Need to change the timing on a nurture sequence? Go to that one branch. Want to hand off a reactivation campaign to your junior builder? Copy just that logic block. No more tiptoeing around fragile flows or accidentally breaking five other automations while editing one.
Faster Troubleshooting
When something doesn’t fire, you can visually trace the logic without unraveling a ball of yarn. Each Go-To trigger shows you exactly where the branch starts, and the clean separation means fewer logic collisions.
This feature doesn’t just make building easier, it makes your business more efficient.
Conclusion – Evolve your automations visually
The days of messy, linear, hard-to-edit workflows are over. With de-linked nodes, Go-To triggers, and keyboard shortcuts inside the Advanced Builder, GoHighLevel just gave agency owners and automation pros a better way to build.
You’re no longer limited to one chain of logic. You can lay out modular paths, organize them visually, and update individual branches without tearing everything apart. It’s like going from duct-taped automation to industrial-grade systems, clean, scalable, and smart.
If you want to move faster, onboard team members easier, and build automations that actually make sense to look at a week later, this update is your green light.
Jump into your builder, set up your first standalone workflow branching, and see the difference for yourself, you won’t want to go back.
Scale Your Business Today.
Streamline your workflow with GoHighLevel’s powerful tools.