Simple Booking Setup Your First GoHighLevel Calendar
Listen up, folks! Tired of playing phone tag and wrestling with schedules? GoHighLevel’s calendar feature is your secret weapon. It lets you slap booking right onto your website or funnels, making life easier for your clients and giving you back precious time. Whether you’re a seasoned GHL guru or just dipping your toes in, getting a handle on creating and embedding a basic booking calendar is like adding a turbocharger to your business engine.
Think about it – clients booking appointments with a few clicks, anytime, day or night. That’s the magic of GoHighLevel calendars. By embedding this bad boy, you’re not just offering convenience; you’re paving a straight shot to engagement and more closed deals. This no-nonsense guide will walk you through the super simple steps to get your first basic booking calendar up and running in GoHighLevel and seamlessly bolted onto your online turf.
Nail this guide, and you’ll be embedding a basic booking calendar in GoHighLevel like a pro. Clients book directly, you save time, and your scheduling headaches? Gone.
Easy to Follow Step-by-Step Instructions: Creating Your Basic Booking Calendar
Alright, let’s get down to brass tacks and set up your basic booking calendar inside the Calendars section of your GoHighLevel account. We’re talking about the nitty-gritty – naming it, setting your availability, and telling folks where to show up (virtually or otherwise). Follow these straightforward steps, and you’ll have your first basic booking calendar ready to roll.
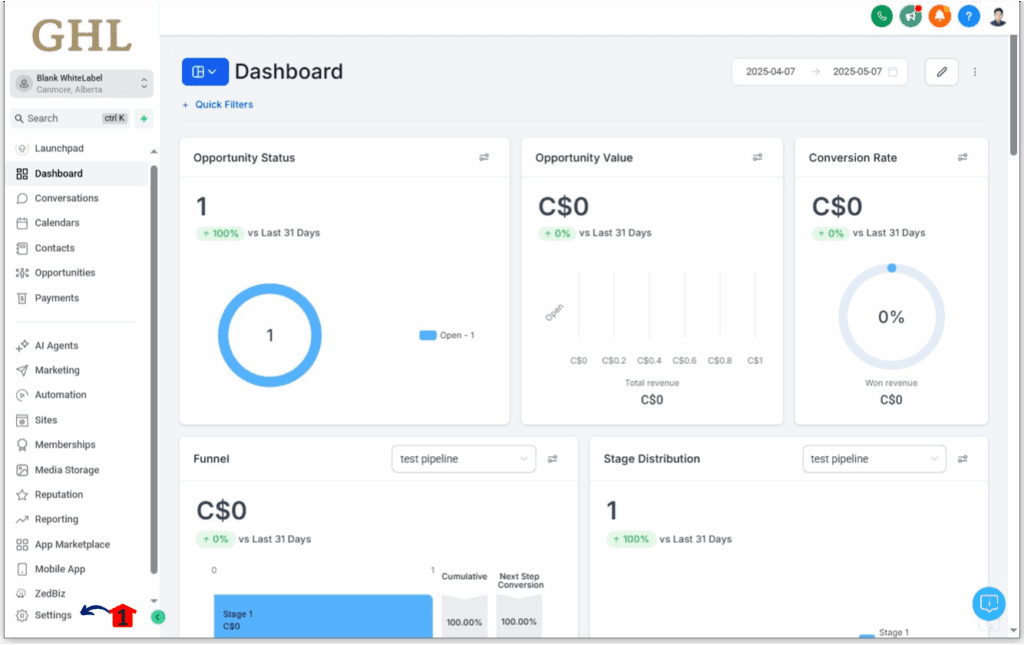
Step 01 – Access the Settings Area in GoHighLevel
- Go to the left-hand sidebar, look all the way to the bottom.
Automate marketing, manage leads, and grow faster with GoHighLevel.

1.1. Click on the gear icon ⚙️ labeled “Settings.”
- You’ll now be in the main Settings dashboard, where you can access:
- Business Info
- Billing
- My Staff
- and more.
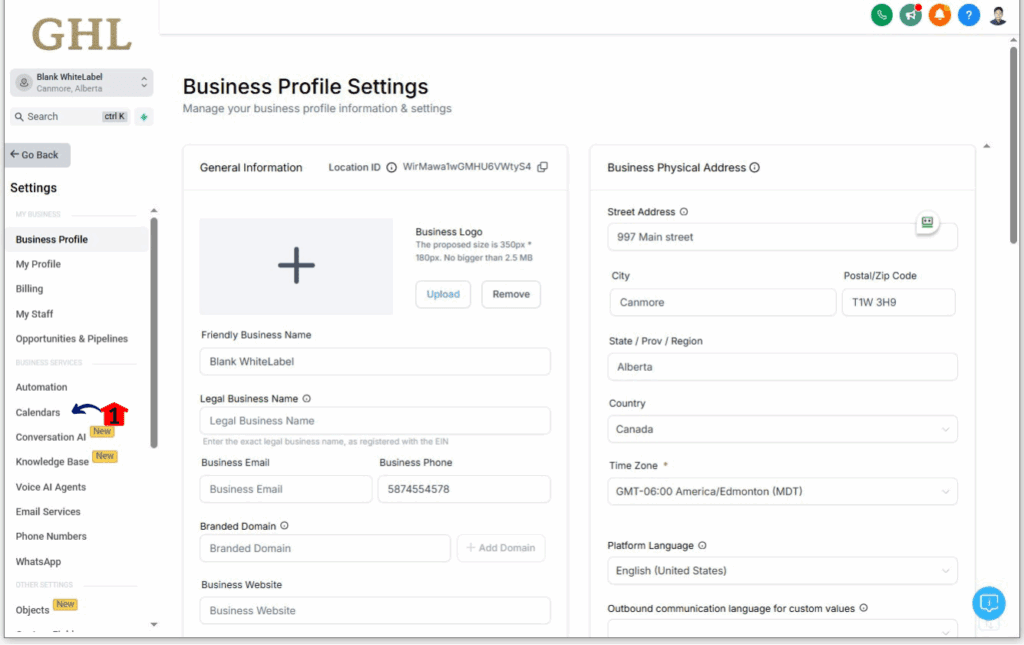
Step 02 – Navigate to the Calendars Section
- Once in the Settings dashboard, locate the “Calendars” option.
2.1. Click on the “Calendars” menu item.
- This will take you to the Calendars management area where you can view existing calendars and create new ones.
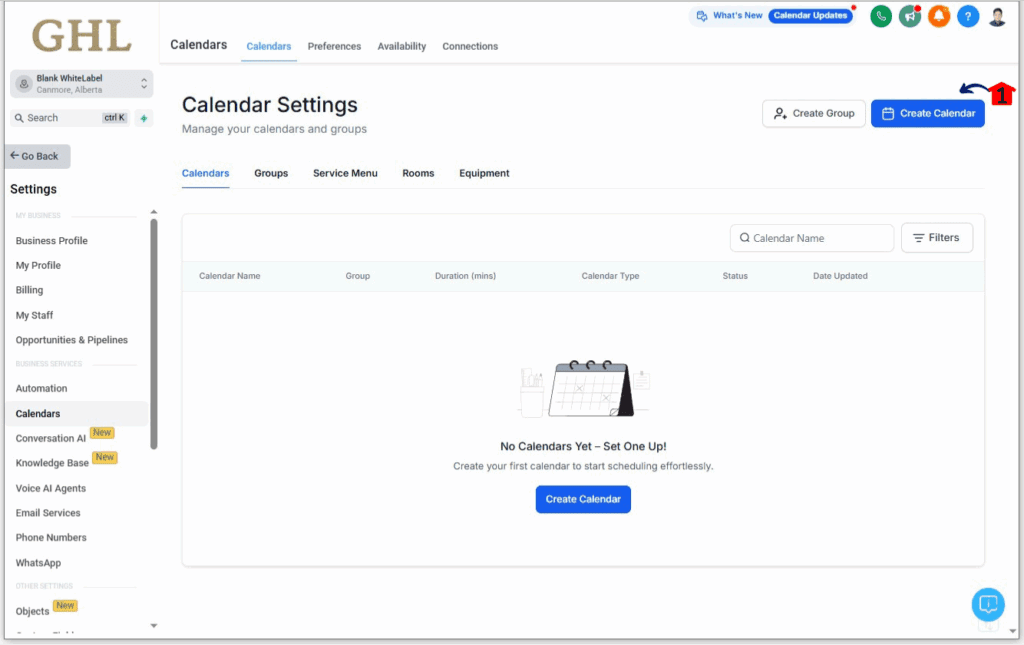
Step 03 – Initiate Calendar Creation
- To create a new booking calendar, find and click the “Create Calendar” button.
3.1. Click on the “Create Calendar” button.
- This action will present you with different calendar types to choose from.
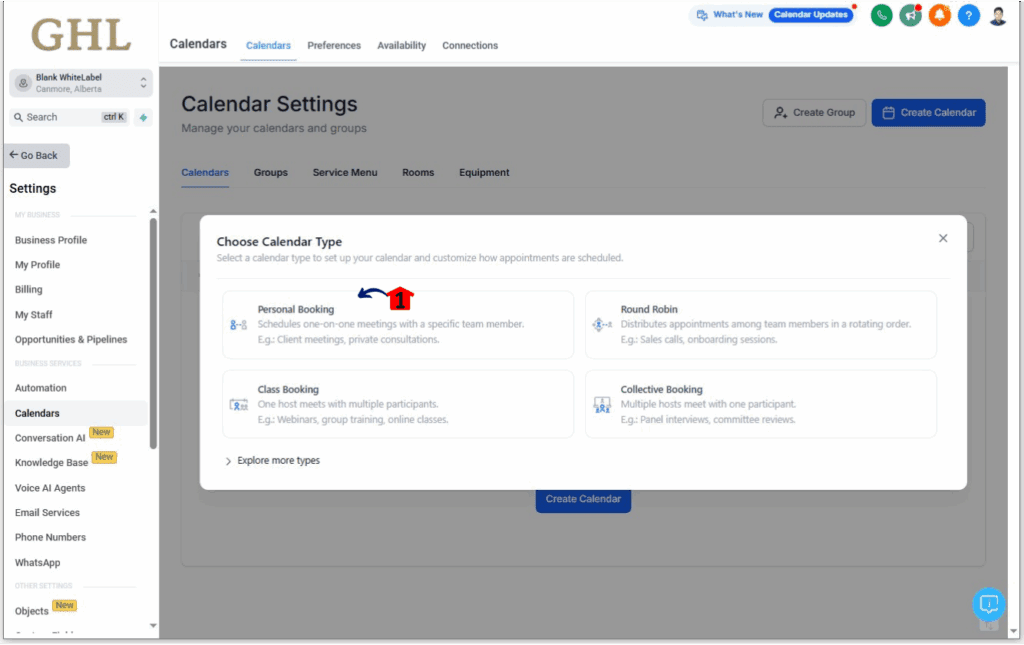
Step 04 – Select the Calendar Type
- Choose the type of calendar that fits your basic appointment scheduling.
4.1. Select “Personal Booking” as the scheduling type.
- A “Personal Booking” is ideal for one-on-one bookings and offers essential scheduling features.
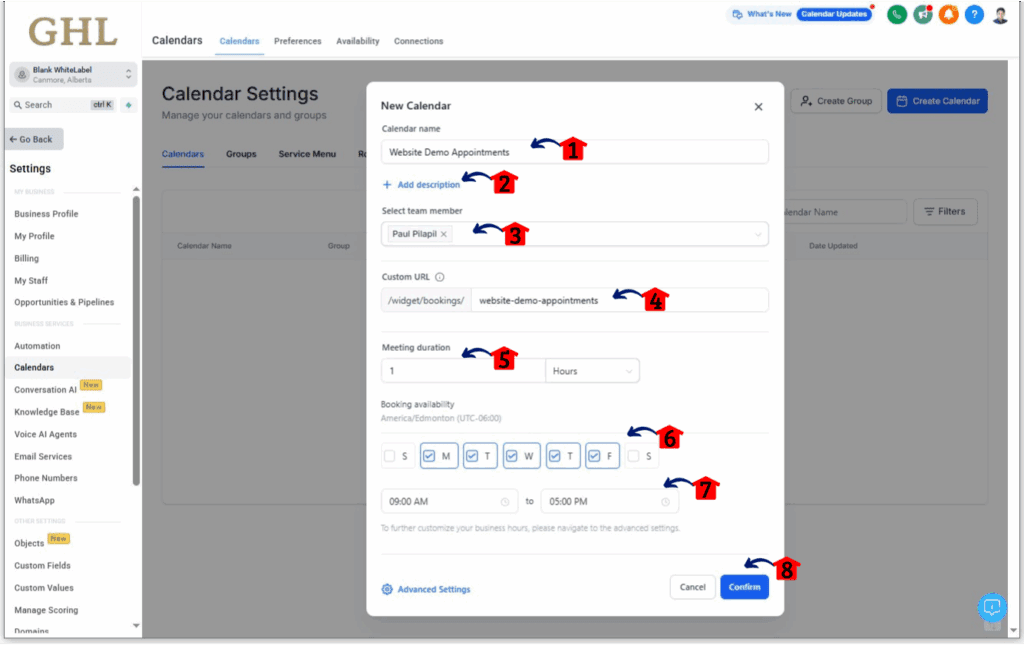
Step 05 – Configure Basic Calendar Details
- Provide the fundamental information for your new calendar.
5.1. Enter a descriptive name for your calendar in the “Calendar Name” field.
- Choose a name that clearly indicates the purpose of this calendar (e.g., “Initial Consultation Bookings,” “Website Demo Appointments”).
5.2. Optionally, add a brief explanation of the calendar’s purpose in the “Description” field.
- This description is for internal use and can help you differentiate between multiple calendars.
5.3. Assign a team member to this calendar.
- Select the specific team member who will be responsible for managing the appointments booked through this calendar.
- This ensures that notifications and calendar events are correctly associated with the designated team member.
5.4. Create a unique and easy-to-share link for your calendar in the “Custom URL” field.
- This URL will be used if you choose to share a direct link to your booking page.
- Make it concise and relevant to your business or the calendar’s purpose.
5.5. Set the duration of your appointments using the “Meeting Duration” dropdown menu.
- Select the length of time each booking slot will be (e.g., 30 minutes, 1 hour).
5.6. Check the boxes next to the days of the week you want to offer appointments.
- Only the selected days will show as available on your calendar.
5.7. Set your daily operating hours by adjusting the start and end times. For example, enter “9:00 AM” in the start time field and “5:00 PM” in the end time field.
- These times define the window within which customers can book appointments on the selected days.
5.8. Click the “Confirm” button to save your availability settings.
Step 06 – Access the Embed Code for Your Calendar
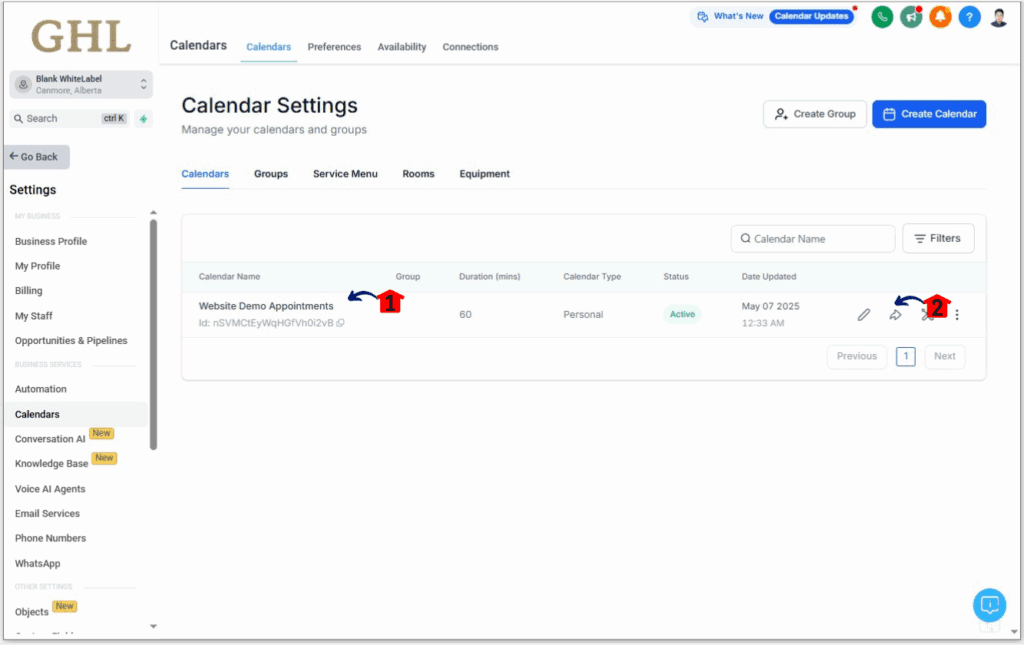
- Once your calendar is created, you can retrieve the code needed to display it on your website or funnel page.
6.1. In the list of your calendars, locate the calendar you wish to embed.
6.2. Click on the arrow or the Share icon associated with that calendar.
- This action will open a pop-up window with different sharing options.
Step 07 – Copy the Embed Code
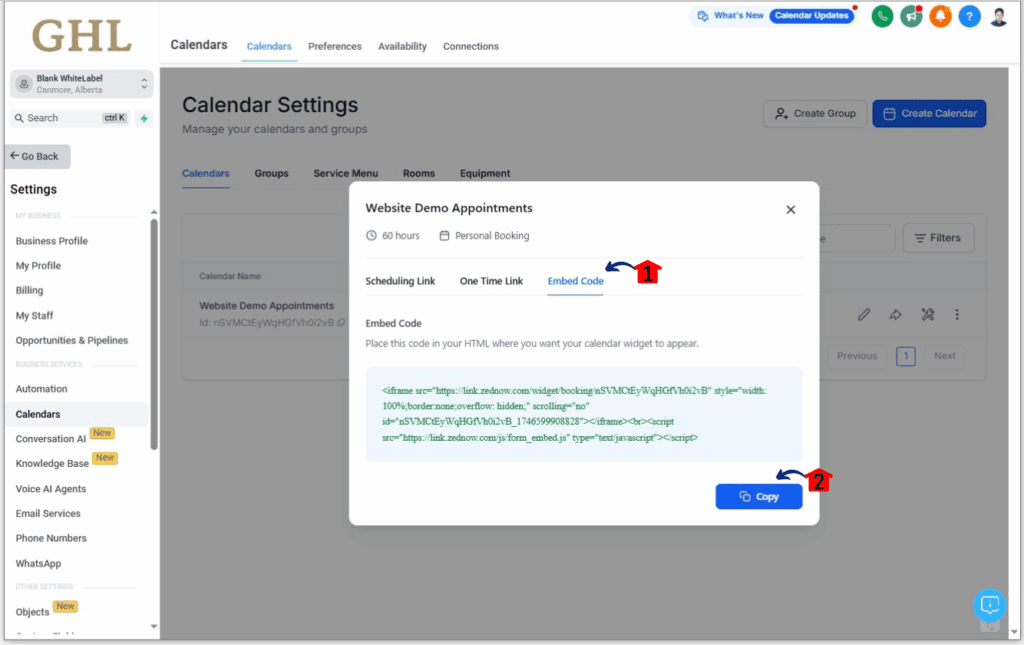
- Within the sharing options, find the embed code.
7.1 Navigate to the “Embed Code” tab within the share window.
- This tab contains the HTML code necessary to display your calendar.
7.2 Click the “Copy” button next to the embed code.
- The embed code is now copied to your clipboard and ready to be pasted into your website builder or funnel editor. You will typically insert this code into a custom HTML or code element on your page.
Level Up Your Scheduling: Pro Tips & Quick Hacks
Want to squeeze even more juice out of your basic booking calendar? Check this out:
- Brand Your Booking Link: Ditch the generic link and make your basic booking calendar URL something catchy and on-brand. It’s easier to share and looks more professional.
- Pad Your Appointment Times: When setting the duration in your basic booking calendar, throw in a little buffer time between meetings. You’ll thank yourself for that breathing room.
- Strategic Placement is Key: Don’t just slap your basic booking calendar anywhere. Put it on pages where folks are ready to book – service pages, contact pages, the money pages.
- Always Test the Waters: After embedding your basic booking calendar, run through the booking process yourself. Make sure everything flows smoothly and looks right.
Conclusion and Next Steps
Alright, you’ve now got the know-how to create and embed a basic booking calendar in GoHighLevel like a seasoned pro. This simple yet powerful tool is going to seriously streamline your scheduling and make booking a breeze for your clients.
Take action now and get that basic booking calendar embedded on your website or funnel. Experience the sweet relief of automated scheduling. As you get more comfortable, dive into GoHighLevel’s more advanced calendar features to really dial things in.
How are you planning to use your new basic booking calendar to reclaim your time and boost your business? Drop a comment below and let’s hear it!
Scale Your Business Today.
Streamline your workflow with GoHighLevel’s powerful tools.
