Decoding Data: A Simple Mini-Guide to GoHighLevel’s Custom Fields and Custom Values
Alright, listen up, you data wranglers! Ever get tangled up trying to sort your client info from your company-wide details in GoHighLevel? You’re not alone, brother. Think of it like this: you wouldn’t try to fit a square peg in a round hole, would ya? Well, Custom Fields and Custom Values, they’re your square and round pegs for data. This fresh word from ZedNow cuts through the confusion, plain and simple. We’re talkin’ about gettin’ your ducks in a row so you can laser-target your messages and keep your business info locked and loaded where you need it.

Nailin’ the difference between GoHighLevel Custom Fields and Custom Values lets you sort your data like a pro, blast out tailor-made messages to your peeps, and keep your essential business info on tap across your whole damn account. Less hassle, more hustle, and bigger wins – that’s the name of the game.
Step-by-Step: Understanding and Using Custom Fields and Custom Values
When you’re knee-deep in managing your leads and clients, the Contacts & CRM section is your stomping ground. That’s where Custom Fields like to hang out. They’re all about grabbing those unique bits of info that make each contact special. Now, Custom Values are more like your secret weapon, working behind the scenes.
You’ll usually find them chilling in the General Settings area. They’re all about those consistent details that you use across your whole operation. Let’s roll up our sleeves and see how this all shakes out. In short:
- Custom Fields are for collecting unique data from each client or lead.
- Custom Values are for storing consistent information that you use repeatedly across your account.
Automate marketing, manage leads, and grow faster with GoHighLevel.

How to Create a Custom Field: From the Settings Section (Option 01)
Step 01: Navigate to Settings
1.1 On your GoHighLevel sub-account dashboard, go to the Settings section.

Step 02: Open Custom Fields
2.1 In the Settings section, click the Custom Fields option.

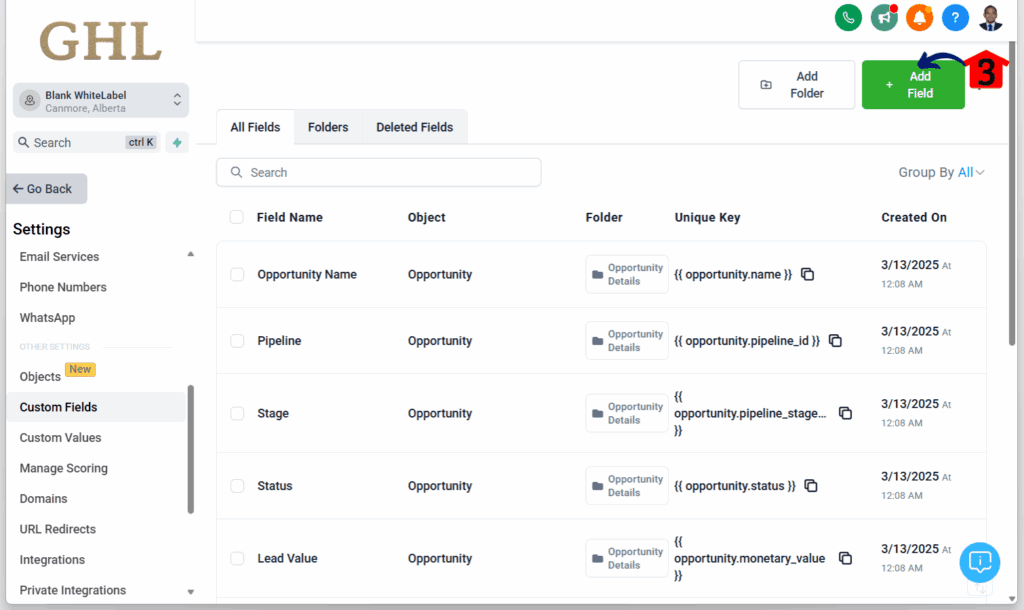
Step 03: Add a New Custom Field
3.1 In the Custom Fields tab, click the + Add Field button.

Step 04: Choose Field Type
4.1 In the New Custom Field popup, choose a field type.
4.2 For this example, select Single Line as the field type.

Step 05: Proceed to the Next Step
5.1 After selecting the field type, click the Next button.

Step 06: Fill Out and Save
6.1 Enter the required field details.

Step 07: Save Your Custom Fields
7.1 Once done, click Save.

How to Create a Custom Field: In Surveys and Forms (Option 02)
Step 01: Go to Sites
1.1 On your GoHighLevel sub-account, go to the Sites section.

Step 02: Access Surveys
2.1 Hover over the Surveys or Forms tab.
2.2 For this example, hover over Surveys.
2.3 Click the Builder option.

Step 03: Start a New Survey
3.1 In the Surveys dashboard, click the + Add Survey button.

Step 04: Start From Scratch
4.1 A pop-up will appear.
4.2 Choose the Start from Scratch option, then click Create.

Step 05: Open Survey Elements
5.1 Click the + button.
5.2 This icon is located in the upper left corner.
5.3 A sliding popup will appear.

Step 06: Access Custom Fields
6.1 In the Survey Element panel, click the Custom Fields tab.
6.2 It’s located next to the Quick Add tab.

Step 07: Add a Custom Field
7.1 In the Custom Fields tab, click the + Add button.
7.2 You can then repeat the steps shown in Option 1.

How to Create Custom Values: In the Settings Section
Step 01: Navigate to Settings
1.1 On your GoHighLevel sub-account dashboard, go to the Settings section.

Step 02: Open Custom Values
2.1 In the Settings section, click the Custom Values option.

Step 03: Access Custom Values Dashboard
3.1 In the Custom Values dashboard, click the Custom Values button.
3.2 It’s located in the upper right corner.

Step 04: Fill Out Custom Value
4.1 In the Custom Value popup, enter the Name, Value, and assign it to a folder.

Step 05: Create Custom Value
5.1 Once done, click the Create button.

How to Create a Folder in the Custom Values Section
Step 01: Click Add Folder
1.1 On the Custom Values dashboard, click the Add Folder button.
1.2 This button is in the upper right corner, beside the New Custom Value button.

Step 02: Name the Folder
2.1 In the Add Folder popup, type in the folder name.

Step 03: Save the Folder
3.1 Once named, click the Create button.

The Bottom Line: Get Smart with Your Data, Get Better Results
So, there you have it. Custom Fields and Custom Values: two different beasts, both tamed for your GoHighLevel domination. Think of Custom Fields as your way to get down and personal with each lead and customer. It’s about grabbin’ those unique details that make ’em tick and using that intel to connect on a real level.
Now, Custom Values? That’s your secret sauce for efficiency. It’s about keepin’ your core business info locked, loaded, and consistent across all your campaigns, saving you precious time and lookin’ sharp every damn time. When you know when to unleash each of these bad boys, you ain’t just organizin’ info – you’re fuelin’ smarter automations, sparkin’ more personal connections, and ultimately, bankin’ bigger wins.
Got more GoHighLevel headaches? Drop a comment below and let’s keep this party rollin’!
Scale Your Business Today.
Streamline your workflow with GoHighLevel’s powerful tools.


