- Easily control how new SaaS accounts are named
- Quick Summary – SaaS Account Naming Essentials
- What’s New – Naming Options for SaaS Accounts
- Why This Matters – First Impressions Count
- Naming Options – Which Format Should You Choose?
- When to Use Each – Choosing the Right Format for Your Agency
- How to Use – Step-by-Step Setup in SaaS Configurator
- Pro Tips – For Agencies Using External Checkouts
- What This Means – Better Systems, Faster Workflows
- FAQ – Frequently Asked Questions About SaaS Account Naming
- Start Naming Smart from Day One
Easily control how new SaaS accounts are named
GoHighLevel now lets users customize SaaS account naming for new sub-accounts created during onboarding. This update gives agencies more control over how those accounts are labelled inside the platform.
By default, new SaaS accounts used to follow the pattern of the customer’s name with “’s Account” added to the end. While functional, it often made dashboards cluttered and harder to manage, especially at scale. Now, agencies can choose to use the business name provided at checkout instead.
This small change can help reduce confusion, improve organization, and make onboarding feel more tailored. For agencies running SaaS Mode, it’s a cleaner and more professional way to manage accounts as they come in.
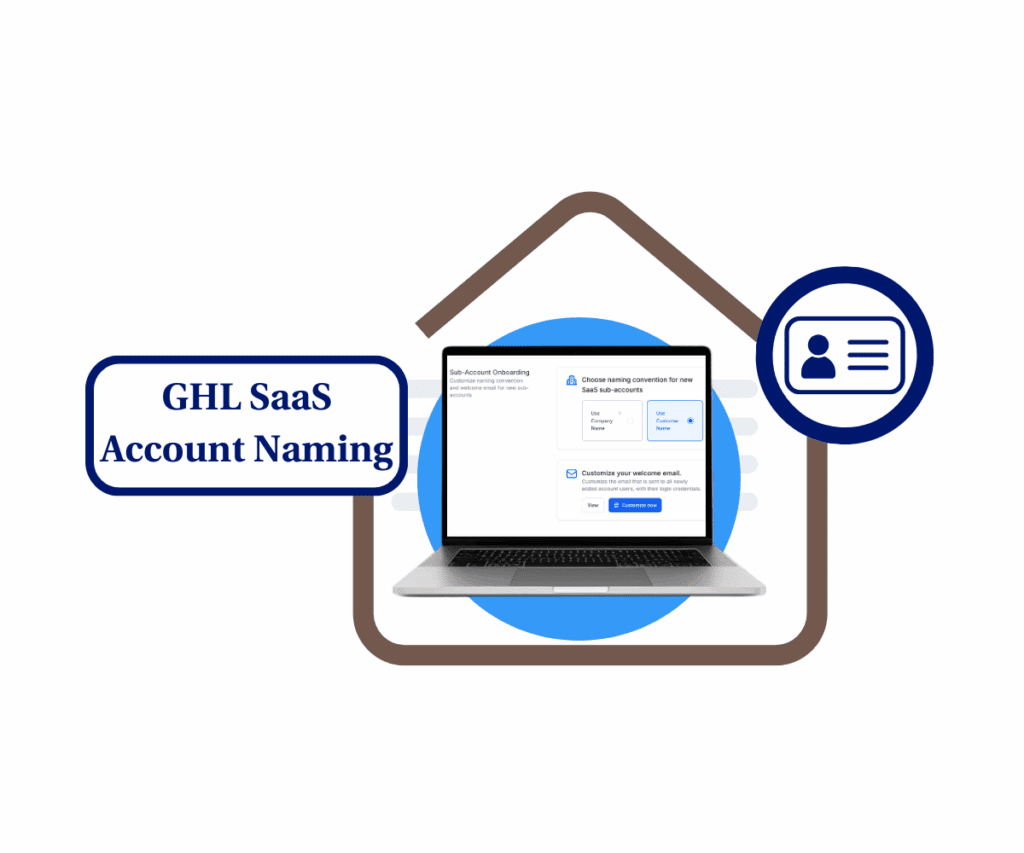
This new setting lets GHL agencies customize how new SaaS sub-accounts are named, helping clean up dashboards, stay organized, and onboard smarter. Whether scaling fast or staying lean, the right naming setup saves time and confusion from day one.
Quick Summary – SaaS Account Naming Essentials
Purpose: Choose how new SaaS sub-accounts are named
Why It Matters: Keeps accounts organized and easier to manage
What You Get: Two naming options in the SaaS Configurator
Time to Complete: Less than 2 minutes
Difficulty Level: Easy
Key Outcome: Better onboarding and a cleaner dashboard
What’s New – Naming Options for SaaS Accounts
GoHighLevel has added a new setting that lets agencies control how SaaS account naming works during client onboarding. This option is now available inside the SaaS Configurator under Advanced Settings in the Onboarding section.
Until now, every new sub-account created through a GHL funnel used the same default format: the customer’s name with “’s Account” added. It was functional but not always helpful, especially for agencies managing multiple clients or white-labeled setups.
Automate marketing, manage leads, and grow faster with GoHighLevel.
With this update, there are now two choices:
- Company Name – This uses the business name the customer enters at checkout. It’s useful when working with small businesses or more formal brands.
- Customer Name + “’s Account” – This keeps the original setup. It may still work well for solopreneurs, coaches, or individuals who don’t run under a company name.
This change gives agencies more control over how accounts appear inside their dashboard. Instead of editing each account manually after it’s created, the system now applies the format automatically. It’s a small update, but one that can help keep things cleaner and easier to manage.
Why This Matters – First Impressions Count
SaaS account naming may seem minor, but it has a real impact on how agencies manage their GoHighLevel dashboards. When new sub-accounts all follow the same default format, things get messy fast. It’s easy to lose track of who’s who, especially when names start to repeat or don’t match the actual business.
Clear account names help avoid confusion. They make it easier for teams to search, sort, and support clients without second-guessing. For agencies managing a lot of accounts, this can save time and prevent errors.
Choosing to use the company name gives you more accurate labels right from the start. It reflects the client’s business instead of just showing a person’s name. That’s useful for internal workflows and also looks more professional from the client’s side.
When clients see their business name attached to their new SaaS account, it feels more personalized. It shows attention to detail and gives a better first impression. That matters during onboarding, especially if you’re reselling GoHighLevel under your own brand.
SaaS account naming is a small part of the setup, but getting it right helps keep systems clean and makes your agency look more put-together.
Naming Options – Which Format Should You Choose?
GoHighLevel gives agencies two simple options for SaaS account naming. Each one fits a different type of client, so the best choice depends on how your agency operates.
The first option is Company Name. This pulls the business name directly from what the customer enters at checkout. It works well if your clients are small businesses or teams that already have a brand. Using the company name keeps your dashboard cleaner and helps your team find accounts faster. It also looks more professional when managing contacts, billing, or CRM data.
The second option is Customer Name + “’s Account”. This is the default format that adds the client’s first name followed by “’s Account.” It’s still a good option if your audience includes solo creators, personal brands, or individuals who don’t have a formal business name.
Both formats are valid. It really comes down to what fits your client base best. If most of your customers provide a company name, use it. If not, the original setup may still do the job just fine.
This update keeps SaaS account naming flexible and easy to manage. Once you pick a default, GoHighLevel applies it to every new account going forward.
When to Use Each – Choosing the Right Format for Your Agency
SaaS account naming works best when it fits the type of clients your agency serves. GoHighLevel gives you the choice, and each option has a purpose.
If your clients are mostly businesses, like local shops or service providers, using the Company Name format makes sense. These clients usually enter a business name at checkout, and having that show up in your dashboard makes things easier. It helps your team find accounts faster and makes internal records clearer.
If you work with solopreneurs, coaches, or people building personal brands, the Customer Name + “’s Account” format might be a better fit. These users often don’t have a formal company name, so using their name keeps things simple and still feels personal.
Some agencies might switch between both formats depending on the offer or the funnel. If one campaign targets business owners and another focuses on freelancers, you can update the default before each launch. It’s flexible and easy to change in your settings.
The goal is to keep your SaaS account naming consistent. Clean naming helps with reporting, client searches, and account management. It also gives your agency a more polished and professional feel, especially as you scale.
How to Use – Step-by-Step Setup in SaaS Configurator
Setting up SaaS account naming in GoHighLevel is quick and straightforward. Once it’s done, every new sub-account created through your funnel will follow the format you selected.
Here’s how to set it up:
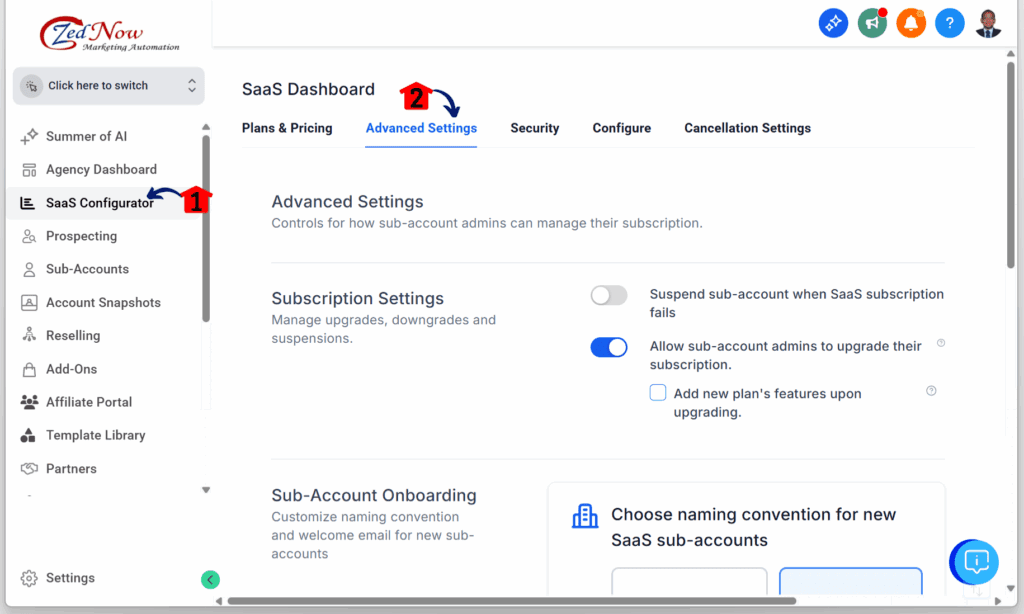
Step 01 – Access the Main Menu in GoHighLevel Agency Account
- The main menu on the left side of your screen includes all the main areas you work in when using GoHighLevel (GHL).
1.1 Click on the Saas Configurator menu item to access the Advanced Settings section.
- You’ll now be in the Saas Configurator section, where you can access the Advanced Settings tab from the top menu.
1.2 Click the Advanced Settings tab.
- This tab is located between Price & Pricing and Security.
Step 02 – Configure the Sub-Account Onboarding Settings
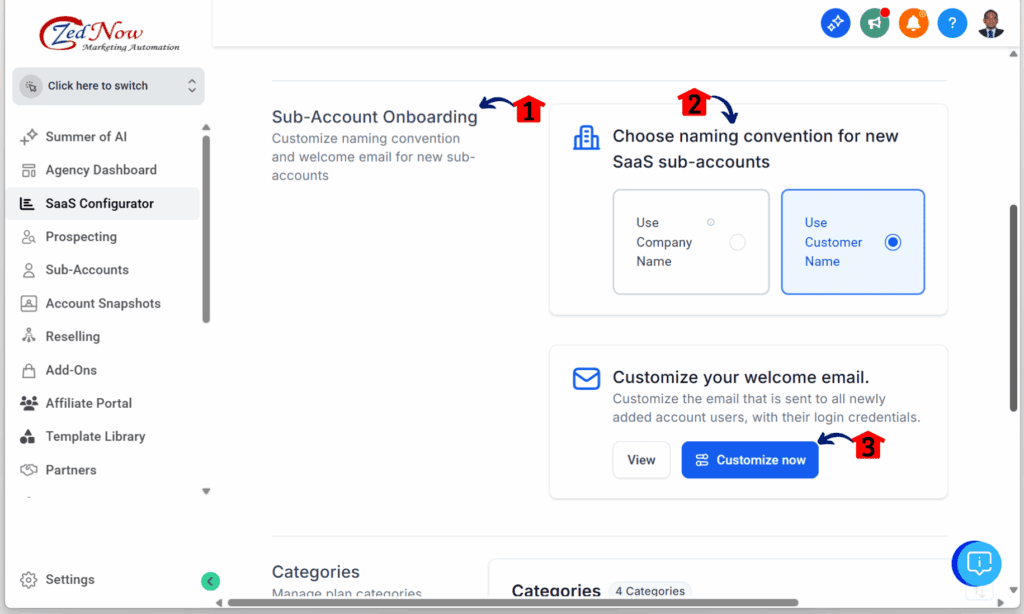
- You should now be in the Advanced Settings section, where you can access the SaaS Configurator’s advanced options, including Sub-account Onboarding.
2.1 Scroll down the Advanced Settings dashboard until you find the Sub-account Onboarding column.
2.2 Select the SaaS Account Naming Convention for new SaaS sub-accounts.
- Choose whether to Use Company Name or Use Customer Name.
- For this example, Use Customer Name is selected.
2.3 Click the Customize Now button.
- This is where you can customise the welcome email for new sub-account users.
Step 03 – Customise the Welcome Email Template
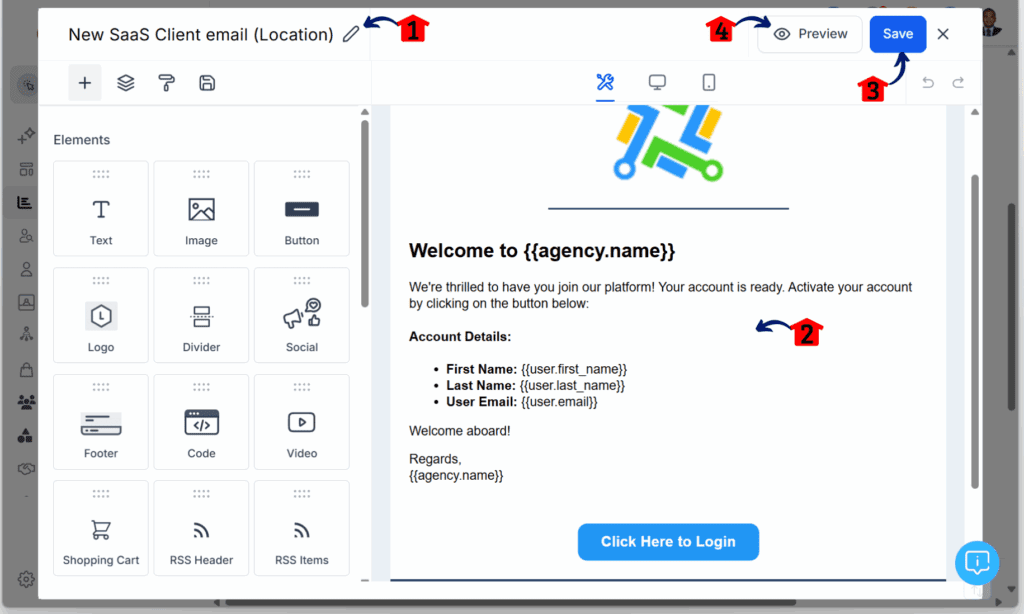
- You should now see the SaaS email editor pop-up.
3.1 Rename the email template.
3.2 Edit the welcome email to match your branding.
3.3 Save the email template.
3.4 Review the email in the preview template.
This setting controls the default name for new accounts only. It does not change existing sub-accounts. If you switch formats later, only the accounts created after that change will follow the new setup.
To make sure it’s working, test it by going through one of your funnels as a customer. Then check your dashboard to see how the new account appears. The name should follow the format you selected in the SaaS Configurator.
This simple step keeps your GoHighLevel account organized from day one. By setting a clear SaaS account naming format; whether you use company names or customer names, the system will handle the rest automatically.
Pro Tips – For Agencies Using External Checkouts
Agencies that use external checkouts can still use the SaaS account naming feature in GoHighLevel. The platform lets you choose how new accounts are named, even if the signup process happens outside of GHL.
To make this work, your checkout system needs to send the company name as part of the subscription metadata. Most payment tools like Stripe and PayKickstart support this. Just make sure the metadata includes a field called companyName.
If the system finds a company name, GoHighLevel will use it when creating the new sub-account. If it doesn’t, it will use the default format instead.
This setup is useful if your agency uses custom funnels, paid ad flows, or anything beyond GHL’s native forms. It helps you keep the naming consistent across every client, no matter how they signed up.
Here’s a quick way to check:
- Make sure your checkout tool supports metadata
- Add a companyName field when the customer signs up
- Run a test to see if the account name shows up correctly in GHL
SaaS account naming still works behind the scenes, as long as you give it the right data. This keeps things organised and gives your clients a cleaner experience from the start.
What This Means – Better Systems, Faster Workflows
Setting up SaaS account naming in GoHighLevel helps agencies work more efficiently. When sub-accounts follow a clear naming format, everything becomes easier to manage.
Searching for accounts, sorting through reports, or assigning support tasks takes less time when names are consistent. You don’t have to guess who “John’s Account” belongs to or open each record to confirm details. A clear label keeps your backend clean and your team on track.
Clients also notice. Seeing their company name on their new account feels more professional than a generic label. It’s a small thing, but it shows that your process is organised and focused on their business.
For white-label agencies, the right SaaS account naming format makes your system look more polished. It gives your service a professional look without extra effort. Once the setting is in place, it works every time a new account is created.
This update helps agencies improve the onboarding flow and maintain better records. It’s one setting, but it supports every part of your client experience.
FAQ – Frequently Asked Questions About SaaS Account Naming
Start Naming Smart from Day One
Good systems start with clear labels. SaaS account naming helps agencies stay organised and gives clients a better first impression.
This update in GoHighLevel gives users more control over how sub-accounts are named. Agencies can now choose between using the company name or the customer’s name when a new account is created. It’s a small change, but it keeps your dashboard cleaner and your process more efficient.
Choosing the right format from the start saves time later. It also helps your team find accounts faster and gives your setup a more professional feel.
If you’re using SaaS Mode, it’s worth checking your SaaS account naming settings. In the SaaS Configurator, choose the naming format that best fits your clients, then save it. From then on, every new account will automatically use that format.
It’s one simple step that supports better workflows and a smoother onboarding experience.
Scale Your Business Today.
Streamline your workflow with GoHighLevel’s powerful tools.
