- Why a quiz funnel builder belongs in your GHL stack
- Quick Summary – Quiz Funnel Builder Essentials
- Why quiz funnels are smart for lead capture
- Tools inside GHL that power your quiz funnel builder
- How to build your quiz funnel builder from start to finish
- Tips to help your quiz funnel builder work better
- Why quiz funnels make sense for agencies
- Quiz funnel builder FAQ
- What to expect from a working quiz funnel builder
Why a quiz funnel builder belongs in your GHL stack
If you want an easier way to turn visitors into leads, a quiz funnel builder can help. Instead of using long forms or pop-ups, quizzes feel more personal and get people to take action. They also help you learn more about your leads right away.
GoHighLevel gives you all the tools to build a quiz funnel in one place. You can set up a landing page, add a quiz using a form or survey, and send the results by email using a workflow. No need to use extra tools or connect different apps.
In this guide, I’ll walk you through each step. You’ll learn how to build a quiz funnel using GoHighLevel quiz funnel builder features you already have. By the end, you’ll be able to capture leads and send custom quiz results automatically.
Quick Summary – Quiz Funnel Builder Essentials
Purpose: This guide shows you how to build a quiz funnel inside GoHighLevel using landing pages, forms or surveys, and workflows.
Why It Matters: A quiz funnel helps you get better leads by asking useful questions and sending custom results automatically.
What You Get: A full walkthrough on setting up the page, collecting answers, and using a workflow to send emails.
Time to Complete: About one to two hours depending on your quiz length.
Difficulty Level: Beginner to Intermediate
Key Outcome: A quiz funnel builder creates a working quiz funnel that captures leads, stores their answers, and follows up by email, without any manual steps.
Why quiz funnels are smart for lead capture
A good quiz funnel builder helps you do more than just collect emails. It lets you ask the right questions, learn about your leads, and give them something useful in return. That might be a score, a tip, or a clear next step.
People enjoy quizzes because they feel easy and personal. At the same time, you’re getting valuable insights that help with follow-up. When done right, a quiz funnel starts a real conversation instead of just pushing a sign-up.
Automate marketing, manage leads, and grow faster with GoHighLevel.

GoHighLevel makes this process simple. You can build your funnel, collect answers, and send custom results all in one place. No need to switch between tools or worry about tech setups. Everything you need is built into the platform.
Tools inside GHL that power your quiz funnel builder
To build a working quiz funnel builder in GoHighLevel, you only need a few key tools. These are already built into your account and don’t require anything extra.
Start by creating a landing page. This is where your quiz will live. Keep the page simple and clear. A short headline, a quick intro, and your quiz form or survey should be the main focus.
Then, use either a form or a survey to ask your quiz questions. Forms work well for quick quizzes. Surveys are better if you want to guide people one question at a time. Add custom fields to save each answer so you can use that data later in your emails.
Finally, build a workflow that sends the quiz results by email. This part connects everything. You can trigger emails based on the answers and even tag contacts depending on what they picked. It all runs in the background once it’s set up.
These three tools: landing pages, forms or surveys, and workflows, are the core building blocks of your quiz funnel builder inside GoHighLevel.
How to build your quiz funnel builder from start to finish
Now that you know what a quiz funnel can do, let’s walk through how to build one using GoHighLevel. This step-by-step process uses the tools already in your account. You’ll start with a landing page, then build the quiz using a form or survey, and finally set up a workflow to send the results by email.
You don’t need extra apps or complicated tech. The goal is to keep it simple and clear so your quiz funnel builder works smoothly and does what it’s supposed to do, help you capture better leads and follow up without manual effort.
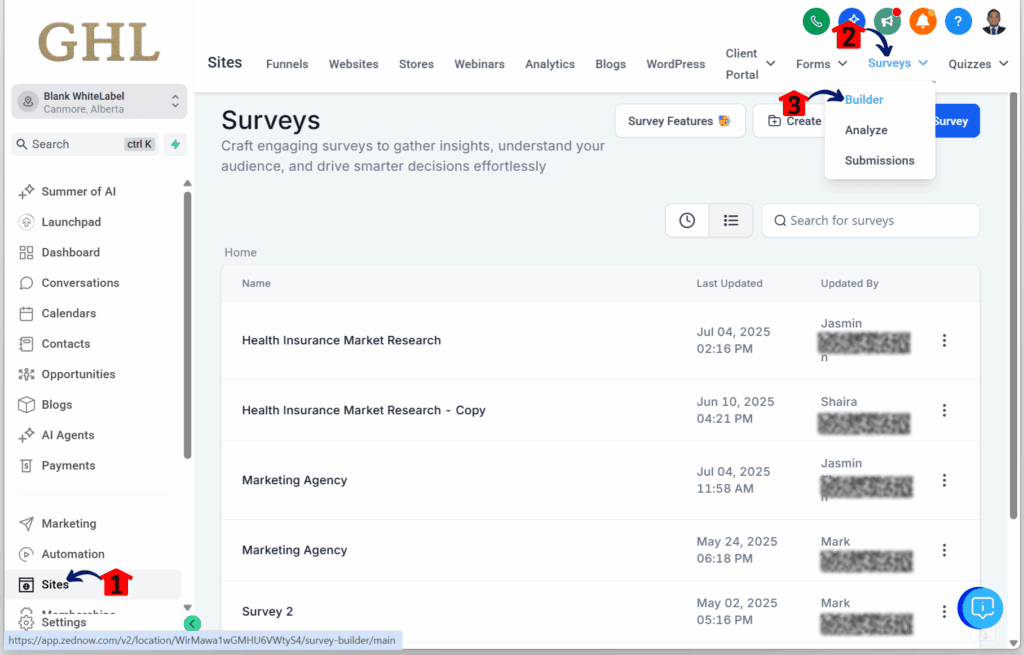
Step 01 – Access the Main Menu in GoHighLevel
- The main menu on the left side of your screen includes all the main areas you work in when using GoHighLevel (GHL).
1.1 Click on the Sites menu item to access the Surveys section.
- You’ll now be in the Sites section, where you can access the Surveys tab from the top menu.
1.2 Hover over the Surveys tab.
- Options will appear, including the Builder option.
1.3 Click the Builder option.
Step 02 – Create a New Survey
- You should now be in the Surveys list, ready to connect it with your quiz funnel builder for the next step.
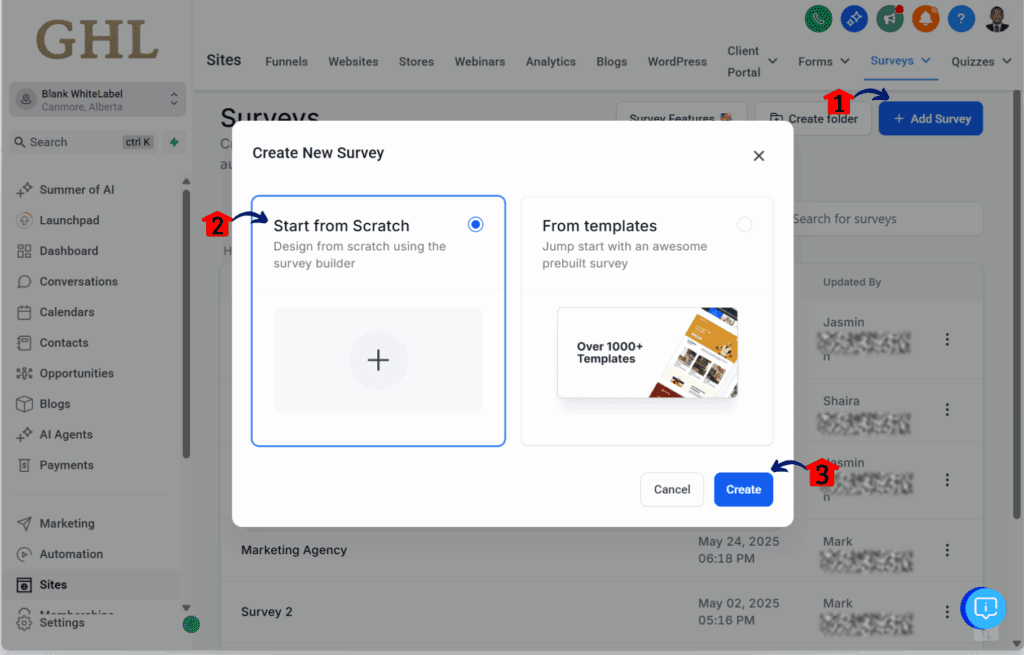
2.1 Click + Add Survey.
- The Create New Survey pop-up will appear.
2.2 Turn on the Start from scratch radio button.
2.3 Click the Create button.
Step 03 – Open the Survey Editor
- You should now be in the survey editor.
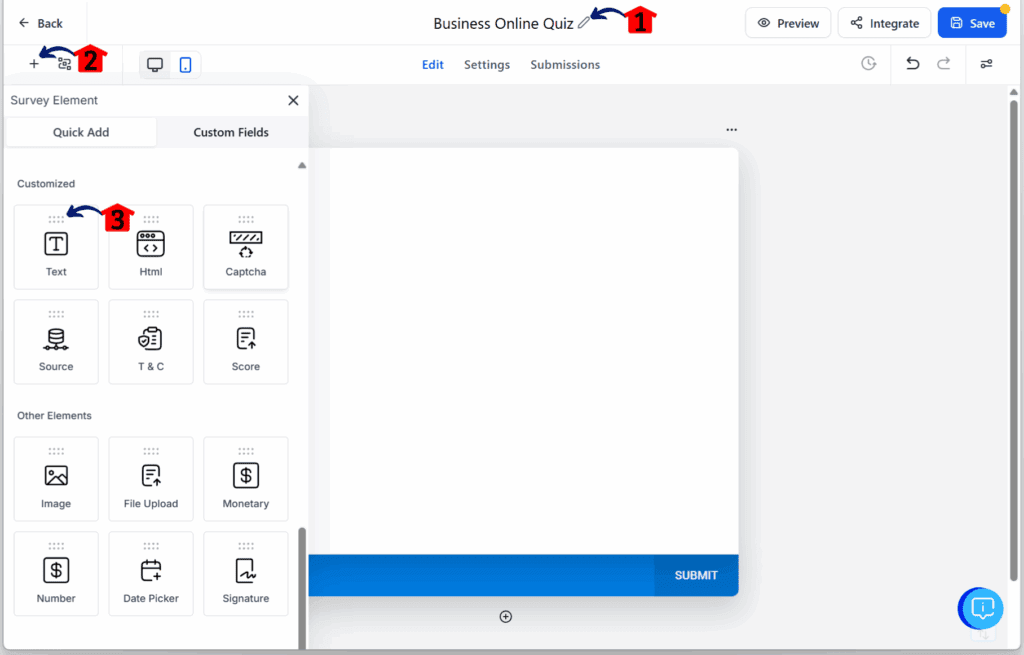
3.1 Rename your quiz or survey form.
3.2 Click the + button to view the form elements.
3.3 Click and drag the Text element to add a header.
Step 04 – Edit the Header Text
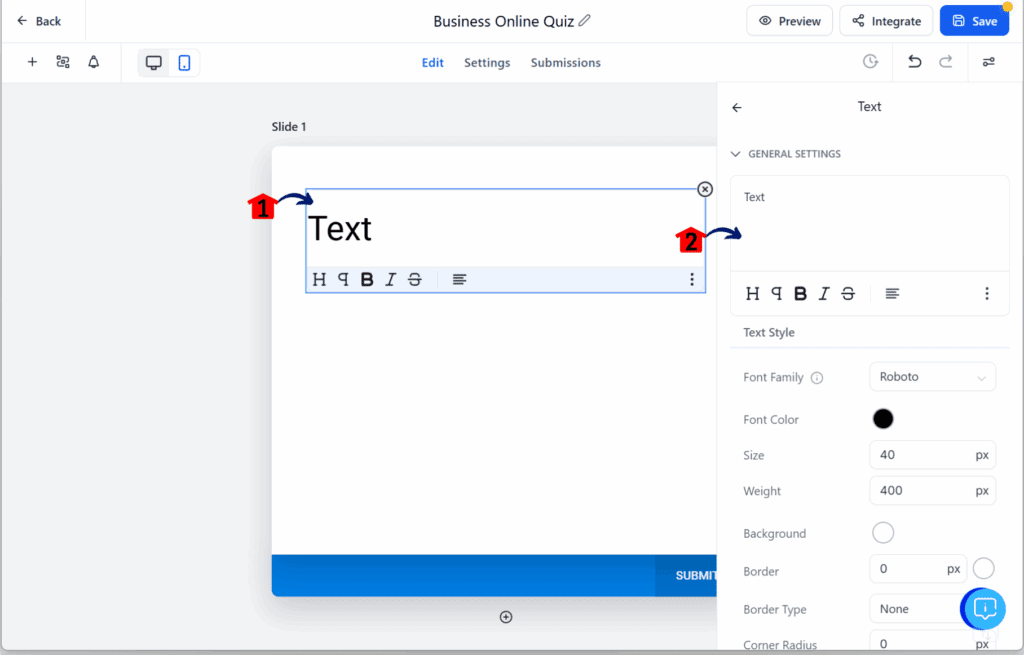
- The Text element should now be on the canvas.
4.1 Click the Text element on the form canvas.
- The Text element’s settings will slide open.
4.2 Change the text in the textbox and adjust the header’s style.
Step 05 – Add a Subheading
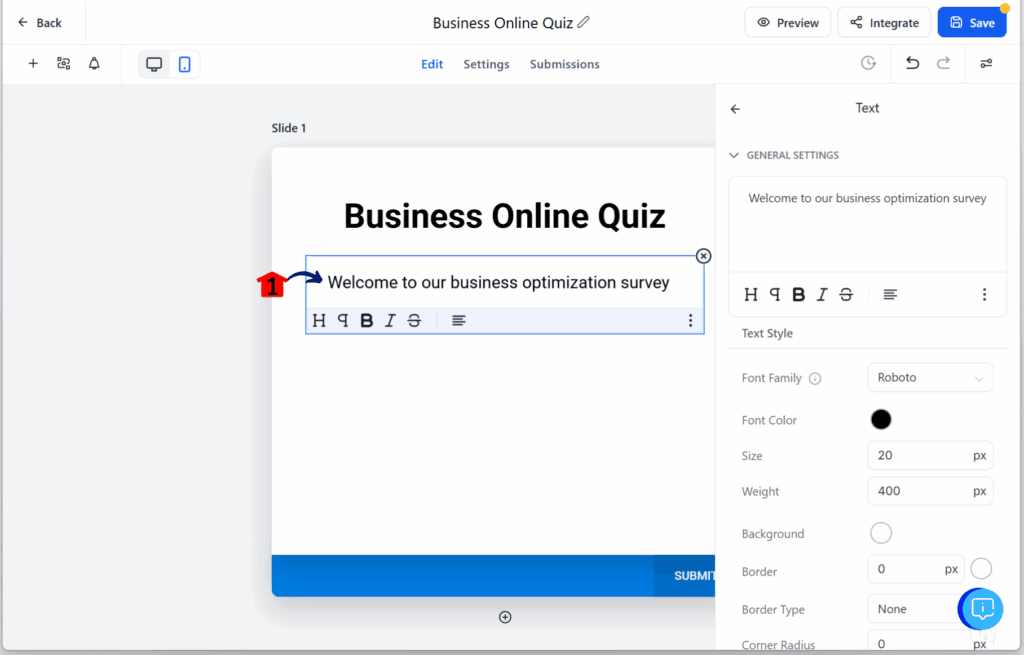
5.1 Add another Text element to the quiz body and write the subheading.
Step 06 – Add a Custom Field
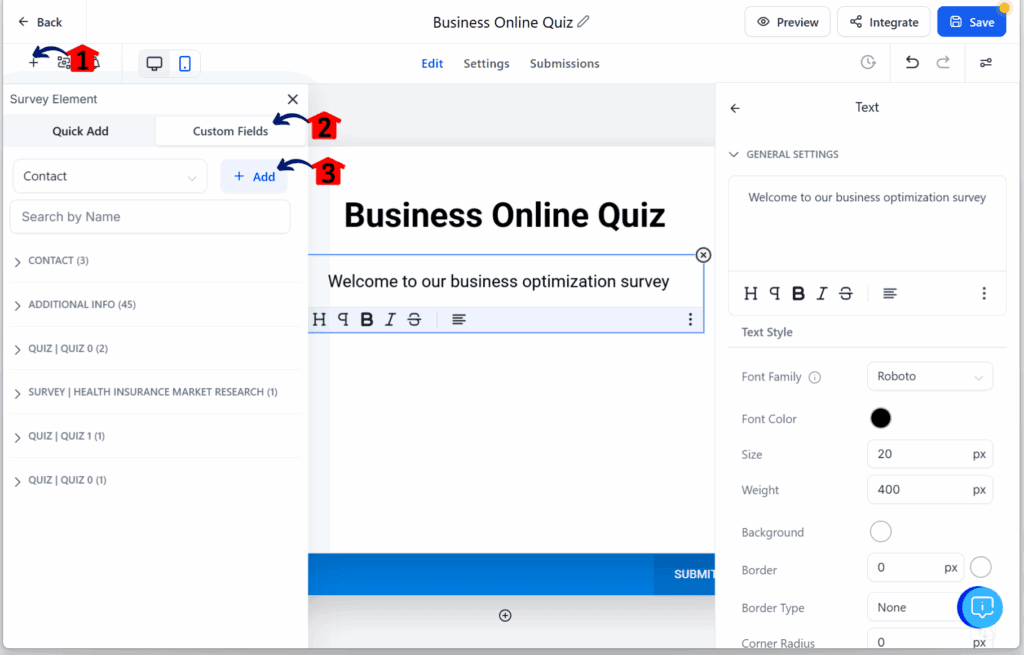
6.1 Click the + element.
- The elements library will slide open.
6.2 Click the Custom Fields tab.
6.3 Click the + Add button.
Step 07 – Create a Radio Select Field
- The New Custom Field pop-up will appear.
7.1 Click the Radio Select element.
7.2 Click Next.
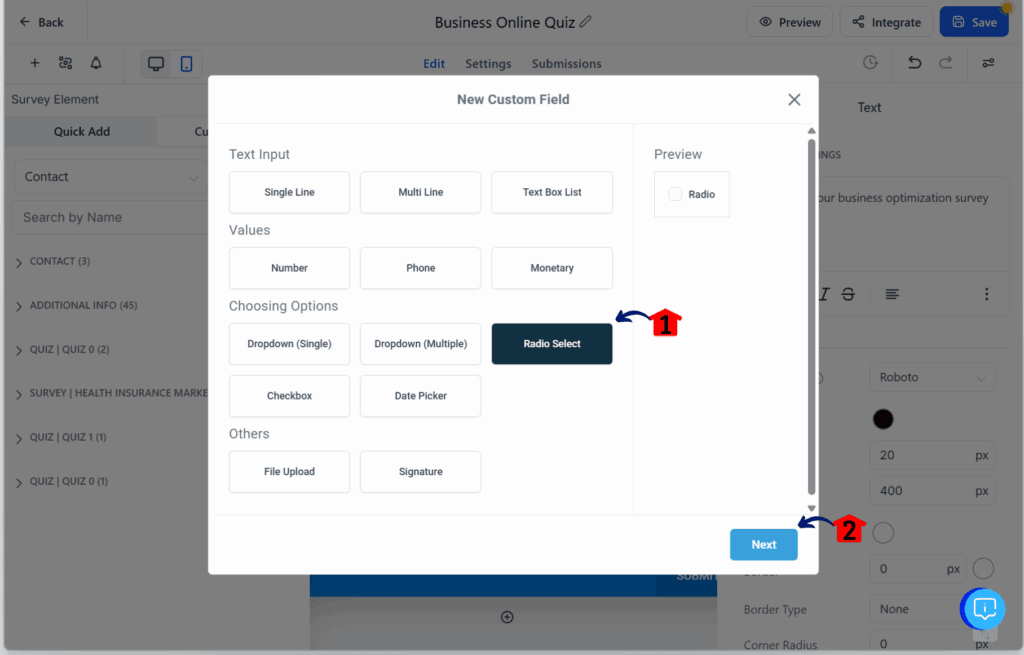
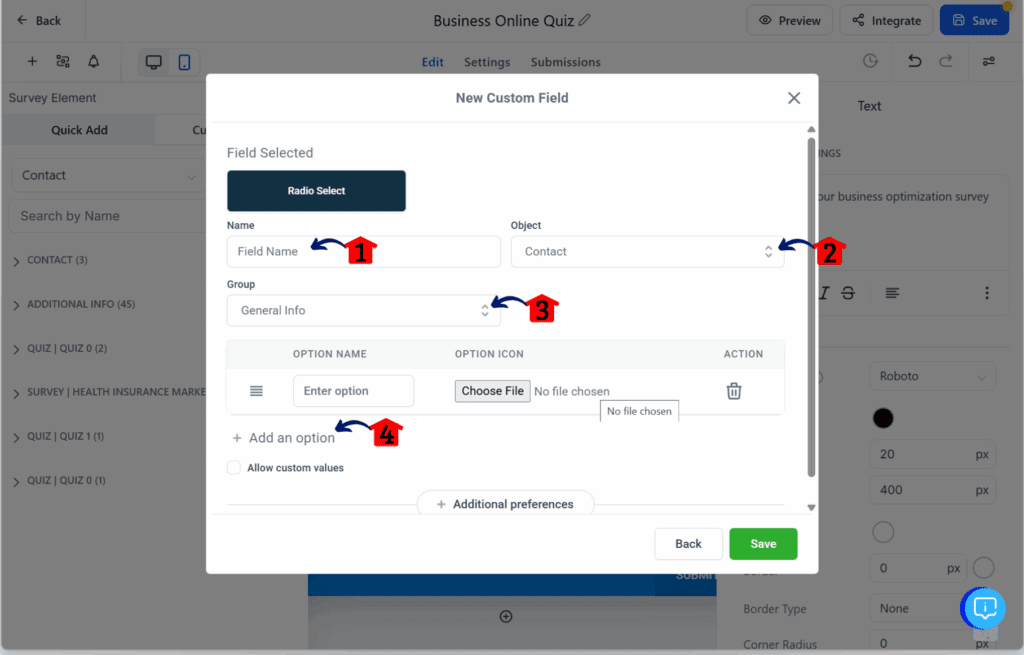
Step 08 – Set Up Question 1
8.1 Type the field name as Question 1 of the quiz.
8.2 Choose Contact as the object for the question.
8.3 Choose General Info as the group name for the question.
8.4 Click the + Add an option button to add four choices for the question.
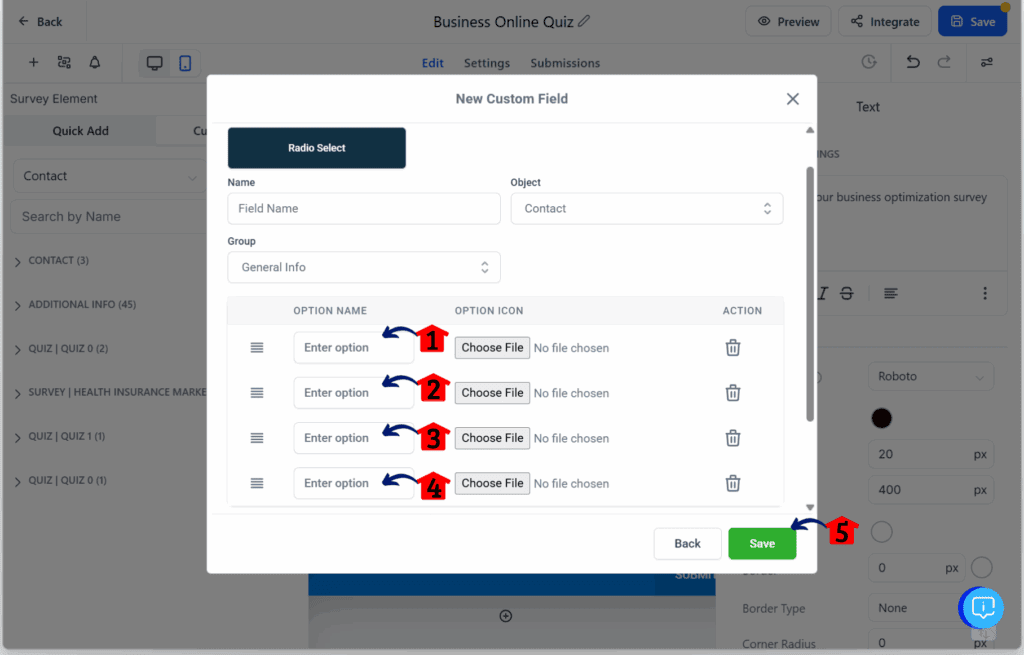
Step 09 – Add Answer Choices for Question 1
9.1 Type the first choice for Question 1.
9.2 Type the second choice for Question 1.
9.3 Type the third choice for Question 1.
9.4 Type the fourth choice for Question 1.
9.5 Click the Save button.
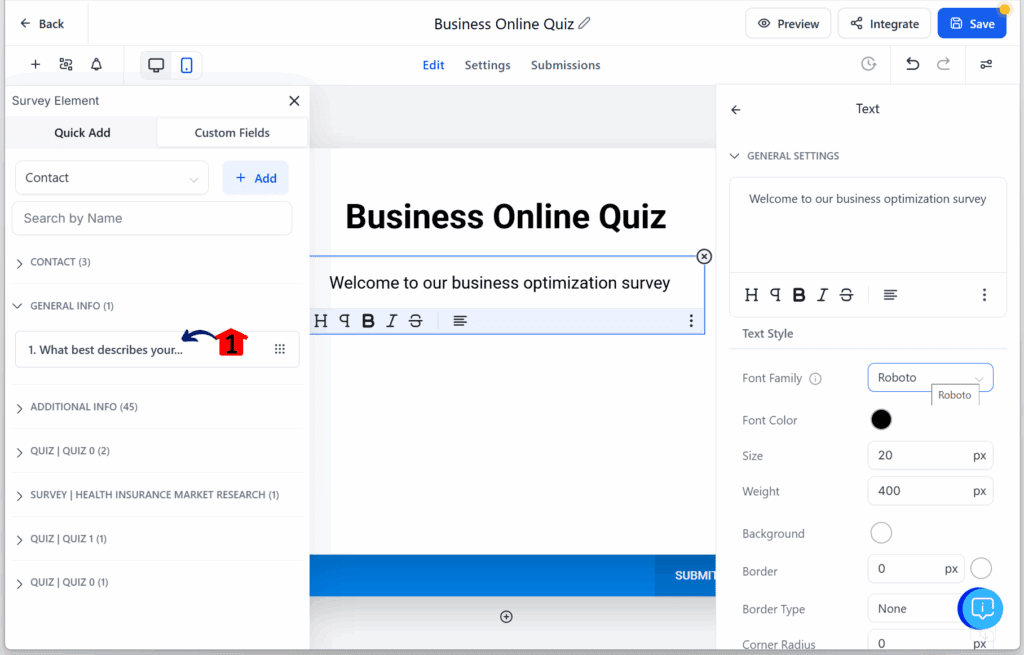
Step 10 – Add Question 1 to the Form
- Question 1 will now appear as a radio element.
10.1 Drag and drop the Question 1 element onto the form canvas.
Step 11 – Create More Questions
11.1 Repeat Steps 6 to 10 for Question 2 and Question 3.
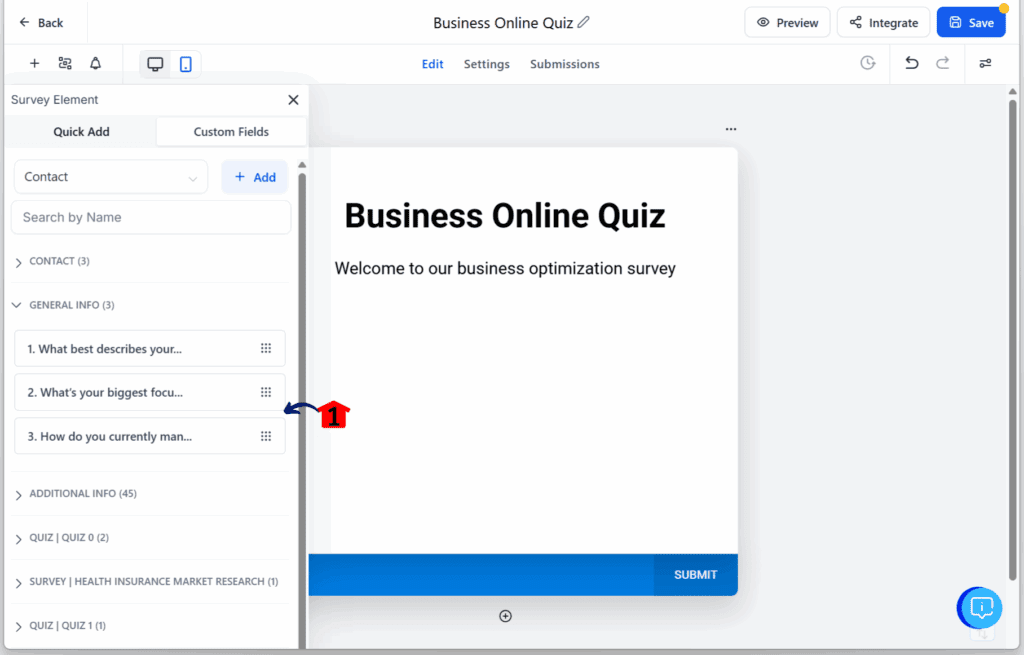
Step 12 – Finalize Survey Layout and Style
- Questions 2 and 3 should now be in the Custom Fields – General Info tab.
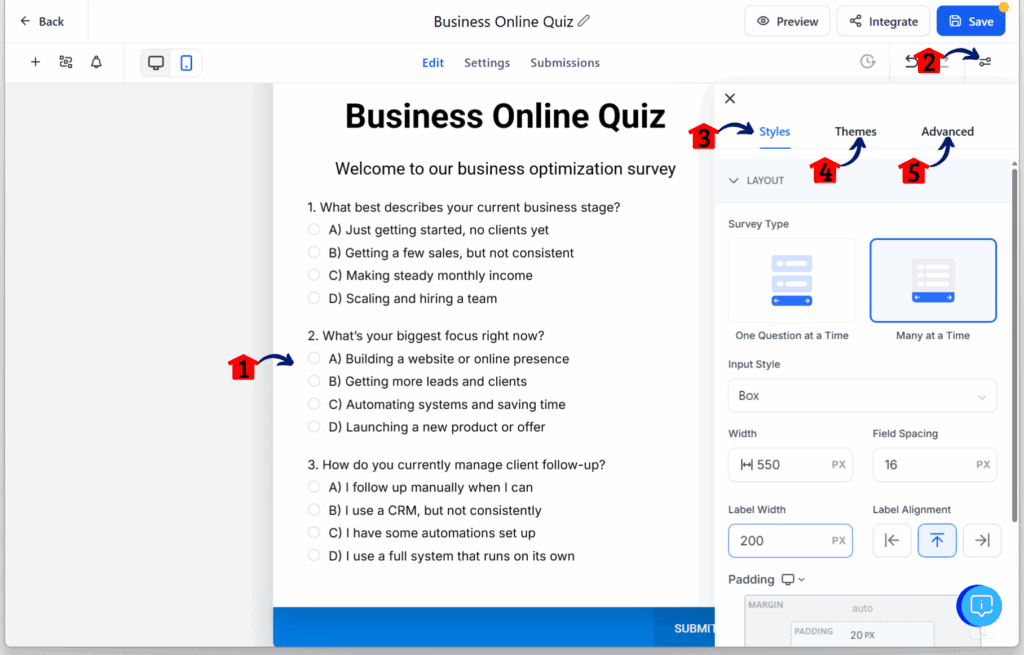
12.1 Make sure all three questions are on the survey canvas.
12.2 Click the Quiz Form Settings icon.
12.3 Click the Styles tab to edit the font size and color of your survey.
12.4 Check the Themes tab if you prefer a pre-made design.
12.5 Click the Advanced button to adjust other form settings.
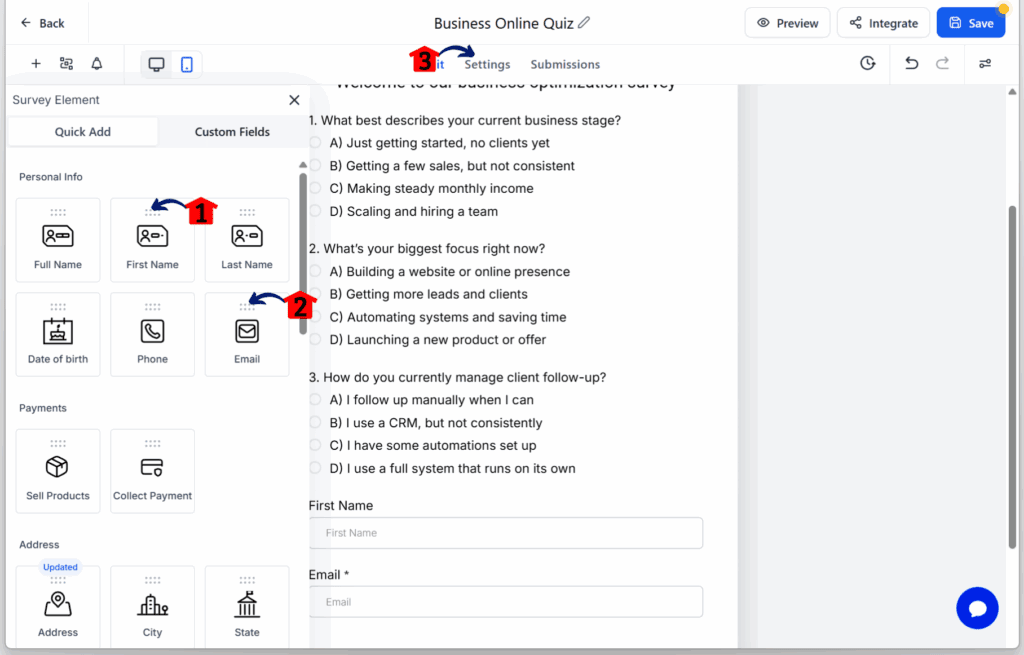
Step 13 – Add Name and Email Fields
13.1 Add the First Name element to the canvas.
- This is where the user will type their name.
13.2 Add the Email element to the canvas.
- This email address will receive the quiz results.
13.3 Click the Settings tab located in the upper part of the canvas.
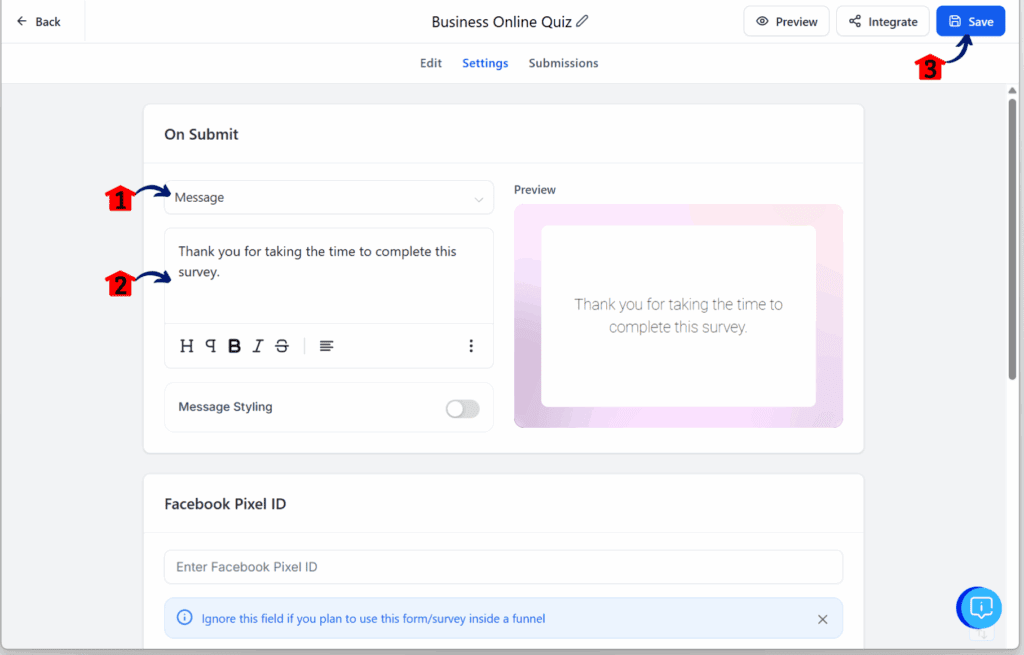
Step 14 – Configure Submission Actions
- You should now be in the survey’s settings section.
14.1 Choose the action after the user submits their input.
- In the quiz funnel builder, the options are to direct them to a link or display a message. For this example, the message option is selected.
14.2 Type the message to display after submission.
14.3 Click the Save button.
Step 15 – Get the Quiz Link
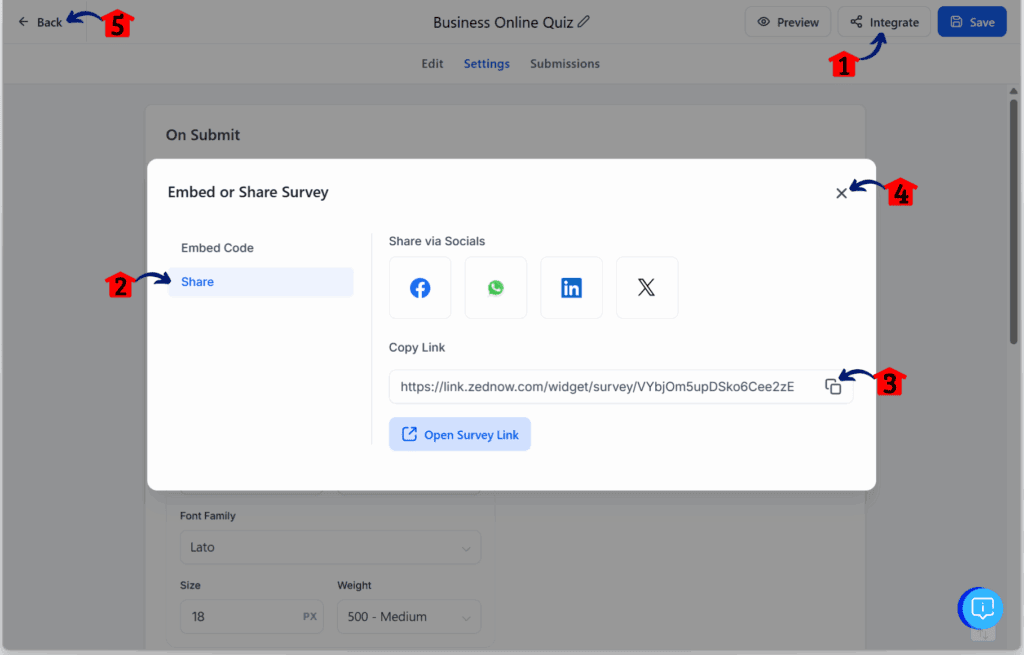
15.1 Click the Integrate button.
- The Embed or Share Survey pop-up will appear.
15.2 Click the Share tab in the Integrate Survey pop-up.
15.3 Copy the quiz funnel builder link and save it in a notepad. This will be used for a button on the landing page.
15.4 Click the X icon to exit the pop-up.
15.5 Click the Back button.
Step 16 – Create a Funnel for the Landing Page
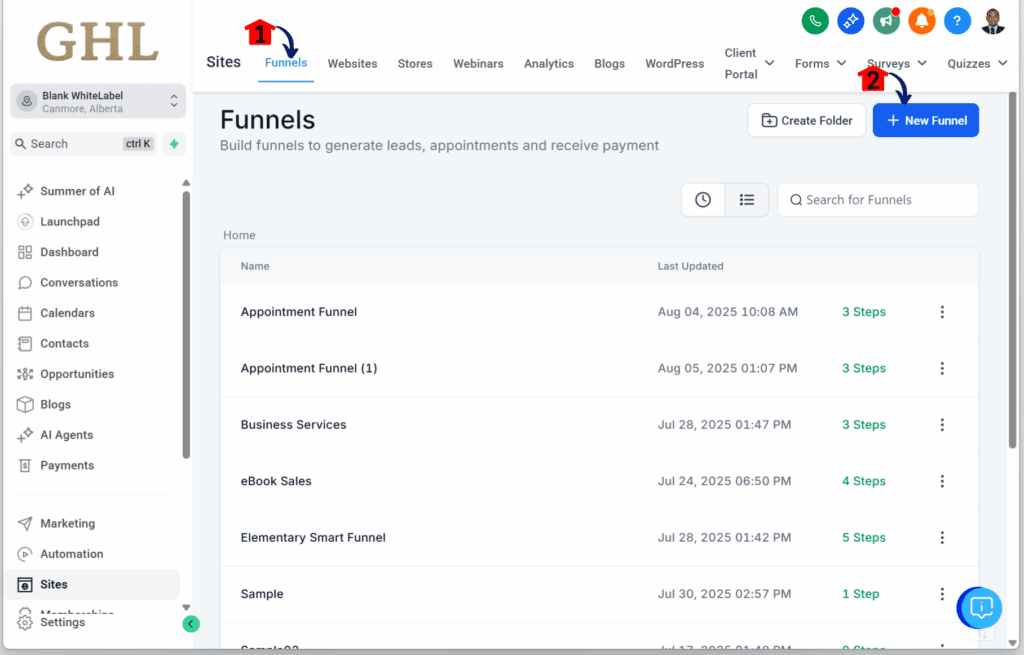
- You should now be back in the Surveys dashboard.
16.1 Click the Funnels tab.
16.2 Click the + New Funnel button.
Step 17 – Start a New Funnel from Templates
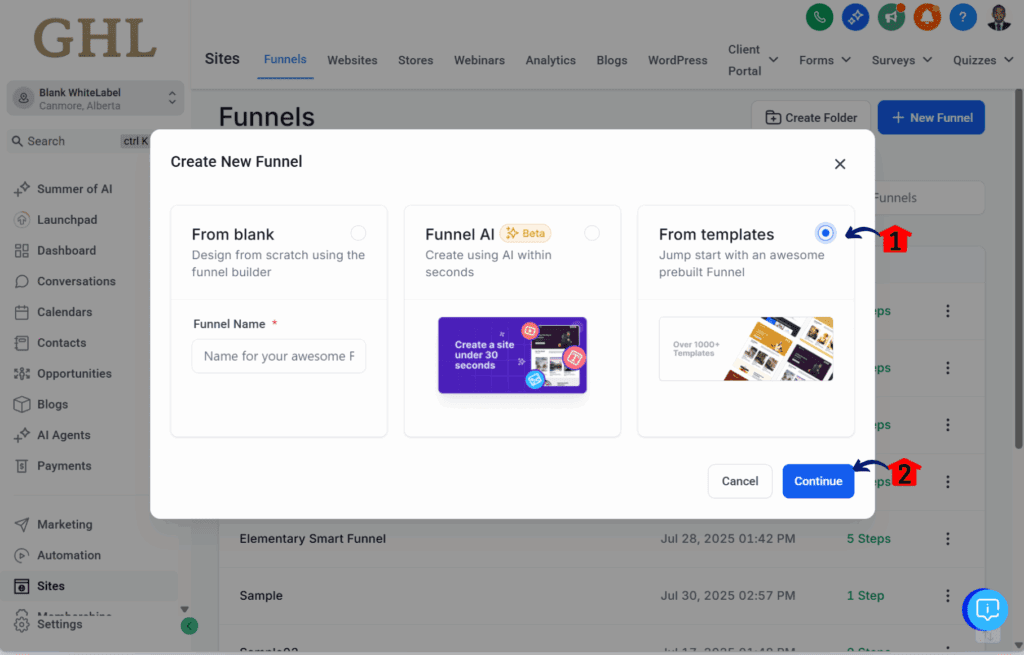
- The Create New Funnel pop-up will appear.
17.1 Click the From Templates radio button.
17.2 Click the Continue button.
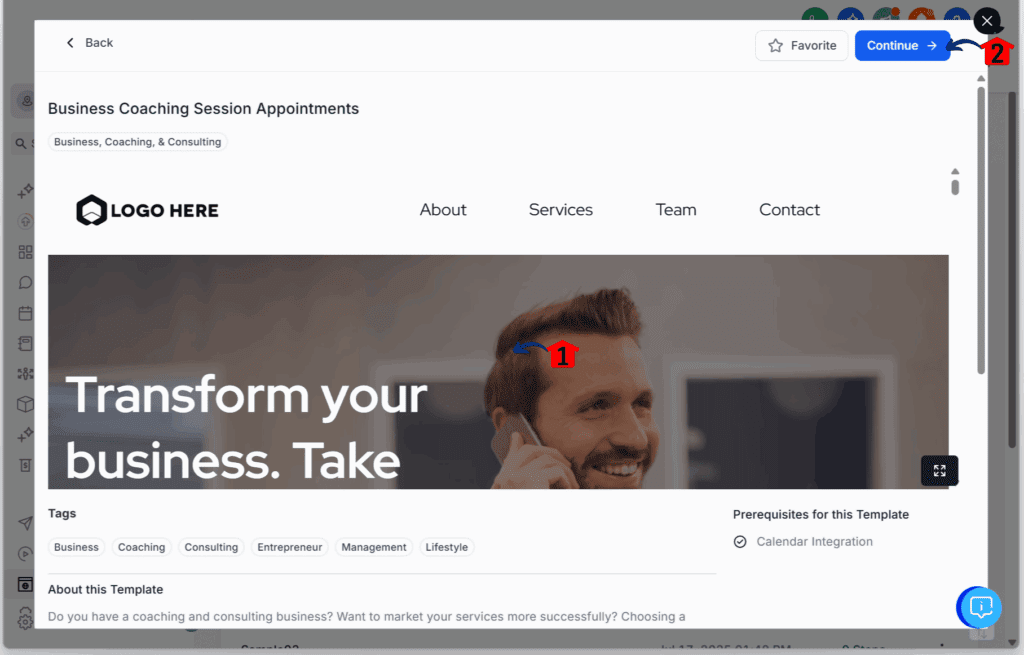
Step 18 – Choose a Template
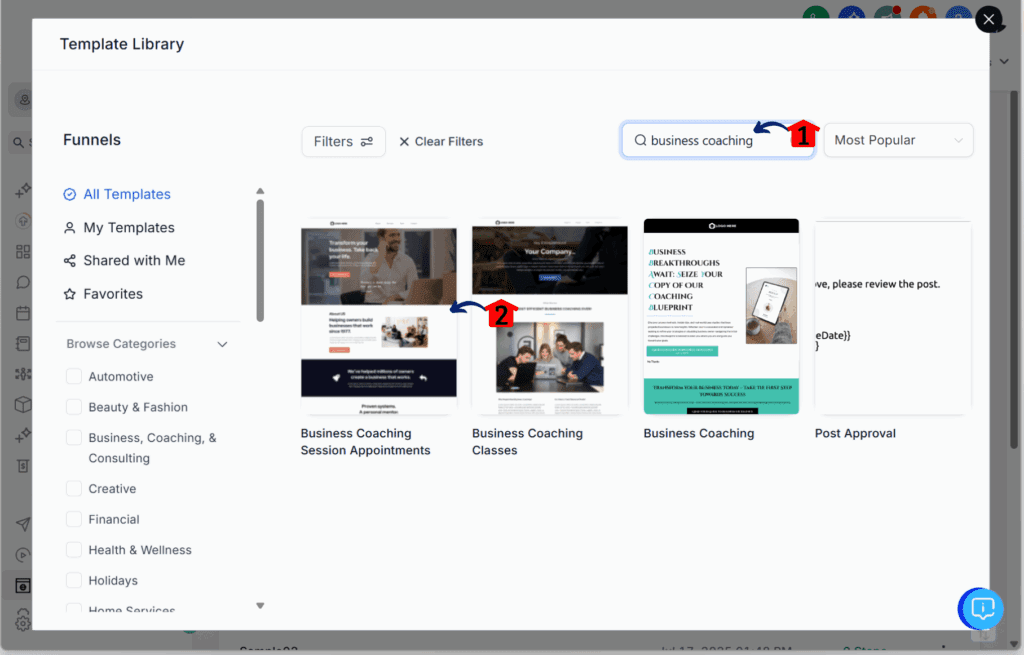
- You should now be in the Template Library.
18.1 Type business coaching in the search bar.
- This will be the example for creating a landing page.
18.2 Click on your preferred template.
Step 19 – Confirm Your Template
19.1 Preview your selected template.
19.2 Click the Continue button to set up the template.
Step 20 – Edit the Funnel Page
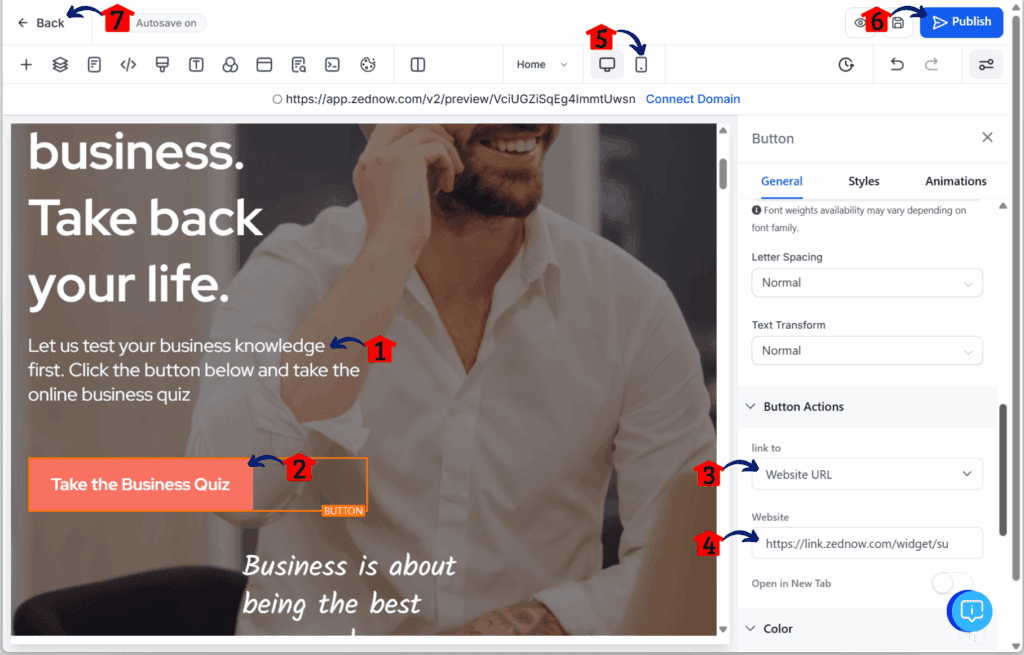
- You should now be in the funnel editor or page builder.
20.1 Apply your branding and messaging to the template.
20.2 Click the Call to Action button.
- The button configuration pop-up will appear.
20.3 Open the drop-down menu for the Link To option under the Button Actions tab.
20.4 In the website field, paste your quiz form URL.
20.5 Make sure the funnel is mobile-optimized.
20.6 Publish your landing page.
20.7 Click the Back button.
Step 21 – Update Funnel Settings
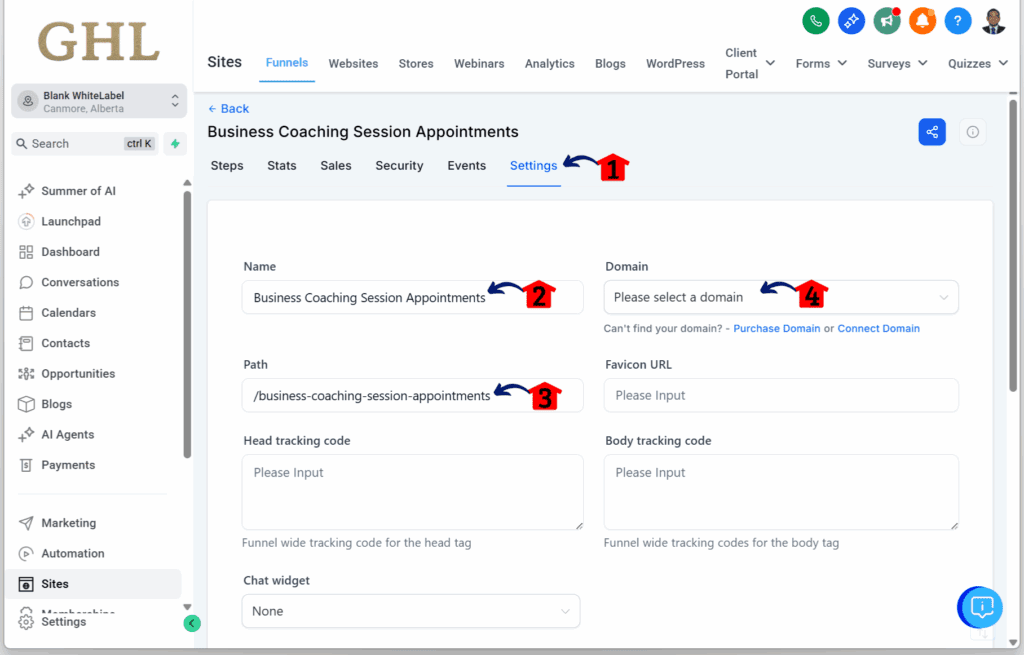
- You should now be back in the quiz funnel builder’s dashboard settings.
21.1 Click the Settings tab.
21.2 Change the name of your landing page.
21.3 Change the path or slug of your landing page.
21.4 Edit the domain for your landing page.
Step 22 – Save Funnel Settings
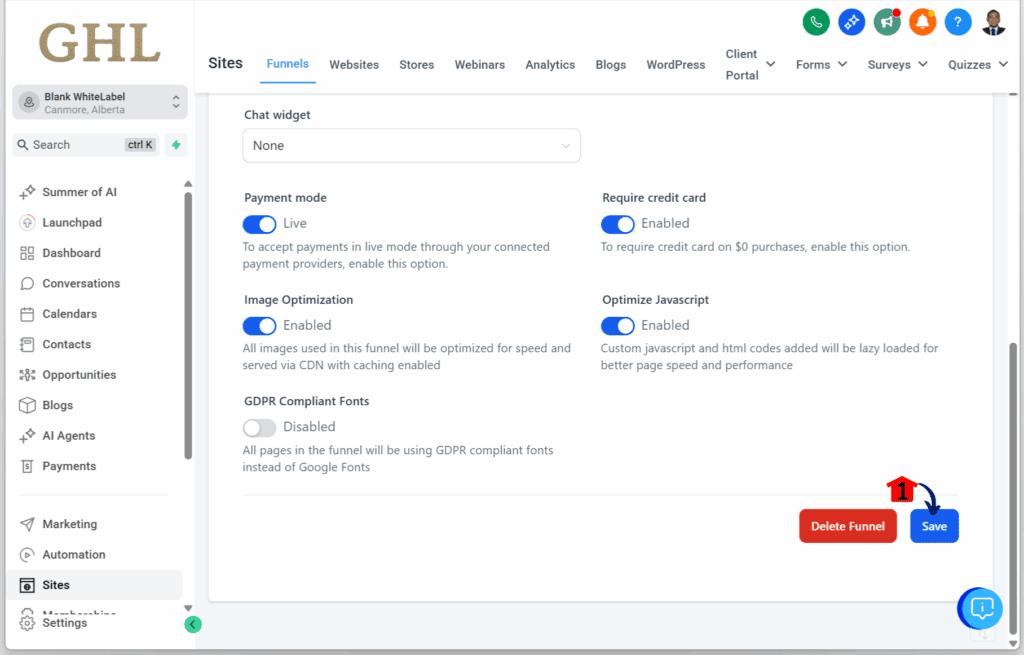
- Scroll down in the Settings tab.
22.1 Click the Save button.
Step 23 – Preview Your Funnel
- Once you click Save, you’ll return to the funnel’s steps dashboard.
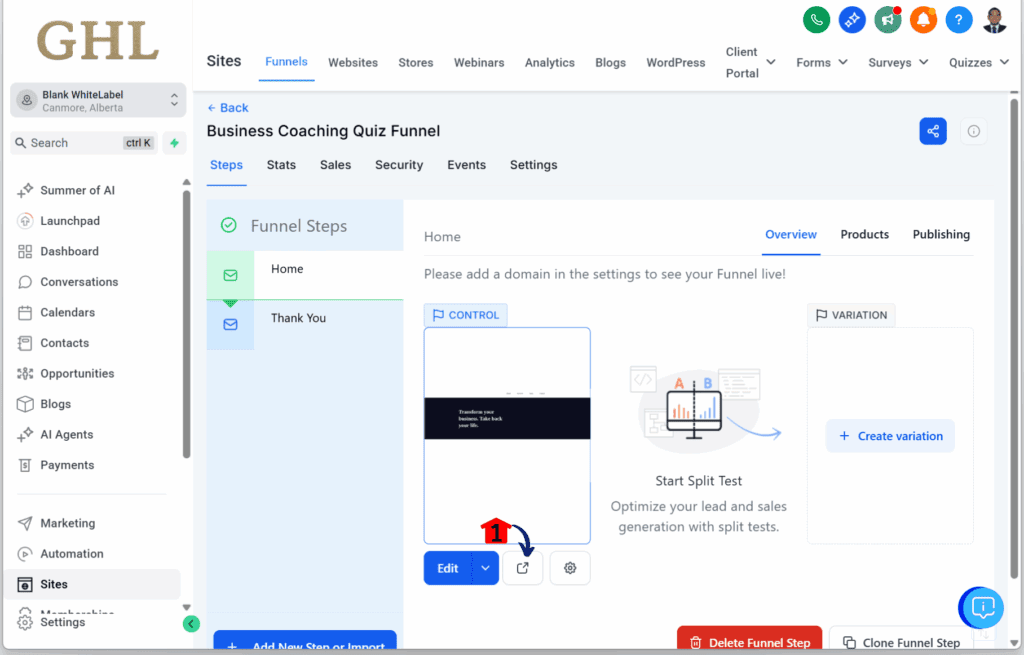
23.1 Click the Visit Funnel URL button to preview the live landing page.
Step 24 – Access the Workflow Section
- The main menu on the left side of your screen includes all the areas you’ll use in GoHighLevel (GHL).
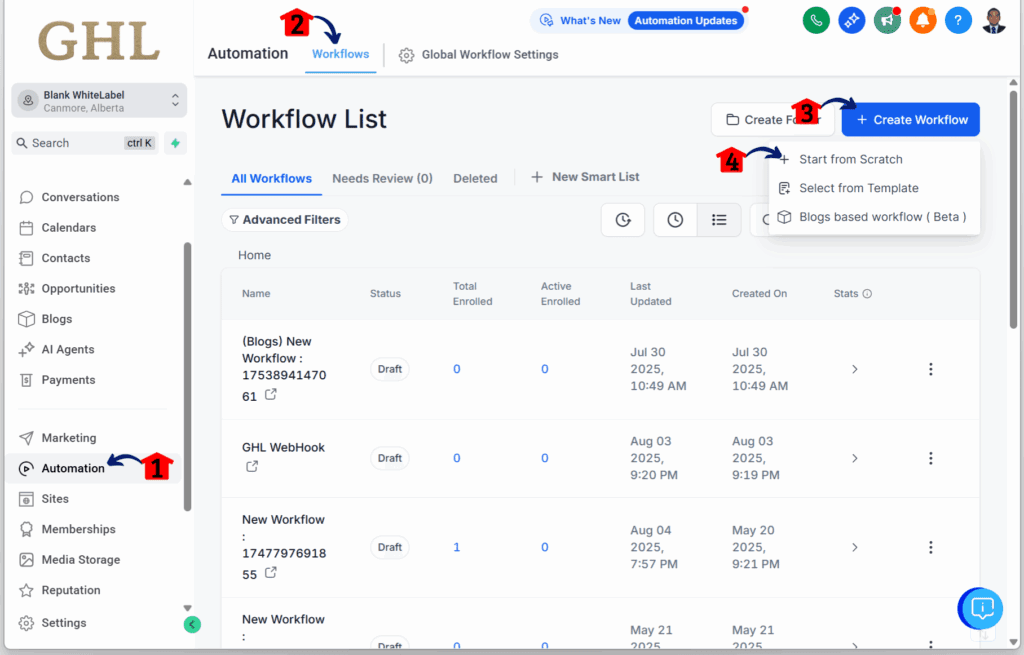
24.1 Click the Automation menu item to access the Workflows section.
- You’ll now be in the Automation section, where you can open the Workflows tab from the top menu.
24.2 Click the Workflows tab.
24.3 Click the + Create Workflow button.
24.4 Click the + Start from Scratch option to create a new workflow.
Step 25 – Set Up the Workflow Trigger
- You should now be in the workflow editor, ready to connect it with your quiz funnel builder for smooth automation.
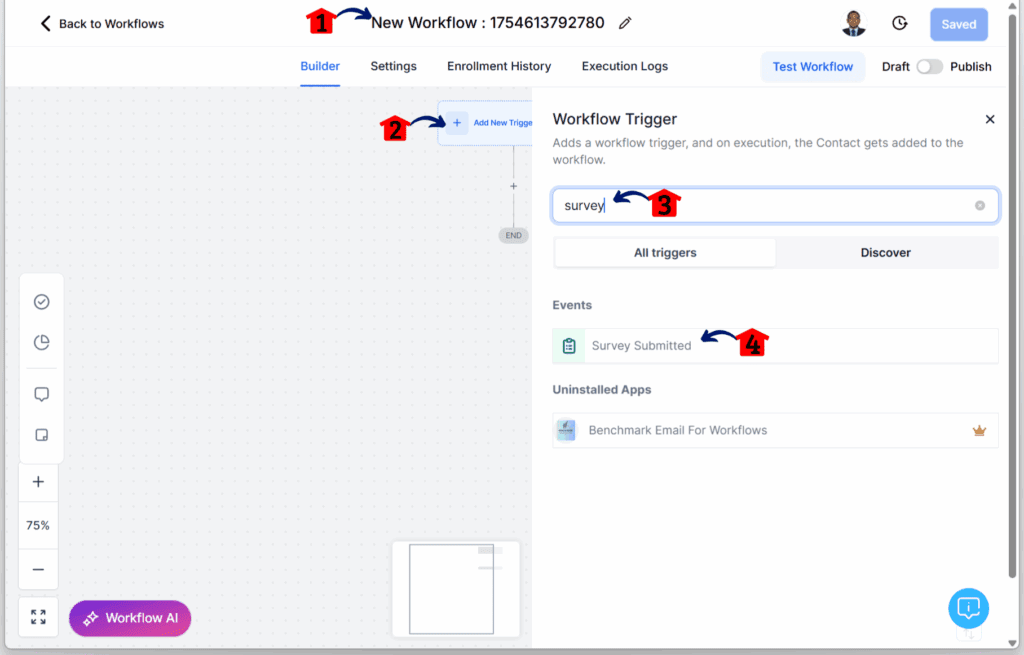
25.1 Rename the workflow.
25.2 Click the + Add New Trigger button on the workflow canvas.
25.3 Type Survey in the search bar.
- The Survey Submitted event should appear.
25.4 Click the Survey Submitted option.
Step 26 – Edit the Trigger
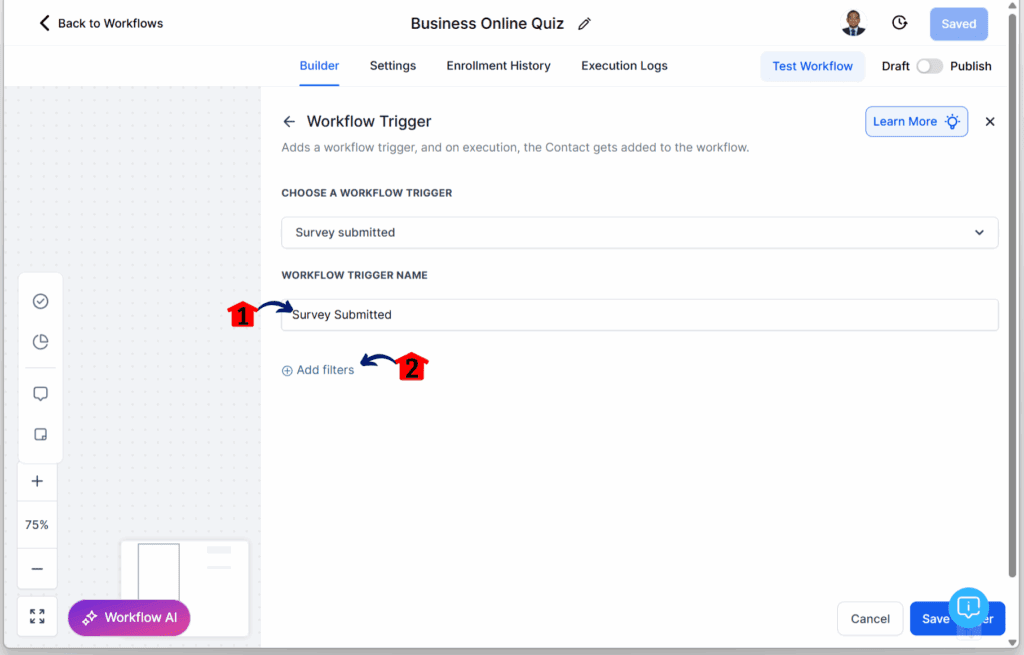
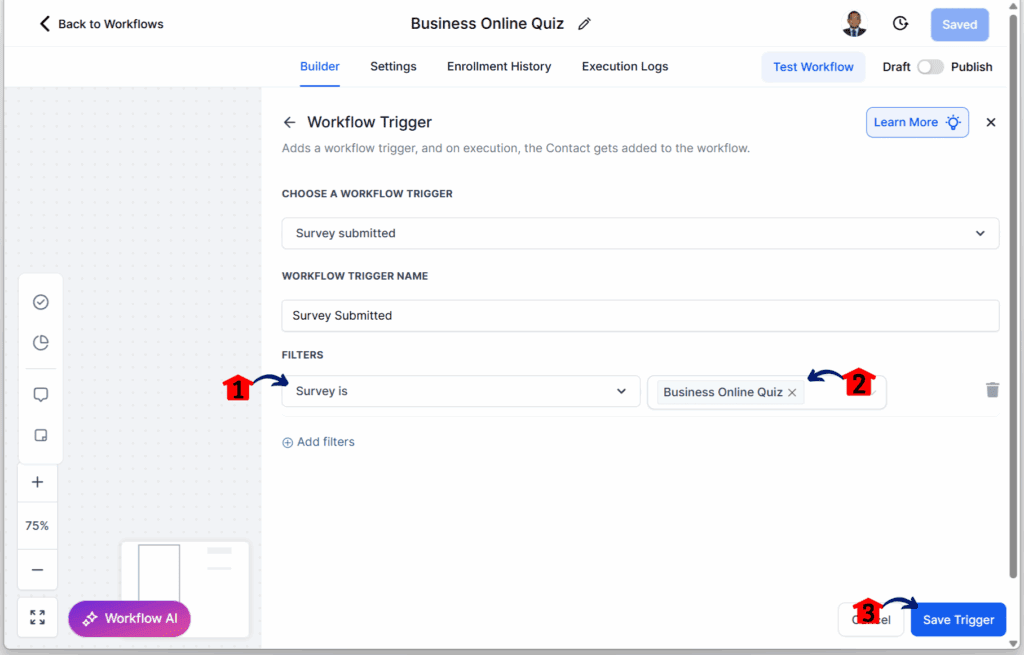
- You should now be in the Survey Submitted editor.
26.1 Rename the Survey Submitted trigger.
26.2 Add a filter by clicking the + Add Filters button.
Step 27 – Select the Quiz for the Trigger
- Once you click + Add Filters, dropdown menus will appear.
27.1 Click the Survey is option.
27.2 Select Business Online Quiz (or the name of your quiz form).
27.3 Click the Save button to save the trigger.
Step 28 – Add an If/Else Condition
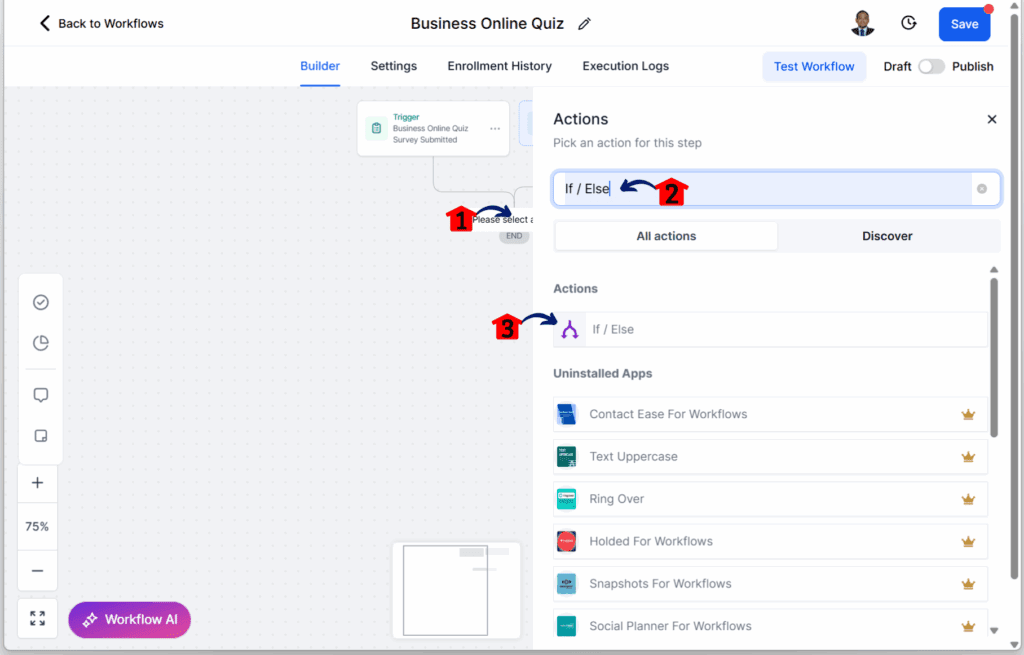
- The trigger element should now be on the workflow canvas.
28.1 Click the + button on the workflow canvas.
28.2 Type If / Else in the search bar.
- The If / Else action element will appear.
28.3 Click the If / Else option.
Step 29 – Create the First Branch (All Correct Answers)
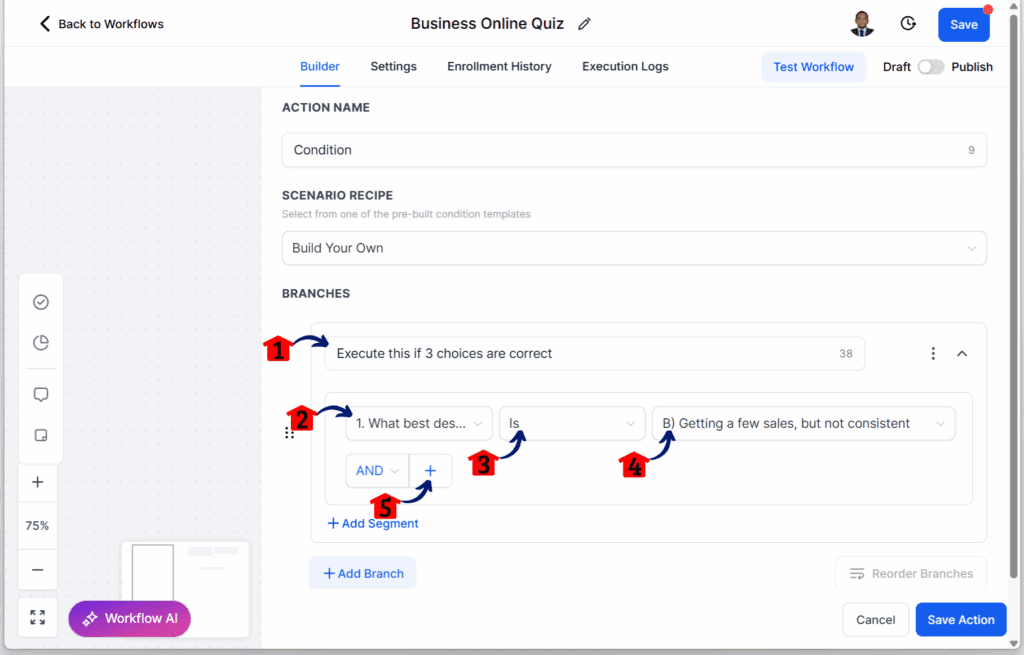
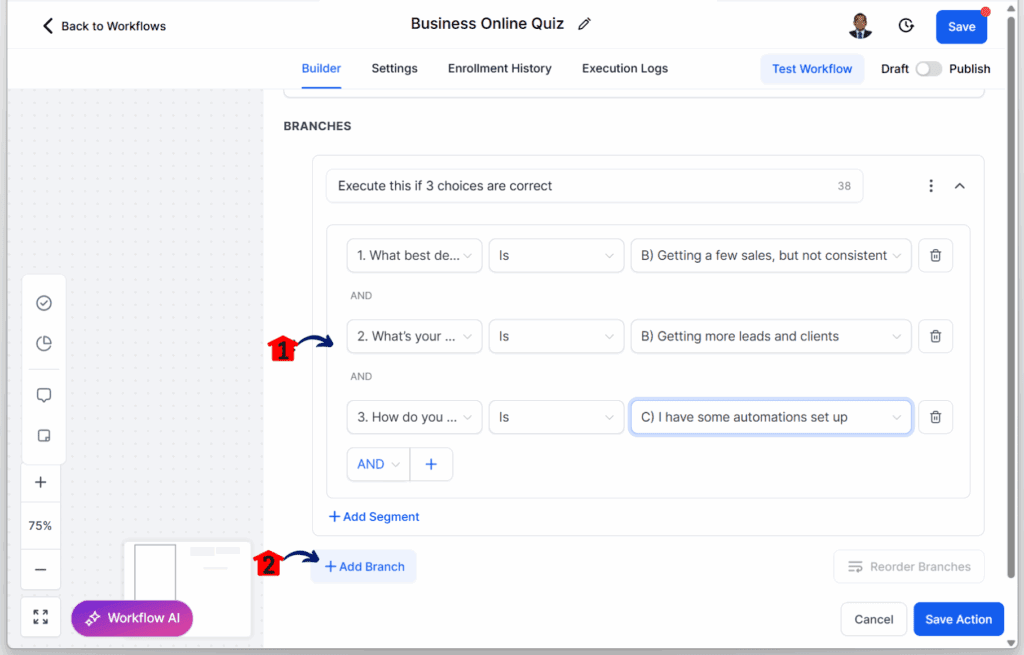
- This branch will run if the user answers all three quiz questions correctly.
29.1 Rename the first branch.
29.2 Open the dropdown and choose the Contact Details option. Then select Question 1.
29.3 Click the Is option.
29.4 Select the correct answer. For Question 1, the correct answer is B.
29.5 Click the + option to add another condition.
- A new set of dropdown filters will appear.
Step 30 – Add Conditions for Questions 2 and 3
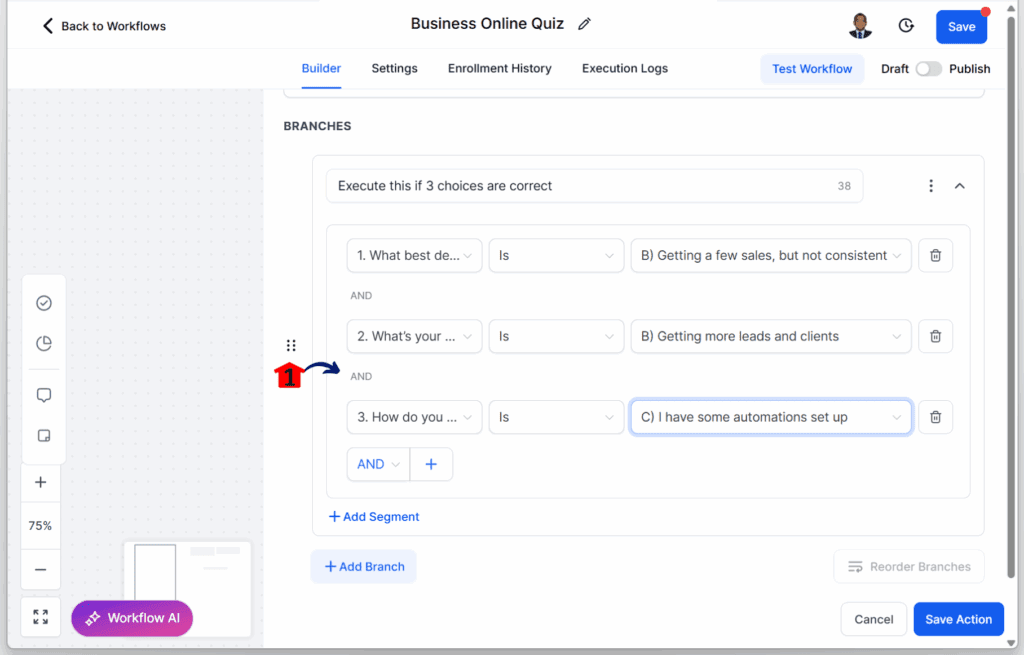
30.1 Add conditions for Questions 2 and 3 so that all three answers must be correct for this branch to run.
Step 31 – Confirm the First Branch Logic
31.1 Ensure all three conditions are set to True.
- For the “Execute if 3 choices are correct” branch to run, the user must choose the correct answers for all three questions.
31.2 Click + Add Branch.
- A new blank branch will appear.
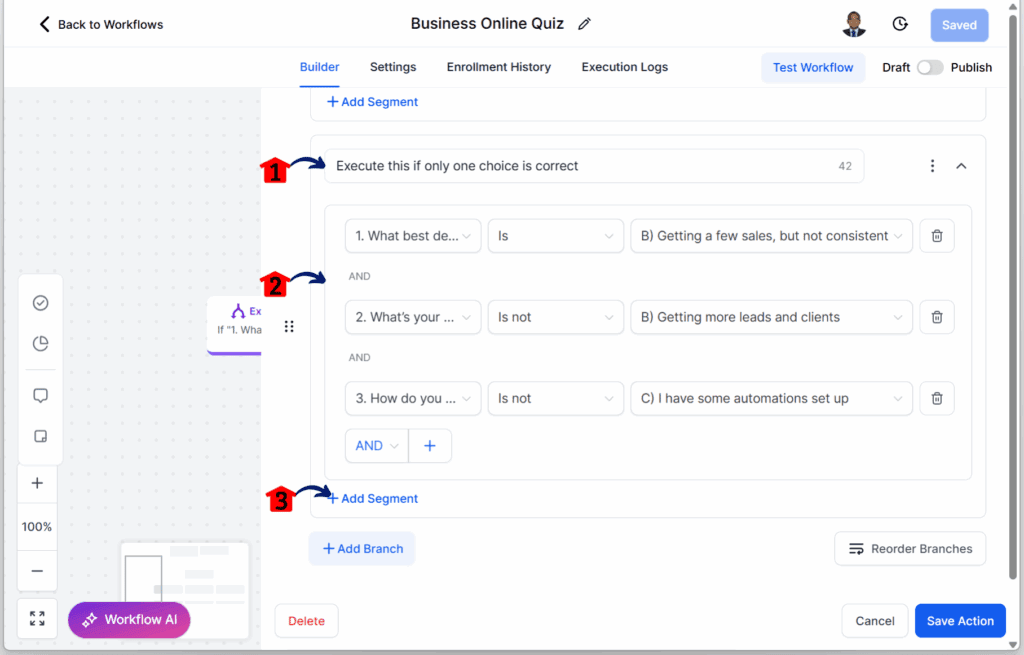
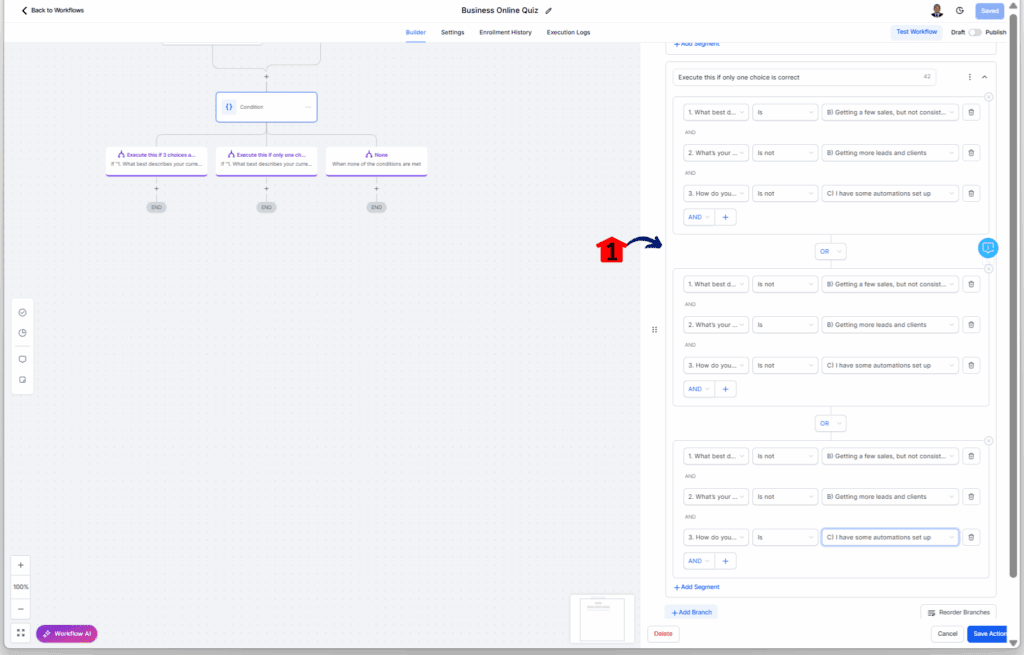
- This second branch will run if the user gets only one correct answer.
Step 32 – Create the Second Branch (One Correct Answer) – First Segment
- This first segment runs if the user answered only Question 1 correctly.
32.1 Rename the second branch.
32.2 Add conditions for all three questions, setting them so that only Question 1 is correct.
32.3 Add another segment for the second condition.
Step 33 – Second Branch – Second Segment
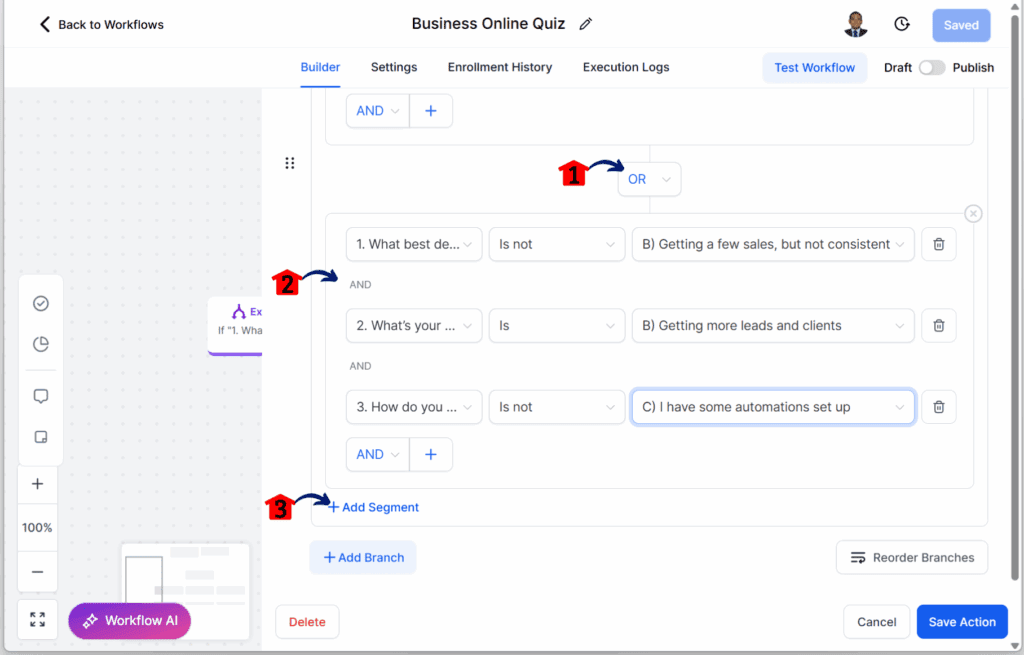
- This segment runs if the user answered only Question 2 correctly.
33.1 Set the condition to OR so the workflow checks this if the first segment is not true.
33.2 Add conditions for all three questions, setting them so that only Question 2 is correct.
33.3 Add another segment for the third condition.
Step 34 – Second Branch – Third Segment
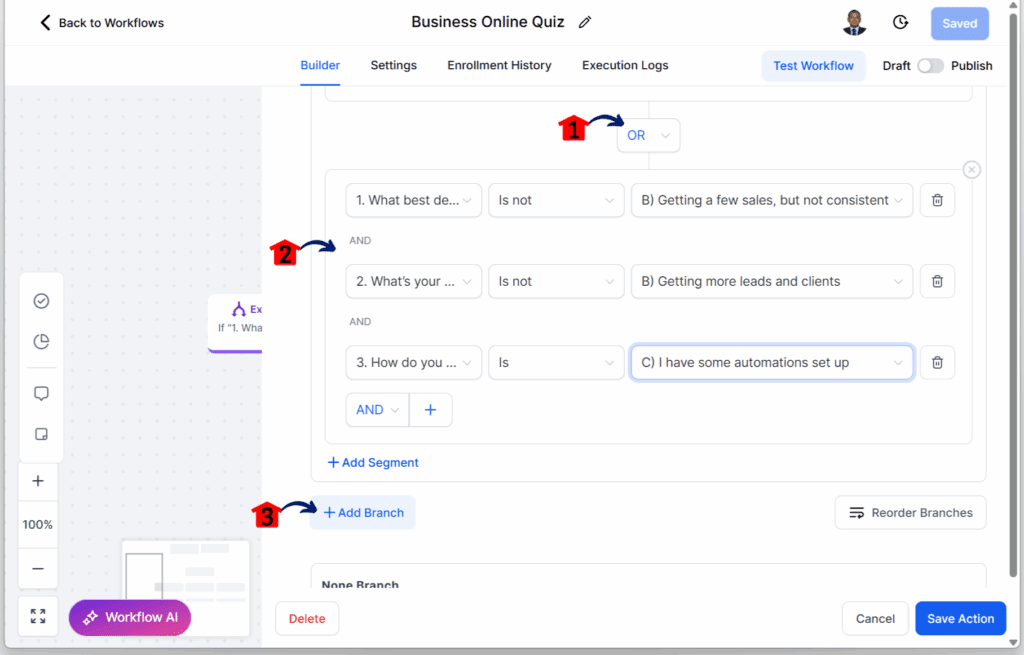
- This segment runs if the user answered only Question 3 correctly.
34.1 Set the condition to OR so the workflow checks this if the first and second segments are not true.
34.2 Add conditions for all three questions, setting them so that only Question 3 is correct.
34.3 Add another branch for the third main condition.
Step 35 – Review the Second Branch
35.1 Double-check the second branch conditions.
- This branch should run if the user got only one correct answer.
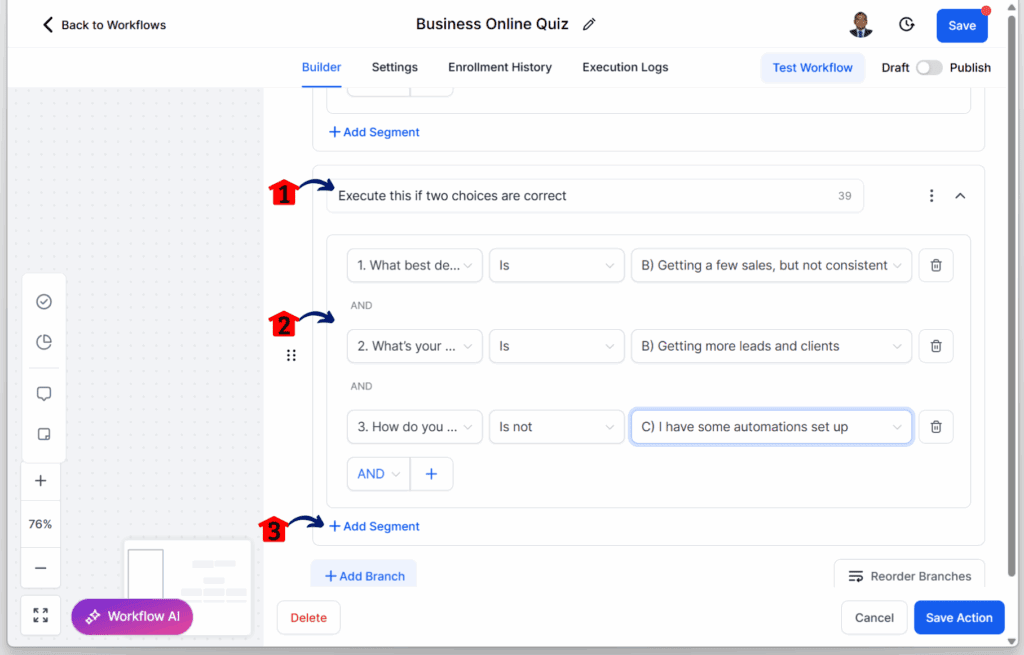
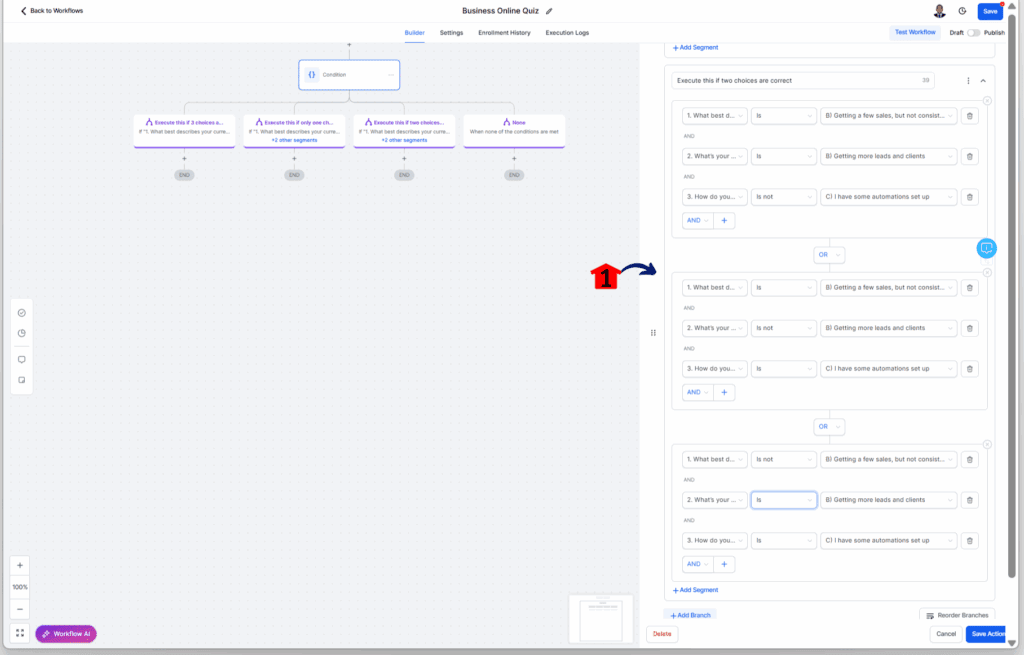
Step 36 – Create the Third Branch (Two Correct Answers) – First Segment
- This segment runs if the user answered Questions 1 and 2 correctly.
36.1 Rename the third branch.
36.2 Add conditions for all three questions, setting them so that Questions 1 and 2 are correct.
36.3 Add another segment for the second condition.
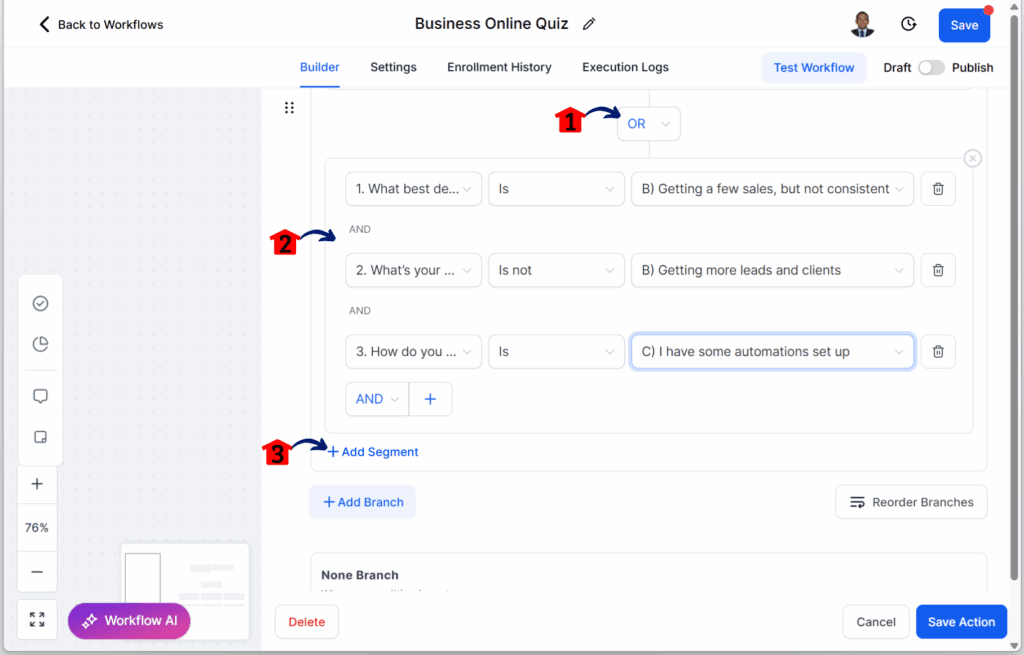
Step 37 – Third Branch – Second Segment
- This segment runs if the user answered Questions 1 and 3 correctly.
37.1 Set the condition to OR so the workflow checks this if the first segment is not true.
37.2 Add conditions for all three questions, setting them so that only Questions 1 and 3 are correct.
37.3 Add another segment for the third condition.
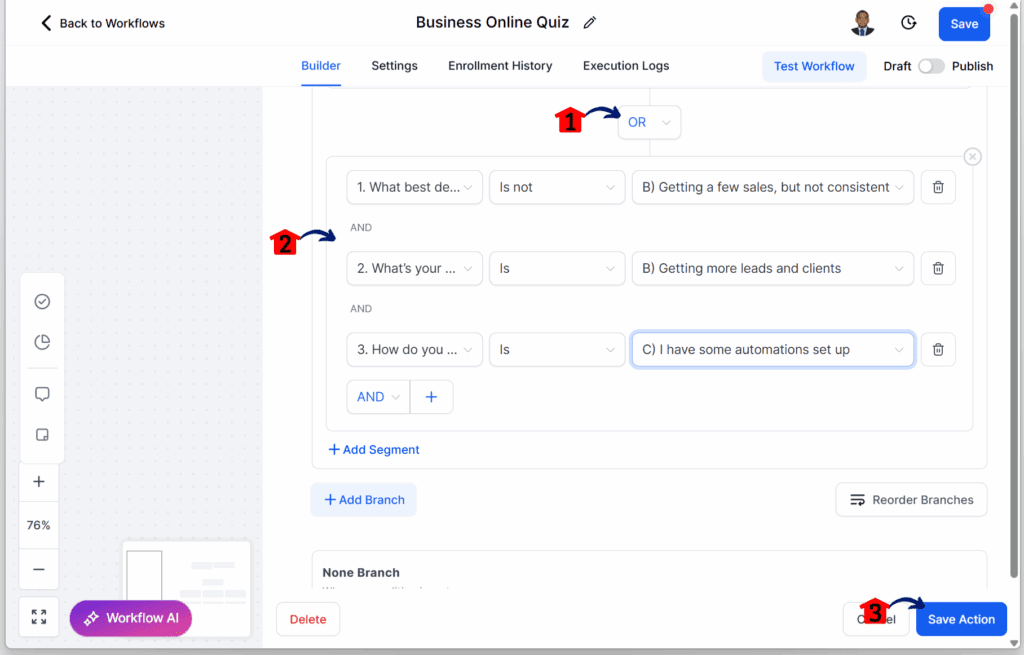
Step 38 – Third Branch – Third Segment
- This segment runs if the user answered Questions 2 and 3 correctly.
38.1 Set the condition to OR so the workflow checks this if the first and second segments are not true.
38.2 Add conditions for all three questions, setting them so that Questions 2 and 3 are correct.
38.3 Click the Save Action button.
Step 39 – Review the Third Branch
39.1 Double-check the third branch conditions.
- This branch should run if the user got two correct answers.
Step 40 – Add Email Actions for the First Branch
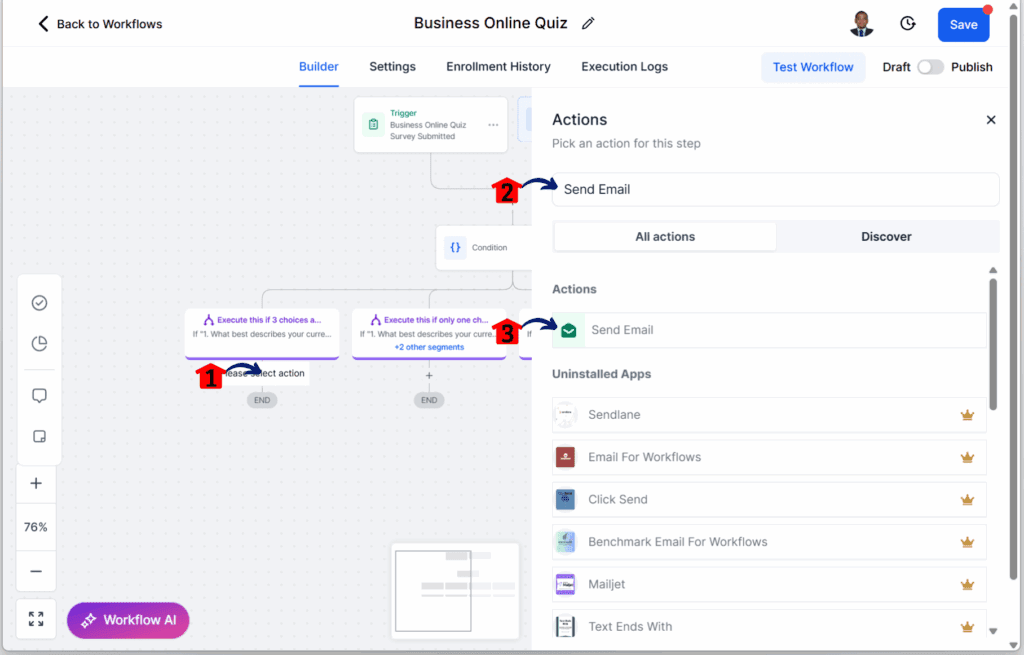
40.1 Click the + button to add an action for the first branch.
40.2 Type Send Email in the search bar.
40.3 Click the Send Email action.
Step 41 – Configure the First Branch Email
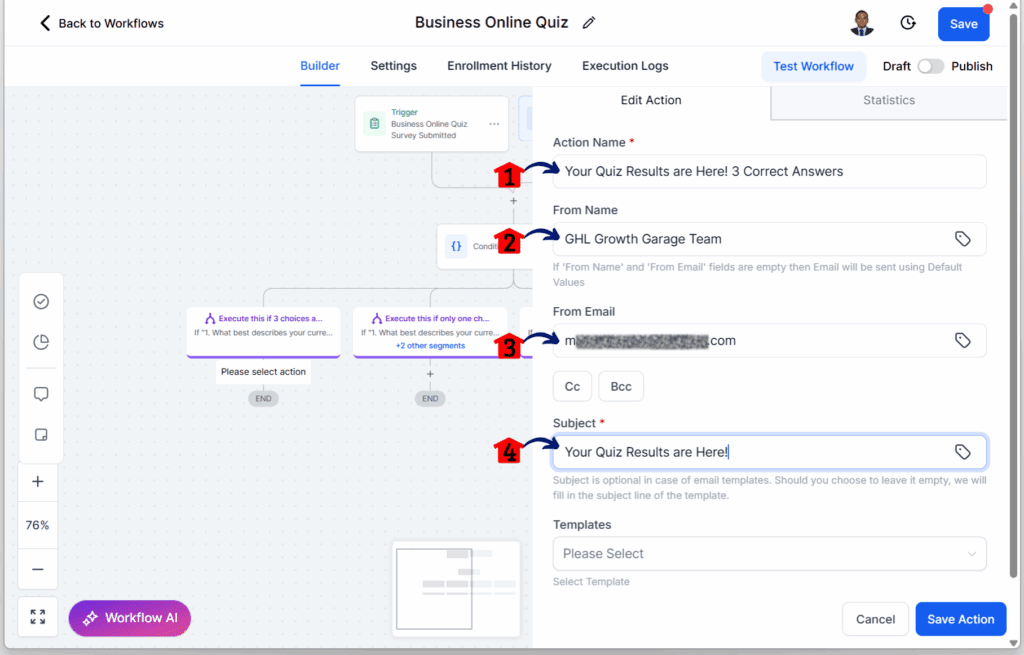
- You should now be in the Send Email settings.
41.1 Rename the Send Email action.
41.2 Enter your name or the sender’s name.
41.3 Enter your email address or the sender’s email address.
41.4 Enter the email subject line.
Step 42 – Write and Save the First Branch Email
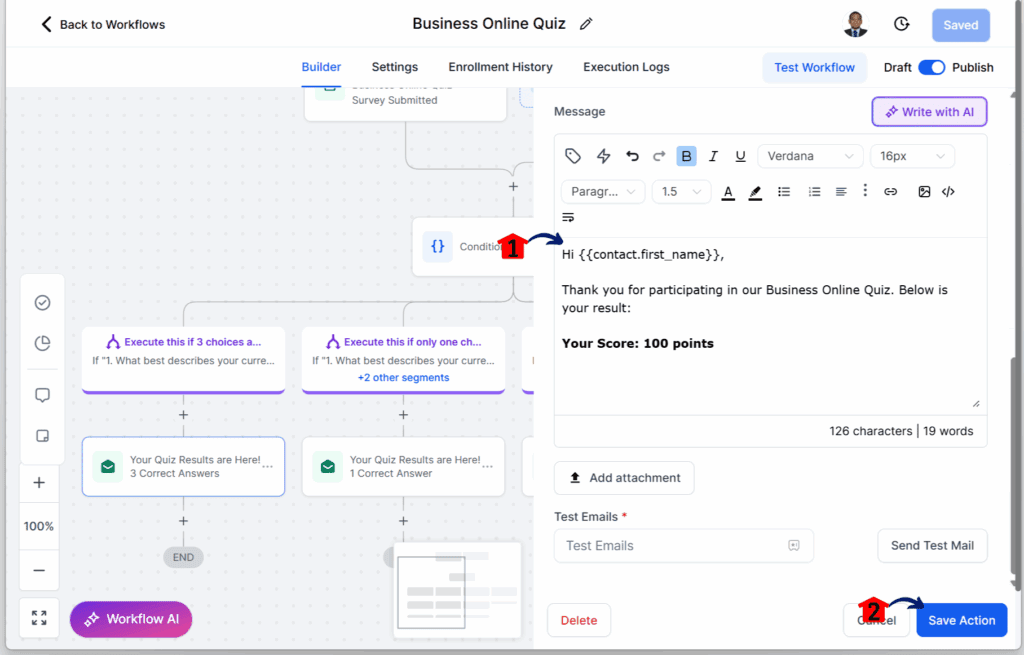
42.1 In the email body, write a message informing the user they got all three answers correct.
42.2 Click the Save Action button.
Step 43 – Finalize and Publish the Workflow
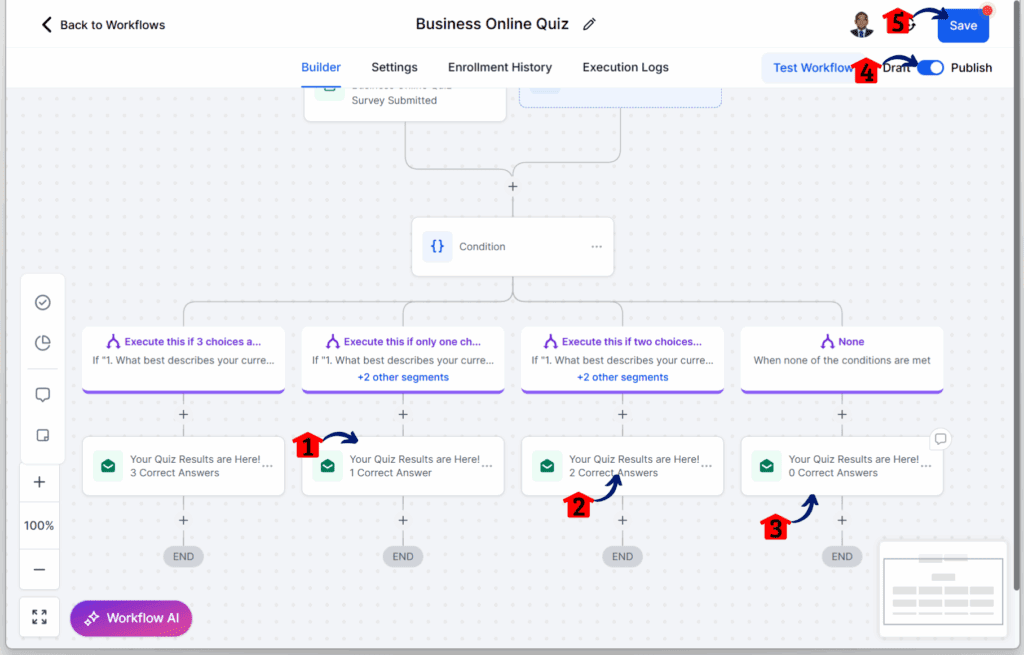
43.1 Repeat Steps 40–42 for Branch 2 (one correct answer). Personalize the email to say the user got only one answer correct.
43.2 Repeat Steps 40–42 for Branch 3 (two correct answers). Personalize the email to say the user got two answers correct.
43.3 Repeat Steps 40–42 for a “None Correct” branch. Personalize the email to say the user got no correct answers.
43.4 Turn on the toggle to publish the workflow.
43.5 Save your changes in the quiz funnel builder by clicking the Save button.
Step 44 – Test the Quiz Funnel
44.1 Visit your landing page and complete the quiz to see your quiz funnel builder in action and test the full funnel.
- Try it here: Online Business Funnel

Tips to help your quiz funnel builder work better
Once your quiz funnel is live, small changes can go a long way. A few smart adjustments can help more people finish the quiz and make sure your follow-up emails get through.
Keep the quiz simple. Ask only what you need to know. A clear path from question to result makes the experience smoother for your users.
Here are some practical ways to improve your quiz funnel builder:
- Use easy-to-follow questions like yes/no or multiple choice. Skip open-ended ones unless they’re really needed.
- Stick to 3 to 5 questions. Too many can cause people to drop off before they finish.
- Personalize your emails. Use merge fields to include their name or a few of their answers.
- Add a clear next step. After showing the results, invite them to book a call or check out something useful.
- Send from a verified email address. This helps your messages land in the inbox, not the spam folder.
- Test everything first. Make sure your form or survey works, tags are applied, and emails are sent out correctly.
The goal is to make your quiz funnel builder simple to complete and easy to follow up on. These small steps will help you get better results with less effort.
Why quiz funnels make sense for agencies
If you run lead generation for clients, you need a way to get better leads without more manual work. A quiz funnel builder gives you that. It helps you ask the right questions up front, so you can learn more about each lead before you ever follow up.
Quizzes are useful because they let people guide themselves. Instead of filling out a basic form, they answer a few simple questions. From those answers, you already know what service or offer fits them best. That saves time for both your team and the client.
GoHighLevel makes it easy to reuse quiz funnels across different clients or offers. You can clone the funnel, tweak the questions, and launch in less time. That’s a big win if you’re managing several accounts or niches.
With answers stored in custom fields or tags from your quiz funnel builder, you also get better data. You can track trends, sort contacts into groups, and write emails that feel more personal. All this adds up to a cleaner list and more qualified leads.
Quiz funnel builder FAQ
Even with a solid quiz funnel, a few small issues can come up. Here are some common questions and straightforward answers to help you fix things quickly.
What to expect from a working quiz funnel builder
A quiz funnel builder does more than collect contact info. It gives you a way to learn about your leads while giving them something helpful in return. That kind of exchange builds trust early on.
Once your funnel is set up in GoHighLevel, the process runs by itself. Someone visits the landing page, answers a few questions, and gets a follow-up email with their results. You get useful data and save time on manual follow-up.
You won’t always get perfect results the first time. But if you keep an eye on quiz completions, popular answers, and email opens in your quiz funnel builder, you’ll know what to adjust. Small changes often lead to better results.
Start with one quiz and see how it works for your audience. Once you’re happy with it, reuse the setup for other offers or clients. It’s a simple way to grow your list and qualify leads without adding more tools.
Share with us how this quiz funnel builder’s features helped you.
Related Posts You’ll Find Useful:
- GHL Just Made Workflow Decision Branches Easier to Use
- Unlock Limitless Design by Mastering GoHighLevel’s Page Builder Elements
- Your Forms, Surveys, and Quizzes Just Got a Builder Layout Redesign That Makes Life Easier
Scale Your Business Today.
Streamline your workflow with GoHighLevel’s powerful tools.
