- Upload brand fonts directly into your funnel or website builder.
- Quick Summary – Website Custom Fonts Essentials
- Upload Custom Fonts Directly in GHL Builder
- No More CSS Hacks or External Hosting
- Full Creative Control Over Brand Typography
- How to do Website Custom Fonts
- Get the Most from Website Custom Fonts
- Faster Builds and Stronger Branding
- Website Custom Fonts – Your Questions Answered
- A Huge Win for Agencies and Brand Builders
Upload brand fonts directly into your funnel or website builder.
Good design starts with the right website custom fonts. It’s not just about how things look—it’s about making sure your brand feels right from the first glance. And until now, customizing fonts in GoHighLevel websites and funnels meant… well, headaches.
You had two choices:
- Hack your way through custom CSS
- Host your fonts elsewhere and embed manually
Both of those are clunky, risky, and slow. But that’s changed.Now, with native website custom fonts support, you can upload your own font files directly into GHL—no code, no drama.
Now you can use your client’s exact font—whether it’s a modern sans-serif or something totally website custom fonts—on every part of their funnel or website. Just a couple clicks, and it’s live. No need to call in a dev or wrestle with code.
Quick Summary – Website Custom Fonts Essentials
Purpose: This update lets you upload custom fonts directly into the GHL builder, so you can style funnels and websites with your exact brand typography—no CSS required.
Why It Matters: It eliminates clunky workarounds and gives your agency full creative control, making it easier to design polished, professional pages that match your client’s brand guide.
What You Get: A built-in custom font uploader inside the Typography settings, support for all major font formats, and centralized font management in your Media Library.
Time to Complete: Less than five minutes to upload and apply your font across any funnel or website.
Difficulty Level: Easy — no coding or developer help needed.
Key Outcome: Faster funnel builds, tighter brand consistency, and a more premium experience for every client you serve.
Upload Custom Fonts Directly in GHL Builder
Here’s what just dropped inside GoHighLevel: a simple, powerful way to upload and manage website custom fonts and funnels—natively.
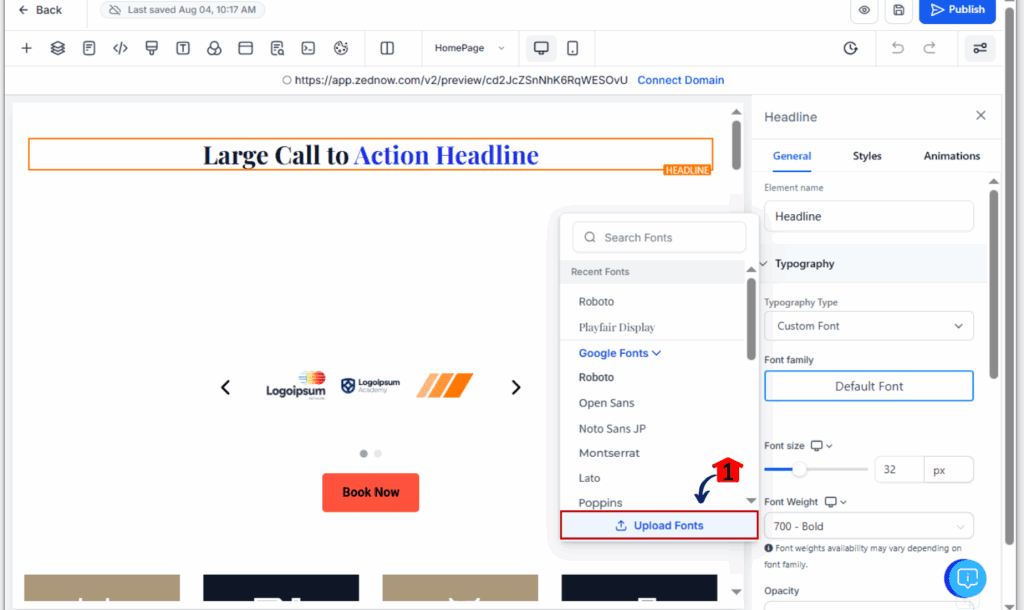
You’ll now find a sleek new “Add Font” option directly inside the font dropdown of the builder. Clicking it opens a new Custom Fonts modal, where you can upload font files right from your device or pull them in from your Media Library.
Automate marketing, manage leads, and grow faster with GoHighLevel.

This update supports all the most common font formats:
- .ttf
- .otf
- .woff
- .woff2
Once uploaded, your font becomes part of the builder’s font options—just like system fonts. And each file you upload (e.g., bold, italic, regular) is treated as a separate style so you can apply them exactly where you need without extra setup.
The best part? It works across funnels and websites, and it’s stored centrally—so your fonts follow you wherever you build.
No More CSS Hacks or External Hosting
Before this update, getting website custom fonts meant taking the long road:
- Hosting the font file externally (like on a CDN)
- Writing custom CSS code to import and apply it
- Hoping it didn’t break on mobile or during publishing
Let’s be honest—that was a pain. And worse, it often required someone on your team who knew how to code, troubleshoot loading errors, and keep things updated.
That all goes away with this release.
Now, you just upload your font and go. It’s fully integrated into the custom fonts websites dropdown in the builder, which means your team (or your clients) can apply brand fonts with the same ease as selecting Arial or Roboto.
This update eliminates one of the biggest friction points in GoHighLevel’s design workflow. It’s cleaner, faster, and finally feels like a proper pro design environment.
Full Creative Control Over Brand Typography
For agencies, branding isn’t optional—it’s everything. Your clients expect every page, ad, and funnel to reflect their identity down to the font. Until now, GHL made that harder than it should’ve been.
Now with website custom fonts baked directly into the platform, you’re no longer limited to Google Fonts or stuck trying to override defaults with CSS. You can use your fonts, your way.
Here’s what that unlocks:
- Faster design workflows: No more switching tabs or writing code just to use a font.
- Cleaner output: No rendering bugs, mismatches, or font load issues.
- Better client satisfaction: Your pages match their brand guidelines to the letter—literally.
- Less dev time: Designers and marketers can handle it all without developers.
And if you’re white-labeling the platform, this makes your service feel tighter, more premium, and more polished out of the gate.
Custom fonts websites used to be a workaround. Now, they’re a feature.
How to do Website Custom Fonts
If you’ve ever had to fight with CSS to get a brand font to show up correctly in a funnel, this update is your new best friend. Adding your own fonts just got simple. No need to mess with code or call in a developer—just a couple clicks, and your brand fonts are live inside the GHL builder.
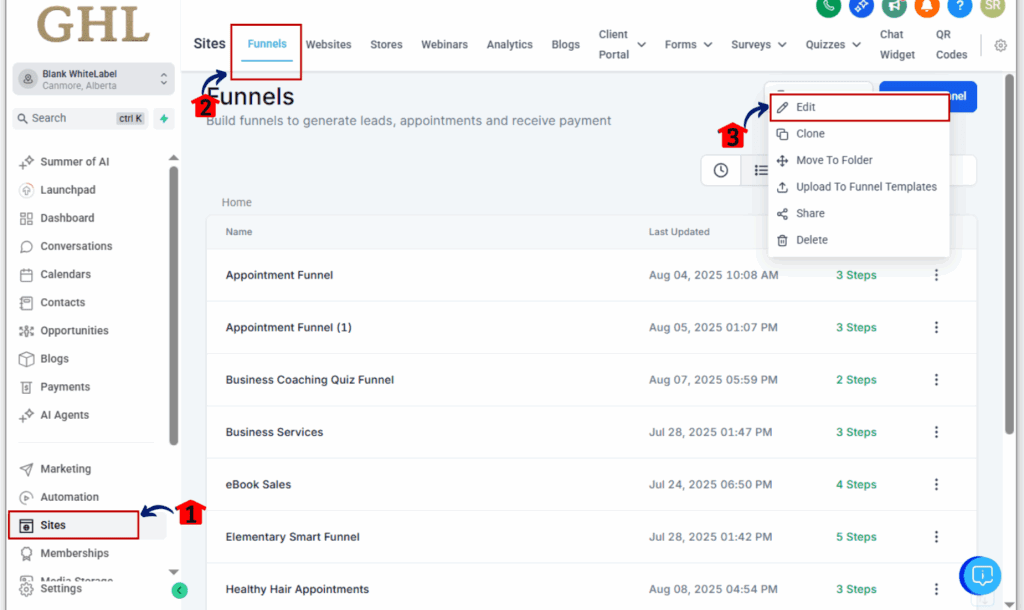
Step 01 – Open the Funnel or Website Builder
1.1 From your GHL account, navigate to Sites > Funnels or Sites > Websites
1.2 Open the page where you want to use a custom font
Step 02 – Select a Text Element
2.1 Click on any text section—headings, paragraphs, or buttons
2.2 The right-hand editor panel will open automatically
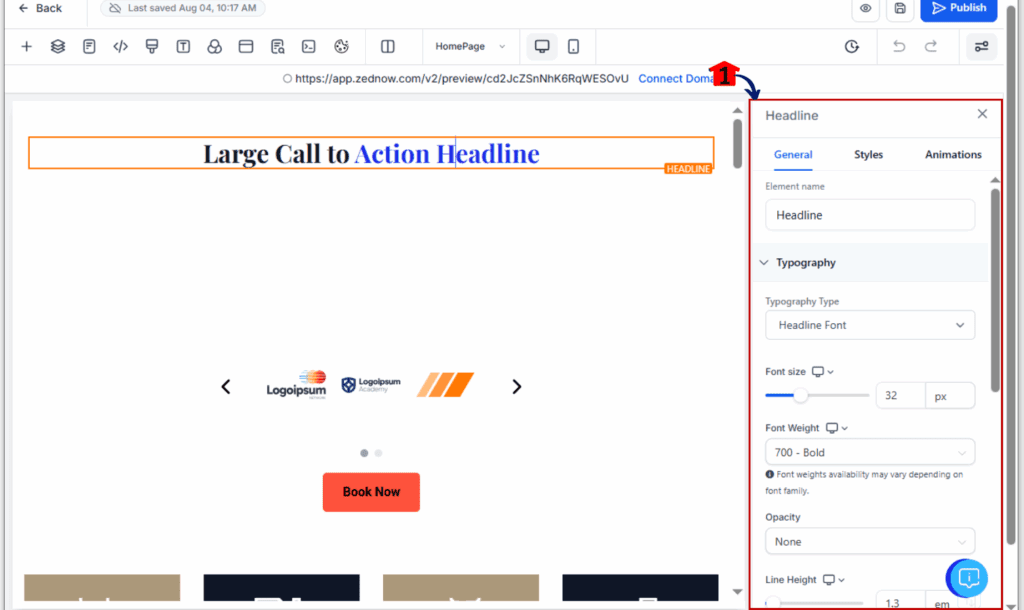
Step 03 – Go to Typography Settings
3.1 Look over to the right panel and find the section labeled Typography.
3.2 Click the current font dropdown
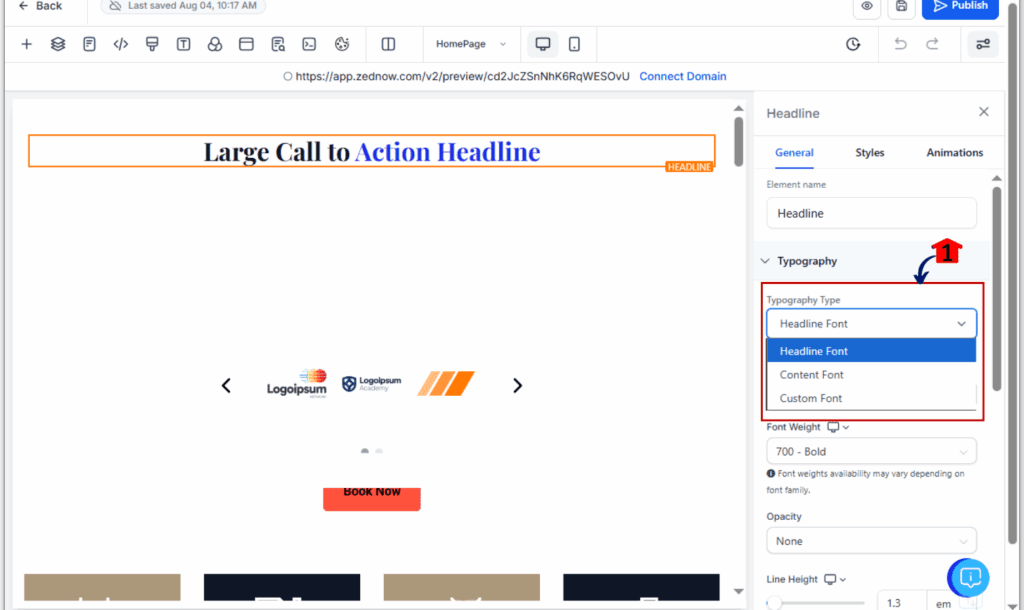
Step 04 – Click “Add Font” to Upload
4.1 Select Custom Fonts in the dropdown
4.2 Click Add Font to launch the Custom Fonts modal
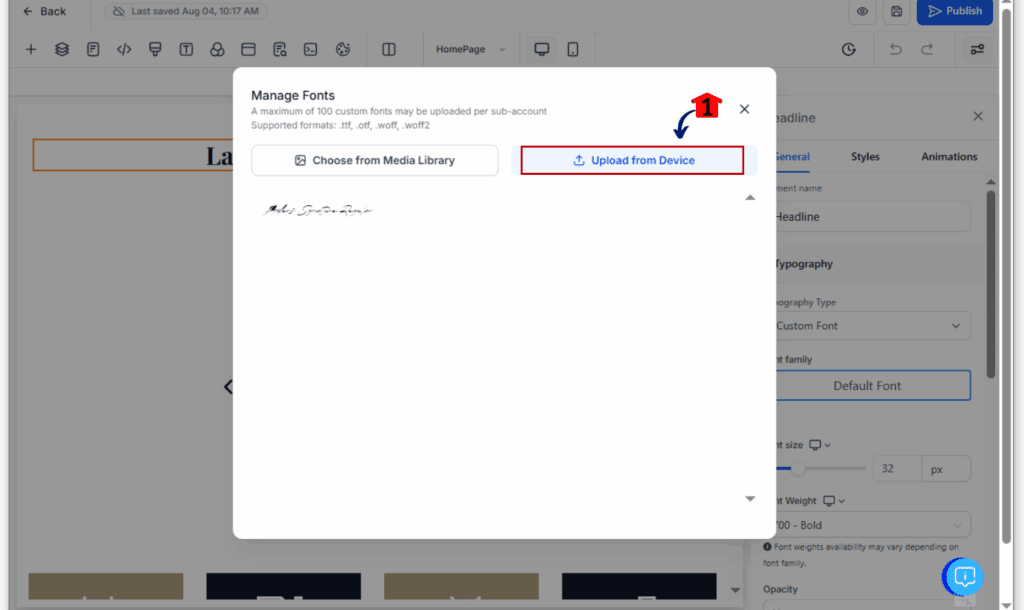
Step 05 – Upload Your Font File
5.1 Click to upload a font from your computer, or select one already in your Media Library
5.2 Supported formats: .ttf, .otf, .woff, .woff2
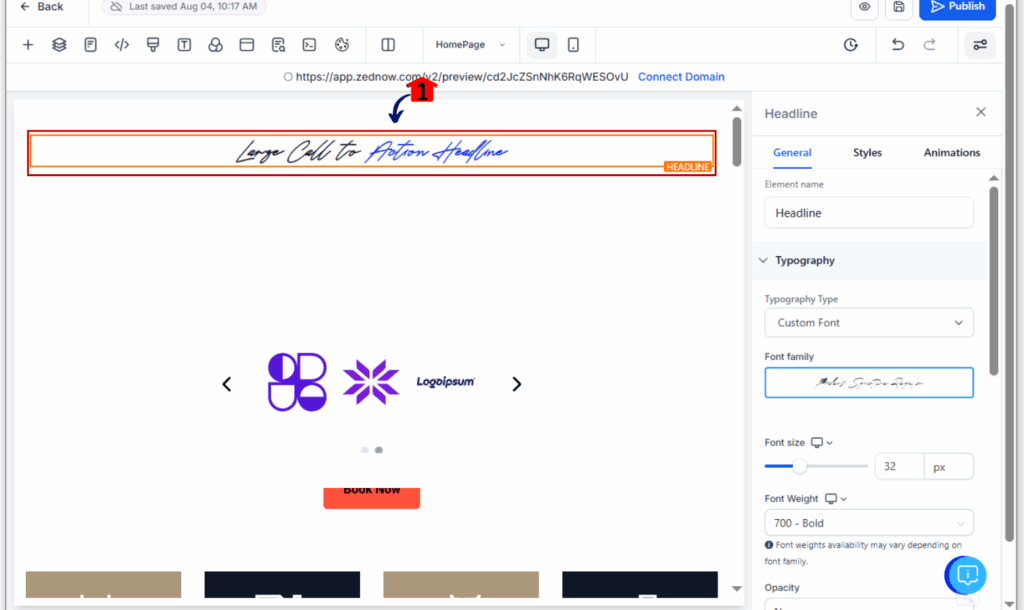
Step 06 – Apply Your New Font
6.1 Your font will now show up in the font dropdown list
6.2 Select it just like any other font and apply across any element
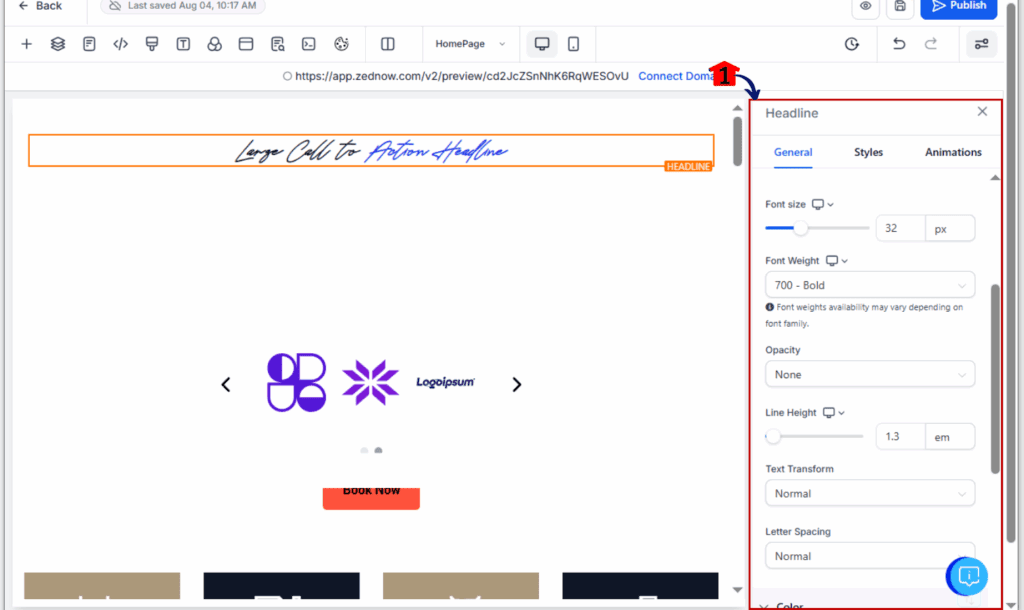
Step 07 – Adjust Design Settings
7.1 Tweak size, weight, letter spacing, or color as usual
7.2 The font will render live on the page, no refresh required
Get the Most from Website Custom Fonts
Uploading website custom fonts is just the beginning—how you organize and use them will make all the difference, especially if you’re managing multiple brands or funnel builds.
Here are a few pro-level tips to keep your setup clean and efficient:
Use Clear Naming Conventions
Avoid uploading files named “font1.otf” or “style-v2.ttf.” Instead, name your fonts by family and weight, like:
- Montserrat-Regular.ttf
- Montserrat-Bold.otf
- Montserrat-Italic.woff2
This helps you find and apply the right style quickly—especially when building for multiple clients.
Separate Each Font Style File
Each upload is treated as a unique font in the dropdown. Upload your Regular, Bold, Italic, and other variants as individual files. Don’t rely on the browser to auto-style it—it won’t.
Organize Fonts by Brand in Media Library
Create a folder in your Media Library for each client or project. This keeps font assets tidy and makes reuse across pages a breeze.
Test on Mobile and Desktop
Fonts will load across all devices, but it’s smart to double-check spacing, readability, and responsiveness before publishing.
Train Your Team Once—Then Delegate
This is a huge time-saver: once your designers or VAs know how to upload and apply fonts, you can standardize your brand setup across all locations.
Faster Builds and Stronger Branding
By removing the old CSS workaround, this custom font update delivers a smoother design experience—and some serious time savings.
Here’s what you’ll notice right away:
1. Brand Consistency Across the Board
Every font you upload is reusable. That means headers, body text, CTAs, and buttons all stay on-brand without extra formatting. Whether you’re building one funnel or ten, your client’s visual identity stays rock solid.
2. Lightning-Fast Design Workflows
No more jumping into code or tracking down hosted font files. Your team can focus on designing, not troubleshooting.
3. Better First Impressions for Clients
When clients see their exact fonts used throughout their funnel or site, it signals professionalism—and builds trust.
4. Easier Team Collaboration
With everything centralized in the builder and Media Library, your designers, VAs, and copywriters can all work from the same set of tools.
5. Zero Breakage on Publish
Website custom fonts load reliably across devices and browsers, so what you build is what visitors see. No weird font-swapping, no rendering bugs.
Website Custom Fonts – Your Questions Answered
A Huge Win for Agencies and Brand Builders
With native support for website custom fonts, GoHighLevel has removed one of the last big obstacles for brand-forward design. No more CSS. No more font hosting headaches. No more compromises on client identity.
This is a huge deal for agencies building at scale. You can now create polished, fully-branded funnels and websites faster—and without looping in a developer.
Even better? Your clients will notice the difference. Branded website custom fonts elevate your pages instantly, making your work look more custom, professional, and premium.
If you’ve been piecing together workarounds just to match a style guide—now you don’t have to. GHL just made font control native, simple, and powerful.
Scale Your Business Today.
Streamline your workflow with GoHighLevel’s powerful tools.