- Build an interactive quiz funnel that attracts leads, segments your audience, and automates follow-up inside GoHighLevel.
- What’s New – The AI + GHL Combo That Changes Quiz Marketing
- How to Create a Marketing Personality Quiz
- Frequently Asked Questions – Common Questions About Building AI Quizzes in GoHighLevel
- Pro Tips & Creative Ideas
- Your Next Step in Smart Lead Generation
Build an interactive quiz funnel that attracts leads, segments your audience, and automates follow-up inside GoHighLevel.
Why Personality Quizzes Still Work in 2025
A marketing personality quiz is one of the most effective ways to attract new leads and build stronger connections with your audience. This type of quiz turns marketing into a friendly conversation instead of a sales pitch. People enjoy discovering something about themselves, and a well-designed marketing personality quiz gives them that moment of insight while introducing your brand in a genuine way.
Creating a marketing personality quiz is also easier than ever. With AI tools and GoHighLevel working together, you can plan, build, and launch a complete quiz funnel in less time than it takes to design a campaign. AI helps you brainstorm creative quiz ideas, write clear questions, and organize personality results that fit your audience. GoHighLevel handles the technical side by building the quiz, collecting responses, and sending personalized follow-up emails automatically.
This guide walks you through each part of the process. You’ll learn how to use AI to plan your quiz content, set it up inside GoHighLevel, and connect automations that make your quiz run on its own. By the end, you’ll have a polished, data-driven marketing personality quiz that attracts the right people and turns simple interactions into qualified leads for your business.
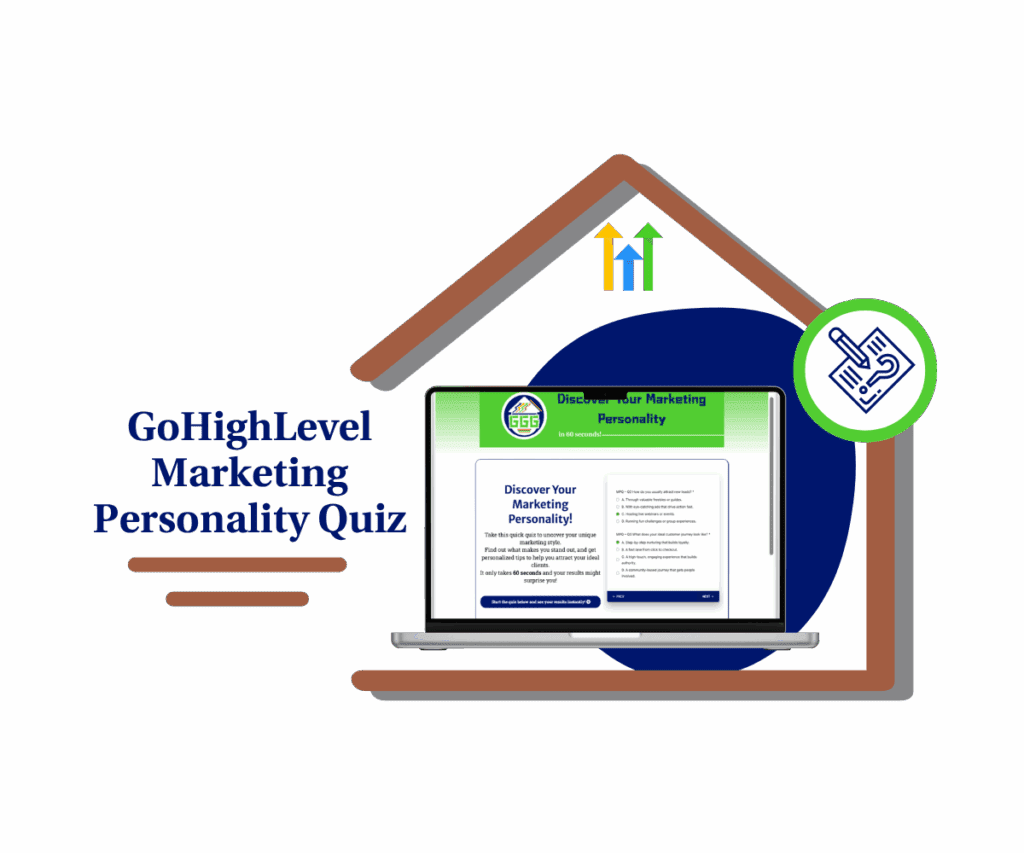
This guide shows you how to combine AI content generation with GoHighLevel’s automation tools to create an engaging, high-converting marketing personality quiz. You’ll learn how to build, automate, and optimize your quiz funnel for smarter lead generation.
Quick Summary – Marketing Personality Quiz Essentials
Purpose: This guide teaches you how to build a complete marketing personality quiz using AI and GoHighLevel to generate and automate leads.
Why It Matters: Quizzes engage audiences better than static forms and help you collect meaningful data that improves your marketing decisions.
What You Get: A clear, step-by-step process for using AI prompts, building your quiz in GoHighLevel, setting up automation, and tracking results.
Time to Complete: Around one afternoon to plan, build, and test your first working quiz funnel.
Difficulty Level: Moderate. Basic familiarity with GoHighLevel is helpful, but the steps are beginner-friendly.
Key Outcome: A branded, automated quiz funnel that attracts leads, segments your audience, and delivers personalized results with minimal effort.
What’s New – The AI + GHL Combo That Changes Quiz Marketing
The way we build and use quizzes for marketing has changed. What used to take hours of brainstorming and manual setup can now be done in a single afternoon. The combination of AI and GoHighLevel gives marketers a faster, smarter, and more creative way to launch interactive experiences that actually convert.
AI makes the content part easy. You can use it to generate quiz ideas, write fun and relevant questions, and create personality results that fit your audience. It’s like having a creative copywriter on demand. Then, GoHighLevel takes that content and turns it into a working system. You can build the entire quiz inside the Survey Builder, design a landing page for it, and connect all your automations in one place.
Automate marketing, manage leads, and grow faster with GoHighLevel.
How to Create a Marketing Personality Quiz
The way we build a marketing personality quiz has completely evolved. What once took hours of writing, setup, and testing can now be done in a single afternoon. The combination of AI and GoHighLevel gives marketers a faster, smarter way to create high-converting quizzes that feel personal and professional.
AI makes creating an AI marketing personality quiz simple and efficient. You can use it to brainstorm creative quiz topics, write engaging questions, and generate accurate personality results that connect with your audience. Think of it as your on-demand creative assistant that helps you design a quiz that both entertains and qualifies leads.
Then comes GoHighLevel the engine behind your quiz funnel. Using the GoHighLevel Survey Builder, you can easily build your marketing personality quiz, design your landing page, and automate every step of the follow-up. This all-in-one setup lets you collect responses, send personalized results, and track performance without switching tools.
This new workflow transforms how marketers approach quiz marketing. Every response inside your GoHighLevel quiz funnel becomes valuable data you can use to segment contacts, tailor follow-up emails, and refine future campaigns. Instead of generic content, your AI-powered quiz marketing strategy delivers personalized experiences that build trust and convert faster.
When AI and GoHighLevel work together, you get a marketing personality quiz that runs automatically, gathers insights in real time, and continues generating leads long after it’s published. It’s a smarter, easier, and more scalable way to market your business.
HOW TO BUILD THE QUIZ IN GHL USING SURVEY BUILDER
Survey Name: Marketing Personality Quiz
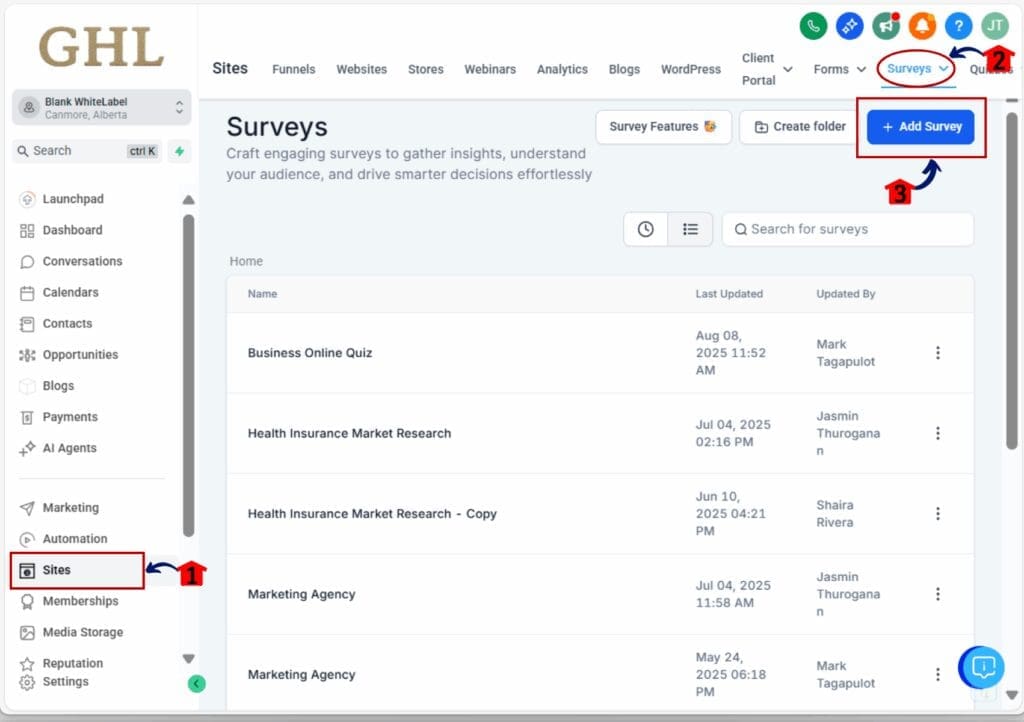
Step 01 – Access the Main Menu in GoHighLevel
- The main menu on the left side of your screen includes all the main areas you work in when using GoHighLevel (GHL).
1.1 Click the Sites menu item to access the Survey section.
1.2 Click the Survey tab from the top menu.
1.3 Click the + Add Survey button.
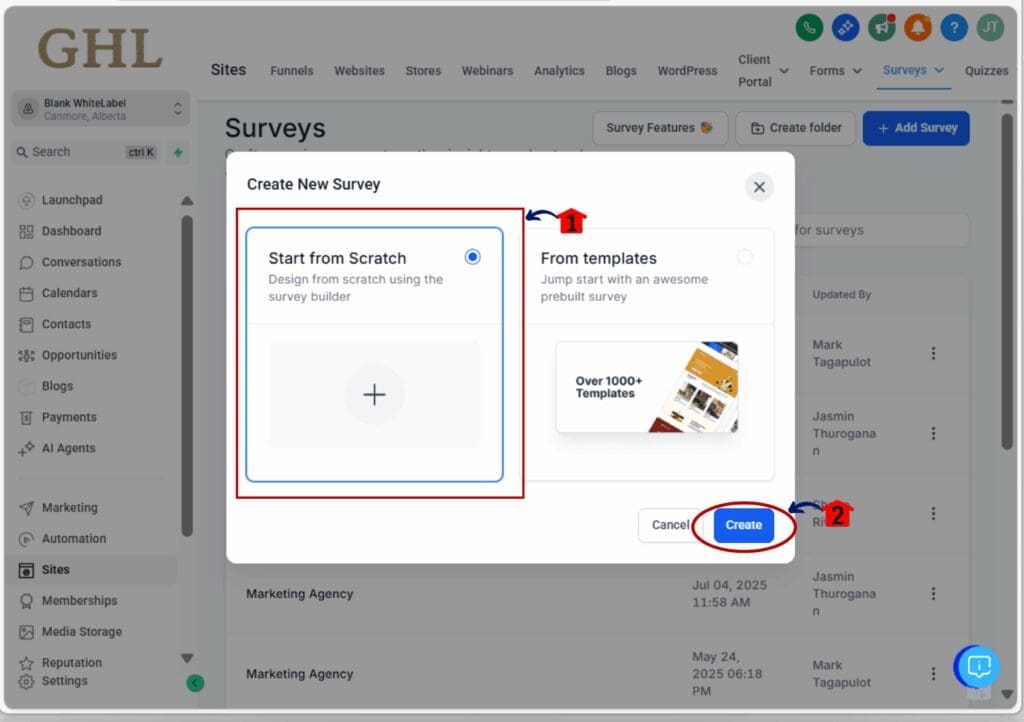
Step 02 – Start a New Survey
- Once you click + Add Survey, the Create New Survey pop-up will appear.
2.1 Select Start from scratch.
2.2 Click create button.
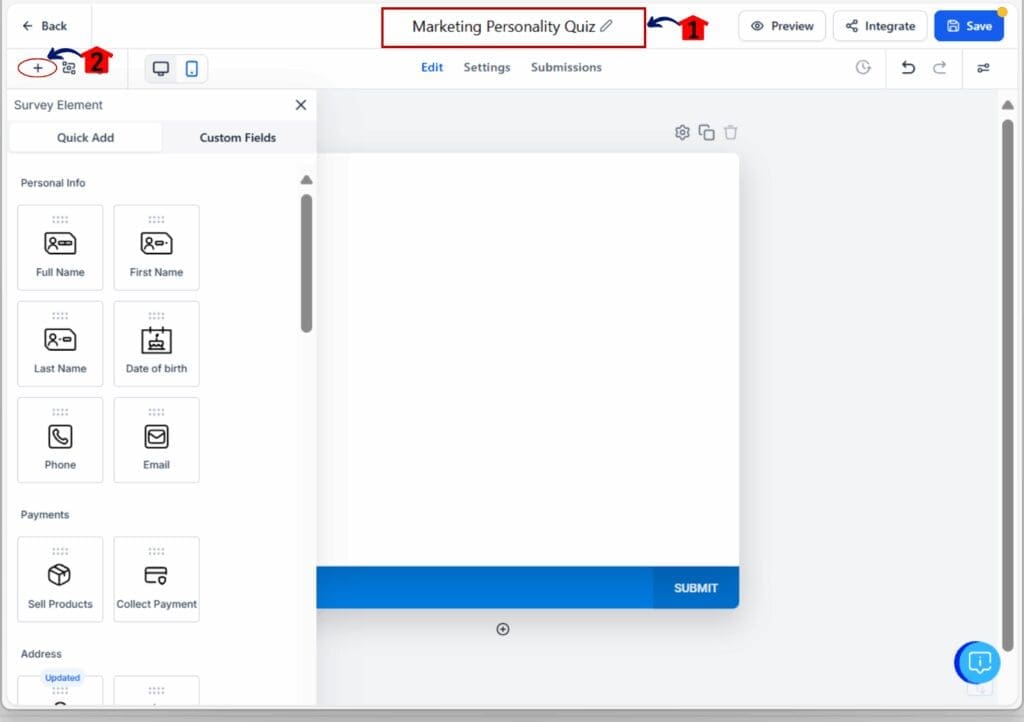
Step 03 – Open the Survey Editor
- You’ll be directed to the Survey Editor.
3.1 Rename your survey to “Marketing Personality Quiz.”
3.2 Click the + button to view form elements.
Step 04 – Add a Header (Title Text)
4.1 Drag a Text element onto the canvas (top of the first slide).
4.2 Replace the text with: “Marketing Personality Quiz”.
4.3 Center-align and style the font/color to match your brand.
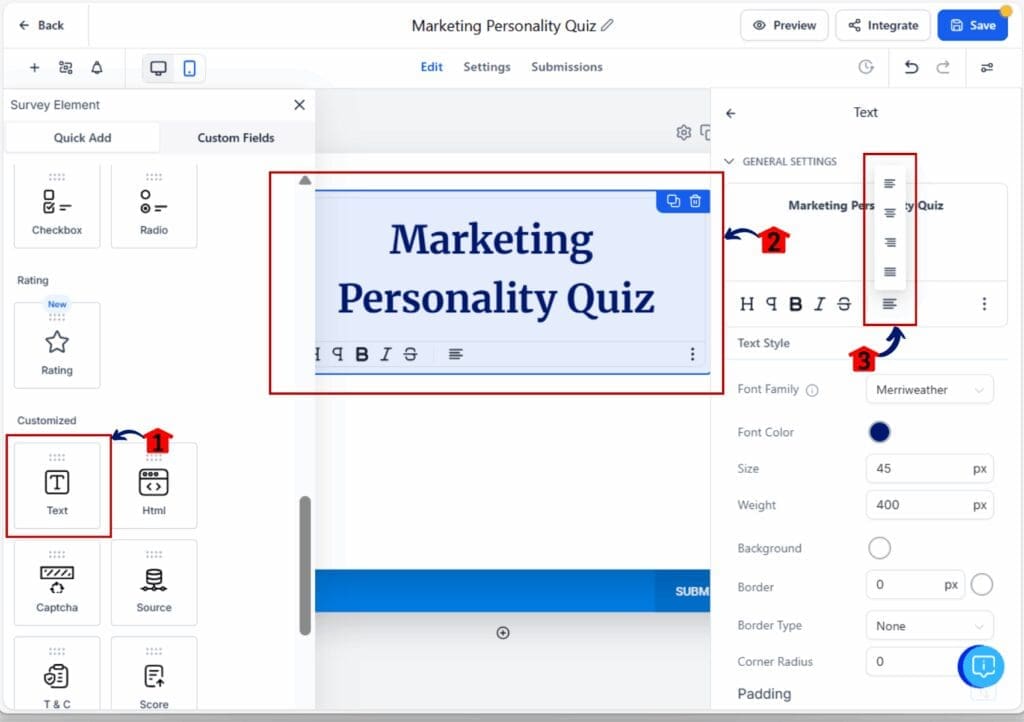
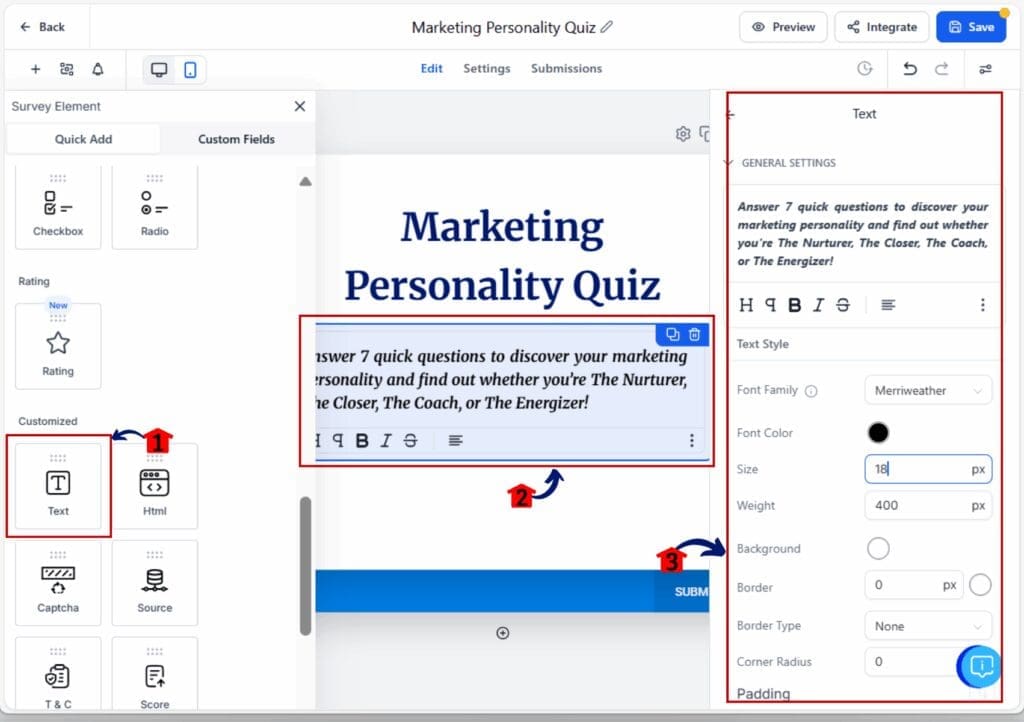
Step 05 – Add Quiz Instructions (Subhead Text)
5.1 Drag another Text element beneath the title.
5.2 Paste this exact line:
- “Answer 7 quick questions to discover your marketing personality and find out whether you’re The Nurturer, The Closer, The Coach, or The Energizer!”
5.3 Style for readability (slightly smaller than the title).
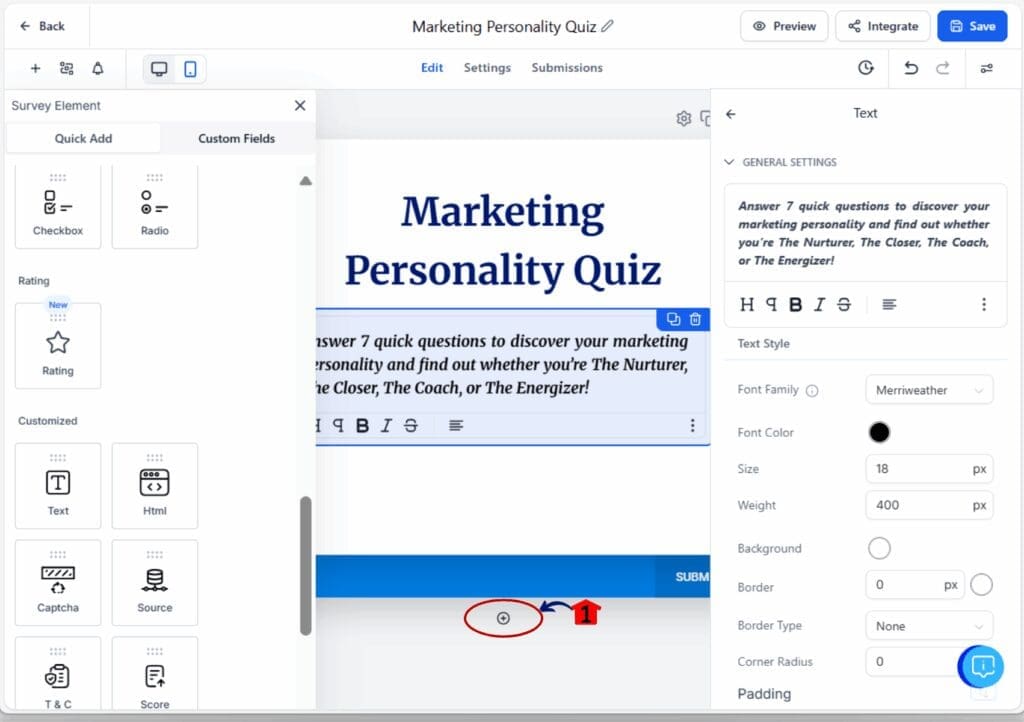
Step 06 – Create Slides (One Question per Slide)
6.1 Click the encircled + (Add Slide) to create a new slide for Question 1.
6.2 Repeat later to create slides for Questions 2–7 and a final Lead Capture slide.
Step 07 – Prepare Custom Fields (for clean data storage)
7.1 Click the Custom Fields tab → + Add.
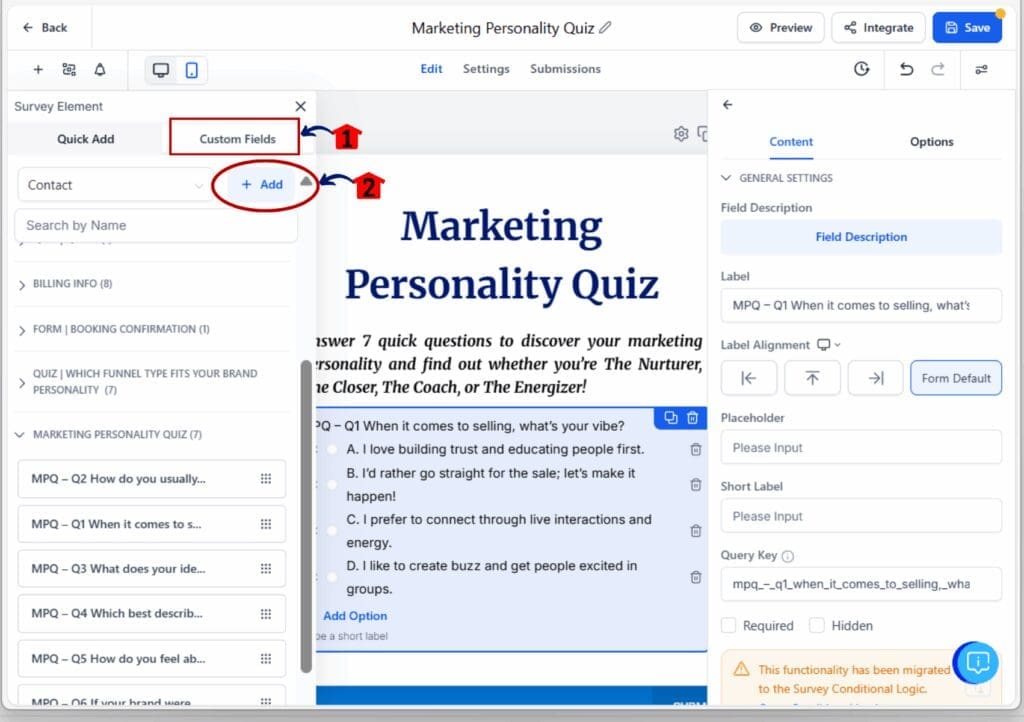
7.2 Click the radio button (for multiple-choice questions), then click next.
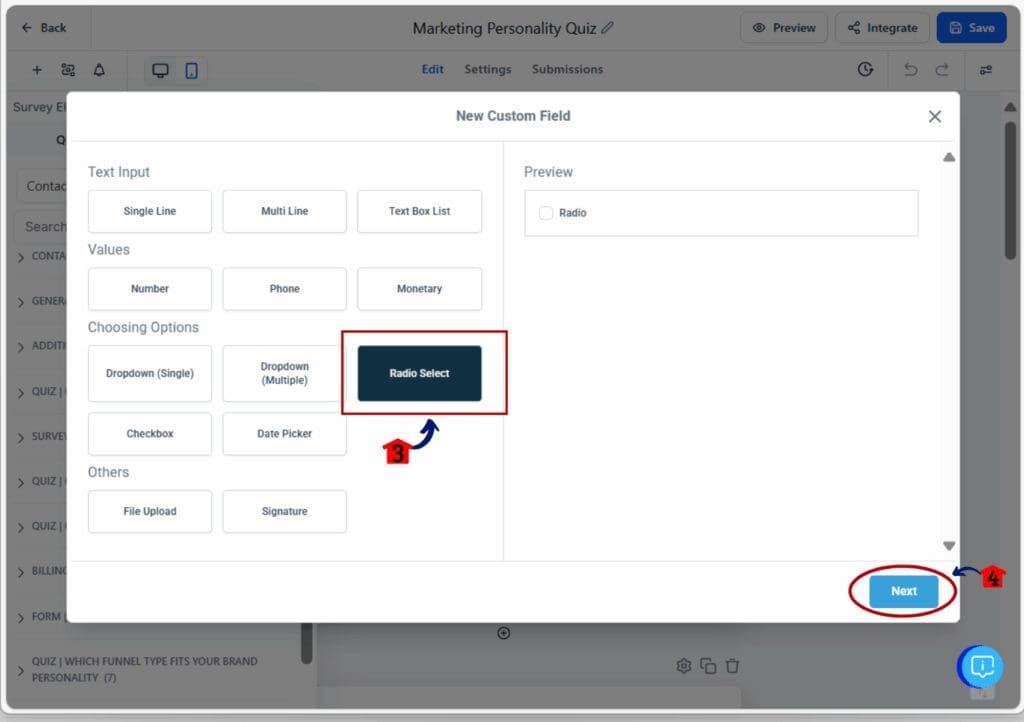
7.3 Type in “Question 1 – When it comes to selling, what’s your vibe?” in the Name box.
7.4 Select the Group in the drop-down to have clean and organize data
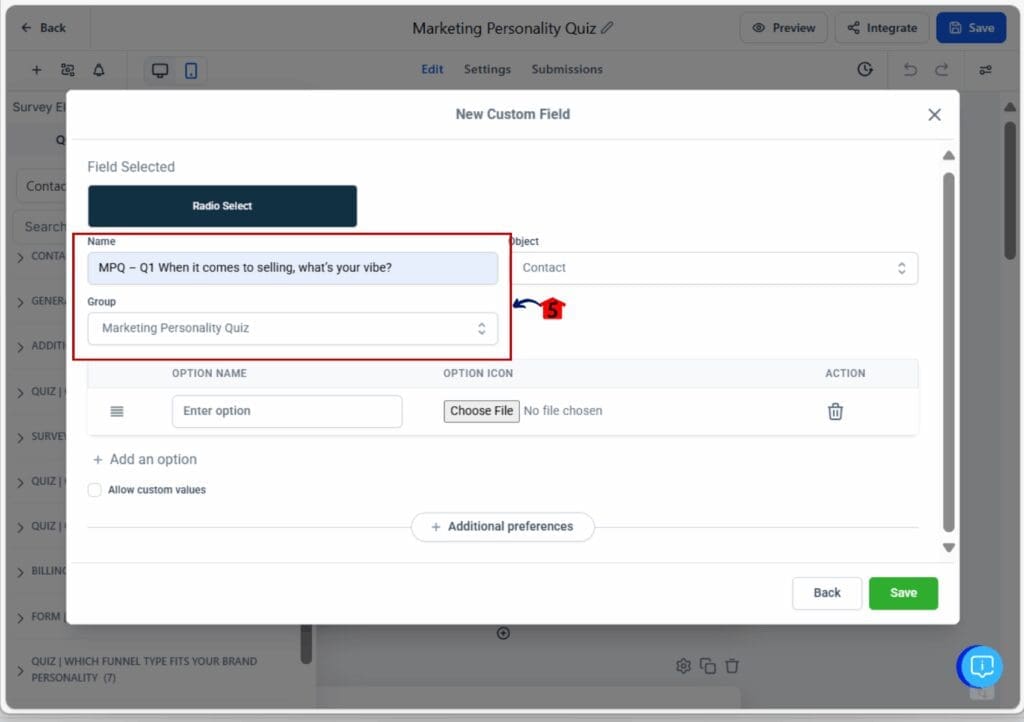
7.5 Under Options, add: your options for the question
7.6 Choose Contact as the object → General Info as the group.
7. 7 Click Save.
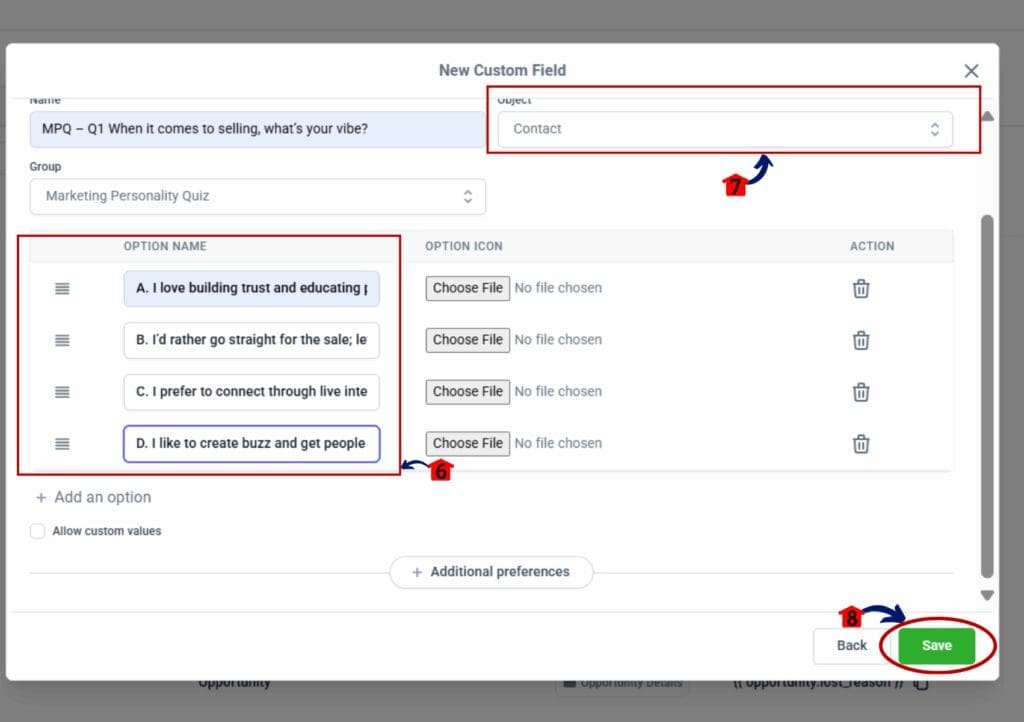
7.8 Repeat the process to add the remaining questions
Step 08 – Add Question 1 (Radio Buttons + Mapping)
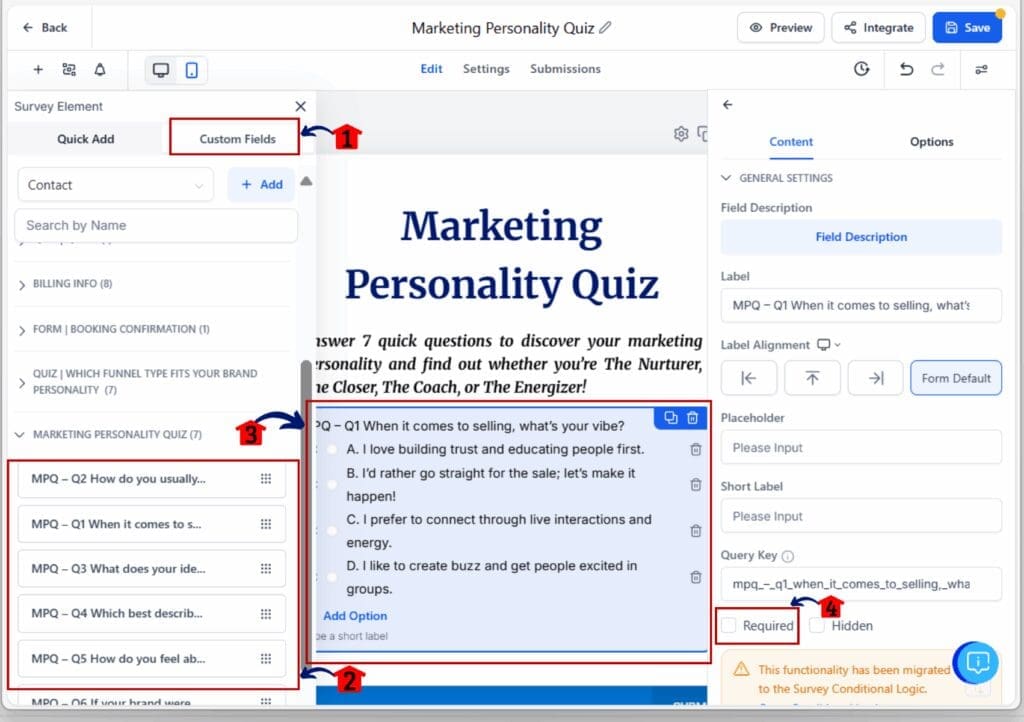
8.1 Click the Custom Fields tab.
8.2 Drag Question 1 from the Custom Fields section onto the canvas.
8.3 Check Required so users must select an answer.
8.4 Click the Question on the Canva
8.5 On the right side Toggle Required.
Step 9 – Add Remaining Questions
- Go to the custom field in the element library.
9.1 Add the remaining questions for the Marketing Personality Quiz-Survey to the canvas.
9.2 Click the Encircled + to add a slide.
- A new slide will appear at the bottom once clicked.
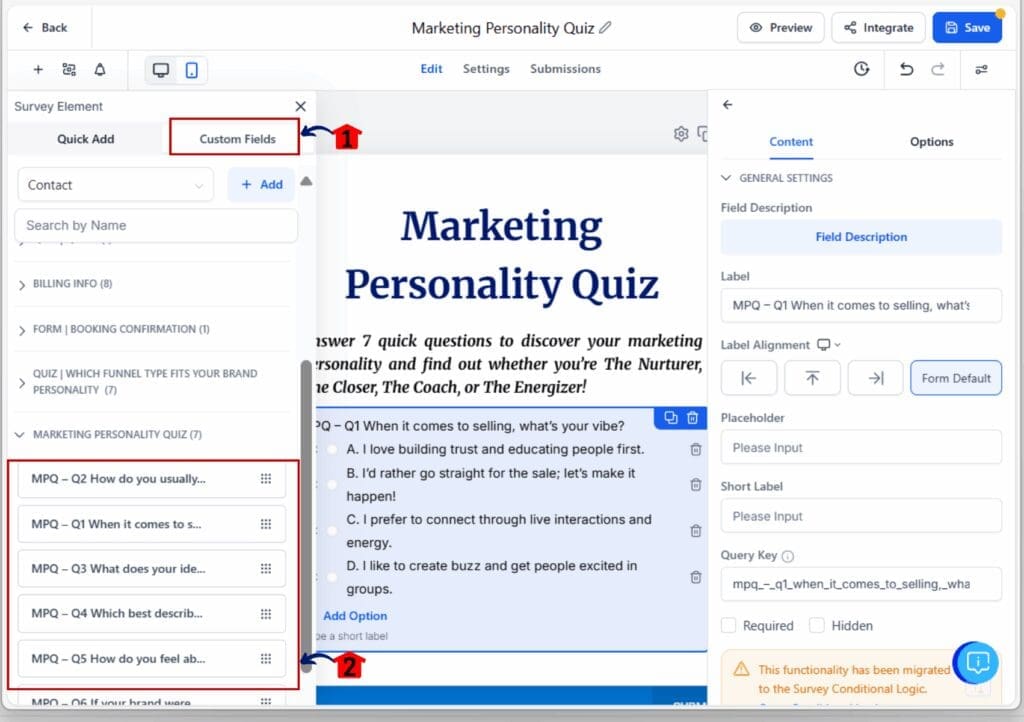
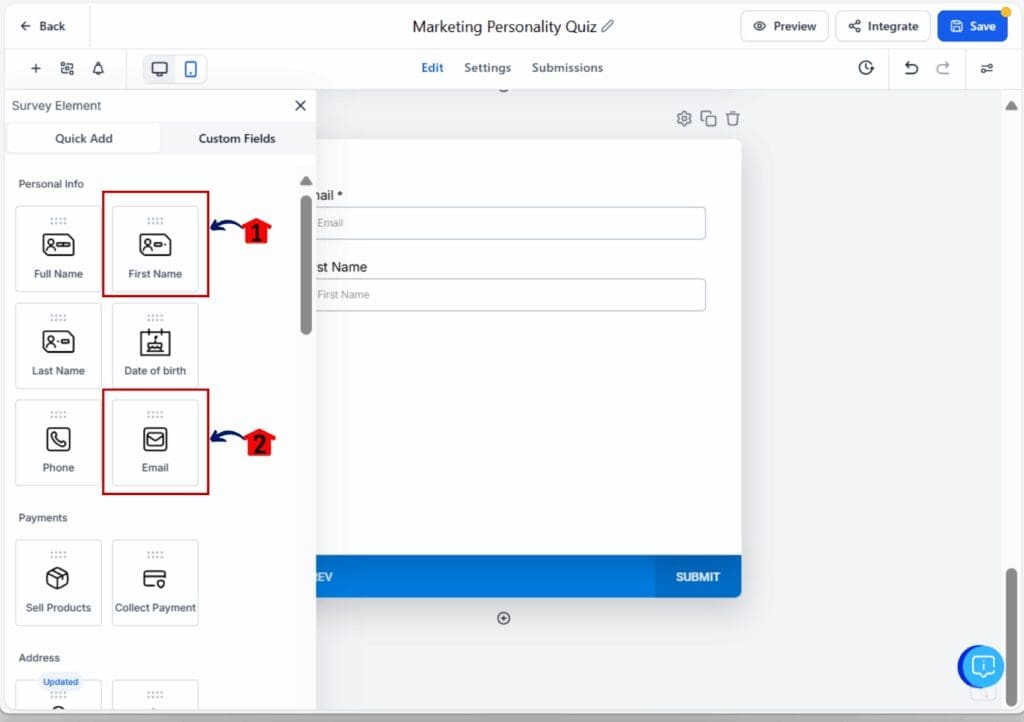
Step 10 – Add Lead Capture (Final Slide)
10.1 Create a final slide named Contact Details.
10.2 Drag First Name and Email (set Email to Required).
10.3 (Optional) Add Phone and a short text note:
- “We’ll send your personalized result to your inbox.”
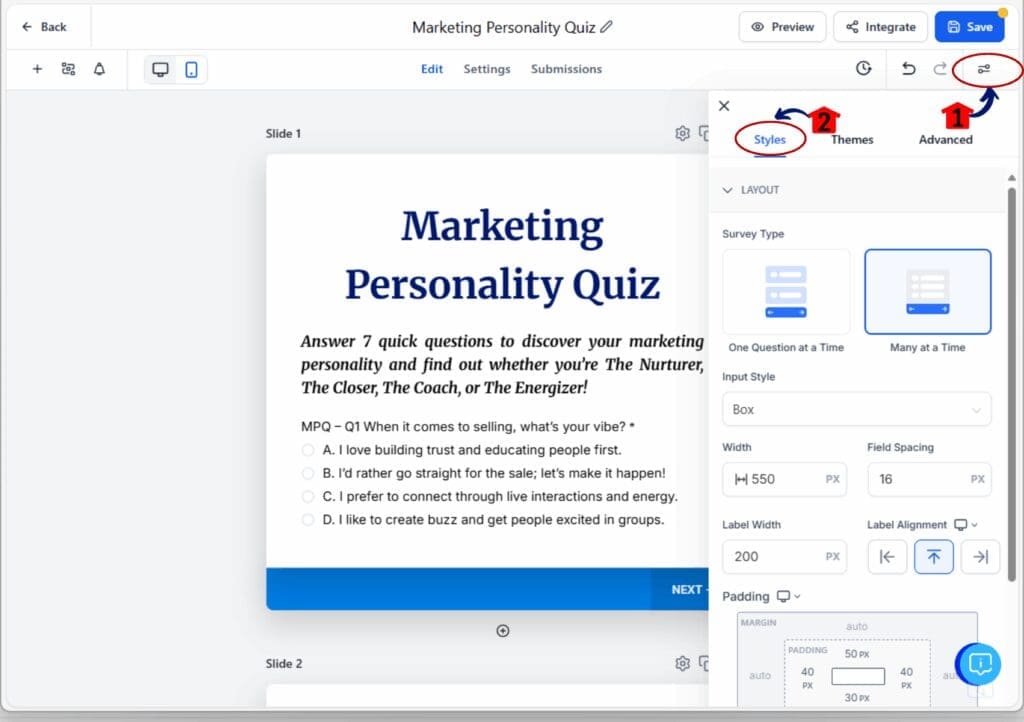
Step 11 – Open Style Settings
11.1 Click the form Styles & Options in the top-right of the editor.
11.2 Select the Styles tab.
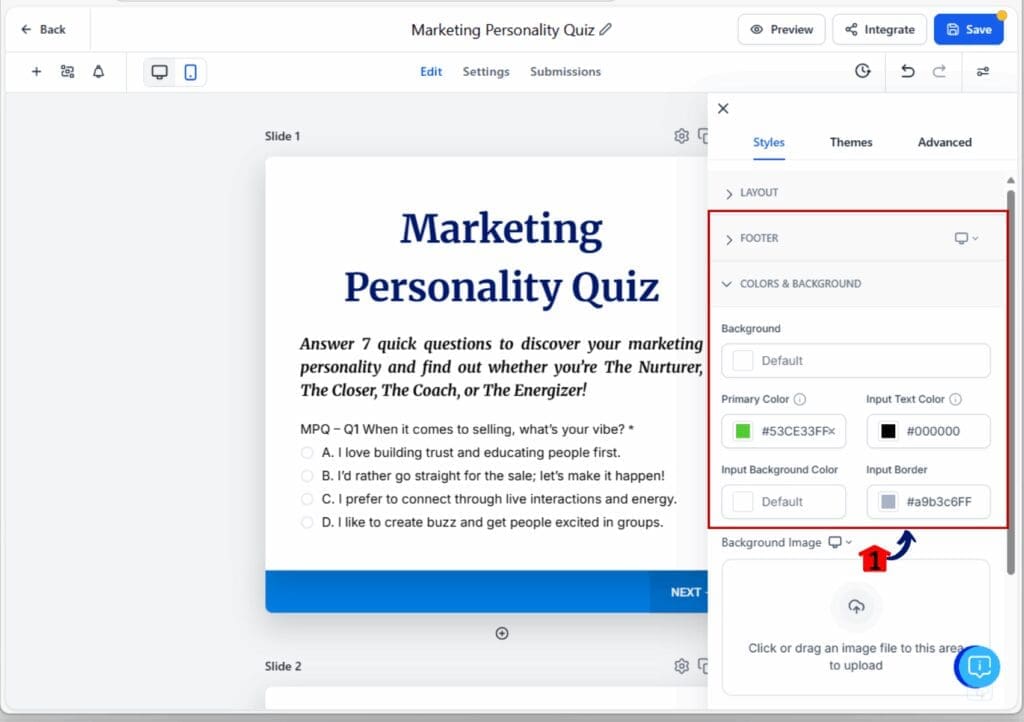
Step 12 – Apply Brand Styles
12.1 Set your brand fonts and sizes.
12.2 Update primary/secondary colors (buttons, highlights).
12.3 Add a subtle background (image or gradient).
12.4 Maintain ample white space for mobile readability.
Step 13 – Choose a Theme (Optional)
13.1 Open the Themes tab.
13.2 Pick a clean, minimal theme.
13.3 Adjust button and accent colors for contrast/accessibility.
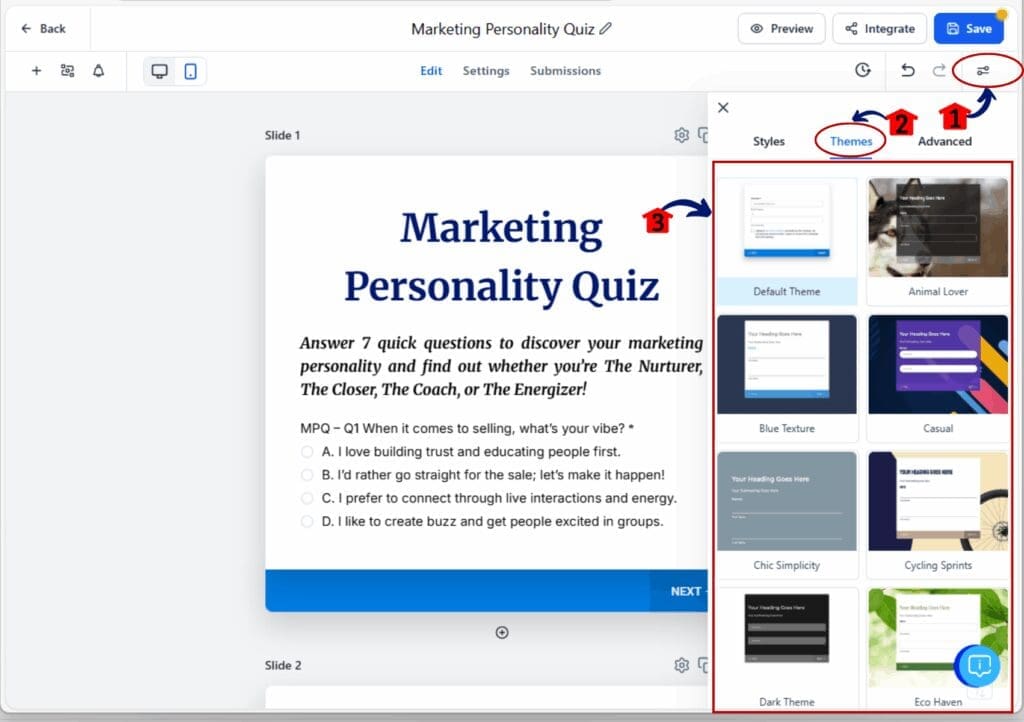
Step 14 – Advanced Design (Optional)
14.1 Go to the Advanced tab.
14.2 Tweak padding, corner radius, and shadow for a polished look.
14.3 Enable smooth transitions between slides (if available).
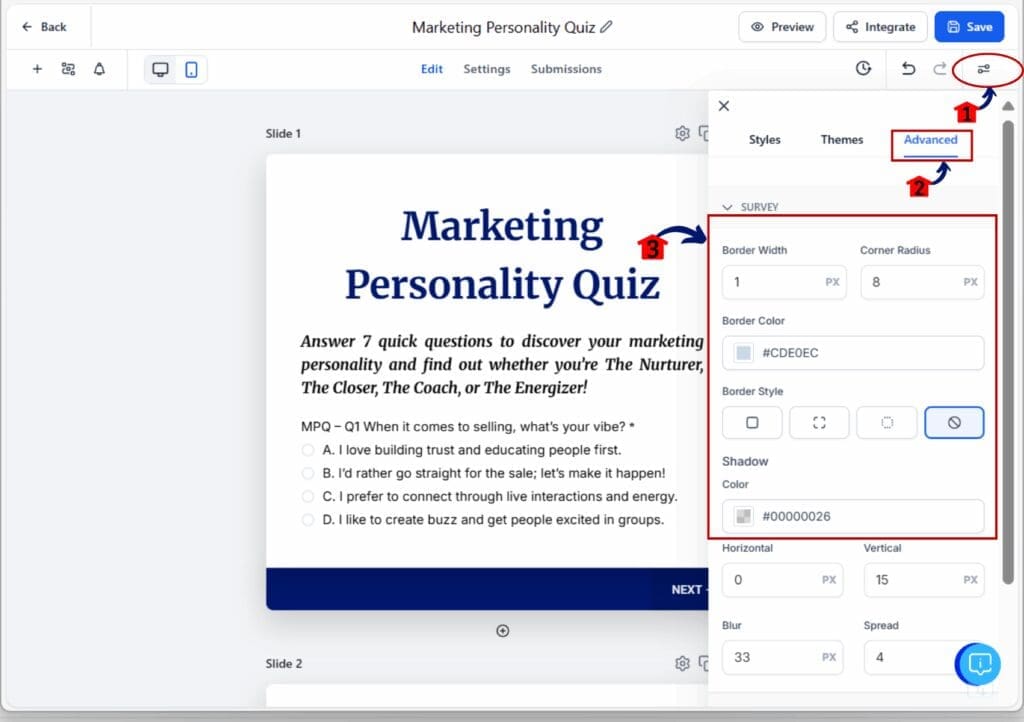
Step 15 – Submission Settings
15.1 Click the top Settings tab (between Edit and Submissions).
15.2 In On Submit, choose Message (you can switch to Redirect later for dynamic results).
15.3 Write the thank-you message (you can update later once automations are set):
- “Thanks for taking the Marketing Personality Quiz! Check your inbox for your personalized outcome.”
15.4 Toggle Message Styling and match your fonts/colors.
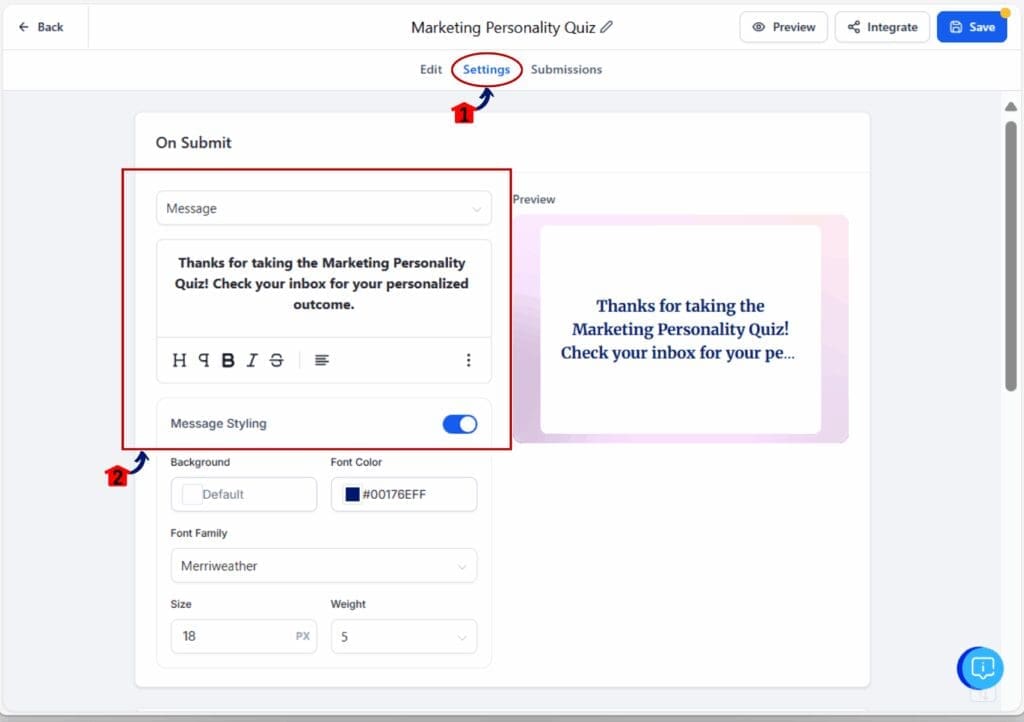
Step 16 – Save the Survey
16.1 Click Save.
16.2 Confirm the survey name is “Marketing Personality Quiz.”
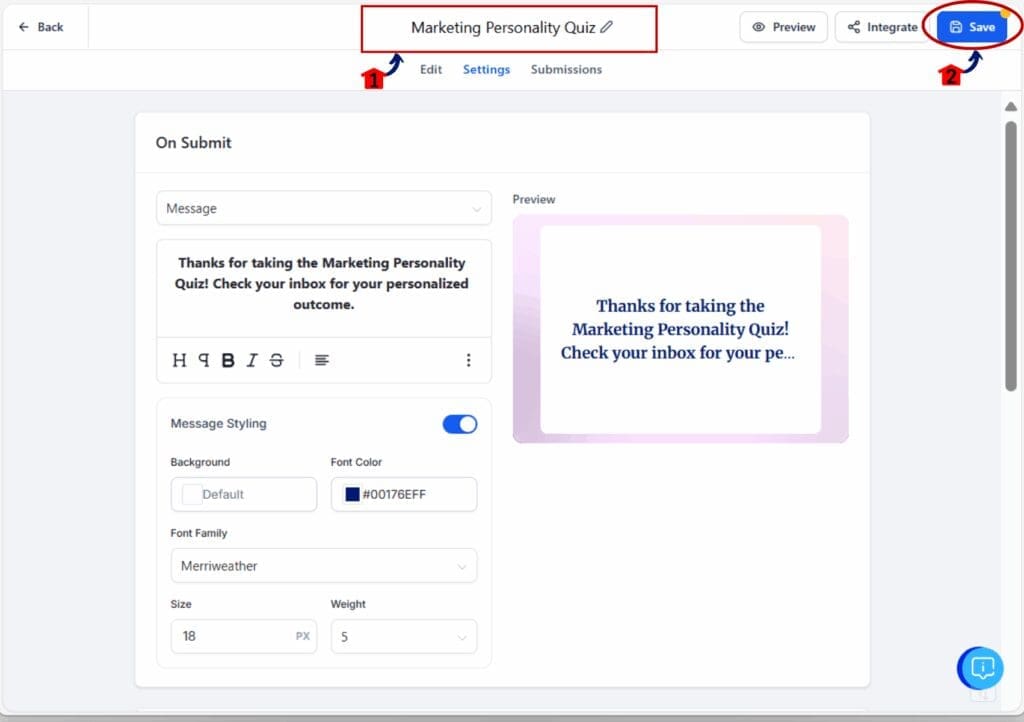
Step 17 – Preview & Test
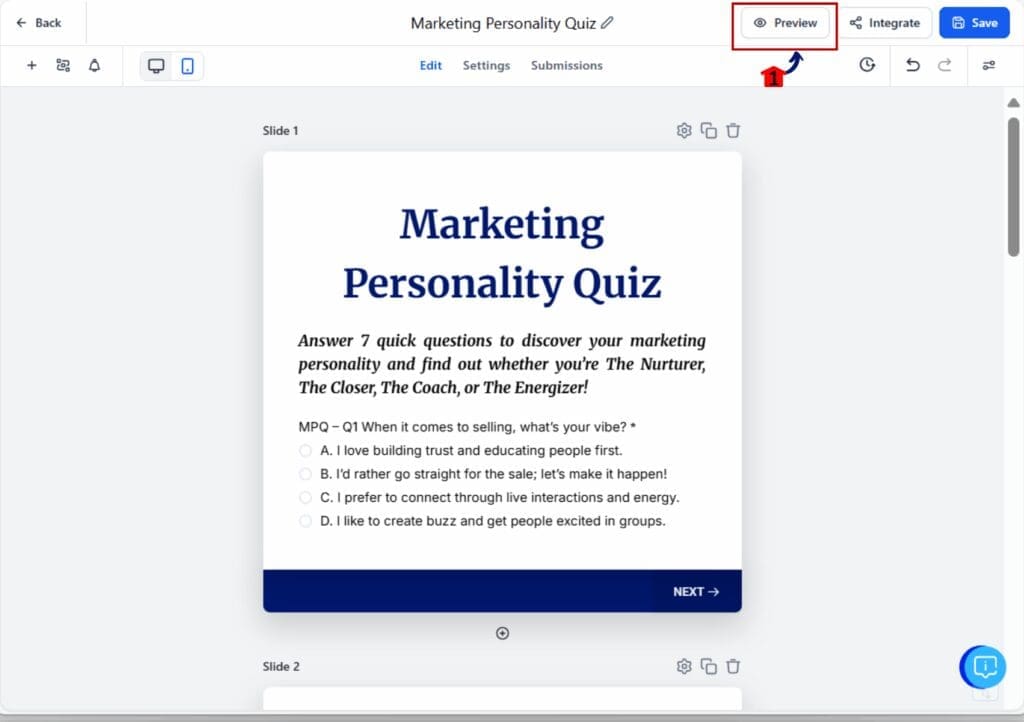
17.1 Click Preview.
17.2 Run through Q1–Q7 and the final form to ensure:
- Options display correctly
- Required validation works
- Progress bar updates
- Submit button shows the thank-you message
How to Create the Quiz Funnel in GoHighLevel
Step 01 – Access the Funnel Builder
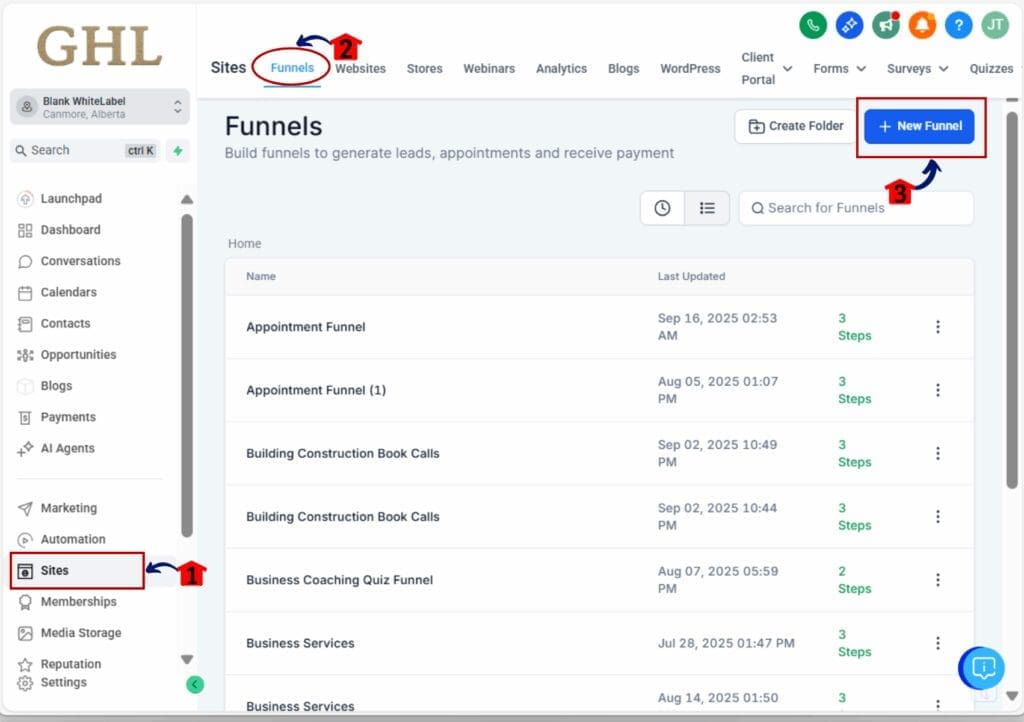
1.1 From the left-side menu in GoHighLevel, click Sites.
1.2 Select the Funnels tab from the top navigation bar.
1.3 Click the + New Funnel button in the upper-right corner.
Step 02 – Create a New Funnel
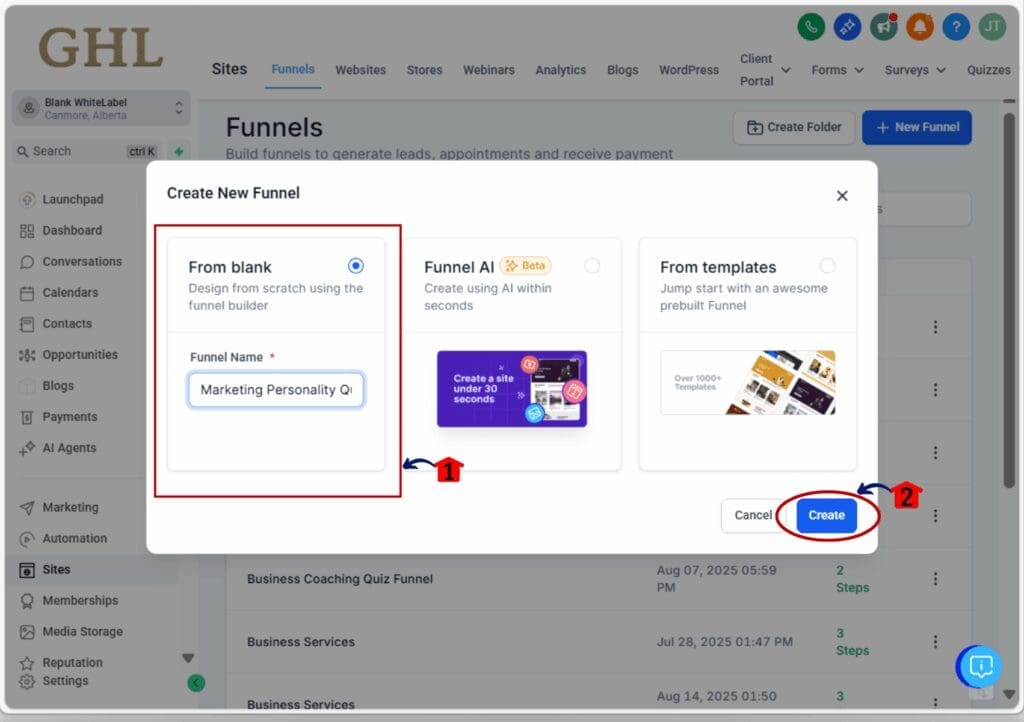
2.1 A pop-up window titled Create New Funnel will appear.
2.2 Type your funnel name:
- “Marketing Personality Quiz Funnel”
2.3 Under the Choose Starting Point section, click Start from Scratch.
2.4 Click the Create button.
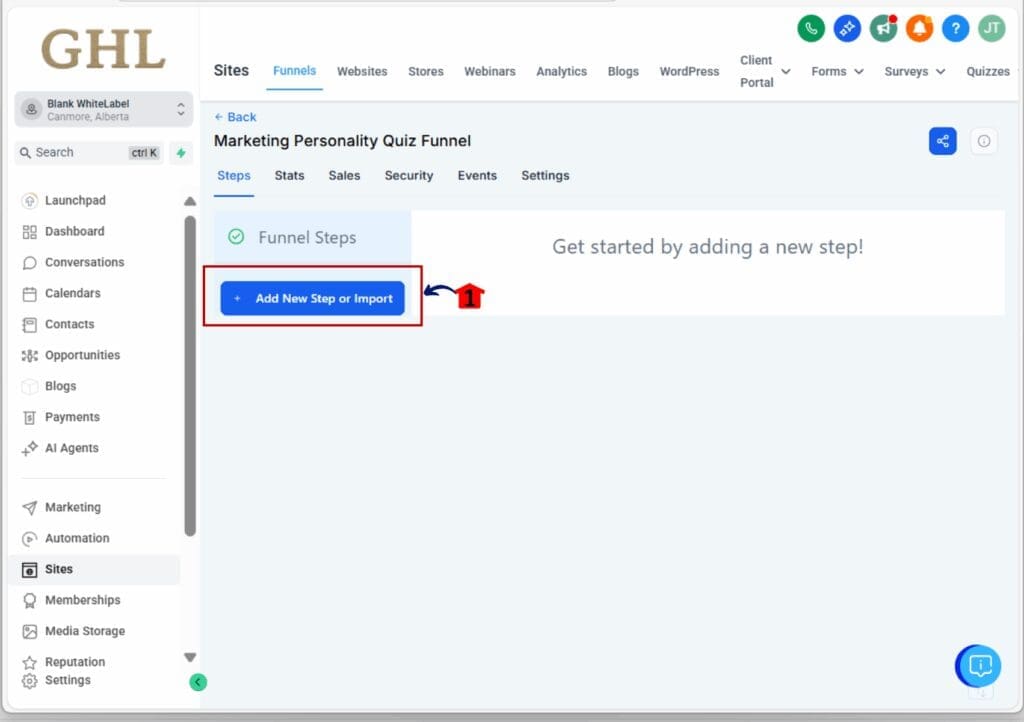
- You’ll now see your new, empty funnel in the workspace.
Step 03 – Add Funnel Steps
3.1 Click + Add New Step or Import on the left sidebar.
- A pop-up will appear type Landing Page (Quiz Page) as the step name.
3.2 Click the Create Funnel Step.
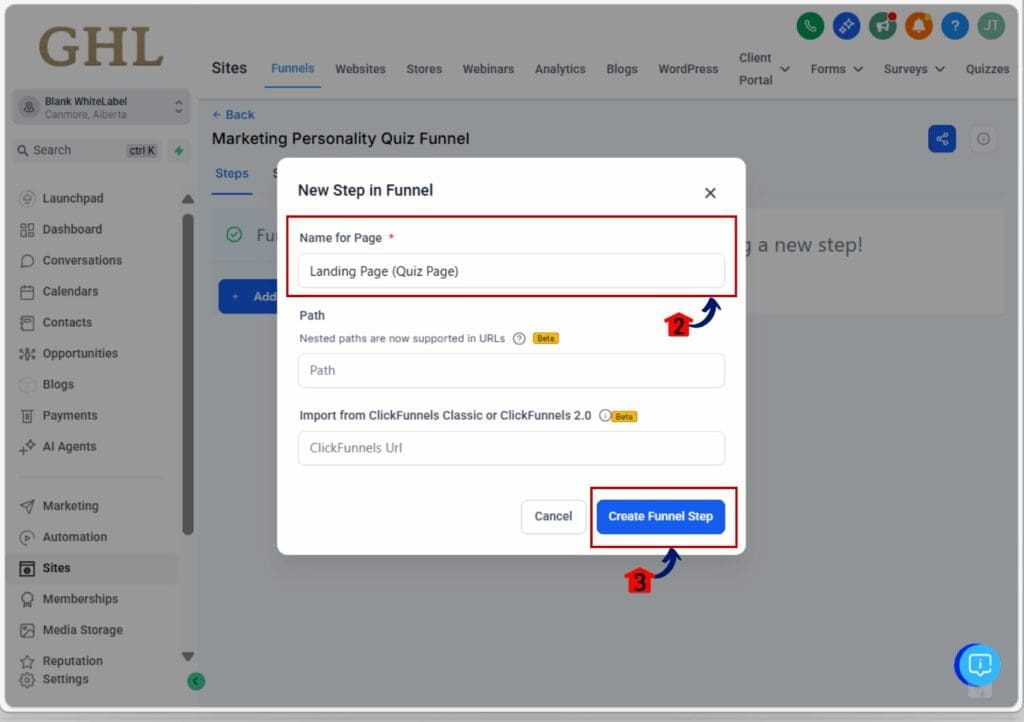
3.3 Repeat the process to add your second step named Thank You / Results Page.
3.3 You’ll now see both steps listed under your funnel name.
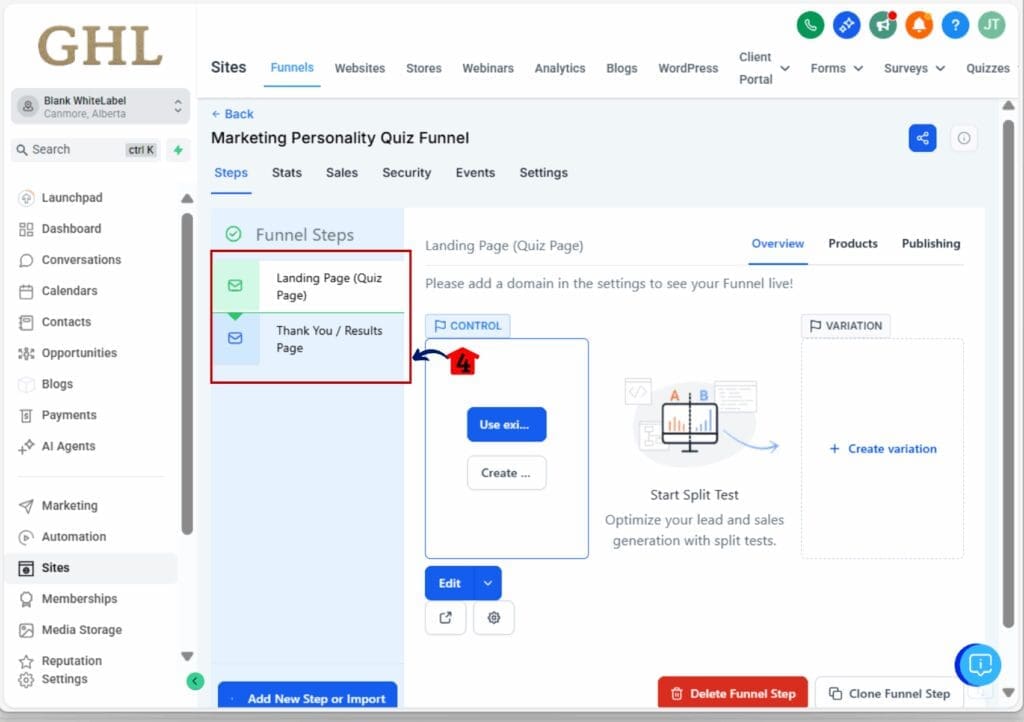
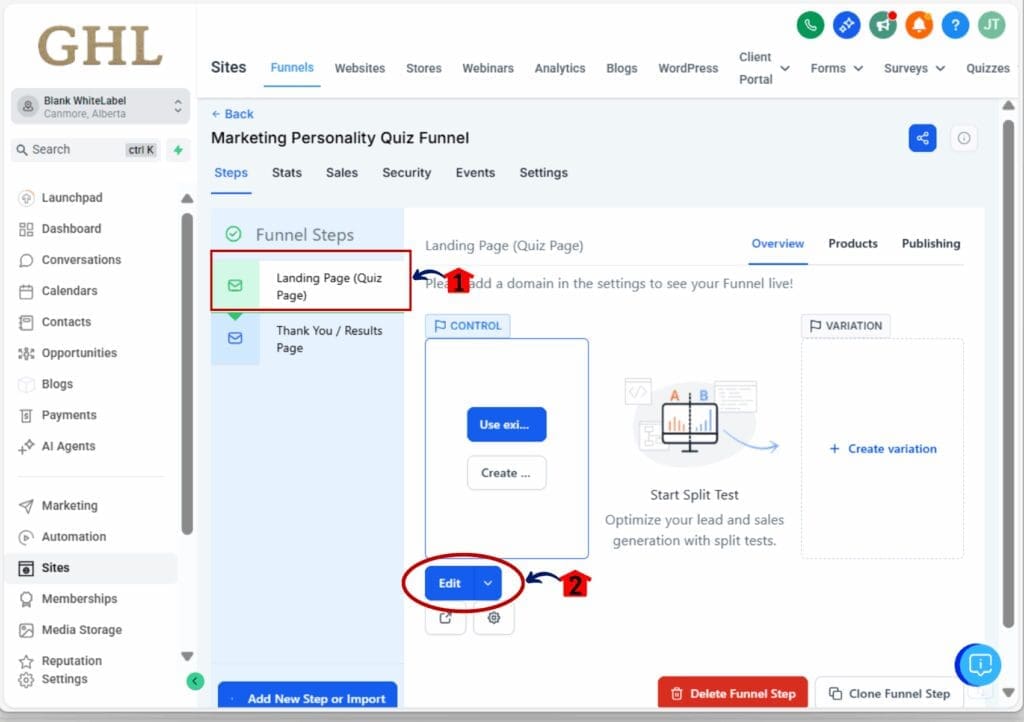
Step 04 – Edit the Landing Page
4.1 Hover over Landing Page (Quiz Page) and click Edit Page.
4.2 You’ll see a button asking to Choose Use existing or Create from Blank.
4.3 Click Blank Template or Edit for a clean start.
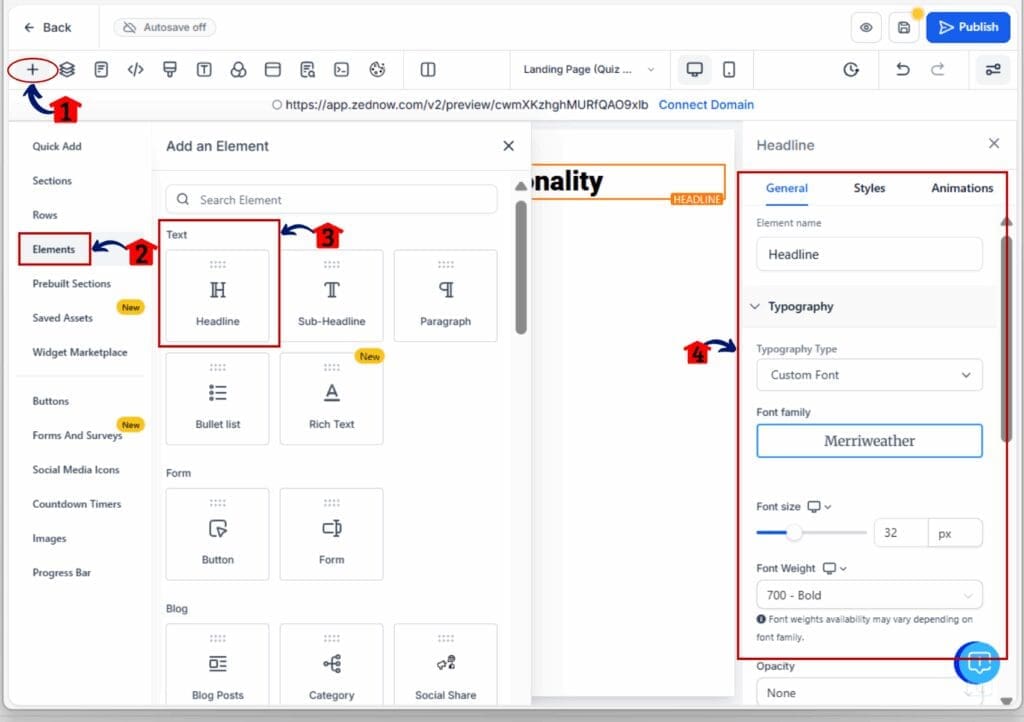
Step 05 – Add a Headline
5.1 Inside the funnel editor, click + Add Element.
5.2 Drag and drop a Headline element onto the canvas.
5.3 Type:
- “Discover Your Marketing Personality!”
5.4 Center the text.
5.5 Use the top toolbar to change the font family, size, and color to match your brand.
Step 06 – Add a Subheadline or Description
6.1 Click + Add Element → Text.
6.2 Type:
- “Answer 7 quick questions to unlock your unique marketing style.”
6.3 Align center and increase the line spacing slightly for readability.
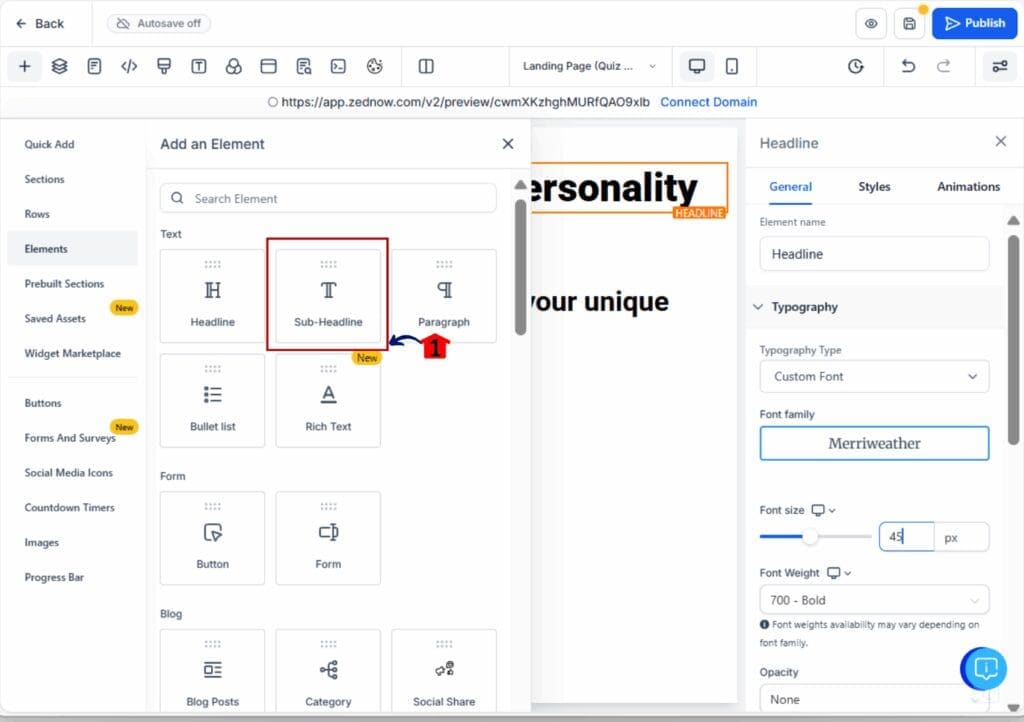
Step 07 – Embed the Quiz Form
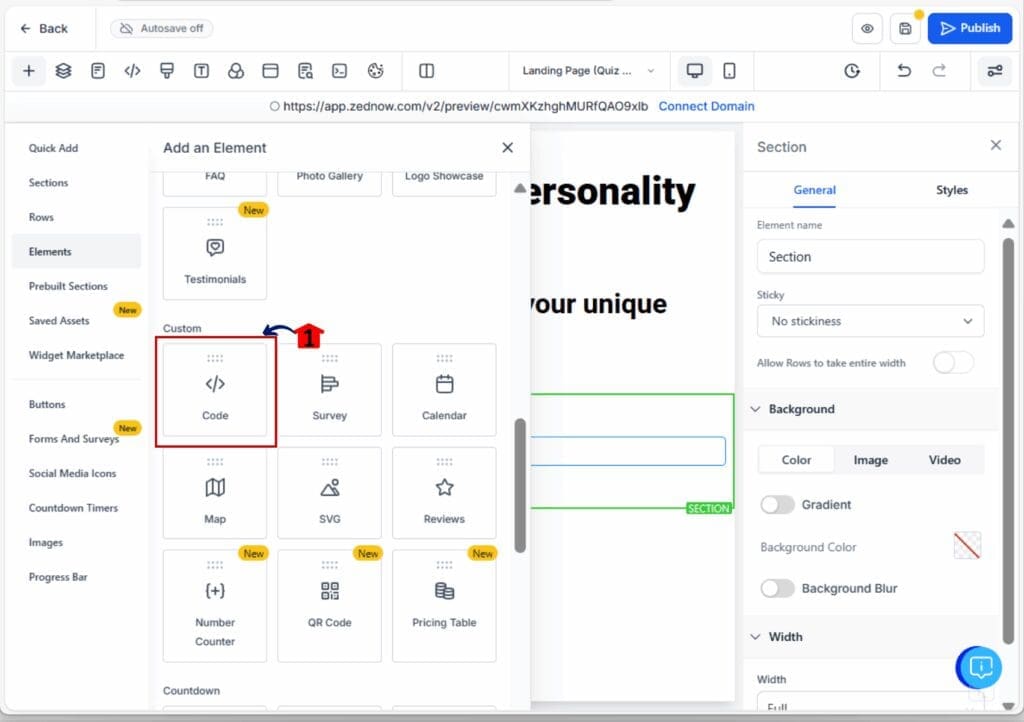
7.1 Click + Add Element → Code.
7.2 Drag the code element on the builder
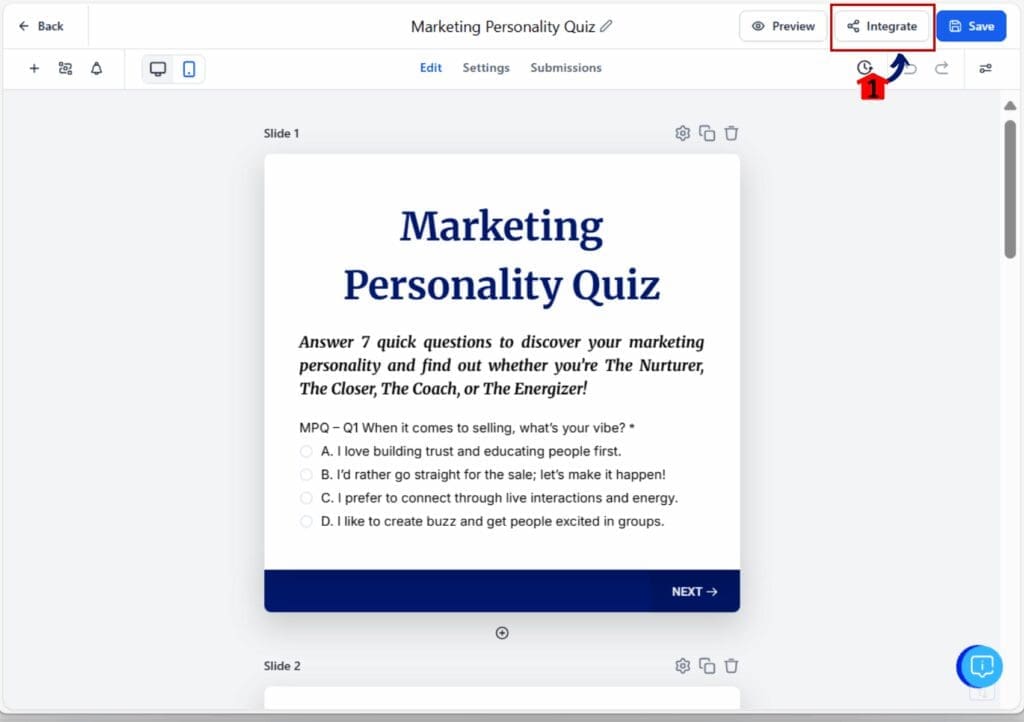
7.3 Go back to you Quizzes builder
7.4 Click the Integrate button.
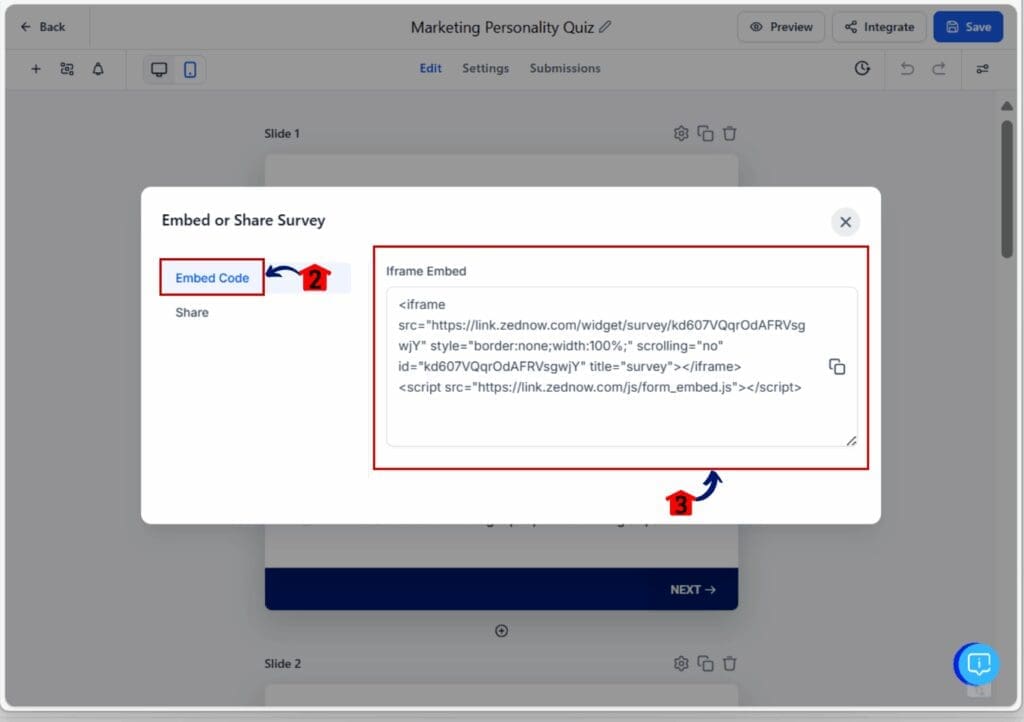
- The Embed or Share pop-up will appear.
7.5 Click and copy the embed code of the quiz
7.6 Go back to your funnel again
7.7 Click on the code element on the builder a general setting on the right side will open
7.8 Click Open Code Editor
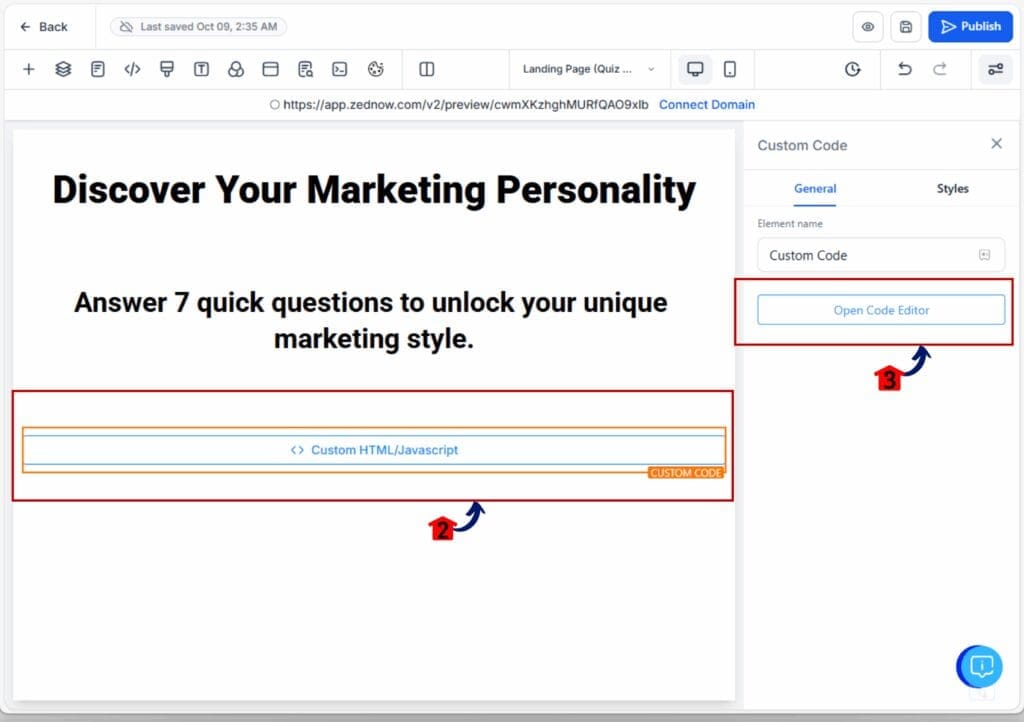
- A pop-up window will appear
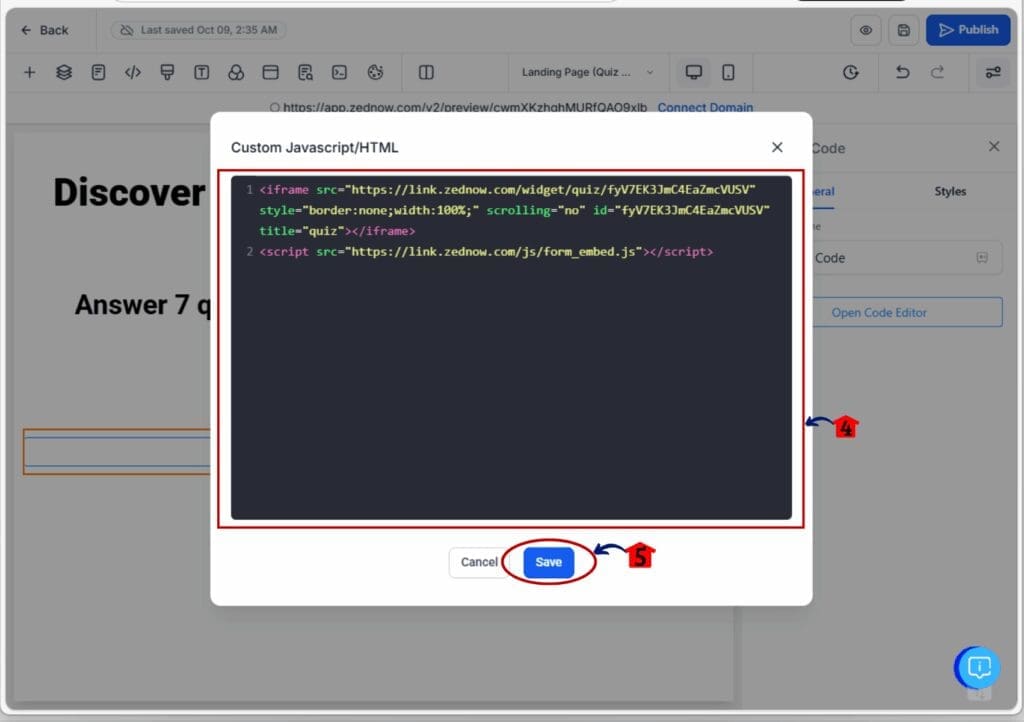
7.7 Paste on it the embed code from the Quiz
7.8 Click save button
- The quiz will appear embedded on your page.
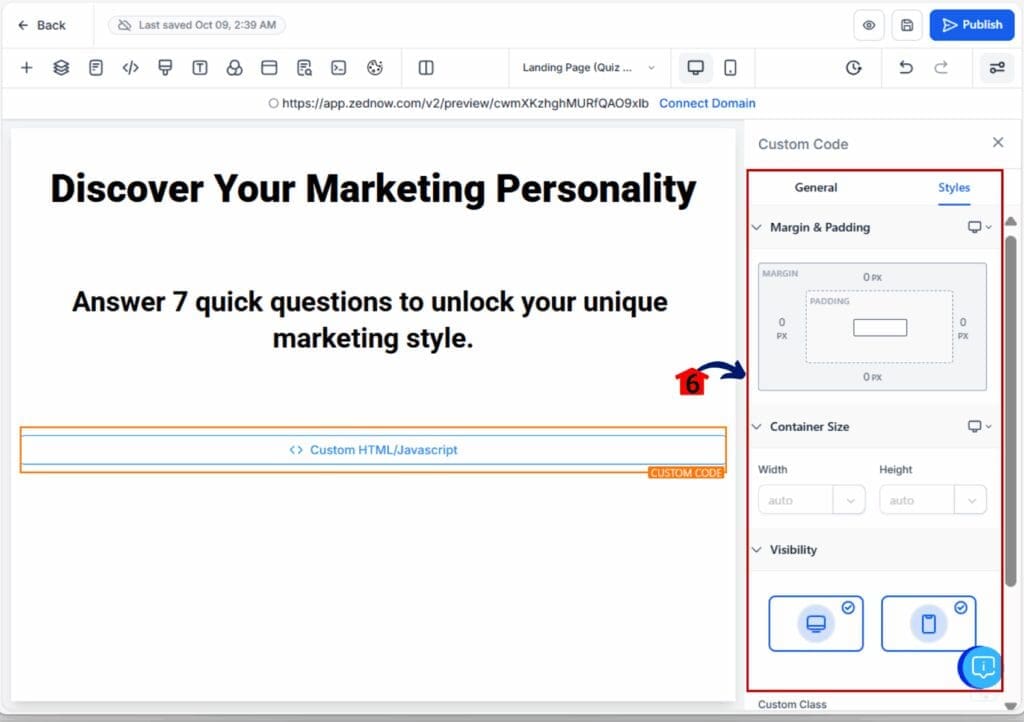
7.9 Click the Style Settings on the right side, then you can adjust your Quiz Format.
7.10 Center the quiz element on the page.
7.11 Add Padding: if you want
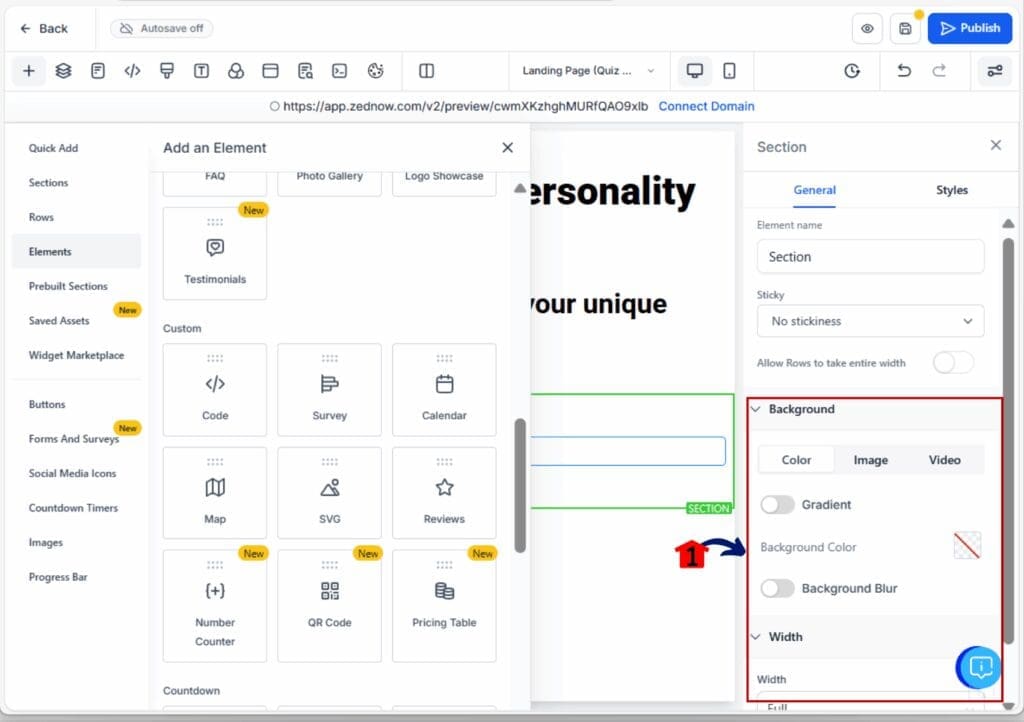
Step 08 – Add a Visual or Background
8.1 Click Background Settings (⚙️ icon) in the left panel.
8.2 Upload a branded image or choose a gradient background.
8.3 Optional: Add a hero image by clicking + Add Element → Image, then upload your visual.
8.4 Position it above or beside your quiz for visual interest.
Step 09 – Add a Call-to-Action Note
9.1 Click + Add Element → Text.
9.2 Type:
- “Take the quiz now and get your personalized result instantly!”
9.3 Use bold or highlight text for emphasis.
9.4 Adjust color to match your CTA button color (e.g., your brand’s accent tone).
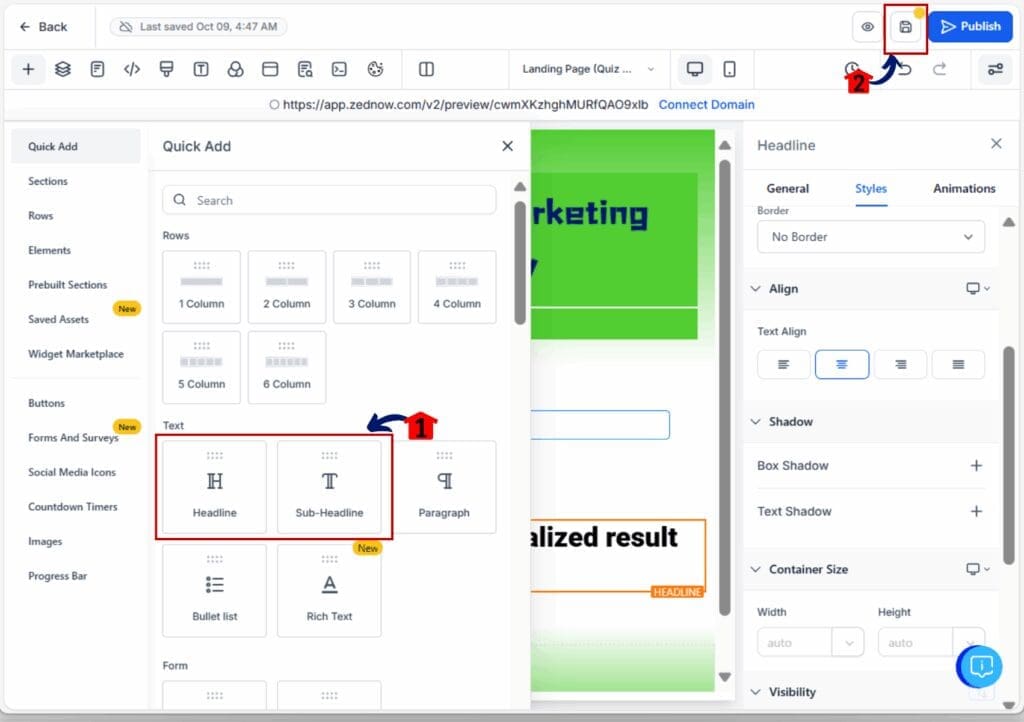
9.5 Click “Save” Button on the top right corner to save the changes on landing Page
Step 10 – Build the Static Results Page
10.1 Return to your funnel dashboard by clicking the Back to Funnels arrow.
10.2 Hover over Thank You / Results Page → click Edit Page.
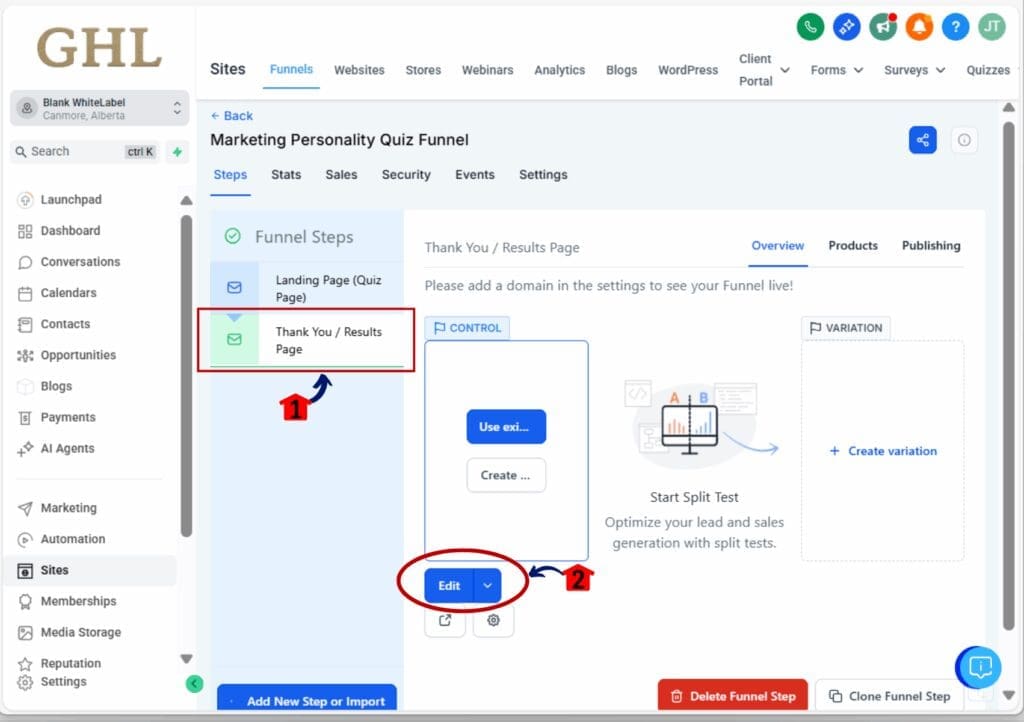
- This will open the Builder
10.3 Add a Headline element and type:
- “Thanks for taking the quiz!”
10.4 Add a Text element below:
- “We’re analyzing your answers. Check your inbox for your personalized marketing personality result.”
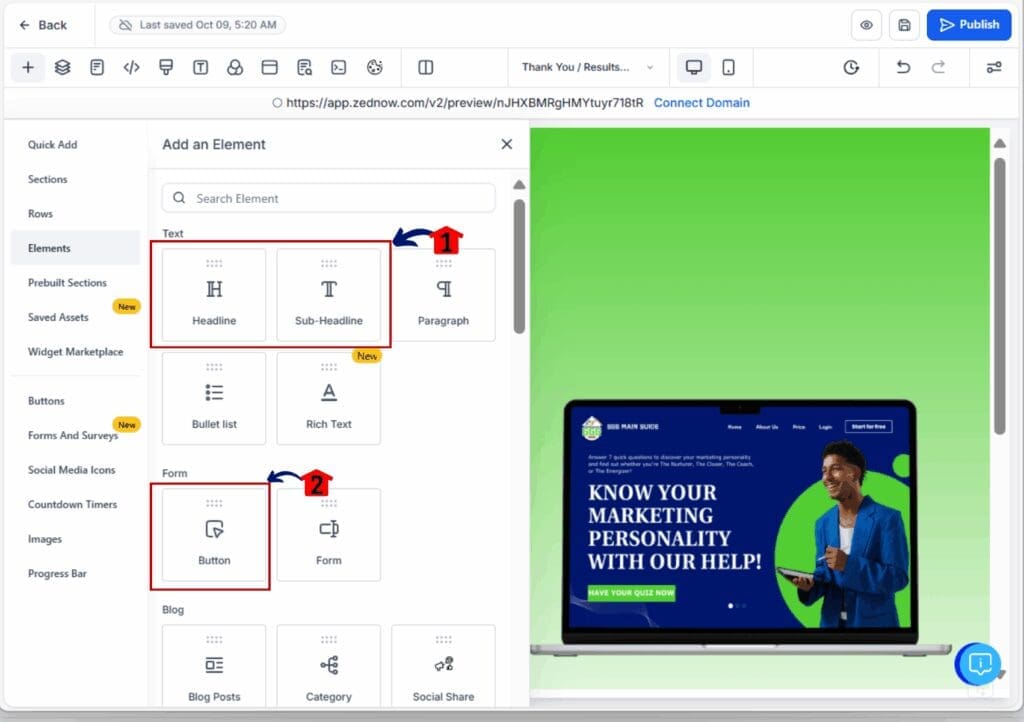
10.5 (Optional) Add a Button element labeled:
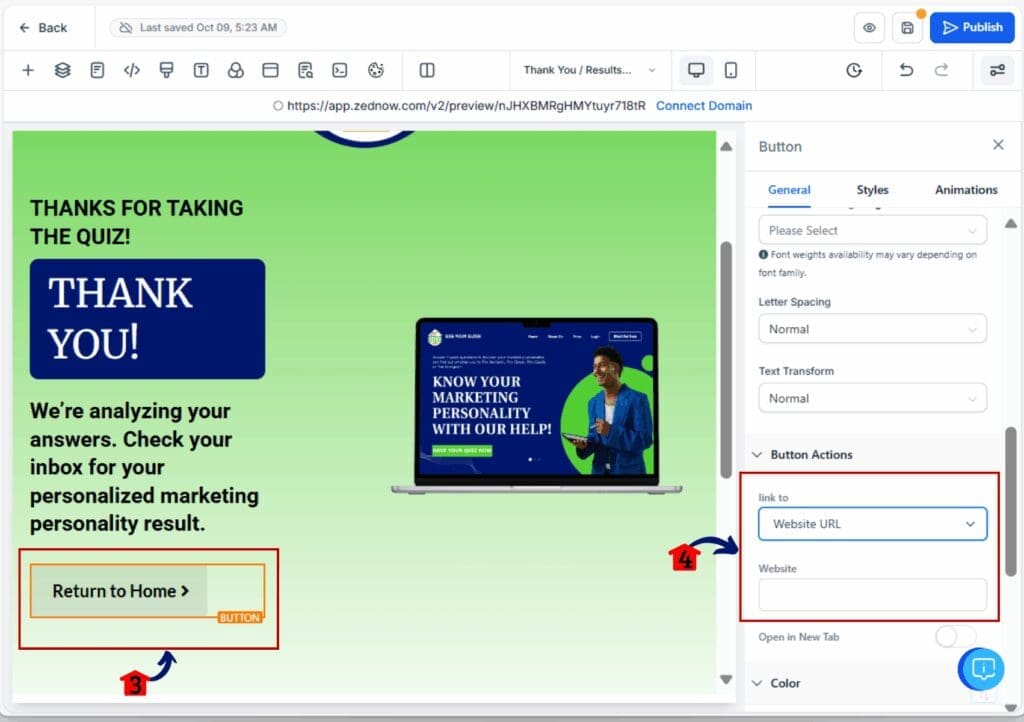
- “Return to Home” or “Explore More Resources.”
10.8 Under Button Settings → Action, set it to Open URL and link it to your website or offer page.
Step 11 – Style and Format
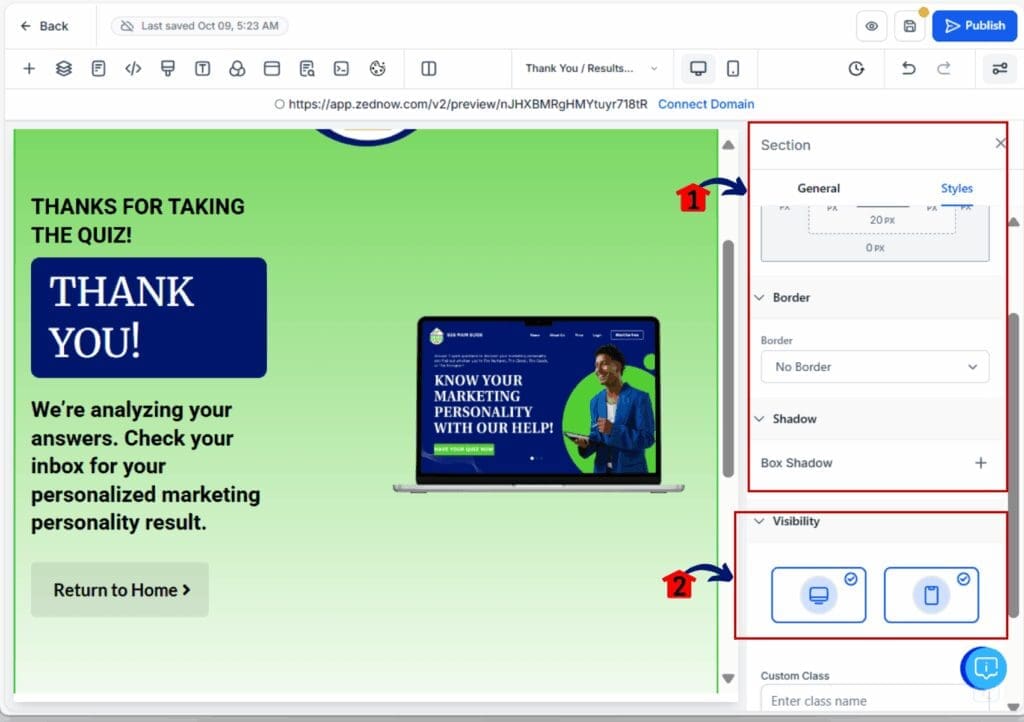
11.1 Click the Settings (⚙️) icon on the right panel → select the style.
11.2 Choose your brand colors, fonts, and button styles.
11.3 Keep plenty of white space for mobile-friendliness.
11.4 Click Mobile Preview (phone icon) to ensure text and quiz are centered and readable.
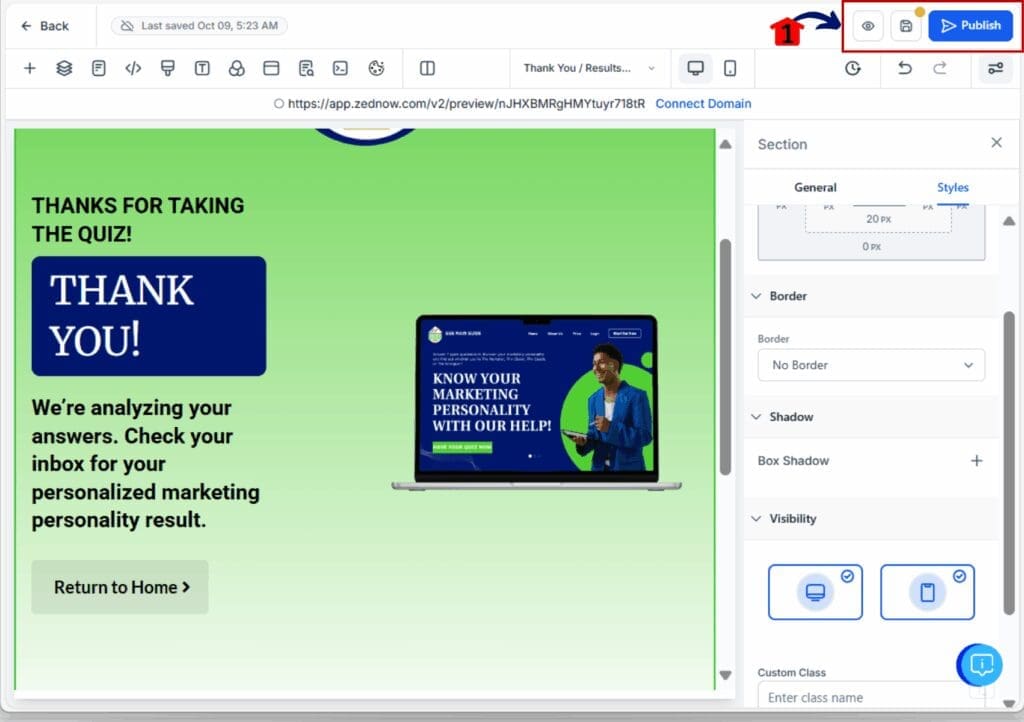
Step 12 – Preview, Test, and Save
12.1 Click Preview Funnel in the top-right corner.
12.2 Take the quiz yourself to confirm:
- The quiz loads and works properly.
- The form submission redirects to the Thank You page.
- The thank-you message displays correctly.
12.3 Click Save
12.4 Click Publish Funnel to make it live.
12.5 Confirm that the Landing Page (Quiz Page) is set as the funnel’s default first step.
HOW TO SET UP THE QUIZ AUTOMATION IN GHL
Workflow Name: Marketing Personality Quiz
Pre-work (quick and important)
Create Tags (4):
- marketing personality: nurturer
- marketing personality: closer
- marketing personality: coach
- marketing personality: energizer
Pre Step 01 – Access Tags
1.1 From the main menu, click Settings
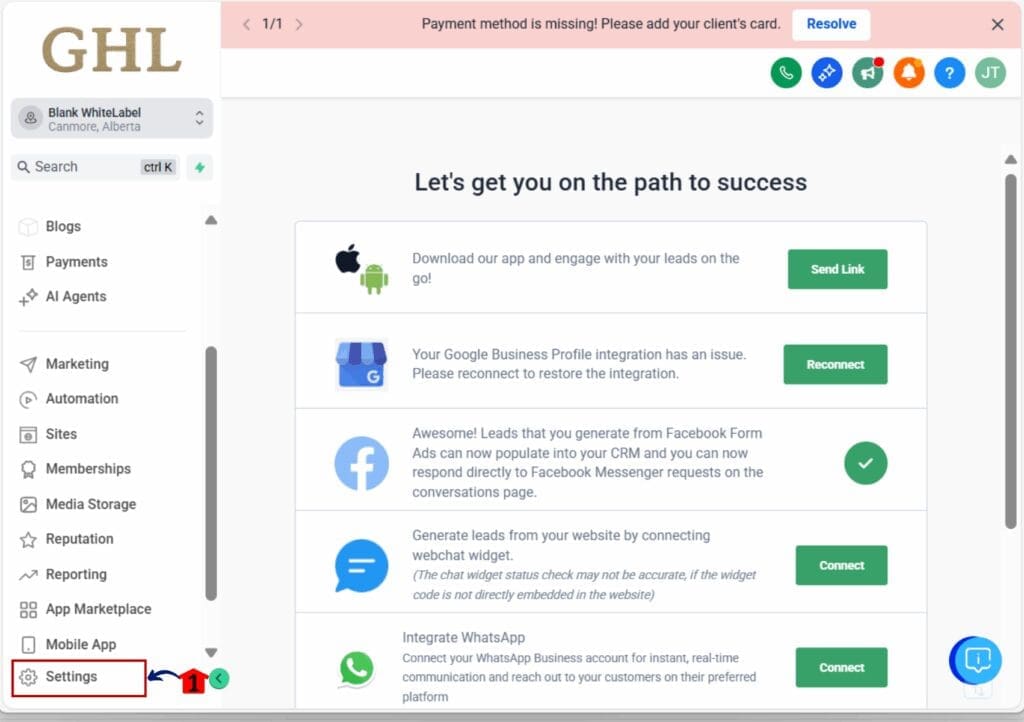
- Another window will open
1.2 On the left side menus scroll down and find tags
1.3 Click tags
1.4 Click “+New tag Button” on the right side upper corner
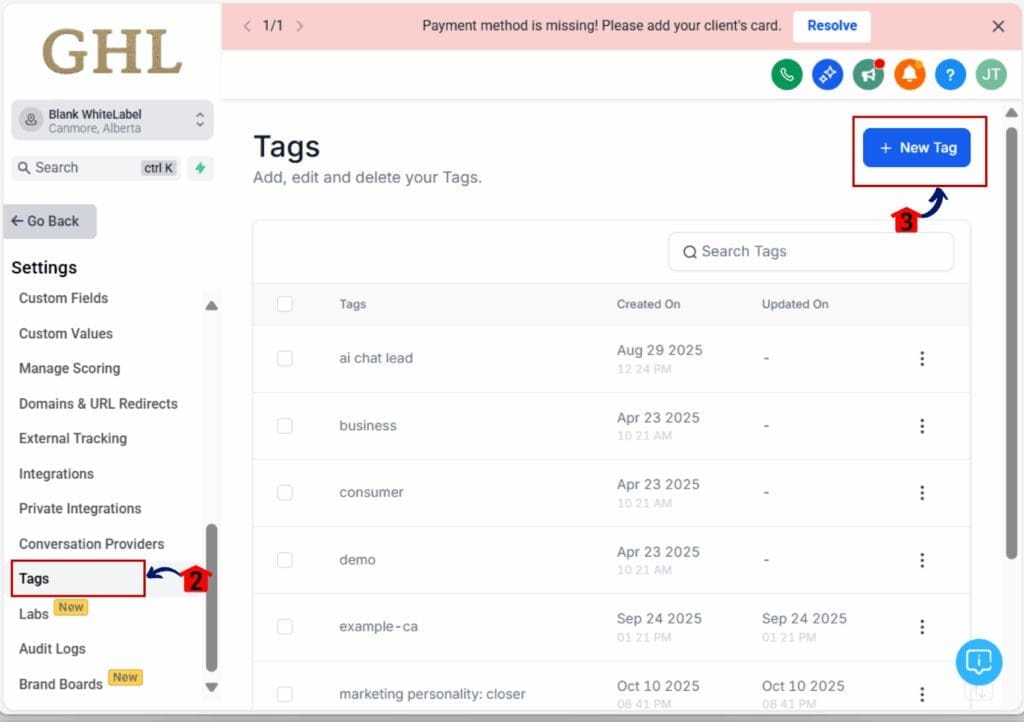
- A pop-up window will appear
1.5 Enter the tag you want to add then click “Create” button
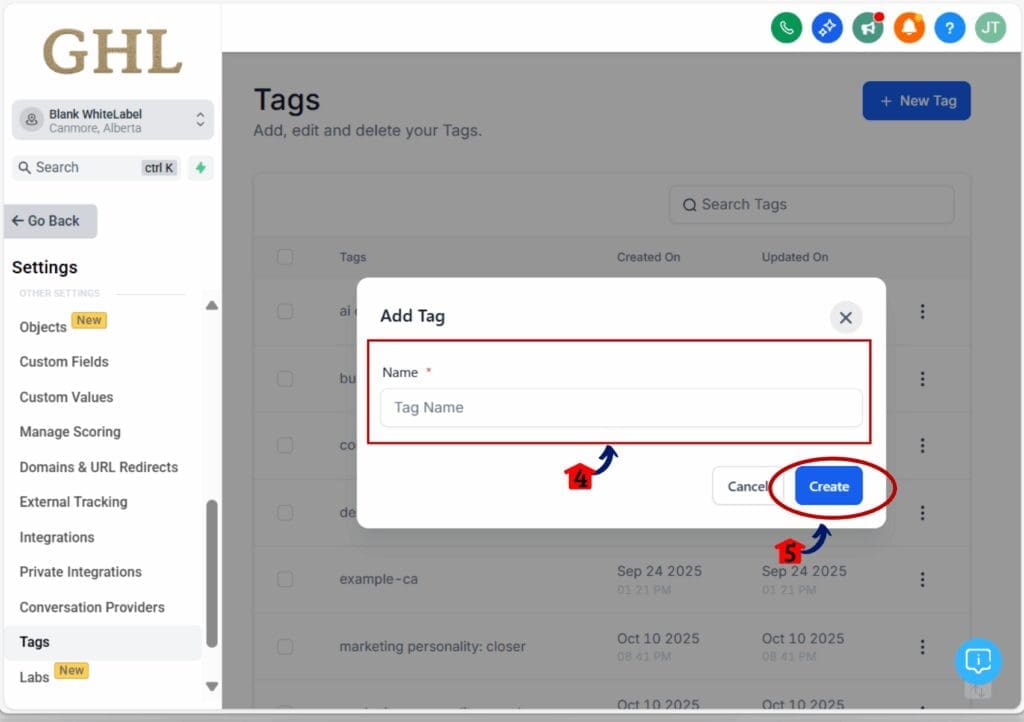
1.6 Repeat the step for the remaining tags
Step 01 – Access Workflow
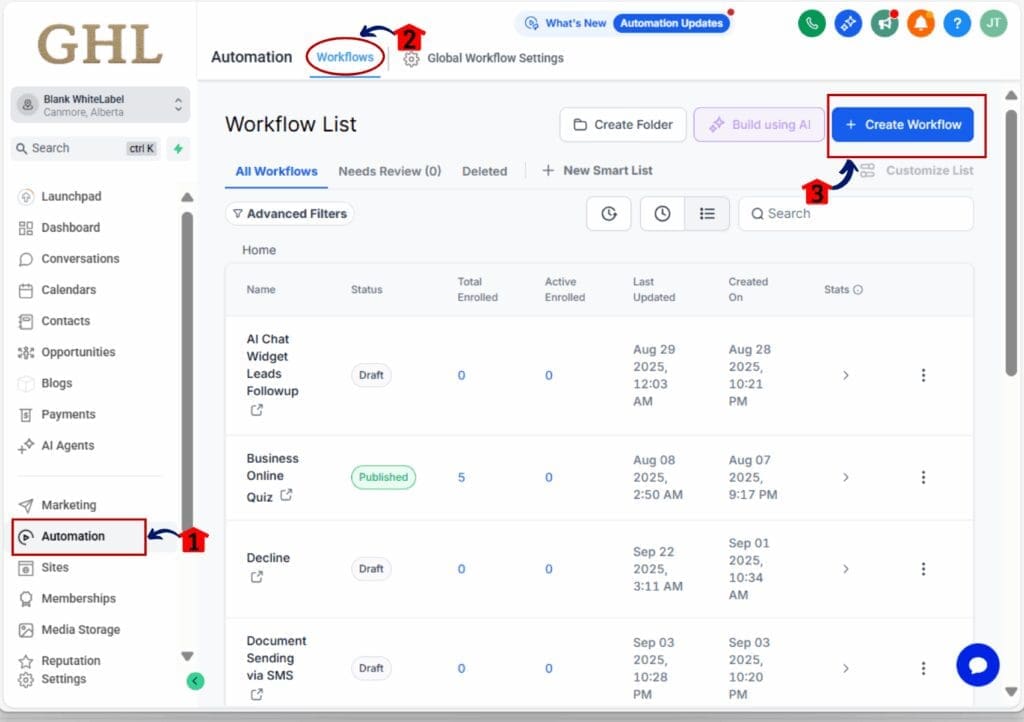
1.1 From the main menu, click Automation → Workflows.
1.2 Click the + Create Workflow button.
Step 02 – Create a New Workflow
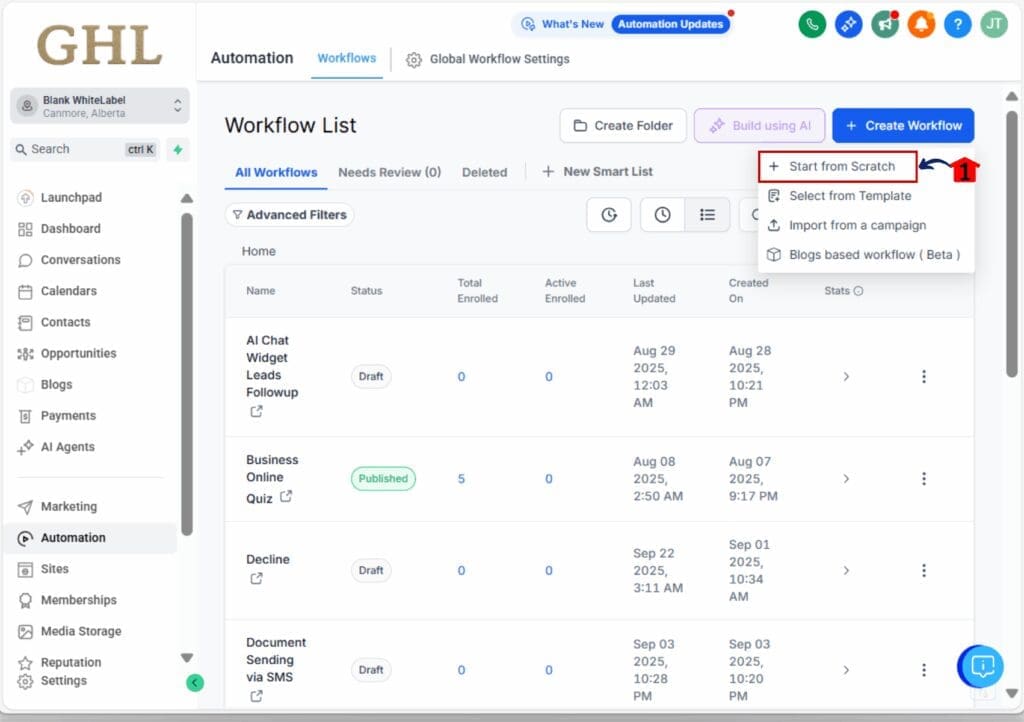
- a drop down will appear
2.1 Choose and click Start from Scratch.
- this will open the builder
2.2 Name your workflow Marketing Personality Quiz.
Step 02 – Add the Trigger
2.1 Click + Add Trigger at the top.
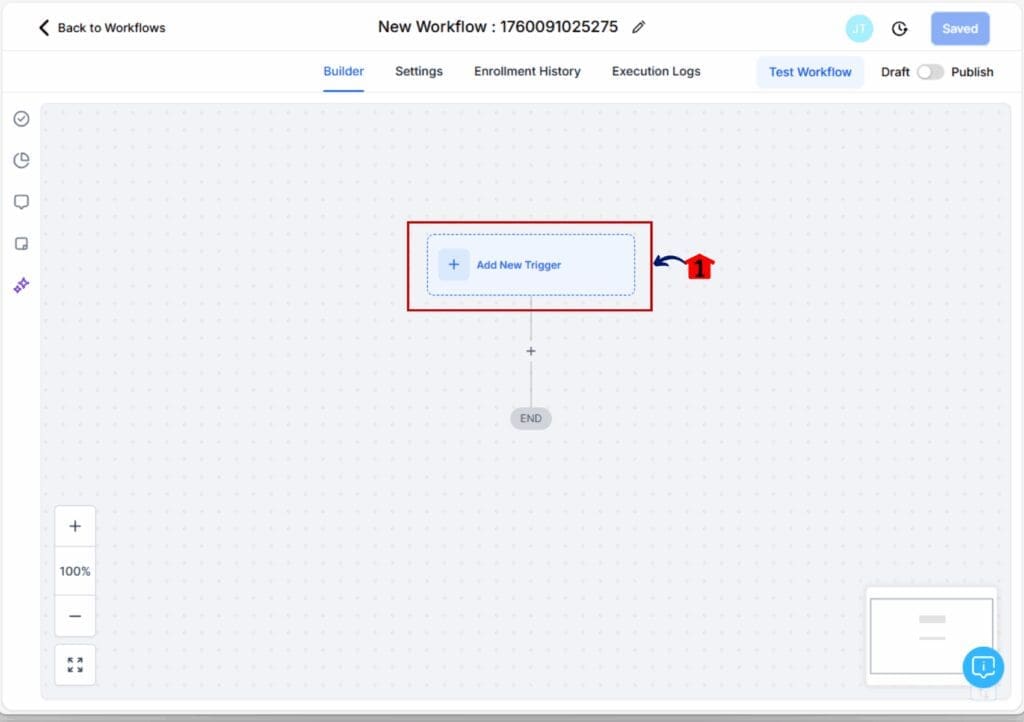
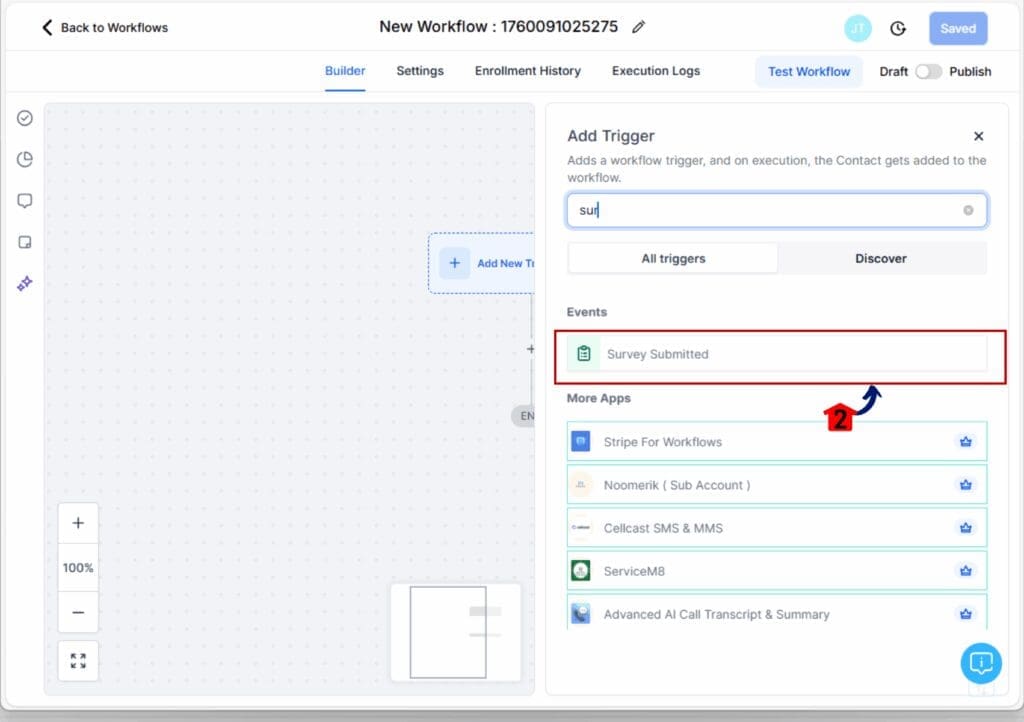
2.2 Select Survey Submitted as the trigger event.
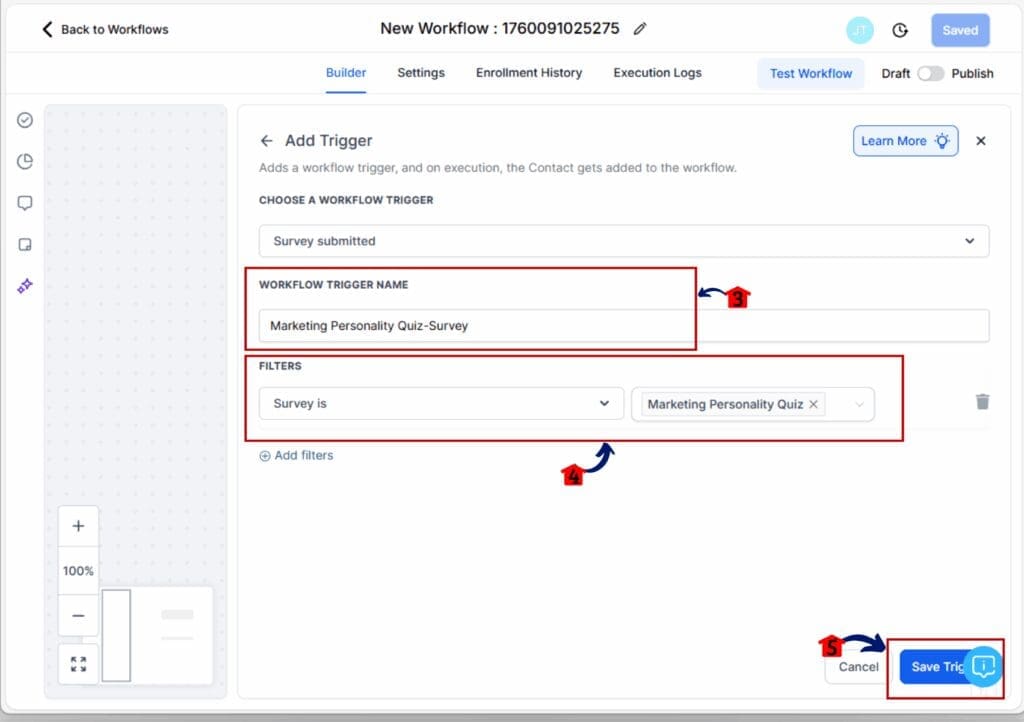
2.3 In the Survey dropdown, name your trigger and filter your survey quiz “Marketing Personality Quiz”.
2.4 Click Save Trigger.
- This ensures that every time someone submits the quiz, the workflow will start automatically.
Step 03 – Add GPT (AI) Action
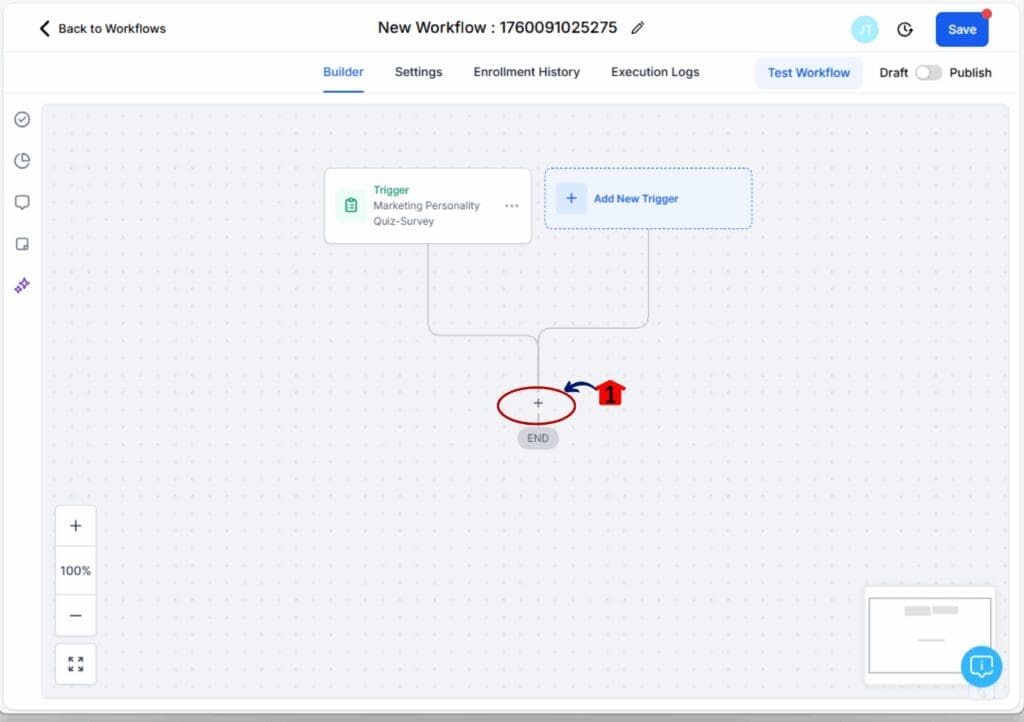
3.1 Click the + icon below your trigger.
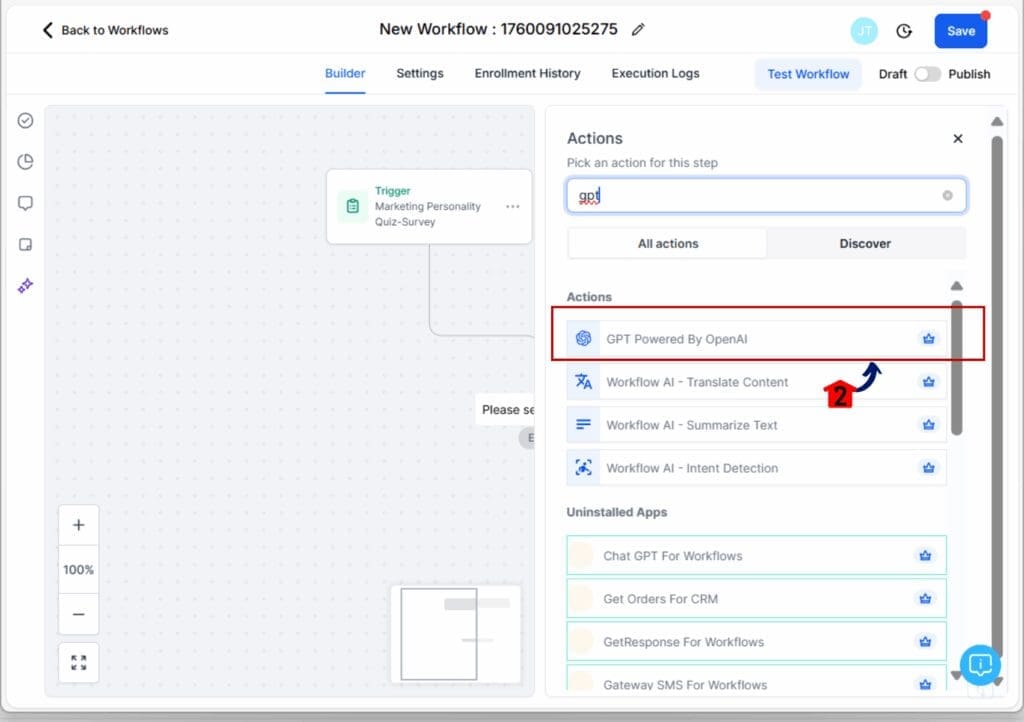
3.2 Select gpt powered by OpenAI
3.3 Name your gpt action
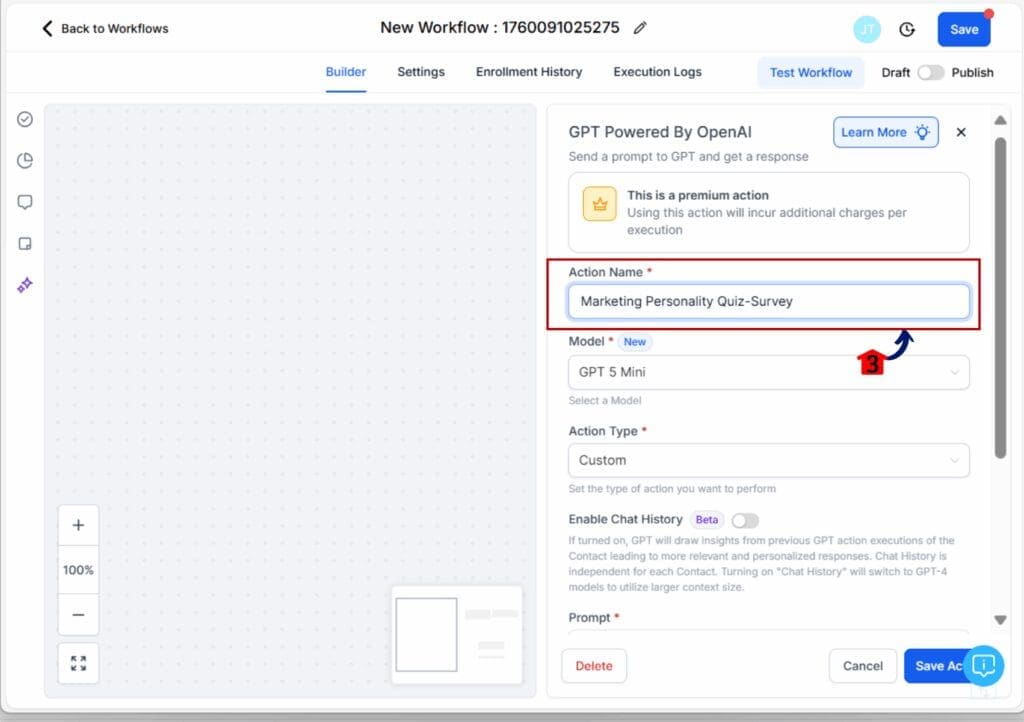
3.4 In the prompt box, enter your prompt:
- “Based on the quiz answers, identify which marketing personality best fits this user: The Nurturer, The Closer, The Coach, or The Energizer. Use the contact’s quiz responses as your reference.”
3.5 Click Save Action.
- This step lets the AI interpret the quiz answers and generate a summarized personality result.
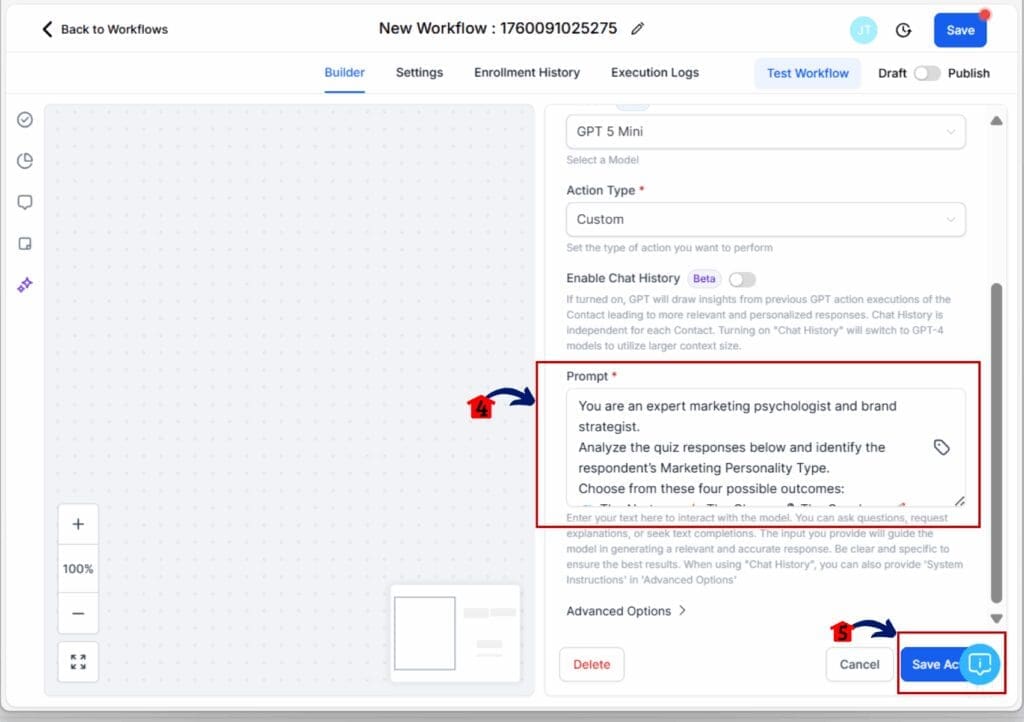
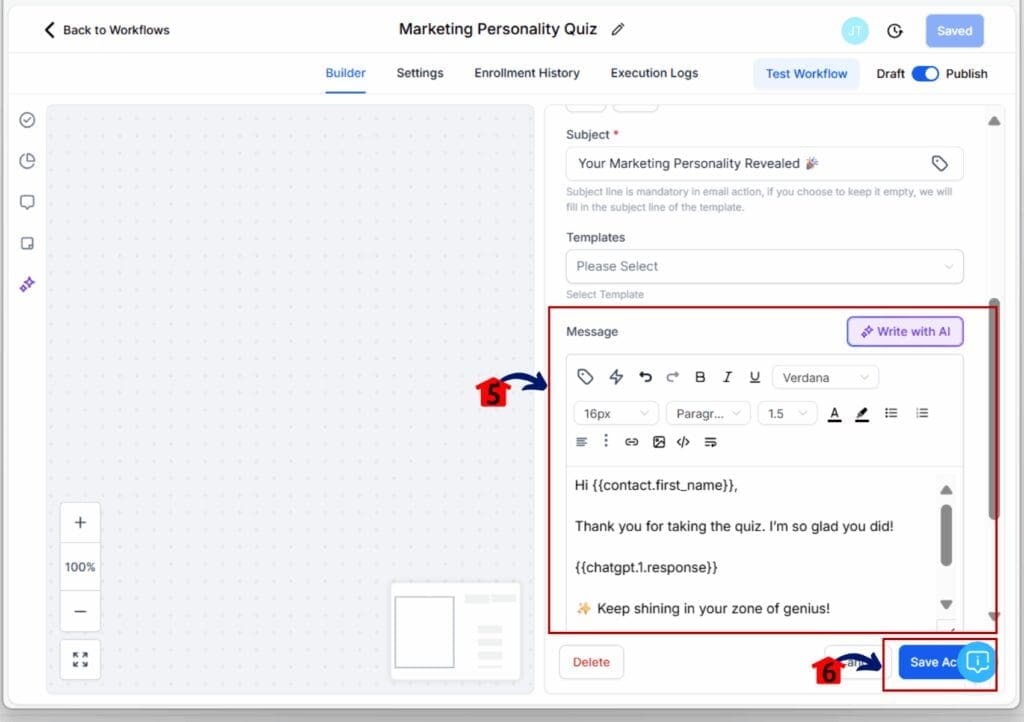
Step 04 – Send Quiz Result Email
4.1 Click the + icon under the trigger.
4.2 Choose Send Email.
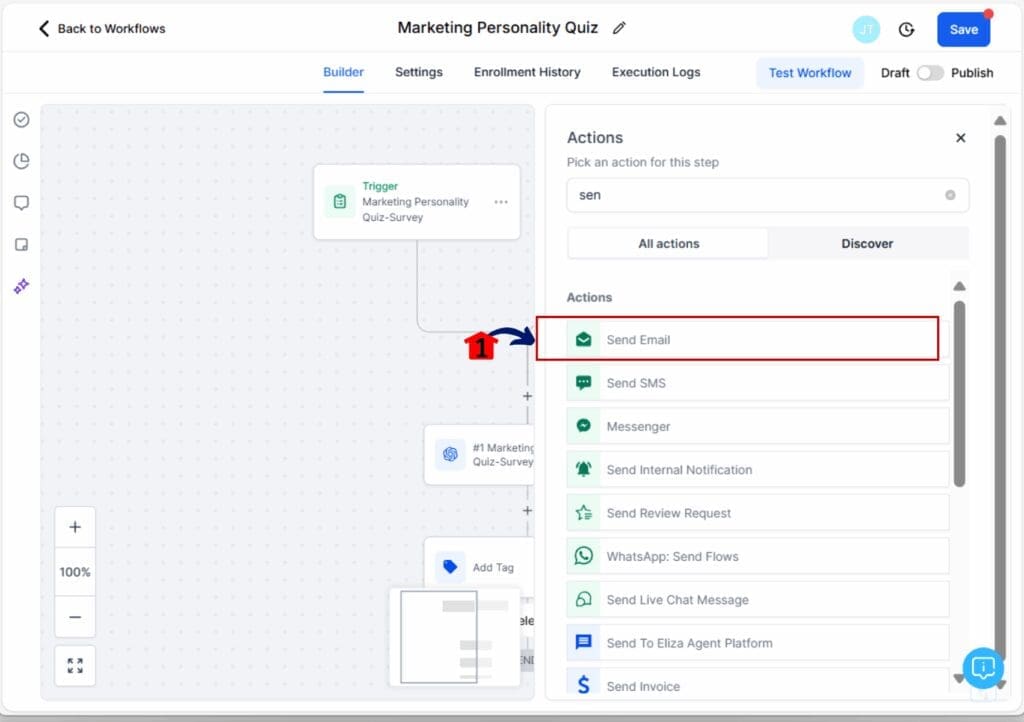
4.3 Name it Email – Marketing Personality Result.
4.4 Set the From Name and From Email dynamic
4.5 Enter the Subject of the email
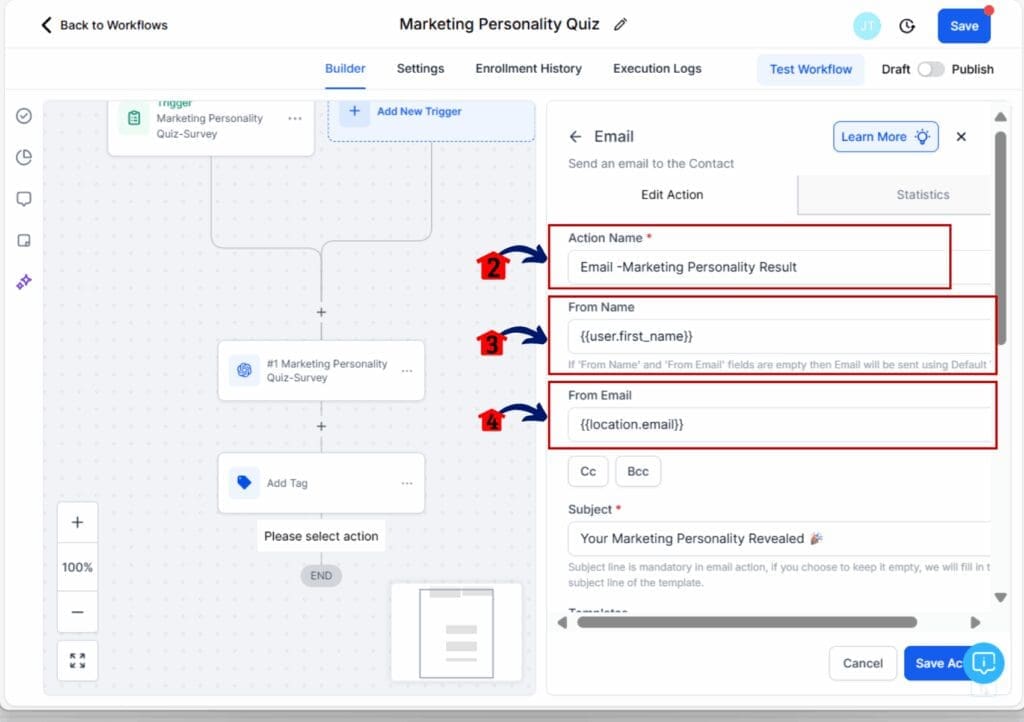
4.6 Enter your email in the message box.
4.7 Click Save Action.
- You can personalize the email to include their result type (e.g., The Nurturer, The Closer, etc.) later when mapping quiz outcomes.
Step 05 – Add and Set Up the Condition Step
- This step will separate contacts based on the AI (GPT) result so each personality type gets its own tag.
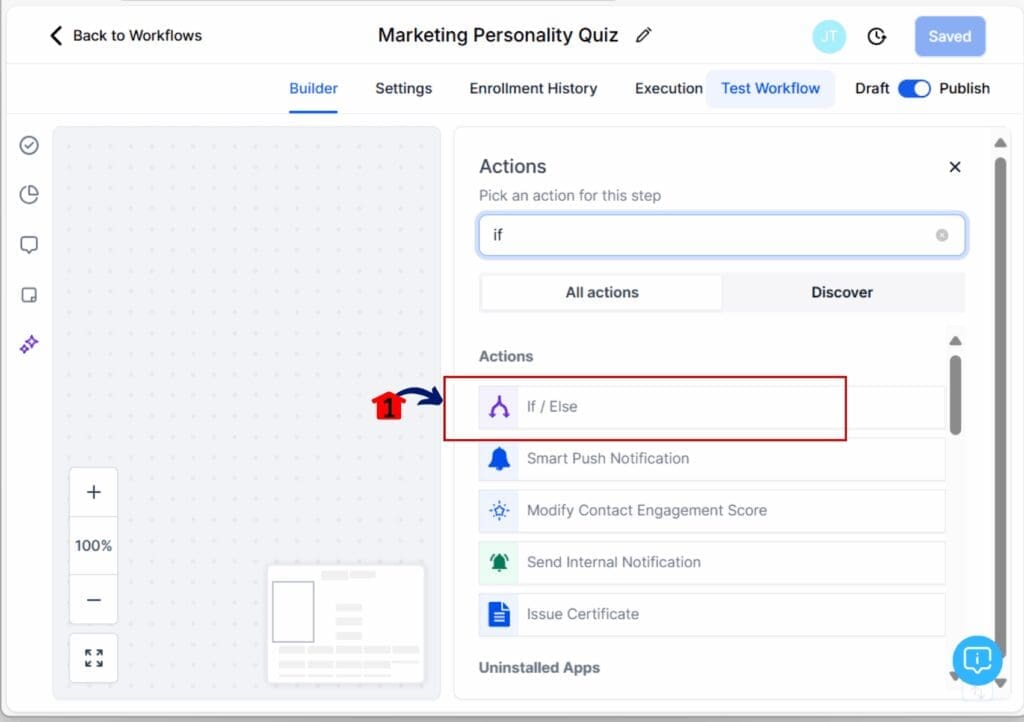
5.1 Click the + icon under the Email – Marketing Personality Result step.
5.2 Choose If/Else Condition from the list.
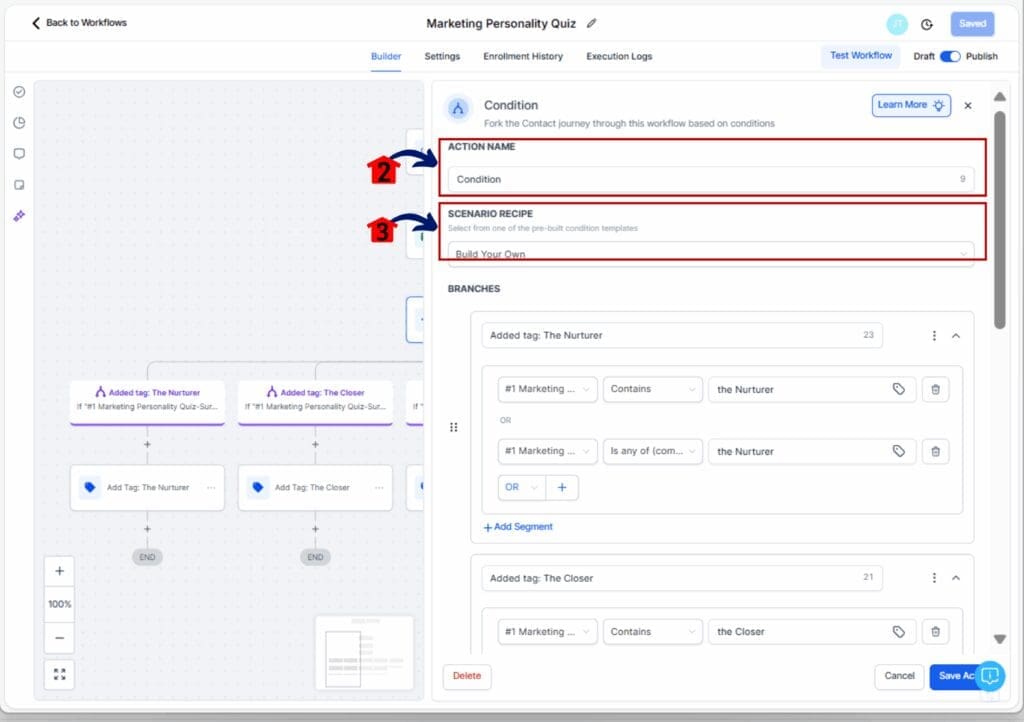
5.3 Rename the action to Condition – Marketing Personality Type.
5.4 Under Scenario Recipe, select Build Your Own.
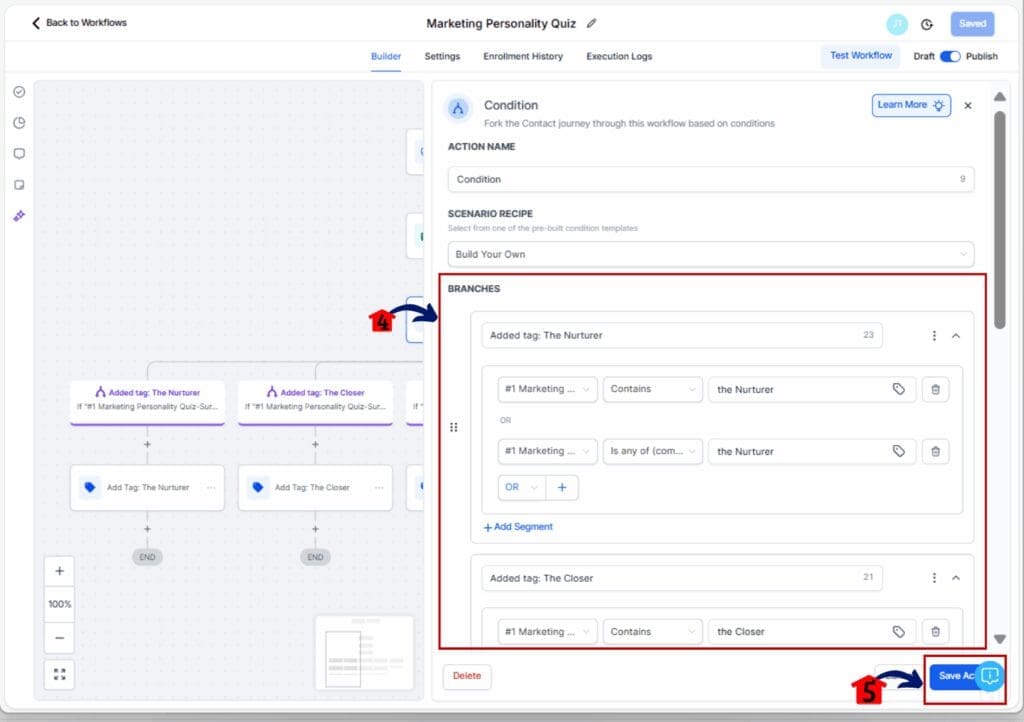
Step 06 – Create Branches for Each Personality Type
- Branch 1 – The Nurturer
- Branch 2 – The Closer
- Branch 3 – The Coach
- Branch 4 – The Energizer
6.1 Click Add Branch → Added Tag: The Nurturer.
6.2 In the first dropdown, choose #1 Marketing Personality Quiz – Survey (GPT Result).
6.3 Set the next dropdown to Contains.
6.4 In the text field, select the Nurturer.
6.5 Repeat the same step on the other categories
6.6 Save Action
Step 07 – Add Tag for Each Quiz Result
- Under each condition branch:
7.1 Click + Add Action under the “The Nurturer” path.
7.2 Choose Add Contact Tag.
7.3 Select The Nurturer.
7.4 Click Save Action.
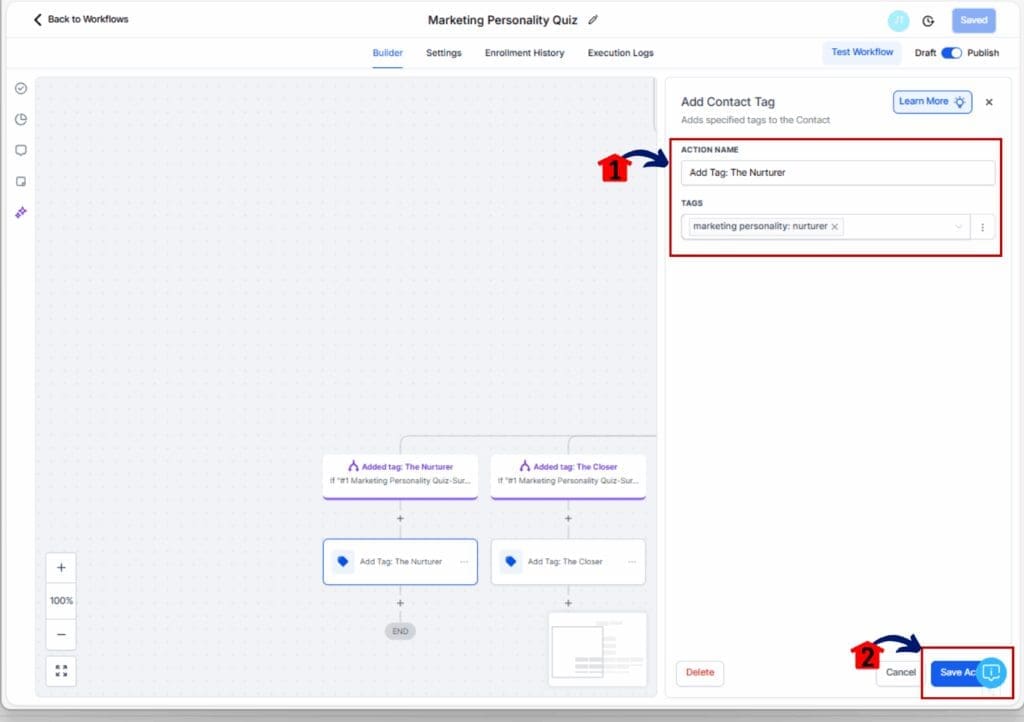
7.5 Repeat the same step on the other tags
Step 08 – Turn On the Workflow
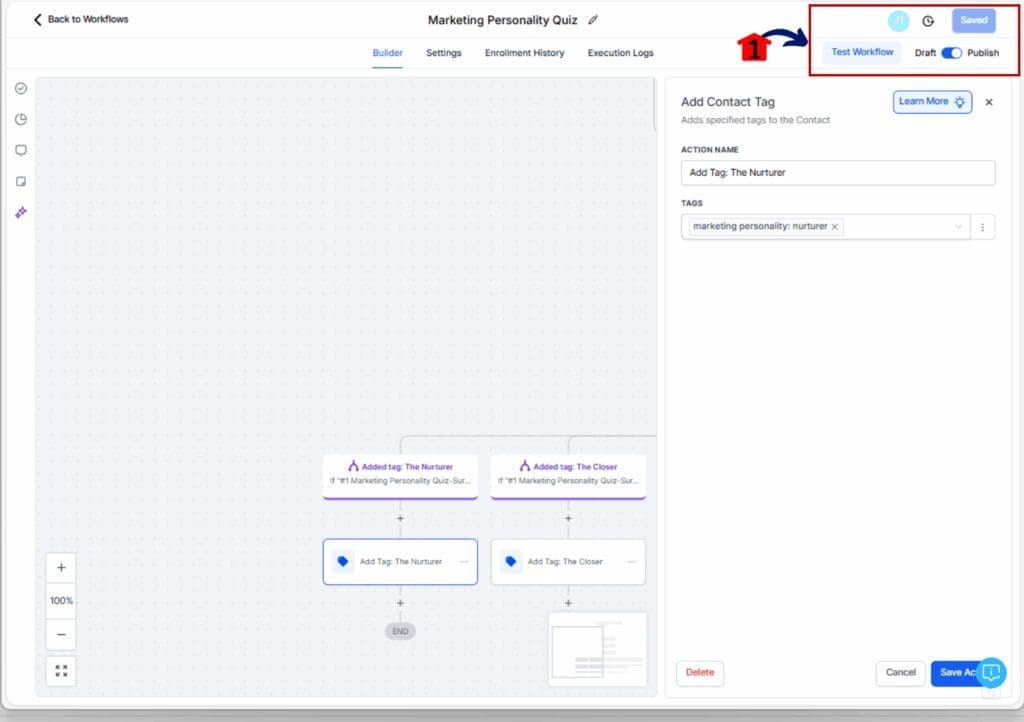
8.1 Toggle Publish Workflow to ON.
8.2 Click Save and Publish Button.
HOW TO TEST THE QUIZ (FROM THE FUNNEL)
Now that your Marketing Personality Quiz is fully built and embedded in your funnel, it’s time to run quality tests to ensure everything works perfectly from form submissions to email delivery and workflow logic.
This testing will be done inside the live funnel, not in the Survey Builder preview.
Pre-Step 01 – Open the Funnel for Testing
1.1 From the main menu, click Sites → Funnels.
1.2 Find the funnel where your Marketing Personality Quiz survey is embedded.
1.3 Hover over the funnel and click Edit Page.
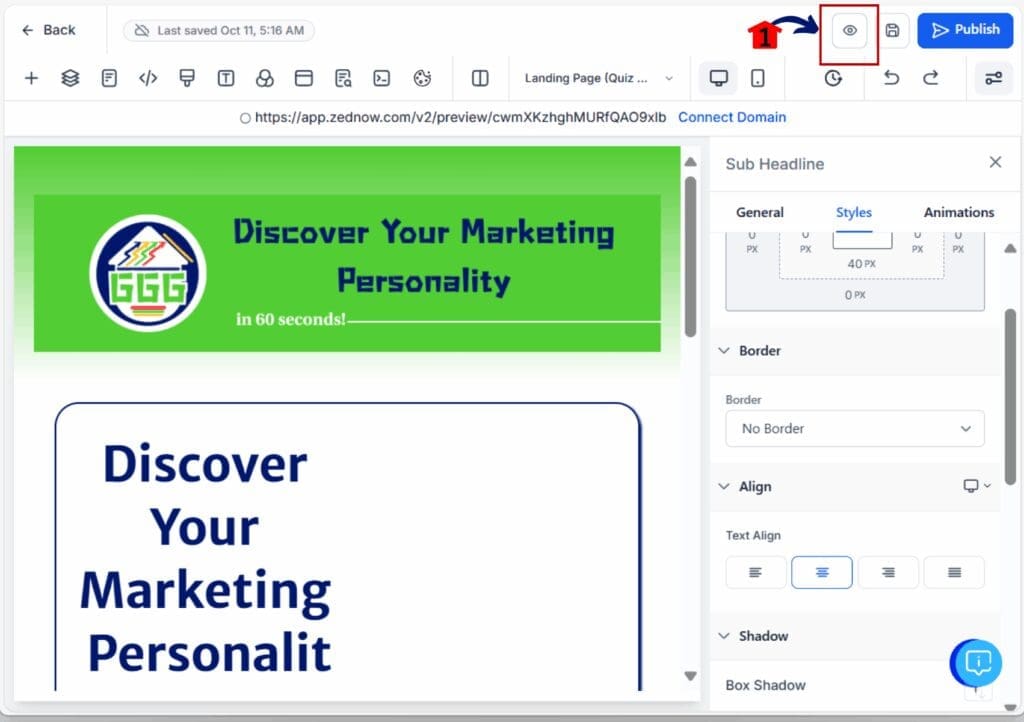
1.4 Once inside the page editor, click Preview in the upper right corner.
1.5 This opens the live test page where you’ll perform all quiz tests.
Step 01 – Prepare Test Emails and Devices
1.1 Create 5–10 test emails
1.2 Open a browser window for desktop testing.
1.3 Keep the following GHL tabs open in separate windows:
- Contacts – to view new submissions
- Automations → Workflows → History – to check workflow execution
- Conversations – to confirm email or SMS delivery
Step 02 – Submit Quiz Test Entries
2.1 In the previewed funnel page, complete the quiz as a visitor would.
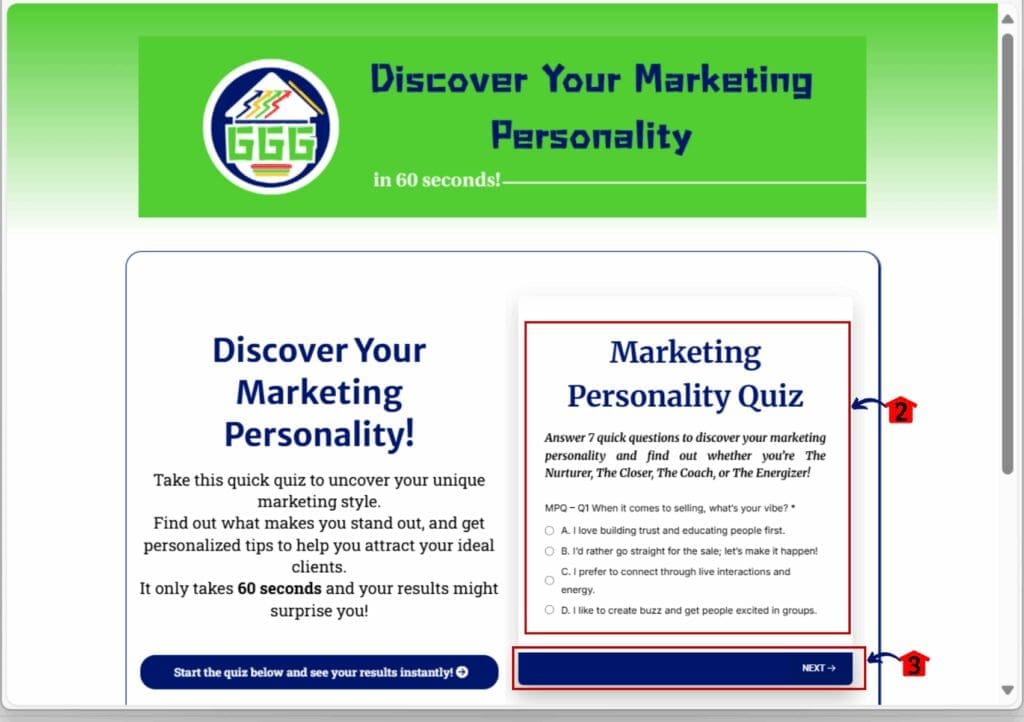
2.2 Submit the quiz using one of your test email addresses.
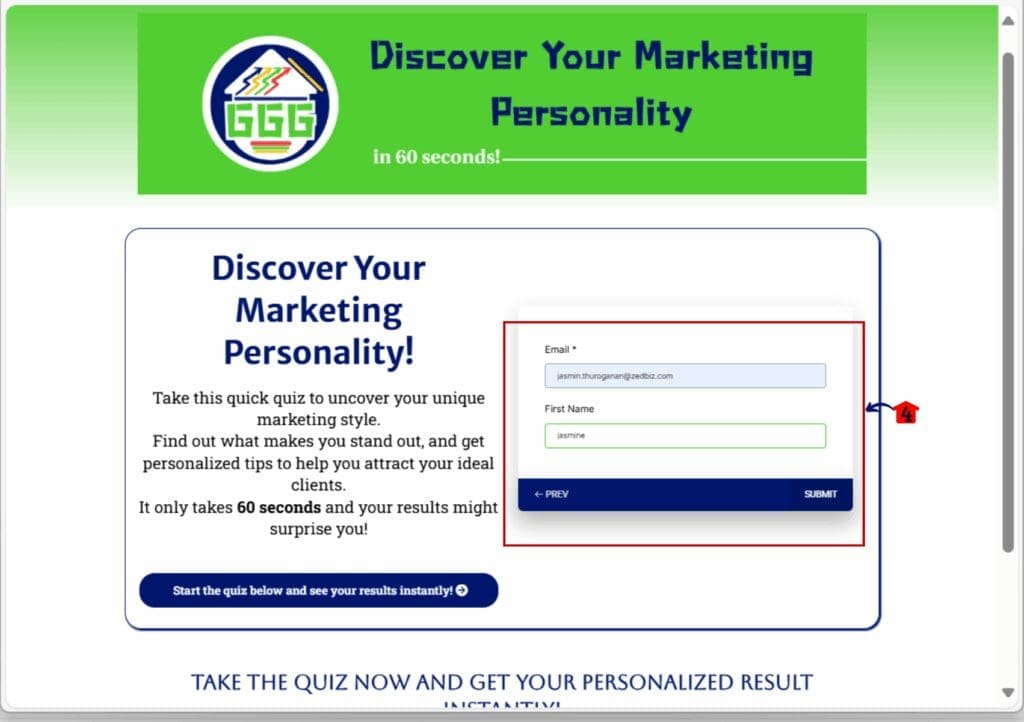
2.3 Repeat the process 5 times using different answer combinations.
2.4 Test every possible personality outcome (The Nurturer, The Closer, The Coach, The Energizer).
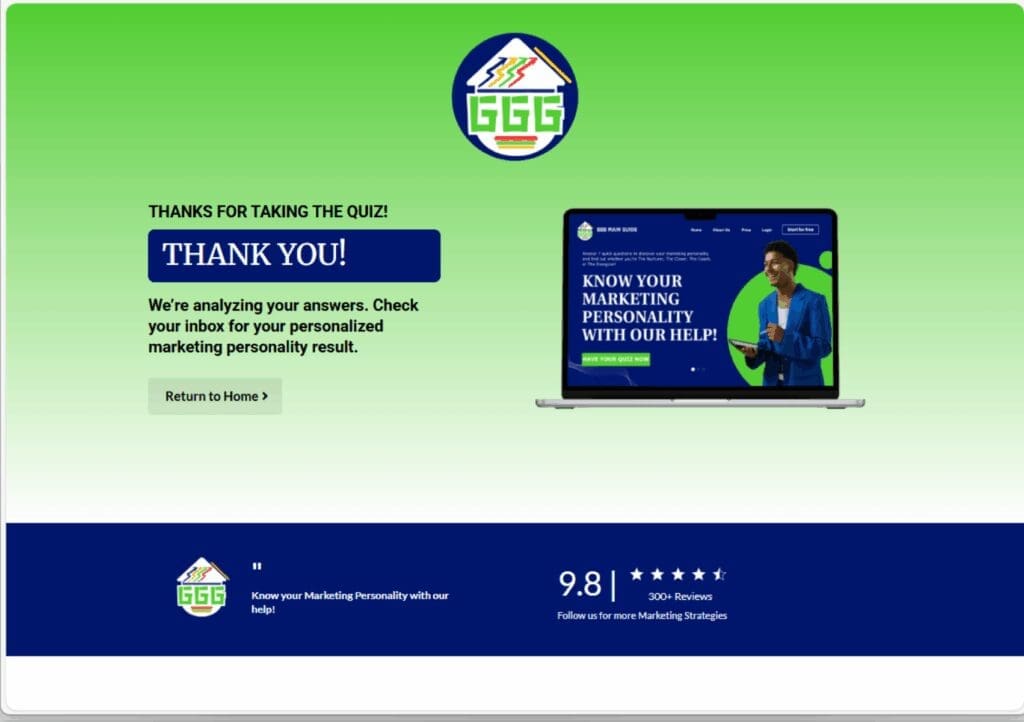
Step 03 – Check Contact Records
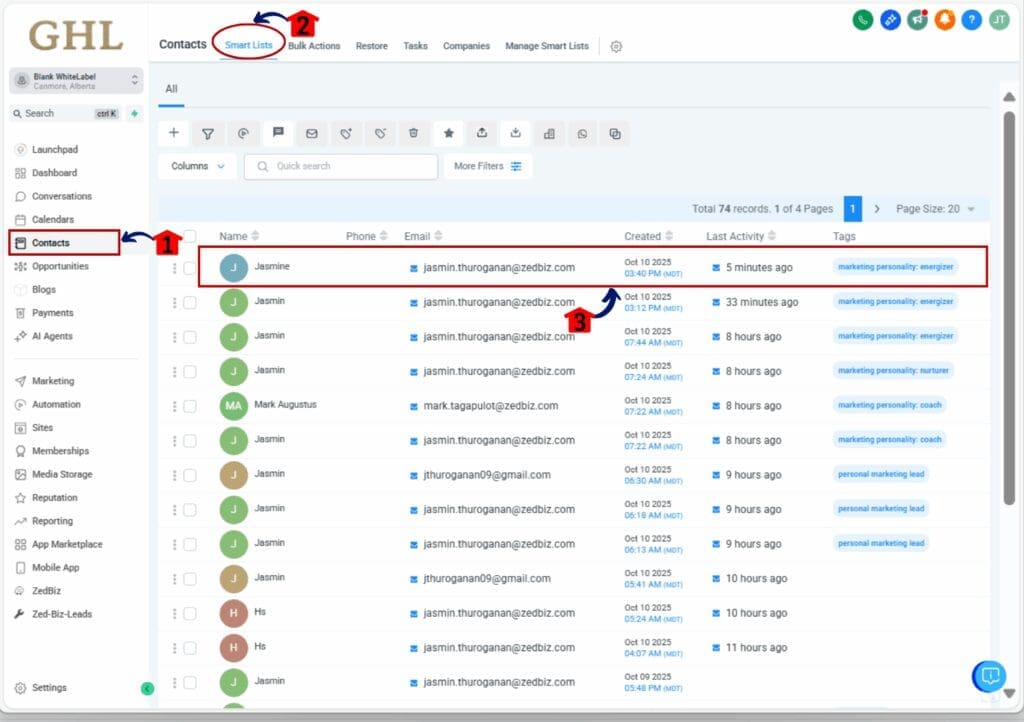
3.1 Go to Contacts → Recent Contacts.
3.2 Click on the most recent test contact.
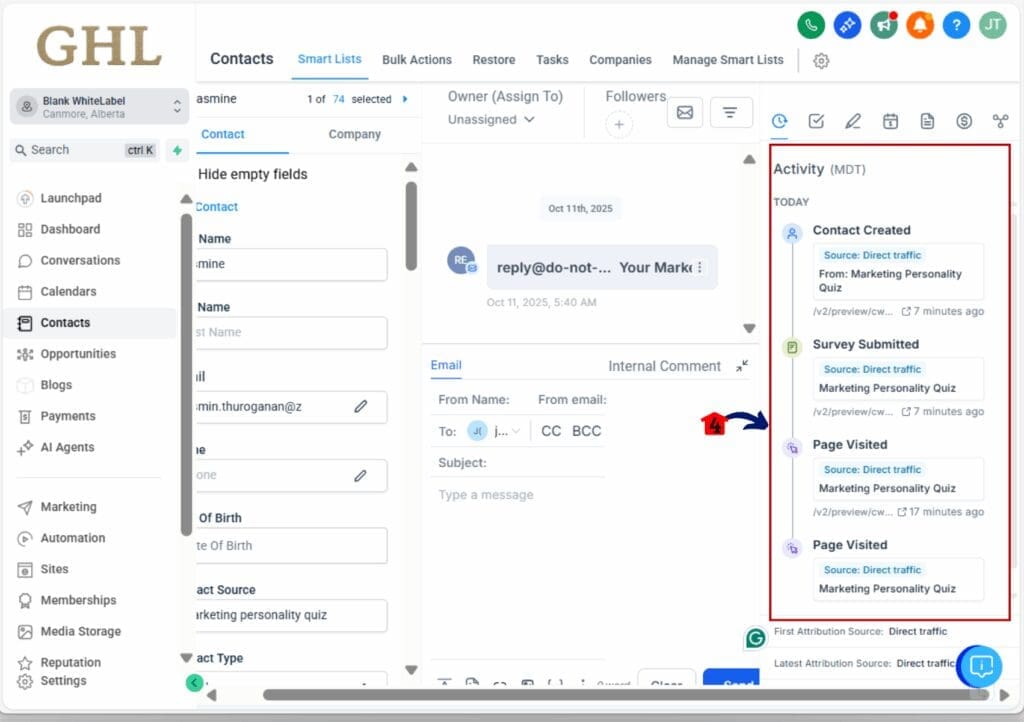
3.3 Verify that:
- The correct Tag (e.g., marketing personality: energizer) is applied.
- A Survey Submitted event appears in the activity timeline.
Step 04 – Verify Workflow Execution
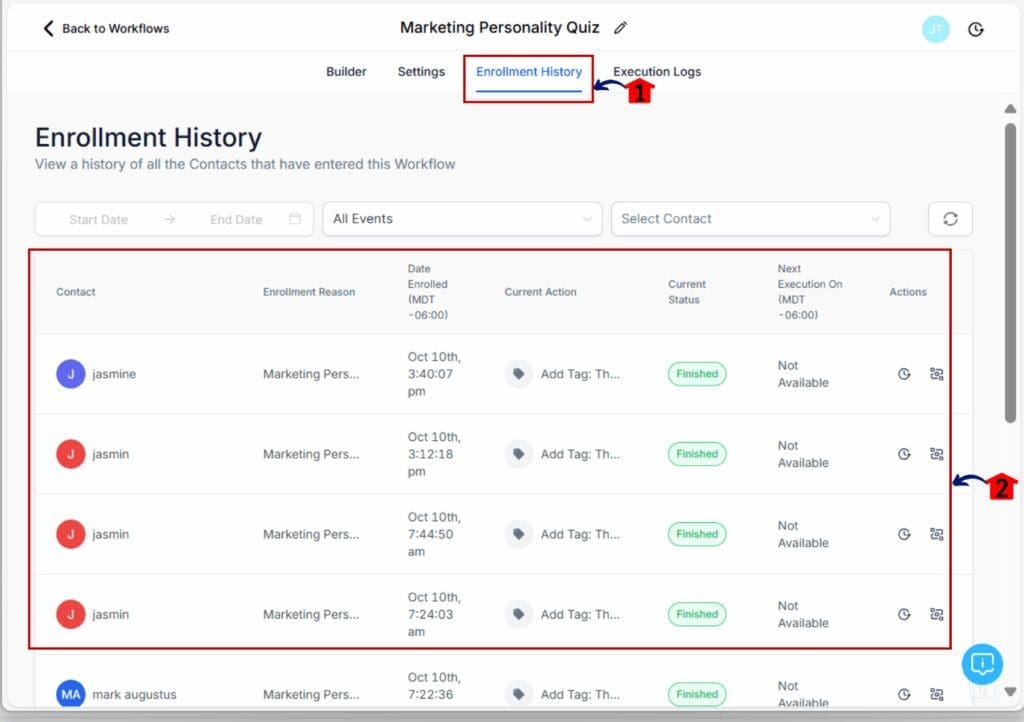
4.1 From the Workflow Builder of Marketing Personality Quiz workflow inside automation.
4.2 Click the Enrollment History tab.
4.3 Find the test contact and confirm all steps show Status = Succeeded.
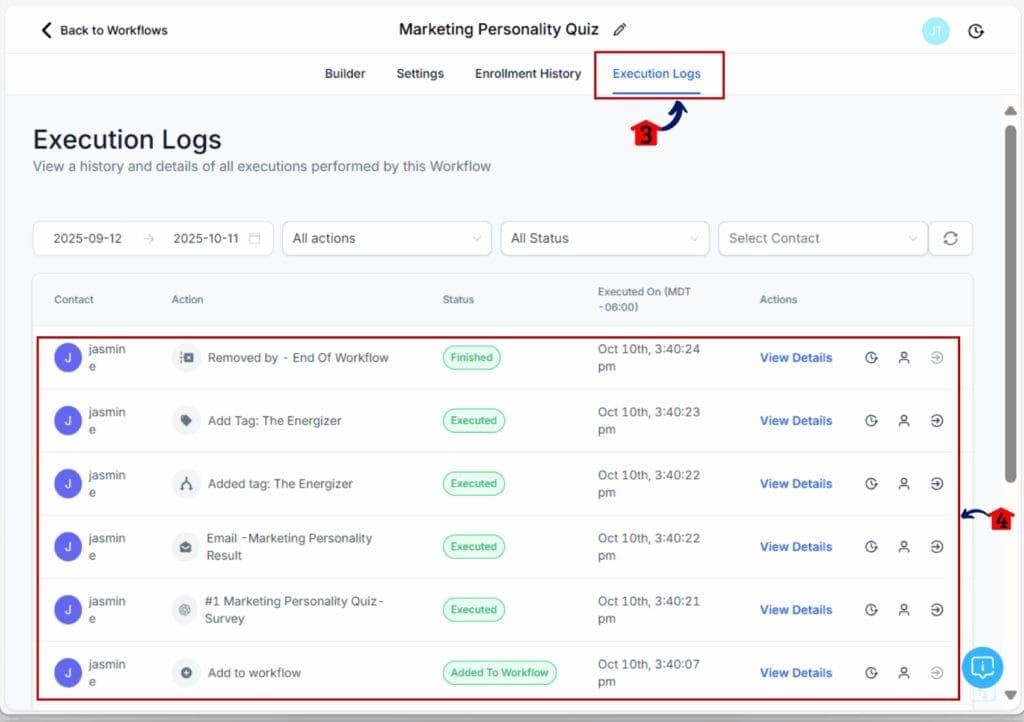
4.4 Click the Execution Logs tab.
4.5 Confirm it shows Status = Succeeded.
- The trigger (should be Form/Survey Submitted = Marketing Personality Quiz).
- Workflow status (must be Published and Active).
- The Send Email action (valid From Email and template).
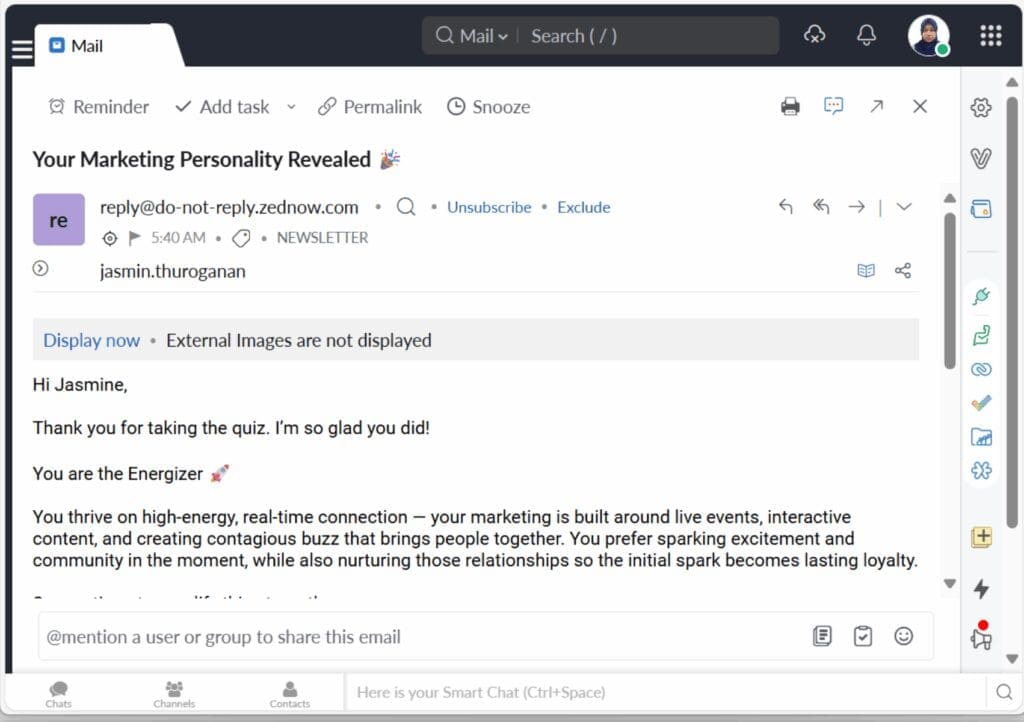
Step 05 – Confirm Email Delivery
5.1 Open your test inbox (the one used in the quiz submission).
5.2 Look for the Marketing Personality Result email.
5.3 Verify:
- Subject line and personalization appear correctly.
- Layout looks clean
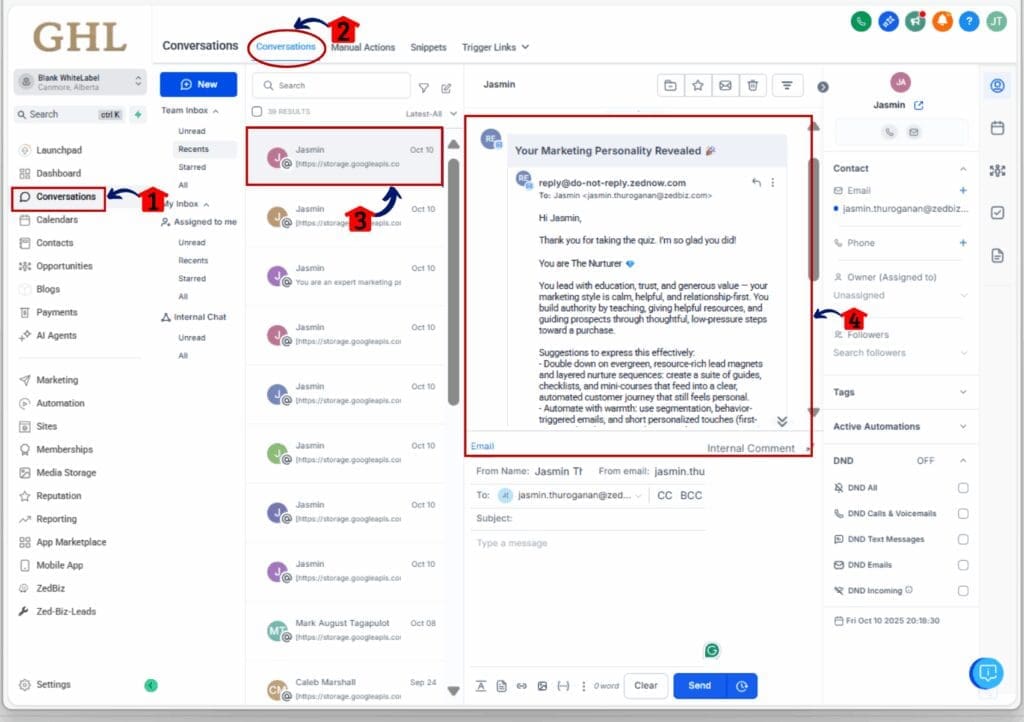
5.4 If the email is missing:
- Check Conversations in GHL to see if it was sent.
- If sent but not received, check Spam/Promotions.
Step 06 – Final Review and Sign-Off
6.1 Confirm that test submissions have been completed.
6.2 All tags and outcomes are correct.
6.3 Custom fields stored each answer properly.
6.4 Emails were delivered and displayed correctly.
6.5 Funnel styling and responsiveness passed on both desktop and mobile.
- Once all checks are complete, your quiz funnel is fully tested and ready for launch.
Analyzing Quiz Results
Step 01 – Access Contacts
1.1 From the main menu, click Contacts.
1.2 Once the Contacts page opens, click the Filter button located in the upper right corner.
1.3 Click more filter
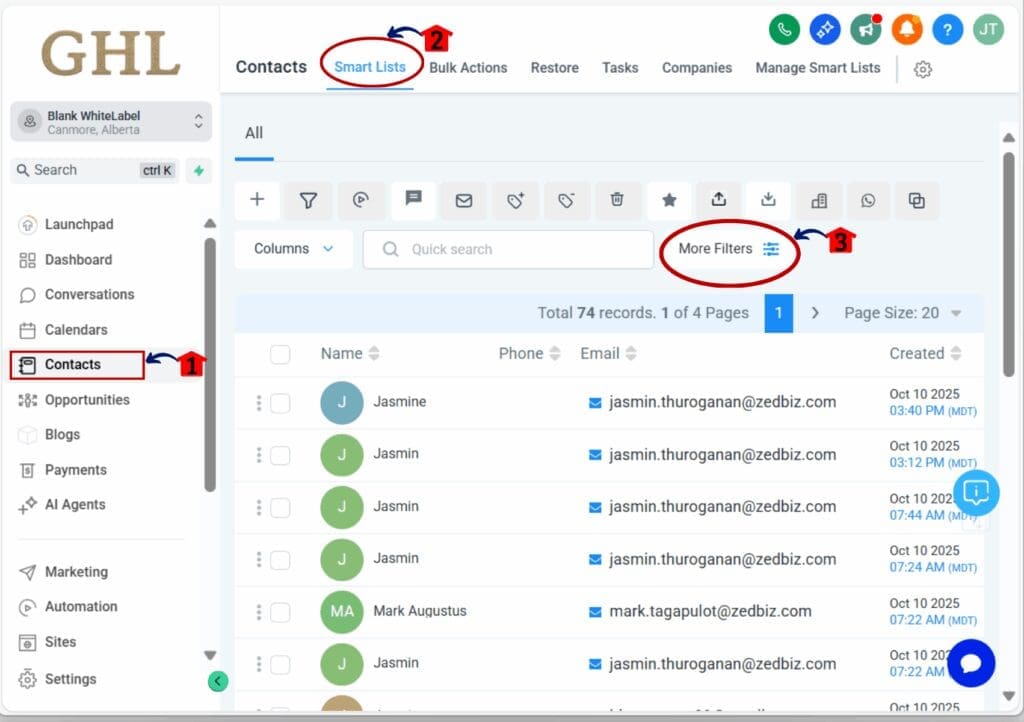
1.4 From the filter options
- a pop-up window will appear
1.5 Select Tag
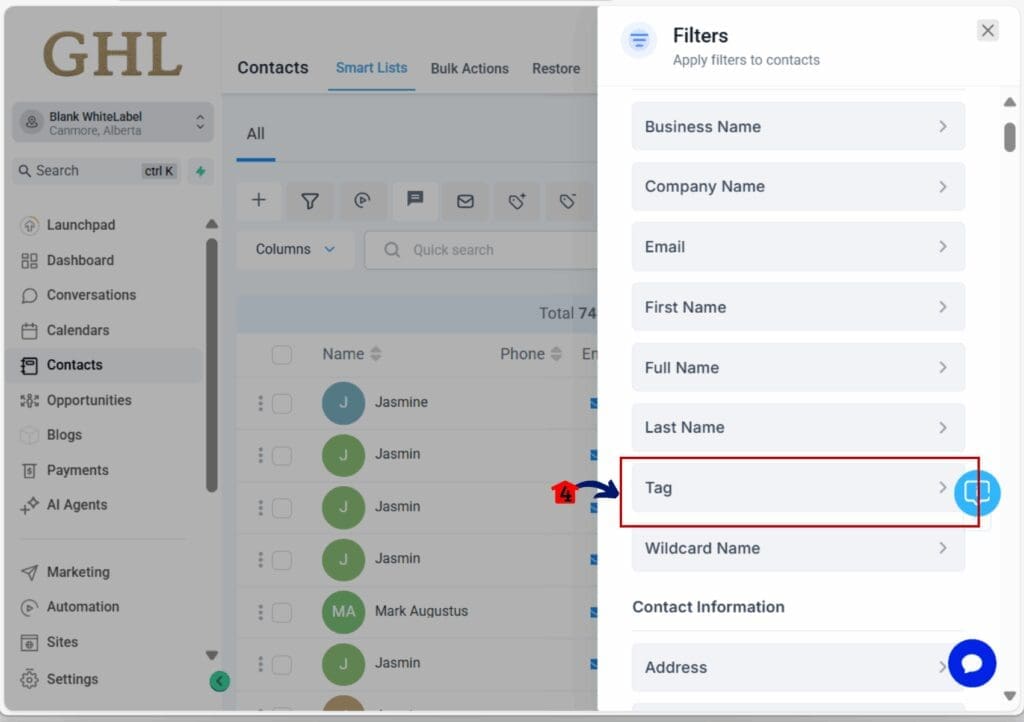
- a pop-up window will appear
1.6 Select is and on the drop down menu select the tag you want to review(e.g., “Marketing Personality: Coach”).
1.7 Click Apply Filter.
- This will display all contacts who received that personality tag “marketing personality:coach” from your quiz workflow.
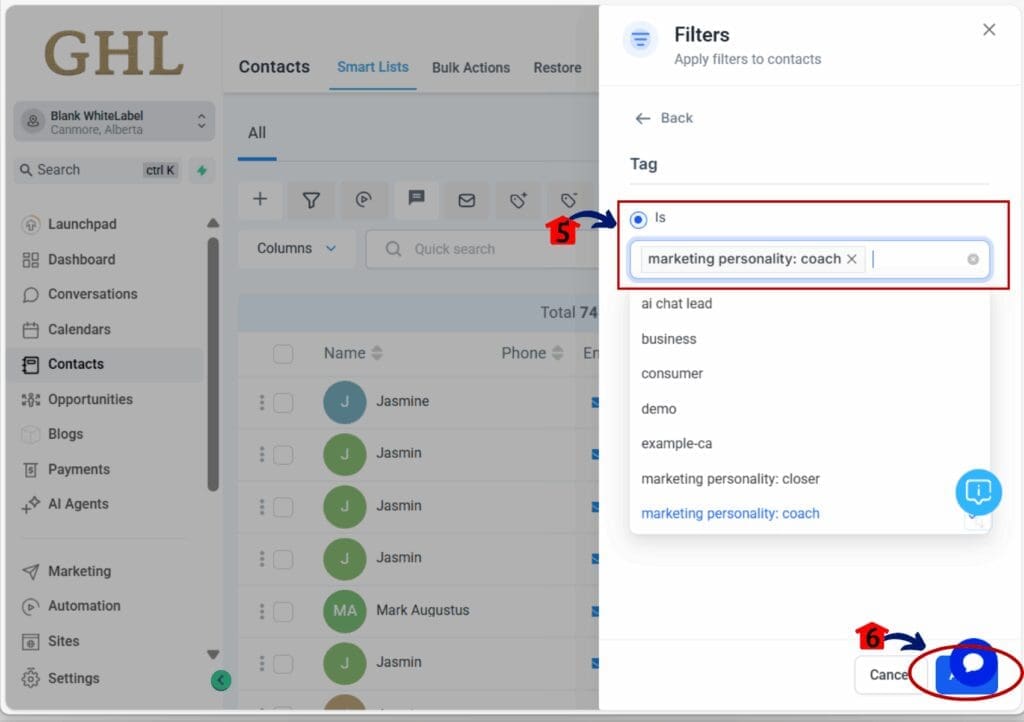
Step 02 – Review Quiz Outcomes
2.1 Repeat the same filtering step for each quiz outcome tag (e.g., Nurturer, Closer, Coach, Energizer).
2.2 Take note of how many contacts fall under each tag.
2.3 This gives you an overview of which personality types are most common among your leads.
- Use this data for:
- Segmenting email campaigns.
- Tailoring offers to personality types.
- Reporting on quiz engagement.
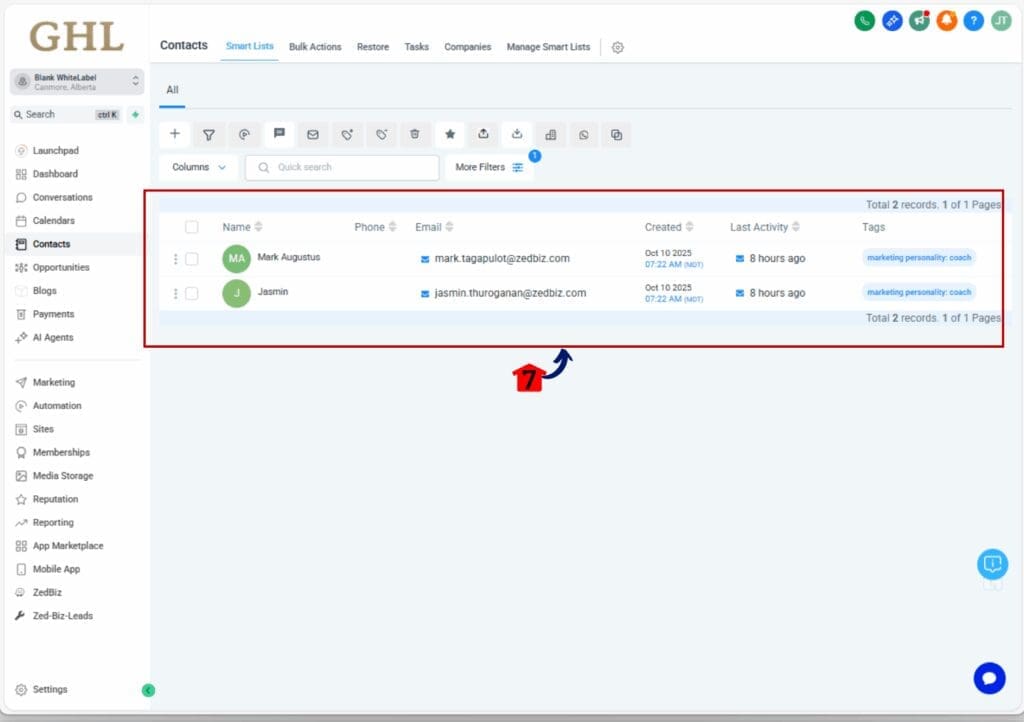
With these steps complete, you now have a working quiz funnel that looks professional, runs automatically, and provides real data you can use to grow your business.
Frequently Asked Questions – Common Questions About Building AI Quizzes in GoHighLevel
Pro Tips & Creative Ideas
Once your marketing personality quiz is live, you can take it further with a few smart improvements. These ideas help your quiz perform better, generate more qualified leads, and give your audience a more personal experience.
Personalize your marketing personality quiz experience.
- Add your brand’s voice, design elements, and short videos to make the quiz feel unique. When users feel that your marketing personality quiz was made specifically for them, they’re more likely to finish it, share it, and remember your brand.
Connect quiz results to personalized offers.
- Inside your GoHighLevel quiz funnel, use workflows to send tailored offers based on quiz outcomes. For example, someone who scores as a “Strategic Marketer” could get a different follow-up than a “Creative Marketer.” Personalization keeps your AI marketing personality quiz relevant and boosts conversions.
Integrate your quiz with your CRM or pipeline.
- If you’re using GoHighLevel pipelines, set up automations that send new quiz leads straight into the right stage. This turns your GoHighLevel marketing quiz into a system that tracks where every contact is in the buyer journey without manual work.
Test and improve your marketing personality quiz over time.
- Every quiz can be optimized. Check which questions have the most drop-offs, refine confusing wording, and A/B test your landing page design or quiz title. Even small updates can improve completion rates and lead quality.
Use Marketing Personality Quiz data to guide future campaigns.
- Every response in your marketing personality quiz provides real data about what your audience values. Use that insight to shape your next offer, ad campaign, or blog post. The more your marketing reflects what people actually care about, the stronger your results will be.
A well-optimized marketing personality quiz isn’t just a lead magnet it’s a smart, automated system for building trust, collecting insights, and driving consistent growth inside GoHighLevel.
Your Next Step in Smart Lead Generation
A marketing personality quiz is one of the smartest ways to attract qualified leads and understand what drives your audience. It turns a quick interaction into a meaningful experience that builds trust and sparks interest in your brand. When you combine AI with GoHighLevel, your marketing personality quiz becomes more efficient, engaging, and scalable.
You now have everything you need to create a marketing personality quiz that fits your business goals. AI helps you brainstorm creative quiz ideas, write strong questions, and design clear result types that reflect your audience’s personality. GoHighLevel takes care of the rest by managing your marketing personality quiz funnel, automating your follow-up, and organizing your lead data all inside one platform.
The real value of an AI marketing personality quiz comes from the insights it delivers. Each answer reveals something important about your audience’s preferences and motivation. By using that data in your GoHighLevel quiz funnel, you can segment your leads, personalize your messages, and create marketing campaigns that feel more relevant to each person.
Start small, test your quiz, and keep refining it as you go. Every version helps you learn more about your audience and how to connect with them. With AI and GoHighLevel working together, your marketing personality quiz becomes more than a lead-generation tool, it becomes a long-term system for understanding your audience and building stronger customer relationships.
Scale Your Business Today.
Streamline your workflow with GoHighLevel’s powerful tools.
