Finally! AI That Listens: Supercharge Your Content Creation with GoHighLevel’s New Feedback Feature
Listen up, GoHighLevel users! We just dropped a seriously smart update that’s going to change how you work with AI. Say hello to the new “AI content feedback” system – your direct line to refining every piece of AI-generated content, from social posts to blog articles and even those quick grammar fixes. No more guessing games; now you can tell the AI exactly what’s hitting the mark and what needs a little… persuasion.
This new feature is all about making your content creation process smoother and more effective. Located right where you’re working – in the Social Planner, Email Builder, Funnel and Website editors, and even those handy Quick Actions – you can now give a thumbs up or down, and even provide specific reasons why. This feedback isn’t just for show; it actively trains the AI to better understand your preferences, leading to higher-quality, more relevant content that speaks directly to your audience.
By actively using the new AI content feedback tool, GoHighLevel users will experience increasingly relevant and high-quality AI-generated content, saving time and effort while ensuring their marketing messages are always on point.
Easy Steps to Provide AI Content Feedback
This guide will walk you through providing feedback on content generated by AI within GoHighLevel. Whether you’re crafting social media posts, blog articles, emails, or building funnels and websites, GoHighLevel’s AI content generator can assist you.
For this example, we’ll focus on the AI content generation feature within the Social Planner.
Step 01 – Access the Social Planner in GoHighLevel
Automate marketing, manage leads, and grow faster with GoHighLevel.

- The Main Menu on the Left side of your screen has all the main areas that you work in when using GHL.
1.1. Click on the ‘Marketing’ Menu Item.
- Access the ‘Marketing’ section of GoHighLevel.
- You’ll now be in the ‘Marketing’ section of GHL, where you can access the ‘Social Planner’ tab.
1.2. Select the ‘Social Planner’ tab.
- This will take you to the Social Planner interface.
1.3. Click the ‘New Post’ button.
- This button is usually located in the upper right corner of the Social Planner.
1.4. Select ‘Create New Post’.
- This action will open the post creation window.

Step 02 – Initiate AI Content Generation
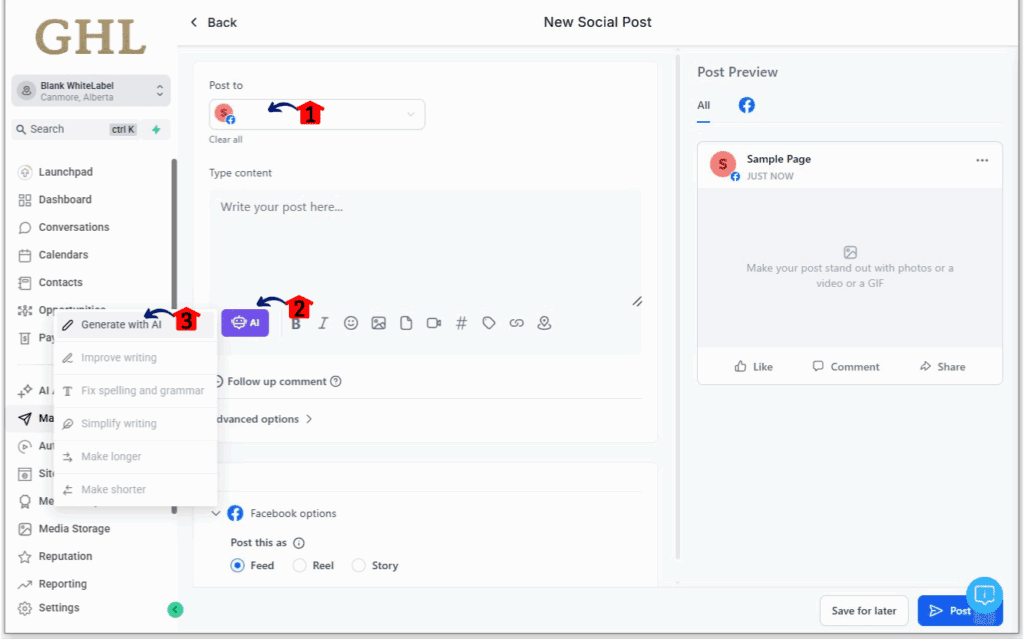
- To activate the AI content generation feature, you’ll need to select a social media account first.
2.1. Select a social account to post to.
- Choose the social media profile where you intend to use the generated content.
- Once an account is selected, the ‘AI Generate’ button will become active.
2.2. Select the ‘AI Generate’ button.
- This button typically appears within the content creation area.
2.3. Click ‘Generate with AI’ in the pop-up options.
- A small pop-up options for the AI content generation will appear. Select ‘Generate with AI’ to proceed.
Step 03 – Configure AI Content Generation Settings
- To get the best results, you can customize the AI’s content generation parameters.
3.1. Set ‘Brand Voice’.
- Define the tone and style that aligns with your brand’s identity. This helps the AI generate content that sounds like you.
3.2. Create a ‘Content Title’.
- Provide a clear and concise title for the content you want the AI to generate. This gives the AI context for the topic.
3.3. Write a brief ‘Content Description’.
- Add a short paragraph describing the main points or purpose of the content. This helps the AI understand the desired message.
3.4. Add ‘Keywords’.
- Include relevant keywords that you want the AI to incorporate into the content. This can help with searchability and relevance.
3.5. Set a ‘Writing Tone’.
- Choose the desired tone for the content, such as formal, informal, friendly, or persuasive.
3.6. Choose the ‘Number of Variations’.
- Specify how many different versions of the content you want the AI to generate. This allows you to have multiple options to choose from.
3.7. Select the ‘Length of the Content’.
- Indicate the desired length of the generated content, such as small, medium, large or custom size.

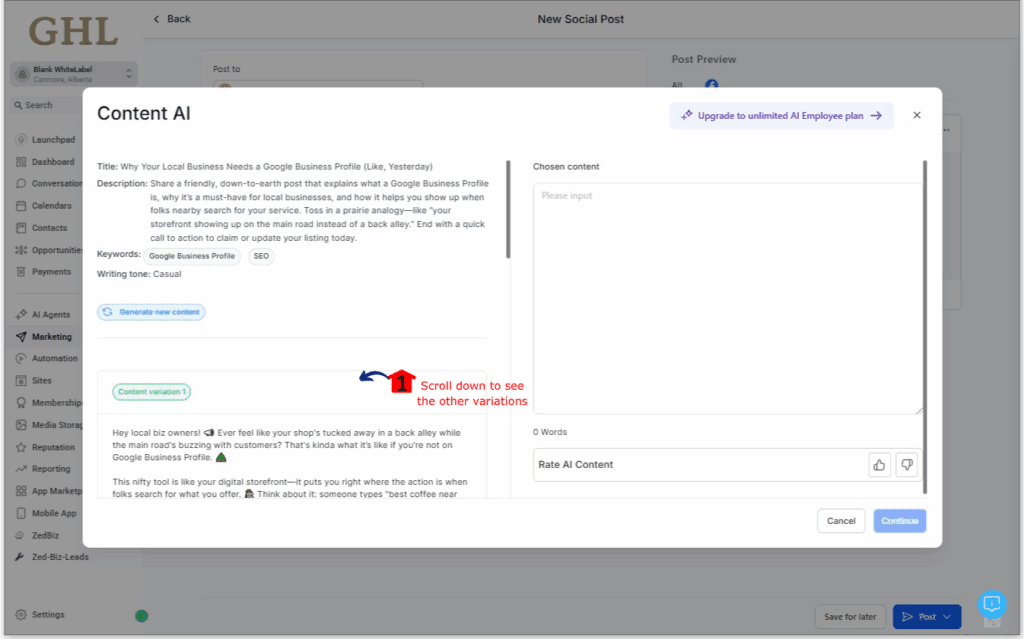
Step 04 – Review AI-Generated Content Variations
- Once the AI has processed your request, you’ll see different versions of the content.
4.1. Here are the variations of the AI-generated content.
- Take your time to read through each of the generated options.
- Scroll down to see all the variations. Ensure you review all the generated content before making a decision.
Step 05 – Provide Feedback and Finalize Content
- Your feedback helps improve the AI. Choose the best option and provide feedback.
5.1. Choose a variation and click the ‘Copy’ button.
- Select the content variation that best suits your needs and click the ‘Copy’ button to save it.
5.2. Give a Thumbs Up: If the AI-made content is great, just click the 👍 (Thumbs Up).
- This tells the system that you found the generated content helpful and relevant.
5.3. Give a Thumbs Down (and Help the AI Learn): If it’s not quite right, click the 👎 (Thumbs Down).
- Clicking the thumbs down indicates that the content did not meet your expectations.
5.4. Pick a Reason: On the form that pops up, you’ll see a list of common reasons why the content might not be good. Choose the one that fits best.
- Selecting a reason helps the AI understand the specific issues with the generated content.
5.5. Add a Comment (If You Want): There’s also a box where you can type in more details about why you gave a thumbs down. The more you tell it, the better the AI can get!
- Providing additional context can significantly improve the AI’s future performance.
5.6. Send Your Feedback: Click the “Submit” or “Send Feedback” button to send your thoughts.
- This action transmits your feedback to the system.
5.7. Click the ‘Continue’ button if you’re okay with the content generated.
- If you are satisfied with a particular variation, click ‘Continue’ to proceed with using that content in your social media post.

By using this AI content feedback feature, you’re directly helping the AI get smarter and work better for what you need. So, start using those thumbs and let GoHighLevel’s AI know what you think!
Practical Application: Making it Work for You
Think about when you’re using the Social Planner to write posts for Instagram. The AI gives you a few options, but one sounds a little too formal for your audience. Instead of rewriting the whole thing, you can hit that thumbs down, pick “Tone is inappropriate,” and maybe add, “Make this sound more casual and fun.” That direct AI content feedback teaches the system your style for Instagram.
Or, maybe you’re writing a blog post, and the AI suggests a paragraph that’s about the wrong topic. You can give it a thumbs down, select “Irrelevant content,” and maybe write a quick note about what the paragraph should really be about. This kind of AI content feedback helps the AI give you better ideas next time.
Conclusion
The new AI content feedback tool in GoHighLevel is more than just a way to rate content; it’s a way for you to directly shape the AI to fit your needs. By taking a few moments to give your feedback, you’re making the AI better for yourself and for everyone else using GoHighLevel. So, go ahead, try out the AI content feedback feature, and let us know what you think – your input really matters!
How else are you thinking of using the new AI content feedback tool in your GoHighLevel setup? Share your ideas in the comments below!
Scale Your Business Today.
Streamline your workflow with GoHighLevel’s powerful tools.
