No More Guesswork—The Builder Just Got Smarter
Working inside a drag-and-drop builder shouldn’t feel like coding in disguise. But until now, dropping a text box on a fresh canvas meant building a Section, then a Row, then a Column… just to add one thing. It was clunky, and it slowed down even the simplest edits.
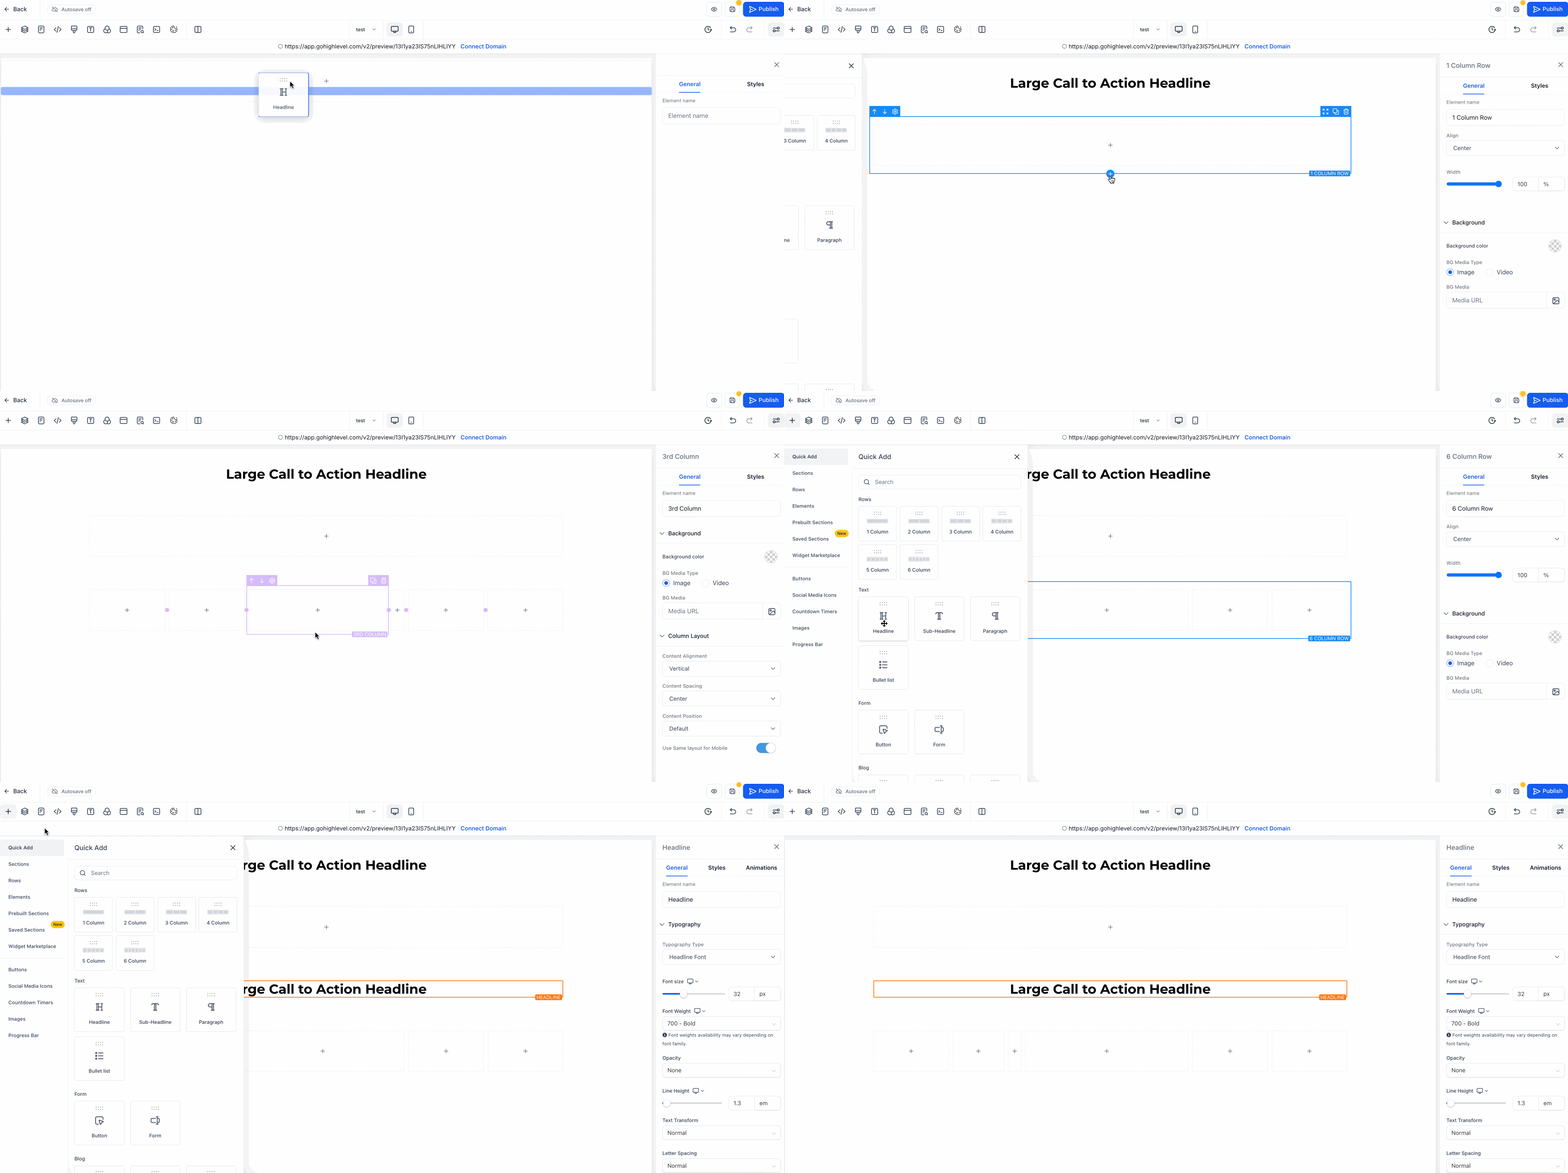
That’s over. With the new update now live in Labs, you can drop any element onto the canvas—no pre-planning needed. The drag-and-drop builder takes care of the structure for you. Text, images, rows—it figures out what needs to be wrapped and builds the layout in the background.
It also shows you what’s happening. You’ll see ghost previews and clear drop zones that guide placement. You’re not guessing where something will land or how it’ll be nested—it’s all visual and clean.
This makes it easier to stay focused. No more bouncing back and forth trying to line things up. Whether you’re building a sales page, tweaking a funnel, or just moving fast, the new drag-and-drop builder helps you move with way less friction.
Here’s What Changed—And It’s All About Flow
The drag-and-drop builder just got a whole lot easier to use. No more building sections manually or trying to guess the right layout. Now you can just drop and go.
Here’s what’s new:
1. Drop Without Setup
Automate marketing, manage leads, and grow faster with GoHighLevel.

No need to build a Section, then a Row, then a Column. Just drag your element—Text, Button, Image—onto the canvas. The builder wraps it with the correct structure behind the scenes.
2. Smart Auto-Wrapping
When you drop something on a blank canvas, the drag-and-drop builder creates Section > Row > Column > Element automatically. It’s like having a layout assistant working in the background.
3. Smarter Placement Logic
Already have a layout going? The builder looks for valid containers and places your element where it fits. No more breaking things by accident.
4. Inline Column Controls
Want to add a column to a row? Now you can do it right from the canvas. Hit “+ Add Column” and it drops in on the spot—no popups or sidebars.
5. Visual Drop Zones
You’ll see clear previews before anything lands. Ghost outlines show exactly where your element will go, so you’re never left guessing.
This isn’t just a small tweak—it’s a total flow upgrade for anyone using the drag-and-drop builder.
Here’s Why This Update Makes a Difference
The drag-and-drop builder update isn’t just about saving clicks. It’s about making everyday tasks easier—especially when time and clarity matter.
1. You spend less time building structure.
Now you can drop elements without building Sections or Rows first. The builder auto-wraps them for you. Less setup, more momentum.
2. It’s easier to train your team.
You don’t need to explain layout hierarchy anymore. Anyone—from your VA to a new client—can drop content on the canvas and let the drag-and-drop builder figure it out.
3. Layout mistakes are easier to avoid.
With smart placement logic and visual guides, you’ll spend less time fixing misaligned content and more time building clean pages.
4. Updates are quicker.
Need to add a column or move a section? You can do it right on the canvas without digging through side menus.
5. It just feels better to use.
The drag-and-drop builder flows like it should’ve from the start—intuitive, quick, and forgiving. You stay focused on design, not the tech behind it.
This upgrade helps whether you’re a solo builder or running an agency with multiple team members. It’s simple. It works. And it keeps things moving.
How to Use the New Drag-and-Drop Builder
If you’ve used the drag-and-drop builder before, this is going to feel way smoother. You’re not digging around to build the right layout first—you just drop what you need, and the builder handles the rest.
This isn’t a full rebuild. It’s the same builder, just smarter. It knows where to put things, how to wrap them, and gives you better visual cues as you go. Whether you’re starting fresh or editing something mid-project, this update keeps you moving without breaking your flow.
Here’s how to start using it:
Step 01 – Access the Main Left Hand Menu in GoHighLevel
- The Main Menu on the Left side of your screen has all the main areas that you work in when using GHL
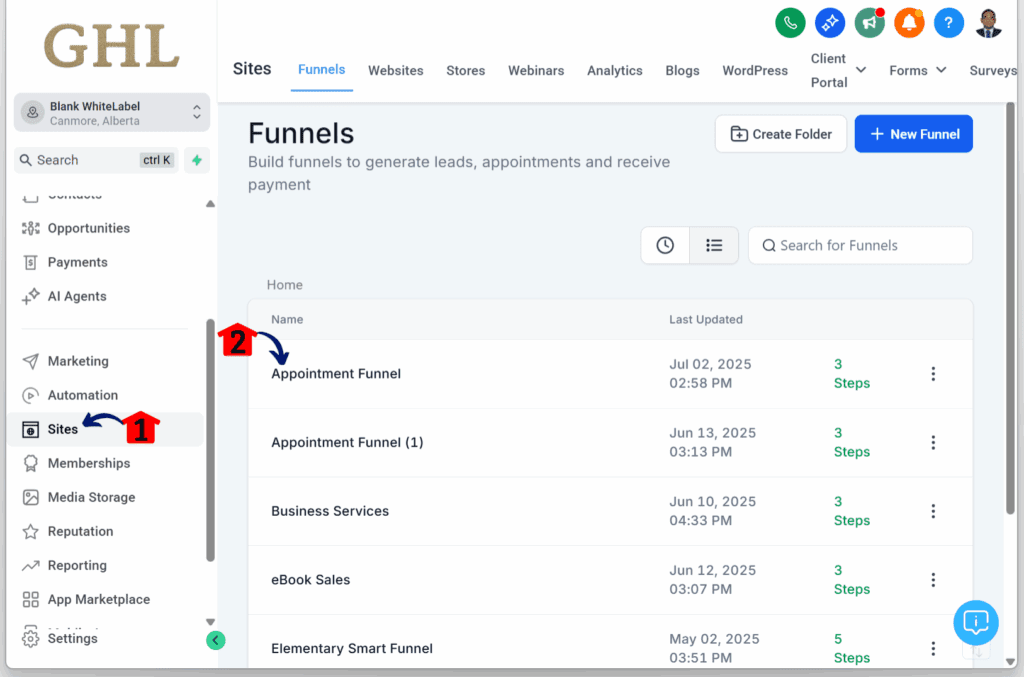
1.1 Click on the Sites Menu Item.
- Access the Sites section of GoHighLevel
- You’ll now be in the Sites section of GHL, where you can access the Funnels section from the top menu:
1.2 Click the Funnels tab.
- We’re using Funnels as the example in this walkthrough.
1.3 Click any existing funnel.
Step 02 – Open the Funnel Step Editor
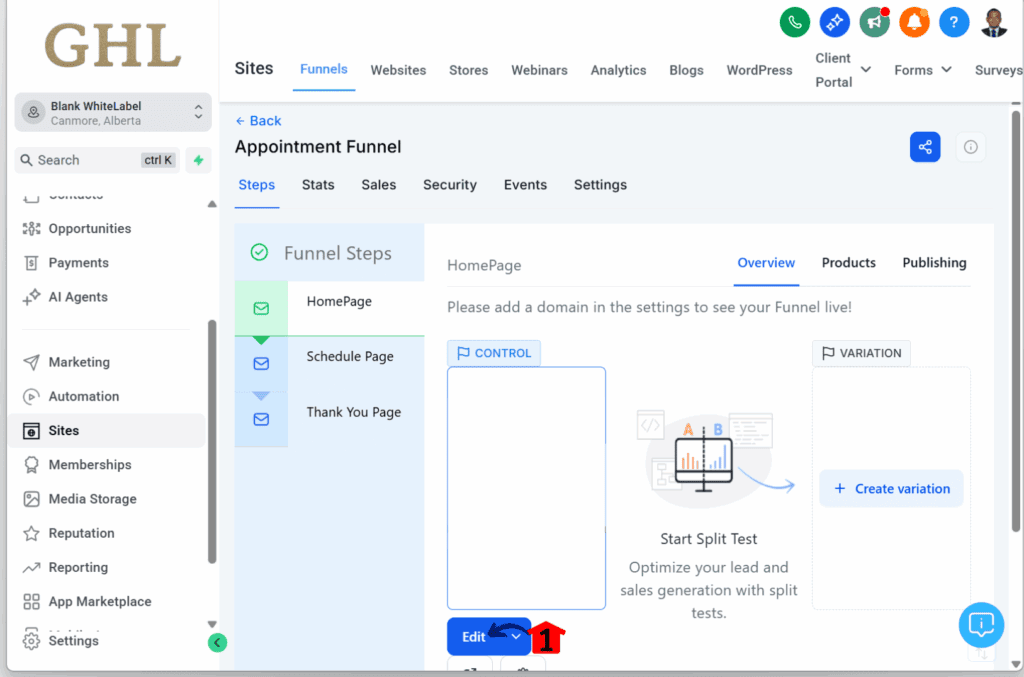
- You’ll now be taken to the dashboard of the selected funnel.
2.1 Click the Edit button on any funnel step.
- For this guide, we’re using the first step as the example.
Step 03 – Review the Funnel Canvas
- You’ll now be taken to the web builder/editor.
3.1 Check if the canvas has no elements, sections, rows, or columns.
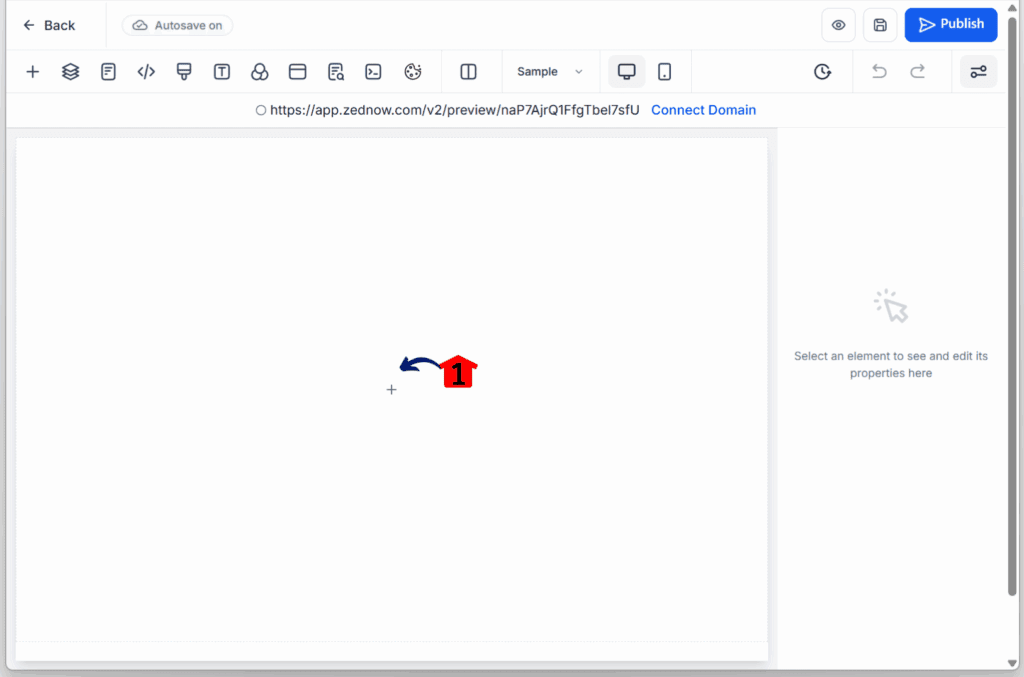
Step 04 – Add an Element
4.1 Drag-and-drop any element to test the update.
- In this example, we’re using a Paragraph element.
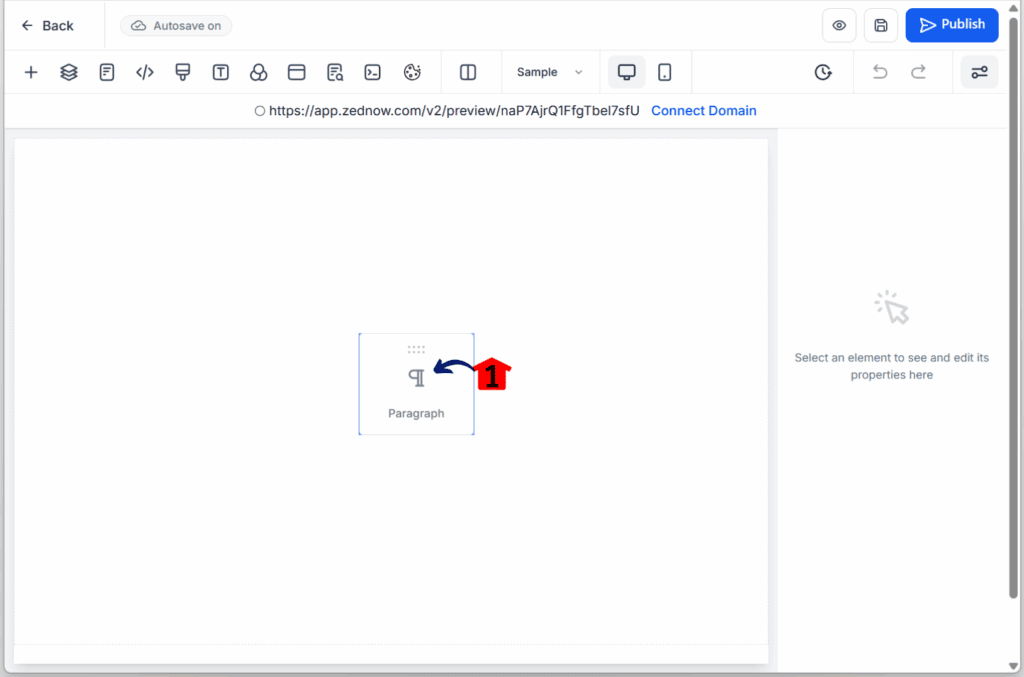
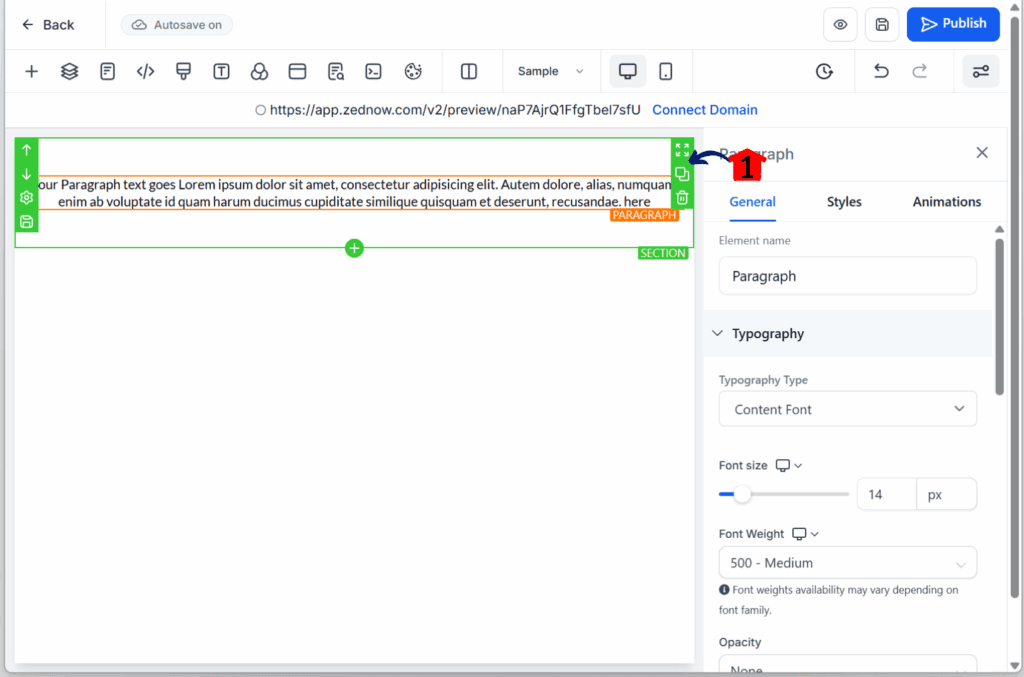
Step 05 – Confirm Auto-Structure
5.1 Check that a section, a column, and a single row automatically appear around the paragraph element.
Simple Update. Big Time Saver.
The new drag-and-drop builder doesn’t need a manual. You drop something in, and it builds the right structure for you—fast. It’s clean, visual, and does the heavy lifting behind the scenes.
If you’re building pages every day, this change matters. Less clicking, fewer layout mistakes, and more time focused on what you’re actually trying to do. Whether it’s a landing page, funnel, or quick edit—you’ll feel the difference.
Turn it on in Labs and see what it’s like to build without stopping to fix things. Then let us know—what’s the first thing you’re building with the new drag-and-drop builder?
Scale Your Business Today.
Streamline your workflow with GoHighLevel’s powerful tools.
