Tired of Rebilling Each Account One by One?
Manually setting up rebilling for each sub-account? It’s a grind. Agencies have dealt with it for too long—clicking into every account, setting up payments, repeating the same markup values. It’s slow. It’s repetitive. And now, it’s fixable. GoHighLevel just rolled out a bulk rebilling setup that lets you configure payment providers and markups across multiple accounts at once. Straight from the Sub-Accounts screen. No more jumping into every single location. Just select, apply, and move on.
This kind of update hits right where it matters—time and consistency. If you’re running SaaS mode or managing a bunch of client accounts, keeping billing in sync across all of them isn’t just helpful—it’s essential. The new bulk rebilling setup does that in minutes instead of hours.
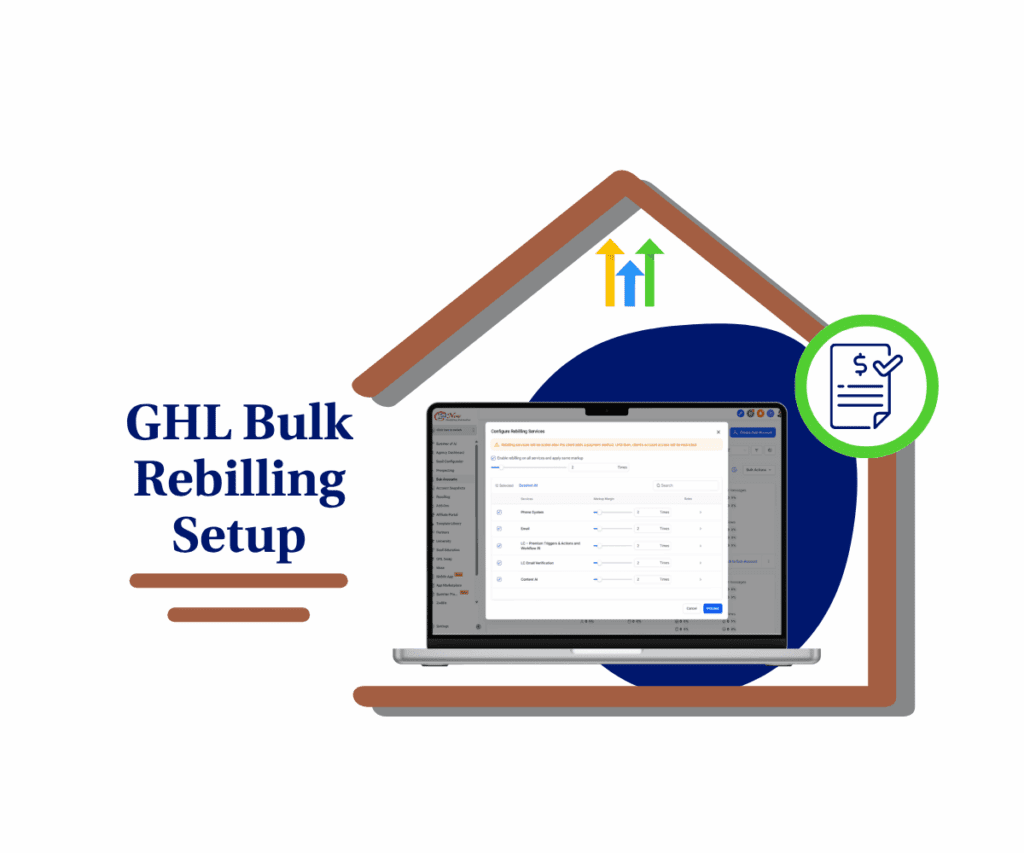
It’s also flexible. If a client already has a card on file, rebilling starts immediately. If not, it waits until they add one. Either way, you don’t have to lift a finger after setup. That’s a small shift with a big impact, especially if you’re scaling.
Bulk Actions Now Work for Rebilling Too
The old way of setting up rebilling was slow. You had to open each sub-account, choose the payment provider, set the markup, save it, and repeat. For one or two accounts, not a big deal. But if you manage dozens, it became a full-blown chore.
Now, with the new bulk rebilling setup, you can apply your settings to multiple sub-accounts at once. From the Sub-Accounts page, just select the accounts you want, hit “Set Rebilling” under Bulk Actions, pick your payment provider, drop in your markup values, and click proceed.
That’s it. You’ve just handled rebilling across all those accounts in a few clicks. This update isn’t just faster—it’s cleaner. You set everything once and apply it consistently. No more wondering if you missed one or used the wrong markup somewhere.
Automate marketing, manage leads, and grow faster with GoHighLevel.

GoHighLevel also handles activation for you. If a sub-account has a card already, rebilling starts right away. If not, it waits until the card is added—no extra steps for you. The bulk rebilling setup does the work behind the scenes.
It’s a simple change, but if you run an agency at scale, it’s one that’s going to save you a lot of time.
Why This Update Saves Time and Headaches
When you’re managing a bunch of sub-accounts, doing things one by one gets old fast. The new bulk rebilling setup takes that off your plate. It’s not about bells and whistles—it’s about getting the boring stuff done quicker and cleaner.
You no longer have to worry about copy-pasting settings or tracking what you did in each account. One setup covers them all. That’s a solid win for any agency juggling client billing.
Here’s why this matters:
- Faster setup: Handle rebilling for 10, 20, or even 100 sub-accounts in minutes.
- Fewer mistakes: One consistent payment provider and markup across the board.
- Better control: Keep your SaaS margins in check without digging through every account.
- Team-friendly: Anyone on your staff can follow the same process, no long checklists.
The bulk rebilling setup makes things simple, which is exactly what you need when you’re scaling. Less clicking, fewer errors, more time to focus on real growth.
How to Set Up Bulk Rebilling in Minutes
You don’t need a walkthrough video or support call to get this going. The new bulk rebilling setup is right where you’d expect it—on the Sub-Accounts page. No fluff. Just click, set, and done.
Here’s how to set it up without overthinking it:
Step 1.0 – Access the Main Left Hand Menu in your GoHighLevel Agency Account
- The Main Menu on the Left side of your screen has all the main areas that you work in when using GHL
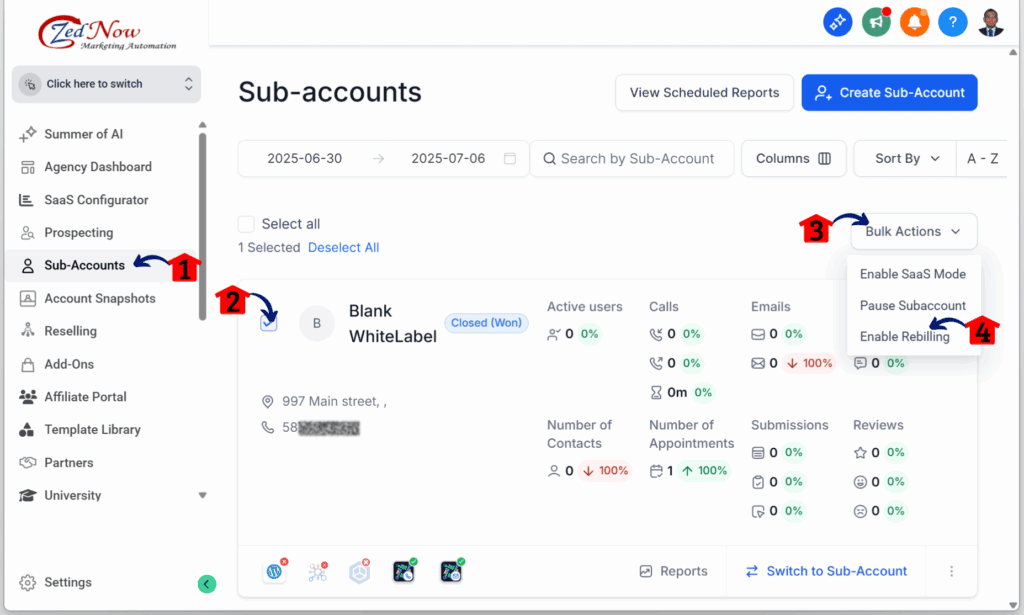
1.1 Click on the Sub-accounts Menu Item.
- Access the Sub-accounts section of GoHighLevel
- You’ll now be in the Sub-accounts section, where you can view the list of all your sub-accounts.
1.2 Select the sub-accounts you want to enable rebilling for.
- In this example, only one sub-account is selected.
- Once a sub-account is selected, the Bulk Actions button should become clickable.
1.3 Click the Bulk Actions button.
- Three drop-down options should appear.
1.4 Click the Enable Rebilling button.
- A payment provider pop-up should appear.
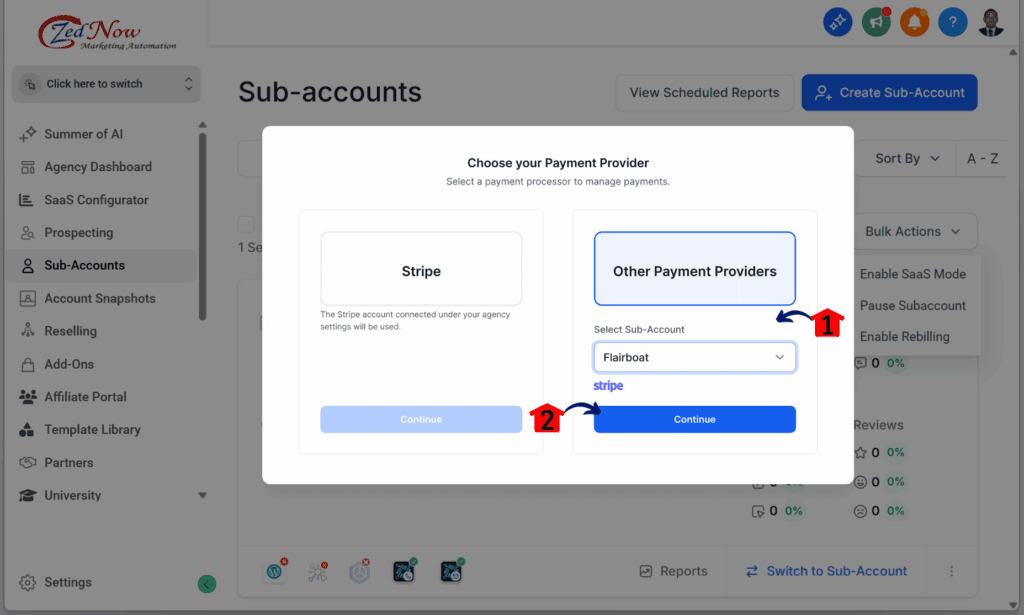
Step 2.0 – Choose a Payment Provider
2.1 Choose a payment method, either Stripe or another available provider.
2.2 Click the Continue button.
Step 3.0 – Set Up Billing Services
3.1 Configure the billing services you want for the selected sub-accounts.
3.2 Click the Proceed button when you’re done.
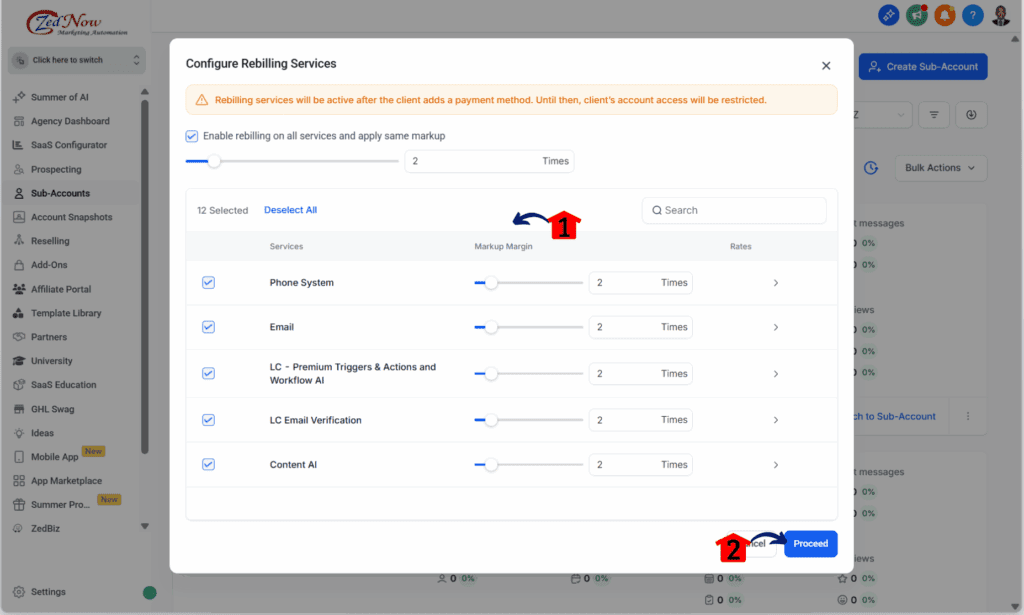
The bulk rebilling setup makes it easy to stay consistent without adding extra work. No mess. No follow-ups.
Simplify Rebilling and Focus on Growth
The new bulk rebilling setup isn’t flashy—but it solves a real problem. If you’ve ever lost 30 minutes clicking through accounts just to update markups, you know what I mean. Now, you can get it done in five.
This isn’t just about saving time. It’s about keeping things clear. One process, one set of rules, one screen to handle it all. No second-guessing. No wondering if that one account slipped through the cracks.
If you’re growing fast, this kind of control matters. You’ve got enough to keep track of—rebilling shouldn’t be on that list. Use this setup once and trust it’s done right.
Try it out the next time you onboard a new group of clients or update your pricing. And if you’re already using it, let us know how it’s working for you. Got a quick tip? Drop it in the comments.
Scale Your Business Today.
Streamline your workflow with GoHighLevel’s powerful tools.


