The best way to build a trial email sequence in GHL is with a simple three-day workflow. Start it when a user begins a free trial. Send the first email right away. Wait one day, send a value email, then send a final email that asks the user to stay.
When I tested this setup, I found that timing matters more than sending more emails. I use one simple rule. Give each email one job. The first welcomes, the second shows value, and the third asks the user to act.
Free trials give users time to test an offer before they pay. Recurly reports that trial results can vary based on the offer and trial setup. That makes a clear follow-up plan worth testing.
In this step-by-step GHL Growth Garage guide, you’ll build the full workflow from start to finish. You’ll set the trial trigger, add three emails, add one-day waits, and set the right time zone.
Once it is live, GHL handles the follow-up for each new trial user. You’ll have a simple trial email sequence that keeps users engaged and gives them a clear path to become paid users.
Quick Summary – Trial Email Sequence at a Glance
Purpose: You’ll learn how to build a three-day trial email sequence in GHL. It starts when a user begins a free trial.
Why It Matters: Trial users may leave if you don’t stay in touch. This workflow helps you follow up, show value, and guide them before the trial ends.
What You Get: You’ll build a GHL workflow with a trial trigger, three emails, and one-day wait steps.
Time to Complete: Plan for 15 to 30 minutes. Your product, free trial, and emails should be ready before you start.
Difficulty Level: This setup is easy for new GHL users. You only need the basic workflow tools to build it.
Key Outcome: Your trial email sequence will follow up with new users on time. It will help them see the value and choose if they want to stay.
See How to Build a Trial Email Sequence in GHL
Want to keep trial users active before their free trial ends? This video shows you how to build a simple trial email sequence in GHL from start to finish.
What you’ll learn:
- Set the trigger when a user starts a free trial
- Send the first email as soon as the trial starts.
- Add one-day waits so each email goes out on time.
- Send three emails that welcome, show value, and ask users to stay.
- Publish and save the workflow
Automate marketing, manage leads, and grow faster with GoHighLevel.

Why Trial Users Don’t Become Paying Customers
When someone starts a free trial, you have their interest. The hard part is keeping it. People get busy, forget to log back in, or fail to see enough value before the trial ends. If you leave them on their own, you may lose users who simply needed a clear next step.
A trial email sequence helps you stay in touch without chasing each user by hand. You can use each email to guide them through the trial and keep the focus on what matters.
- Welcome the user and help them take a useful first step.
- Show them what they can gain from your product.
- Give them a clear reason to come back and keep using it.
- Remind them when their free trial is close to ending.
- Ask them to stay before their access is put on hold.
You don’t need to push for a sale in every email. You need to help the user see why it makes sense to stay. With GHL, your trial email sequence can send the right message as the trial moves along. You give each user a clear path from starting the trial to choosing a paid plan.
Build Your Trial Email Sequence in GHL
You’ll build your trial email sequence in the Automations area of your GHL sub-account. The workflow starts when a user begins a free trial for the product you choose. It then sends three emails, with a one-day wait between each one.
You’ll set the trial trigger, add each email and wait step, choose the contact time zone, and publish the workflow. Before you start, make sure your product and free trial are already set up in GoHighLevel.
- Access the Workflow Builder from the Automation Section.
- Set the Subscription Trigger After Renaming Your Workflow.
- Rename the Subscription Trigger and Add a Filter.
- Set Global Products as the First Filter Before Adding Another Filter.
- Set the Trial Status as the Second Filter Before Saving the Trigger.
- Search for and Add the Send Email Action Element.
- Set the Sender Name, Email Address, and Subject Line.
- Add the First Nurture Email Subject Line and Body.
- Search for and Add the Wait Action Element.
- Rename the Wait Action Element and Set the Time Period to 1 Day.
- Add Two More Email Action Elements with a Single Wait Element Between Them.
- Open the Workflow Settings, Then Set the Contact Timezone Before Returning to the Builder.
- Publish and Save Your Workflow.
To start, make sure you are logged in to your GoHighLevel sub-account. Create your digital course product and enable a free trial.
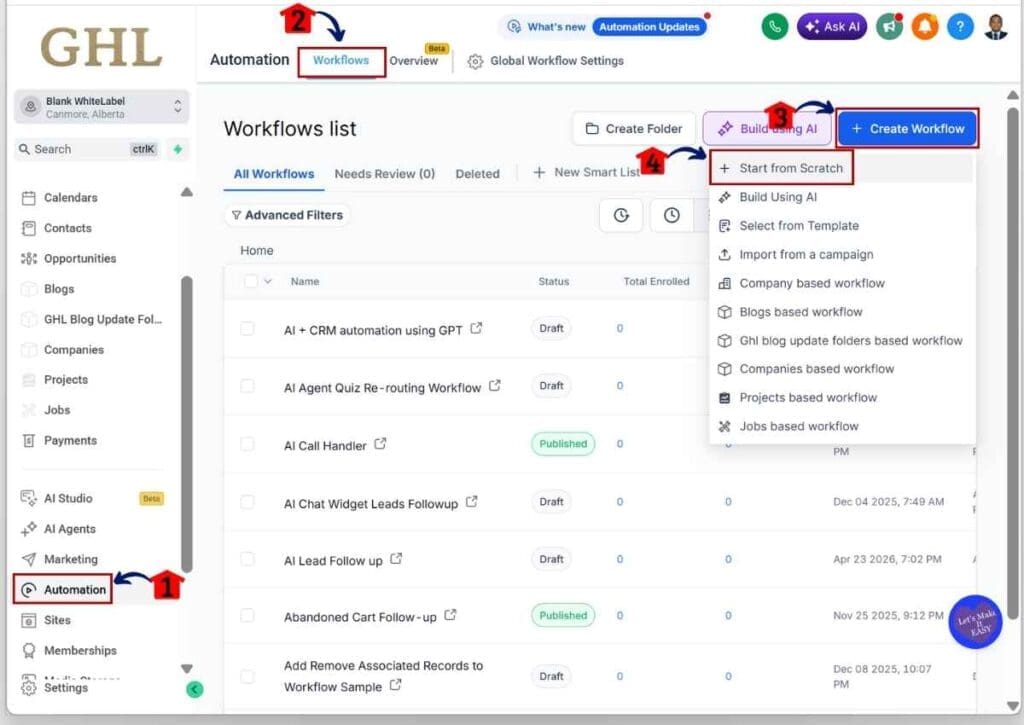
Step 01 – Access the Workflow Builder from the Automation Section
- Create your trial email sequence workflow using the Workflow Builder in the Automation section.
1.1 Click Automation.
- You will be taken to the Workflows tab by default.
1.2 Click Workflows.
- You will see a list of workflows, along with options such as Create Folder, Build Using AI, and + Create Workflow.
1.3 Click + Create Workflow.
- A dropdown menu will appear with several options, including + Start from Scratch.
1.4 Click + Start from Scratch.
- You will be taken to the Workflow Builder.
Step 02 – Set the Subscription Trigger After Renaming Your Workflow
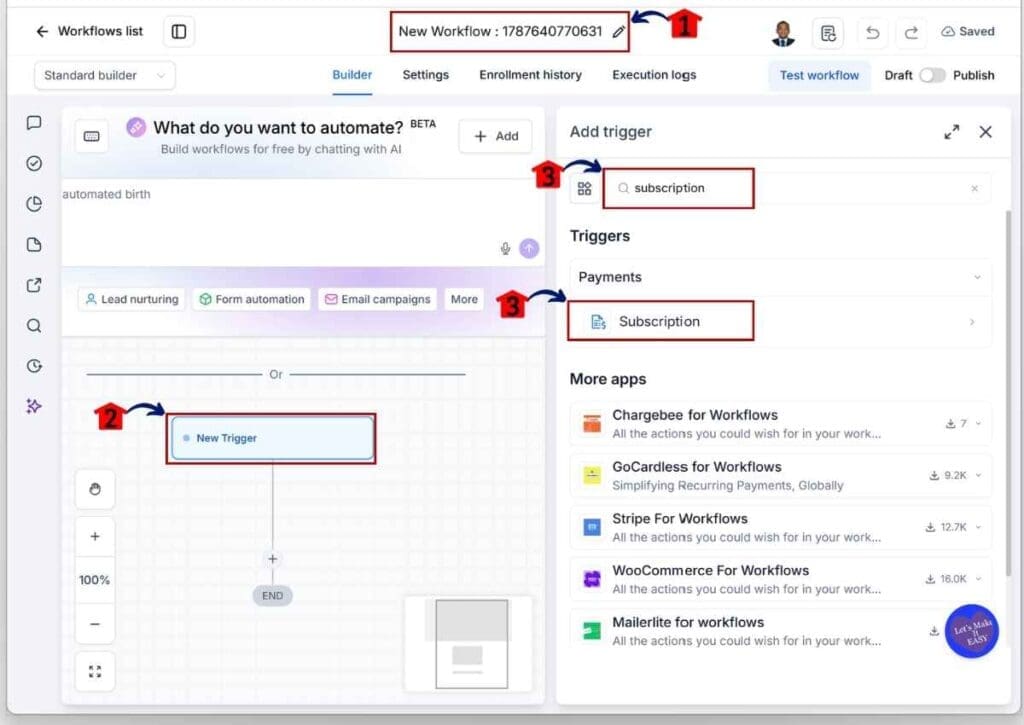
- Rename your workflow, then set the Subscription trigger.
2.1 Rename your trial email sequence workflow.
- Click the Pencil icon at the top of the Workflow Builder and enter a new name for your workflow.
2.2 Click Add New Trigger.
- The trigger library will appear, where you can search for and select a trigger.
2.3 Search for and select Subscription.
- You will be taken to the Subscription trigger settings.
Step 03 – Rename the Subscription Trigger and Add a Filter
- Give the Subscription trigger a clear name, then add a filter.
3.1 Rename the Subscription trigger.
- This makes it easier to identify on the trial email sequence workflow canvas.
3.2 Click Add Filters.
- A drop-down filter will appear below the Add Filters button.
Step 04 – Set the Global Products as the First Filter Before Adding Another Filter
- Choose Global Products as the filter, then select your created product before adding another filter.
4.1 Select Global Products from the first drop-down filter set.
- Another drop-down filter will appear below the said filter.
4.2 Choose Is as the operator
- The chosen option should appear in this specific filter.
4.3 Choose your created product.
- The chosen product should appear in the filter.
4.4 Click Add Filters.
- A drop-down filter will appear below the current filter set.

Step 05 – Set the Trial Status as the Second Filter Before Saving the Trigger
- Choose Status as the filter before saving the trigger.
5.1 Select Status from the second drop-down filter.
- Another drop-down filter will appear below the second filter.
5.2 Choose Is as the operator
- The chosen option should appear in this specific filter.
5.3 Choose Trial as the condition
- The chosen option should appear in this specific filter.
5.4 Click Save Trigger.
- The trigger will now appear on the trial email sequence workflow canvas.

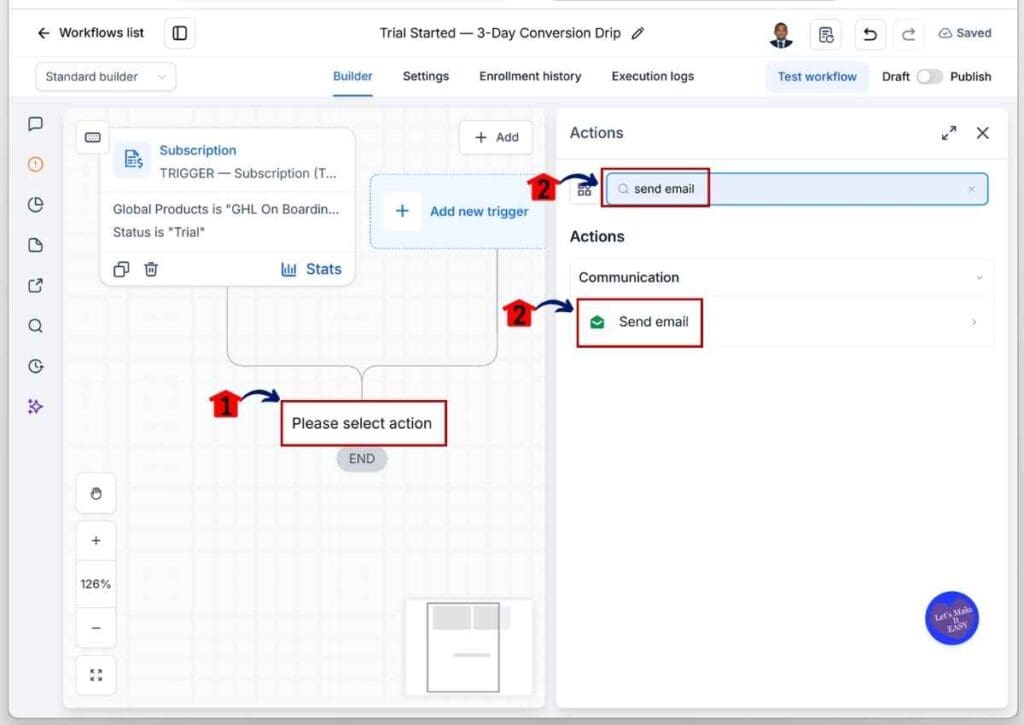
Step 06 – Search for and Add the Send Email Action Element
- Click Add New Element, then search for and select the Send Email action element.
6.1 Click Add New Element.
- The action library will appear on the right side of the canvas.
6.2 Search for and select Send Email.
- You will be taken to the Send Email settings.
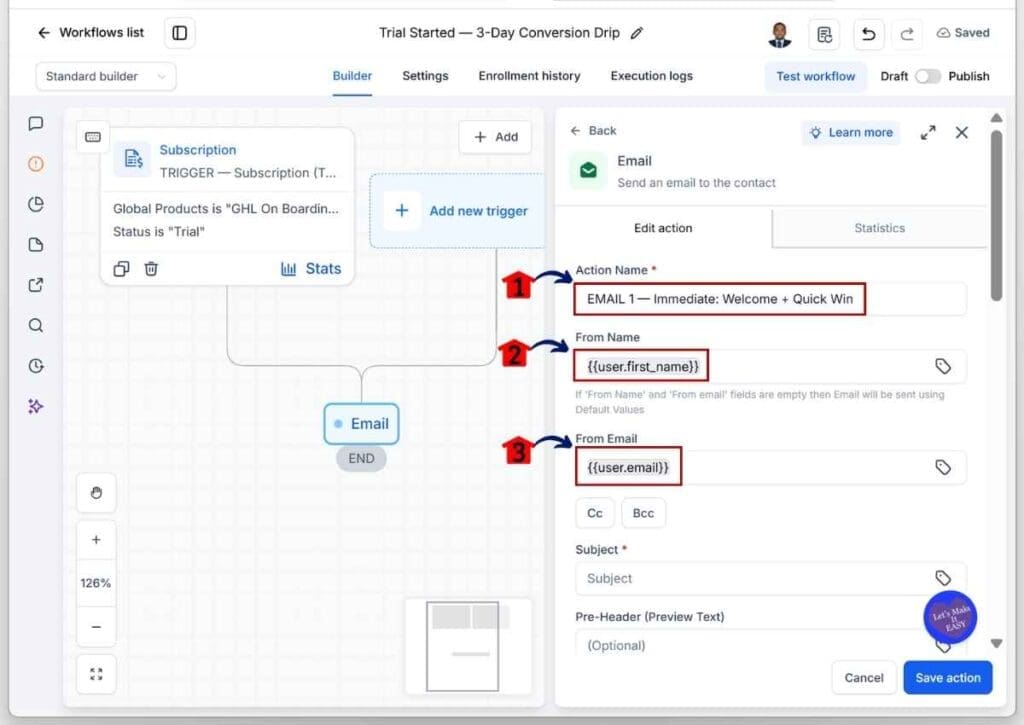
Step 07 – Set the Sender Name, Email Address, and Subject Line
- Set the sender details and subject line for this trial email sequence workflow email.
7.1 Rename the Send Email action element.
- Use a clear and simple name.
7.2 Enter the sender name.
- You can also use a custom value for the sender name.
7.3 Enter the sender email address.
- You can also use a custom value for the sender email address.
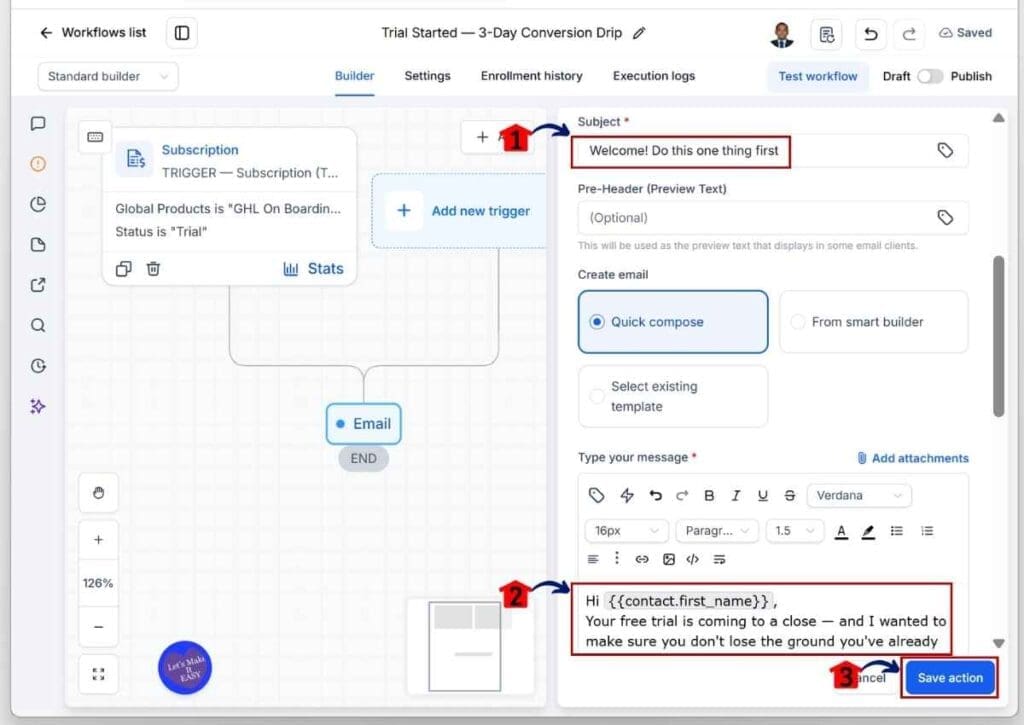
Step 08 – Add the First Nurture Email Subject Line and Body
- Enter the subject line and content for your first nurture email.
8.1 Enter the first nurture email subject line.
- Keep the subject short and clear.
8.2 Enter the first nurture Email body.
- Keep the message clear, polite, and helpful.
8.3 Click Save Action.
- The Send Email action element will now appear on the trial email sequence workflow canvas.
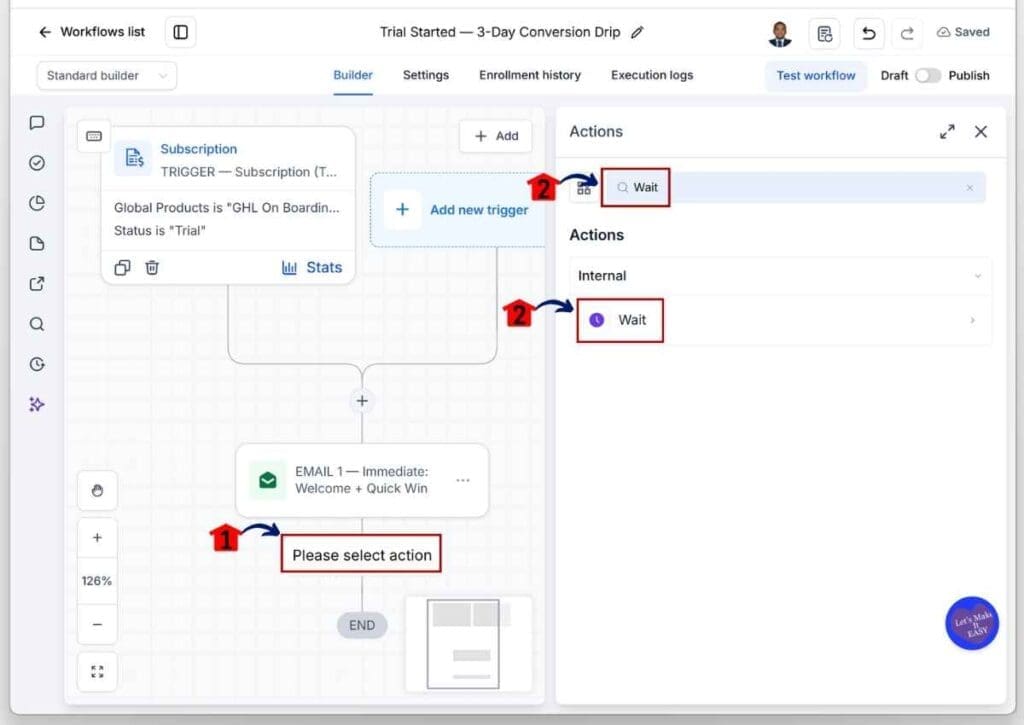
Step 09 – Search for and Add the Wait Action Element
- Click the Add New Element button, then search for and select the Wait action element.
9.1 Click Add New Element.
- The action library will appear on the right side of the canvas.
9.2 Search for and select the Wait action element.
- You will be taken to the Wait settings.
Step 10 – Rename the Wait Action Element and Set the Time Period to 1 Day
- Rename the action element and choose the For a Set Period of Time option.
10.1 Rename the Wait action element.
- This makes the trial email sequence workflow easier to read on the workflow canvas.
10.2 Select the For a Set Period of Time option.
- You will see two input boxes where you can set the time period for this action element.
10.3 Type 1 in the Time Period field.
- By default, the time period is set to minutes.
10.4 Set the Unit to Days.
10.5 Click the Save Action button.
- The Wait action element will now appear on the trial email sequence workflow canvas.

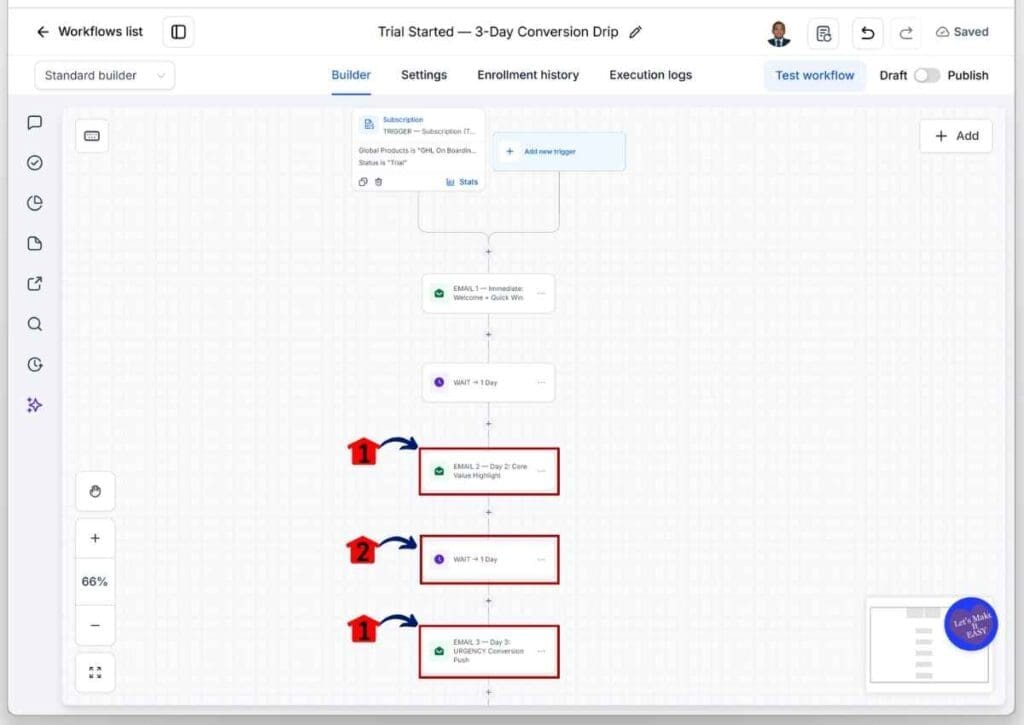
Step 11 – Add Two More Email Action Elements with a Single Wait Element Between Them
- Add the second nurture email, then add another Wait element before adding the third nurture email.
11.1 Repeat steps 06 to 08 to create two more nurture emails.
11.2 Repeat steps 09 to 10 to create a Wait element between the second and third nurture emails.
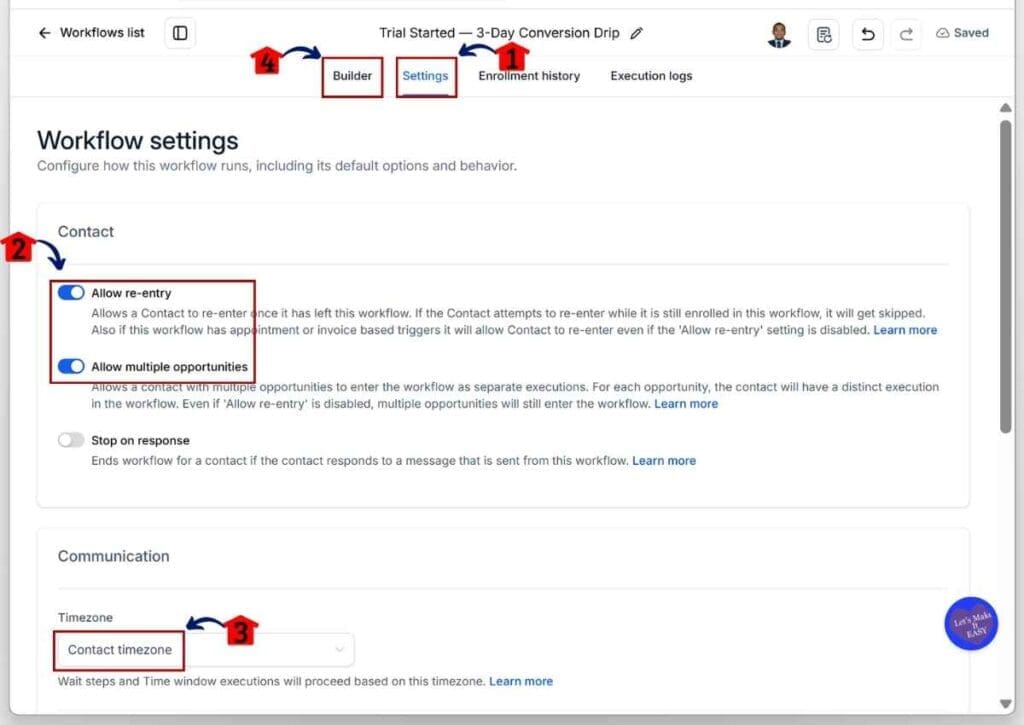
Step 12 – Open the Workflow Settings, Then Set the Contact Timezone Before Returning to the Builder
- Click the Settings tab at the top of the trial email sequence workflow canvas, then set the Contact Timezone in the Communication section before returning to the workflow builder.
12.1 Click the Settings tab.
- You will be taken to the workflow settings section.
12.2 Toggle on the Allow re-entry and Allow multiple opportunities.
12.3 Set the Contact Timezone.
- This helps the workflow send messages based on the contact’s local timezone.
12.4 Click the Builder tab.
- You will return to the workflow canvas.
Step 13 – Publish and Save Your Workflow
- Turn on Publish and save your trial email sequence workflow.
13.1 Turn on the Publish toggle.
- The toggle will turn blue to show that it is active.
13.2 Click Save.
- The red dot on the Save button will disappear, confirming that your trial email sequence workflow has been saved.

Get More Trial Users to Convert
Your trial email sequence does not need to be long or complex. In most cases, simple emails are easier to read and act on. Give each email one clear job, then let the user take the next step.
Keep these tips in mind as you set up your emails in GHL.
- Send the first email right away. Welcome the user and give them one useful action to take.
- Keep each email simple. Focus on one message and one clear next step.
- Show value before you ask for a sale. Use the second email to remind the user why they started the trial.
- Make the last email direct. Tell the user when the trial will end and what will happen to their access.
- Add the contact’s name when it feels natural. A small personal touch can make the email feel less like a system message.
- Give each email room to work. A one-day wait keeps your trial email sequence moving without sending too much at once.
- Test the workflow before it goes live. Check your trigger, product, trial status, emails, links, and wait steps.
You do not need to chase the user in every email. Your job is to keep the next step clear. Start with a quick win, show useful value, then give the user a clear choice before the trial ends.
Put Trial Follow-Up on Autopilot
Once your trial email sequence is live, GHL handles the follow-up for you. When a user starts the right product trial, the workflow begins based on the rules you set. You don’t have to check for new trial users or send each email by hand.
Each email has a clear role in the process.
- Your first email welcomes the user and gives them a good place to start.
- Your second email reminds them of the value they can get while the trial is still active.
- Your final email lets them know the trial is ending and gives them a clear choice to stay.
This is where the trial email sequence earns its keep. You set the path once, and each new trial user gets the same timely follow-up. That keeps your process clear and consistent without adding another task to your day.
What Results Can You Expect?
A trial email sequence will not turn every trial user into a paid user. What it can do is give each user a clear path while the trial is still active. You stay in touch, show value, and ask them to make a choice before their access ends.
With the workflow in place, you can expect a few useful results.
- More trial users get the same follow-up at the right time.
- Users have clear reasons to return and use your product.
- Your last email gives users a clear next step before the trial ends.
- You spend less time sending the same emails by hand.
- You get a set process that you can test and improve over time.
The real win is having a process you can measure. Watch how users respond to each email and track how many choose a paid plan. If an email gets poor results, change the message and test it again. Your trial email sequence gives you a solid base to learn what works for your users.
Trial Email Sequence Questions Answered
A trial email sequence is simple once you know how the parts work together. Still, a few questions tend to come up when you build one in GHL. These quick answers will help you set up the workflow and make better choices for your trial users.
Turn More GHL Trials Into Paid Subscriptions
A trial email sequence gives your users a clear path during their free trial. You welcome them, help them see the value, and remind them to act before the trial ends. Each email has a purpose, so your follow-up stays useful and easy to follow.
Once you set up the workflow in GHL, much of the daily work is done for you. Each new trial user can get the same follow-up at the right time. You can then track what works, adjust your emails, and improve the sequence based on real results.
Keep the process simple. Give each email one job and make the next step easy to understand. You don’t need to push hard for the sale. Give users a fair chance to use your offer, see its value, and decide if they want to stay.
For more GoHighLevel guides and white-label resources, visit GHL Growth Garage. Start with this trial email sequence, test it with your own offer, and use what you learn to make your next trial even better.
Scale Your Business Today.
Streamline your workflow with GoHighLevel’s powerful tools.