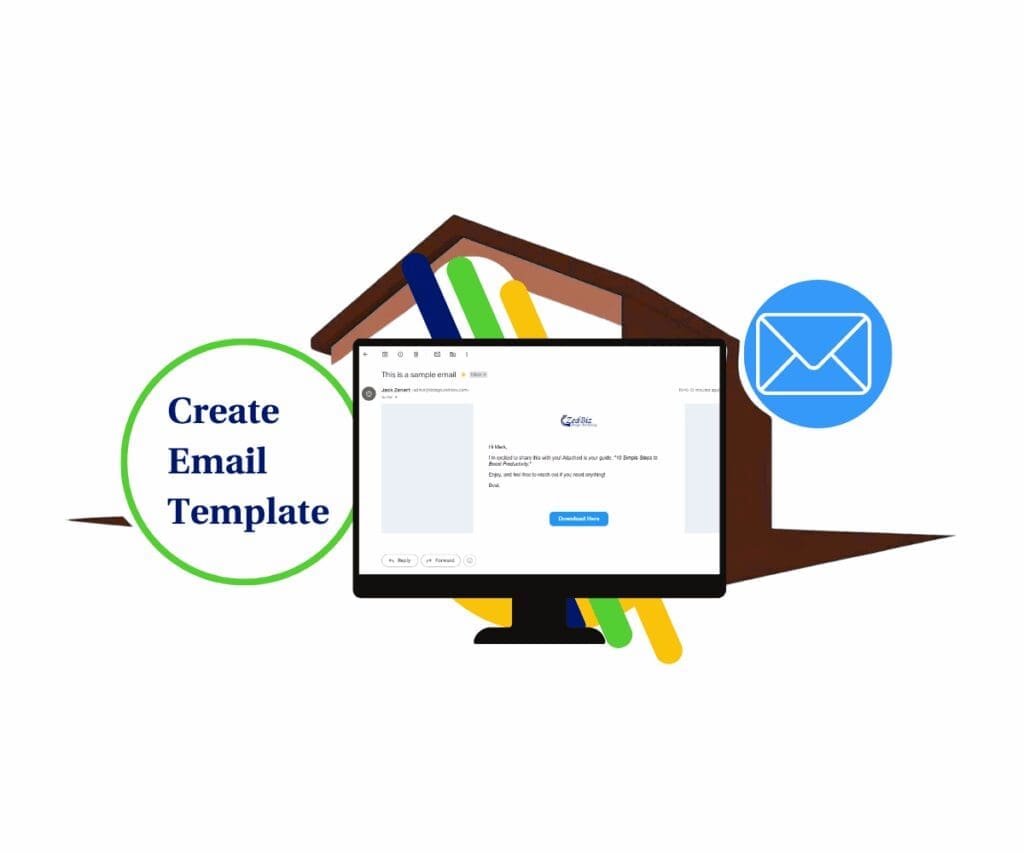
Create, Edit and Design an Email Template
This 5-minute guide will show you how to professionally create email templates in GoHighLevel that you can reuse for all your campaigns, saving you hours of repetitive work each week. You know that feeling when you’re trying to send a quick email, but suddenly, you’re trapped in a never-ending maze of buttons, menus, and “Wait, where was that setting again?” Yep. We’ve all been there. But here’s the good news—creating an email template in GoHighLevel is actually easier than choosing what to watch on Netflix. And in case you’re thinking, Oh great, another boring tutorial—relax, I promise to keep this as smooth as your morning coffee.
So, here’s the deal. You want efficiency. You want your emails to look polished and professional without spending hours tweaking fonts or playing hide-and-seek with the “Save” button. That’s why we’re breaking it down into simple, step-by-step instructions—so you can get in, create your email template, and get back to more important things (like, I don’t know, finally clearing your inbox). From adding logos and call-to-action buttons to making sure your sender details don’t scream mystery spammer, we’ve got you covered.
Let’s walk through this together. By the end, you’ll know exactly how to create email templates that look polished, professional, and ready to send—no design degree or marketing jargon required. Just clear steps, smart structure, and a final product you’ll actually want to hit “send” on.
Quick Summary
Purpose: Craft professional email templates swiftly using GoHighLevel’s intuitive builder.
Why it matters: Efficiently designed emails enhance brand consistency and streamline communication.
What you get: A polished, reusable email template ready to engage your audience.
Time to Complete: 7 minutes
Difficulty Level: Beginner
Prerequisites: Access to a GoHighLevel sub-account
Key Outcome: Branded, reusable email template
Why Taking Time to Create Email Templates Matters More Than Ever
When 87% of marketers say email is their top free organic distribution channel (HubSpot, 2024), having a solid email template isn’t optional—it’s survival. Creating email templates isn’t just about saving time; it’s about locking in consistency, brand tone, and delivery across every campaign.
In GoHighLevel, to create email templates streamline your workflow and eliminates guesswork. Instead of building from scratch every time, you’re pulling from ready-made, branded assets—keeping your campaigns tight and on-message.
Automate marketing, manage leads, and grow faster with GoHighLevel.
Even better, companies that automate and template their emails see 90% higher click-through rates and 150% more engagement (Campaign Monitor, 2023). That’s not theory. That’s what happens when your outreach stops being random and starts being intentional.
How To Create Email Templates
Step 01 – Access the Main Left Hand Menu in GoHighLevel
- The Main Menu on the Left side of your screen has all the main areas that you work in when using GHL
1.1. Click on the Marketing Menu Item.
- From the Main Menu on the left-hand side of your GoHighLevel dashboard (where you access all key tools and sections), click on the Marketing menu item.
1.2. Click on the Emails menu link.
1.3. Choose Templates in the dropdown menu.

Step 2: Start a New Template
2.1 Click the + New button.
- Located at the top-right of the dashboard.
2.2 Select the + Blank Template option.
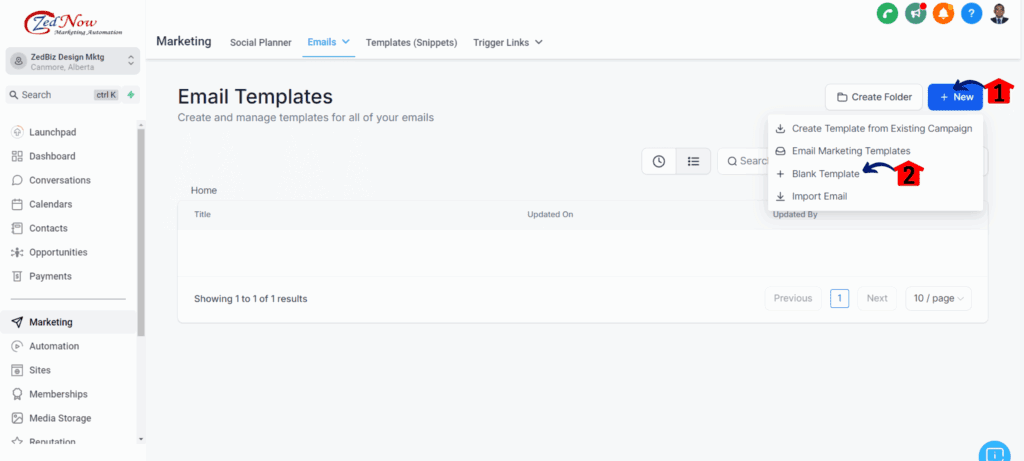
Step 3: Choose the Design Editor
3.1 Click the Select button under the Design Editor option.
- This button will lead you to the email canvas.
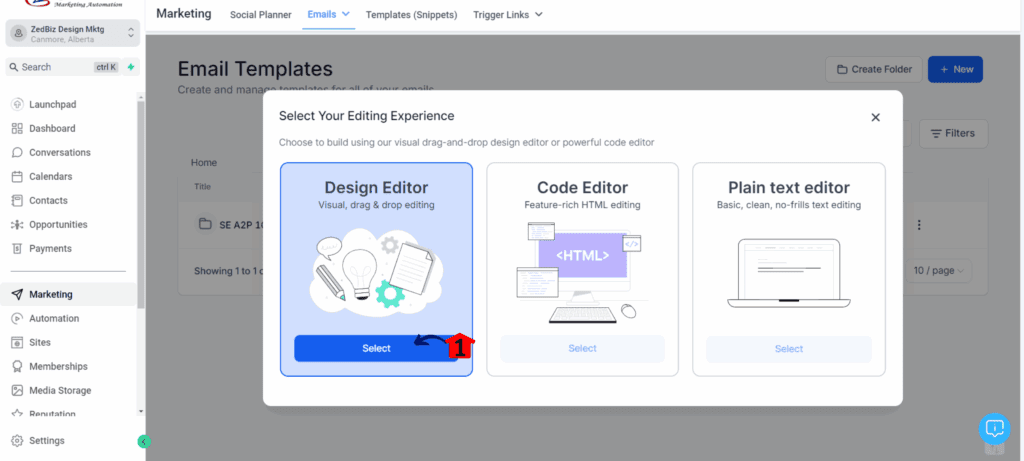
Step 4: Clean Up the Canvas
4.1 Rename your email template.
- This is located on the upper portion of the canvas.
4.2 Click on any unneeded element on the canvas.
4.3 Click the delete icon to remove it.
- You’ll see a small trash icon.
4.4 Repeat this for any other extra elements.
- Aim for a clean starting point.
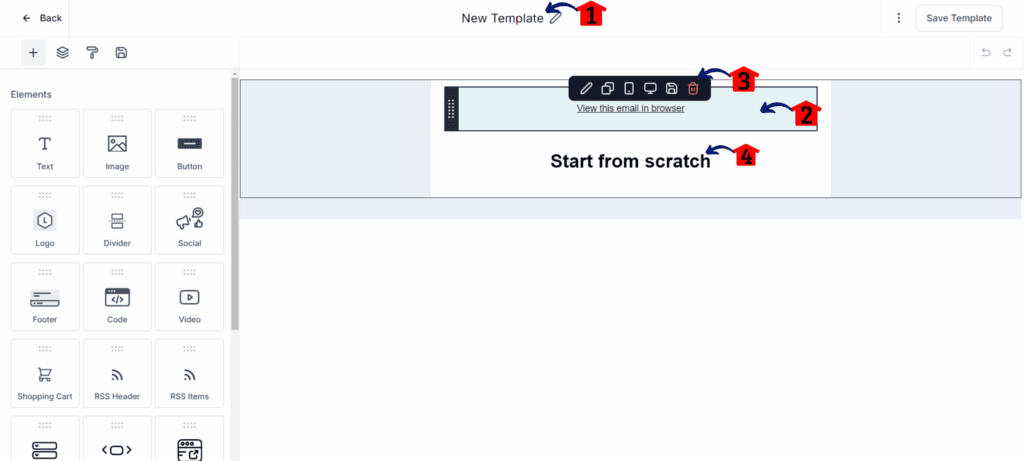
Step 5: Add Your Logo
5.1 Go to the Elements tab and drag the Image element.
- This lets you add your logo or other visuals.
5.2 Drop the image onto the email canvas.
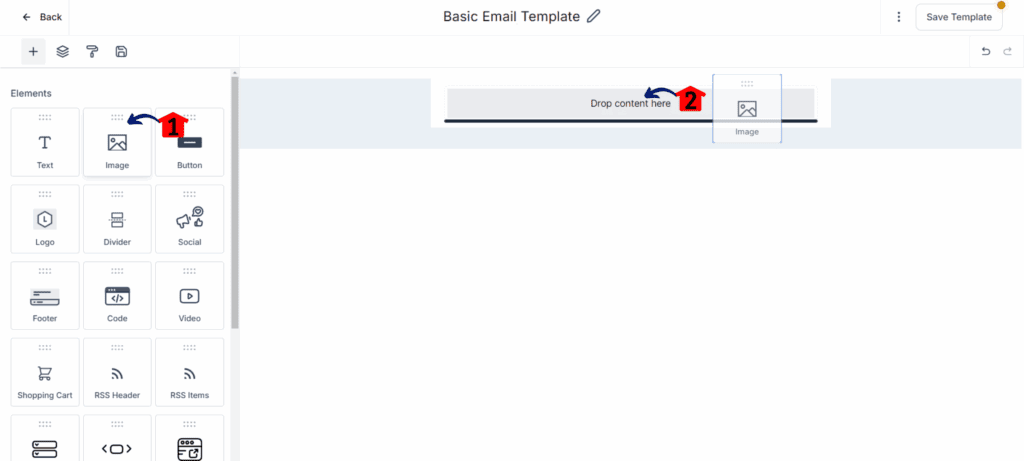
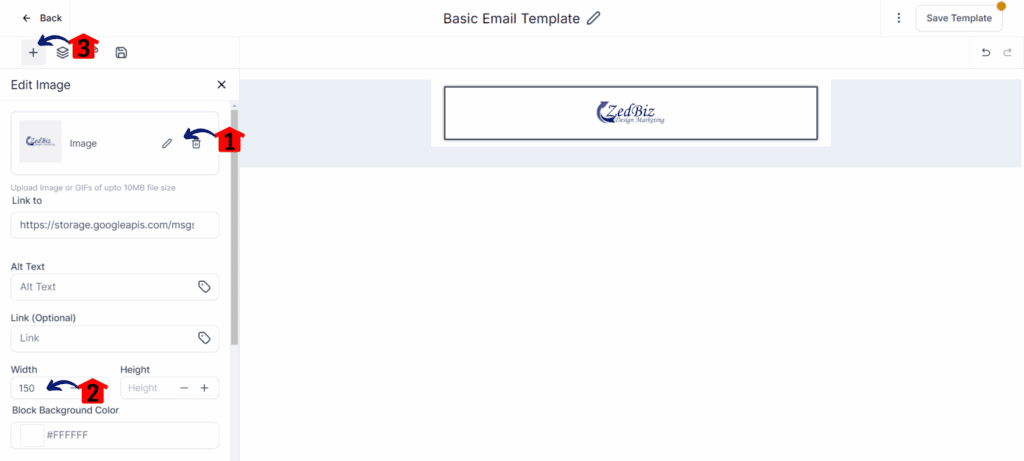
Step 6: Upload and Adjust Your Logo
6.1 Click the edit button on the image block.
- This opens the image settings located on the left side of the canvas.
6.2 Upload your logo and adjust the size.
6.3 To add text, click the + button in the editor.
- This adds a new text block.
Step 7: Add Text Content
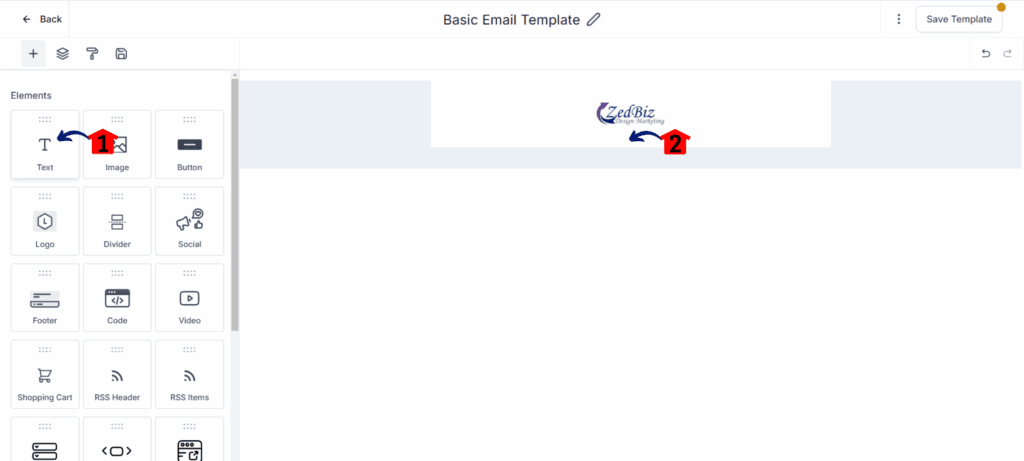
7.1 Drag the Text element from the sidebar.
- The Text element is located on the left side of the elements library beside the image element.
7.2 Drop it onto the canvas.
- You’ll see your text element will appear in the canvas.
Step 8: Write Your Email Copy
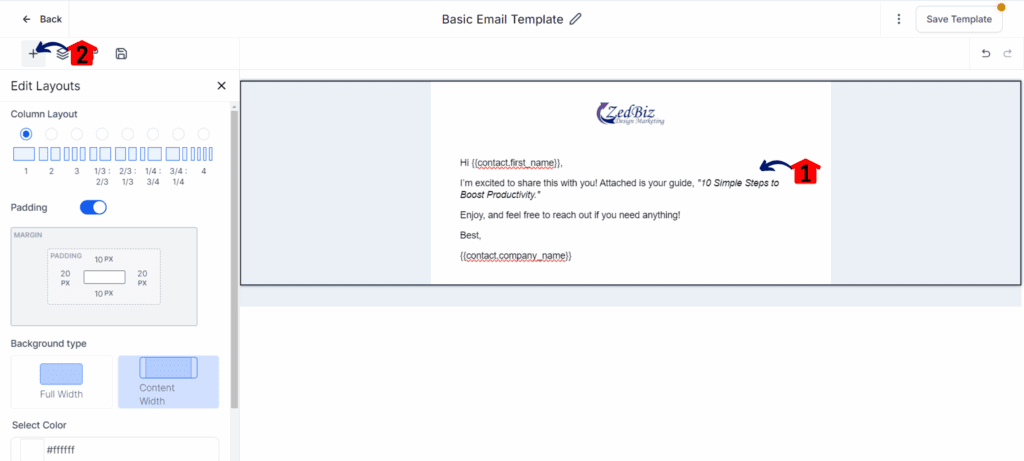
8.1 Type the body of your email directly in the text block.
- Professional sender details reduce the chance of your email being marked as spam.
8.2 Click the + button again to add a call-to-action.
- The elements library pop-up will appear on the left side of the canvas.
Step 9: Add a CTA Button
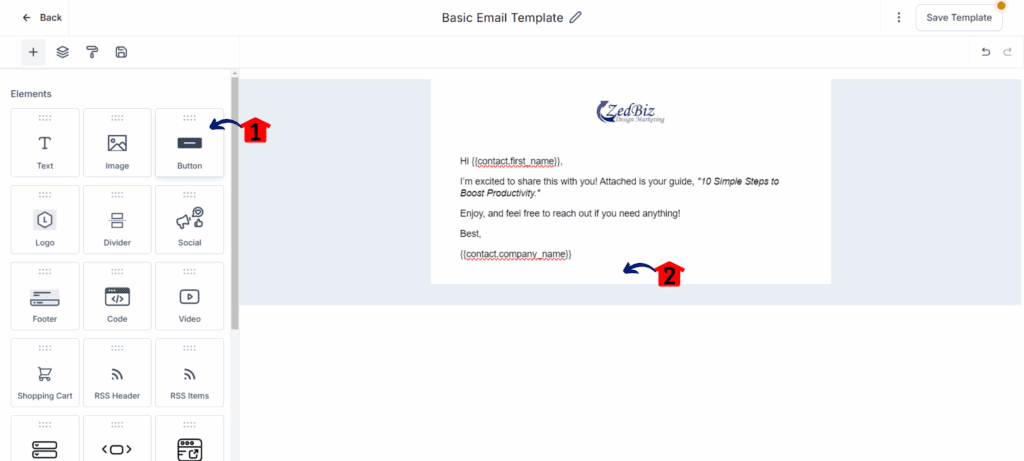
9.1 Drag the Button element onto the canvas.
9.2 Drop it below your email text.
- The button element should appear in the canvas.
- Adding a clear CTA button increases click-through rates by an average of 28% compared to text links.
Step 10: Customize the Button
10.1 Change the button label (e.g., Download Now).
- Be specific and benefit-focused (e.g., Download Now).
10.2 Click the Actions dropdown.
- This controls what happens when users click the button.
- A list of options such as URL, Mail, File, and other options should appear.
10.3 Select File, then upload your document.

Step 11: Open Template Settings
11.1 Click the three dots icon on the top right.
- This opens more options.
- The Test Email, Preview Template, See Version History, and the Settings option should appear.
11.2 Click Settings.

Step 12: Finalize Template Settings
12.1 Add the sender name.
- Use a name your audience will recognize.
12.2 Enter the sender’s email address.
- Make sure it’s verified.
12.3 Type your email subject line.
- This is the first thing your audience sees.
12.4 Add preview text (optional but helpful).
- Tease the content of your email.
12.5 Click Save.

Step 13: Preview and Test
13.1 Click the three dots icon again.
13.2 Click Preview Template to see how it looks.
- The preview tab should appear in your browser.
13.3 Click Test Email.

Step 14: Send a Test Email
14.1 Enter the sample recipient’s email address.
14.2 Click Send Test Email.
- This is located on the lower right of the test email pop-up.

Step 15: Wrap-Up
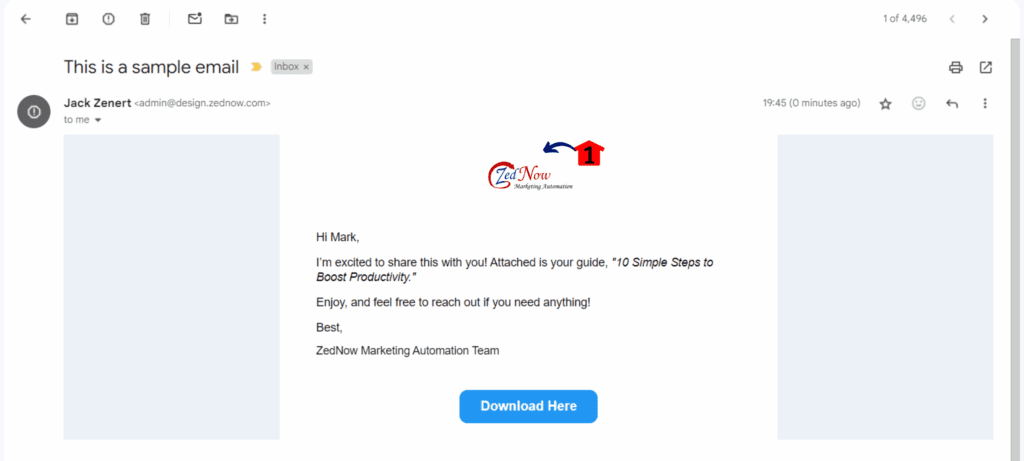
15.1 Congrats—you’ve built a clean, branded email in GoHighLevel.
- Pro tip: Save this template as a base for future emails.
Strategic Applications: Templates That Work Across Niches
Real estate agents use email templates to send property listings with built-in calls to action, turning interest into showings on autopilot. Gyms and wellness studios drop weekly class schedules and promos, always on-brand, always on time.
Ecom brands lean into product launch templates, using urgency and clean design to spike conversions. Local service businesses (like HVAC or dental) use reminder templates that reduce no-shows and boost repeat bookings without lifting a finger.
Whatever your industry, to create email templates give you repeatable wins. It’s not about templating the message—it’s about templating the momentum.
Hit Send with Confidence and Save Time
And just like that, you’ve nailed it. When you create email templates that actually work, everything gets easier. No more starting from scratch, second-guessing your layout, or scrambling at the last minute. Just open your template, make a few quick edits, and send it off with confidence. It’s simple, repeatable, and way less frustrating than building furniture with missing parts
Related Posts You’ll Find Useful:
- Stop Guessing, Start Seeing: Your New Email Stats Dashboard is Here!
- Take Command: Effortless GHL Email Campaign Control and Enhanced Oversight Arrive!
- Stop Guessing, Start Knowing: The GHL Unified Email Dashboard Revolutionizing Your Marketing Insights
- Say Goodbye to Clunky Emails: Master Email Builder Spacing with GoHighLevel’s New Spacer Element!
- Your Emails Just Got Safer: GoHighLevel’s Email Autosave Feature is Here!
Scale Your Business Today.
Streamline your workflow with GoHighLevel’s powerful tools.
