Imagine having a powerful tool that not only helps you grow your business but also gives you a simple system to attract leads and turn them into loyal customers — all on autopilot. That’s exactly what this subscription funnel offers. It’s a complete package, combining a lead generation funnel to bring in fresh prospects and a sales funnel to turn those leads into paying subscribers. Plus, it’s built on GoHighLevel, a game-changing platform designed to handle everything from emails and follow-ups to landing pages and automations, all in one place.
Whether you’re a marketer looking to expand your services or a business owner ready to streamline your growth, this subscription gives you access to your very own GoHighLevel sub-account. No tech headaches, no guesswork — just a smooth, done-for-you system that works behind the scenes to grow your business while you focus on what you do best. It’s more than just a funnel. It’s a gateway to making marketing simple, effective, and seriously exciting.
What makes this offer even more powerful is that it’s not just about giving you access to a tool — it’s about handing you a complete system for success. From capturing leads to nurturing relationships and closing sales, every step is carefully set up to save you time and boost your results. You’ll have the freedom to customize your sub-account to fit your unique brand and business needs while tapping into proven strategies that drive growth. It’s like having a personal marketing assistant working around the clock, so you can focus on the big picture.
Here’s a step-by-step guide to help you create your own subscription funnel using GoHighLevel:
Pre-Requisite and Requirements
You need to complete the following setup before creating a subscription offer funnel.
- You need to set up your domain name.
- You need to set up your business email for email marketing.
- You need to integrate at least one mode of payment (PayPal, Stripe, etc)
- Logo and images.
- Branding color kit (fonts and hex color codes).
Automate marketing, manage leads, and grow faster with GoHighLevel.
How to create a lead generation funnel
How to create a lead generation opt-in page
Step 01: On your GoHighLevel Dashboard:
- Click Sites.
- Click the Funnels tab.
- Click the + New Funnel button.

Step 02: On the Create New Funnel pop-up:
- Click the “From Templates” radio button.
- Click Continue.

Step 03: On the Template Library pop-up:
- Click the Lead Capture funnel type.
- Choose your preferred template. For this example, the Skin Care Sales template is chosen.

Step 04: On the template pop-up:
- Review the template layout.
- Click the Continue button.

Step 05: On the page builder canvas:
- Click the “T” icon.
- Add your branding font and colors.
- Click the Exit button.

Step 06: On the page builder canvas, edit your above-the-fold/hero section.

Step 07: On the page builder canvas, edit your benefits section.

Step 08: On the page builder canvas, edit your “What You Get” section.

Step 09: On the page builder canvas, edit your “How To” section.

Step 10: On the page builder canvas, edit your Call to Action section.

Step 11: On the page builder canvas, edit your footer section.

Step 12: After you have edited the desktop layout, edit the mobile responsiveness of the landing page.

Step 12: After you have edited the desktop layout, edit the mobile responsiveness of the landing page.

Step 13: Once you are done with the design:
- Click the SEO icon.
- Do on-page SEO.
- Click the Save button.
- Click the Back button.

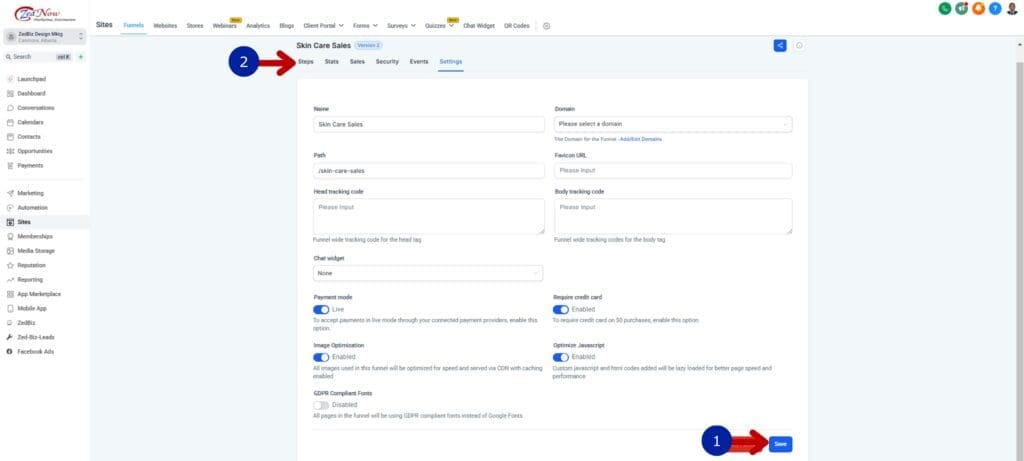
Step 14: On your funnel steps dashboard, click the Settings tab.

Step 15: On the funnel steps settings:
- Change the name of your lead generation funnel.
- Add the path or URL.
- Add your domain.
- Add the link to your favicon (Make sure to upload your favicon in the Media section).

Step 16: On the funnel steps settings:
- Click the Save button.
- Click the Steps Tab
How to Create an opt-in form
Step 01: On your Funnel Steps Dashboard, click the Forms tab.

Step 02: On the Forms tab:
- Click the + Add Form button.
- Click the From Templates radio button.
- Click Continue.

Step 03: On the Template Library popup:
- Check a category for better choices.
- Choose a template form; for this example, the Generic Sign-Up is chosen.

Step 04: On the template popup:
- Review the form template.
- Click the Continue button.

Step 05: On the Form Canvas:
- Rename your opt-in form.
- Edit the opt-in form. For more tutorials on how to edit a form, visit this guide.

Step 06: Once you are done designing the form:
- Click the Save button.
- Click the Back button.

Step 07: On your GoHighLevel dashboard:
- Click the Funnels tab.
- Click the previously created lead generation funnel.

Step 08: On the Funnel Steps Dashboard:
- Click the lead generation opt-in page.
- Click the Edit button.

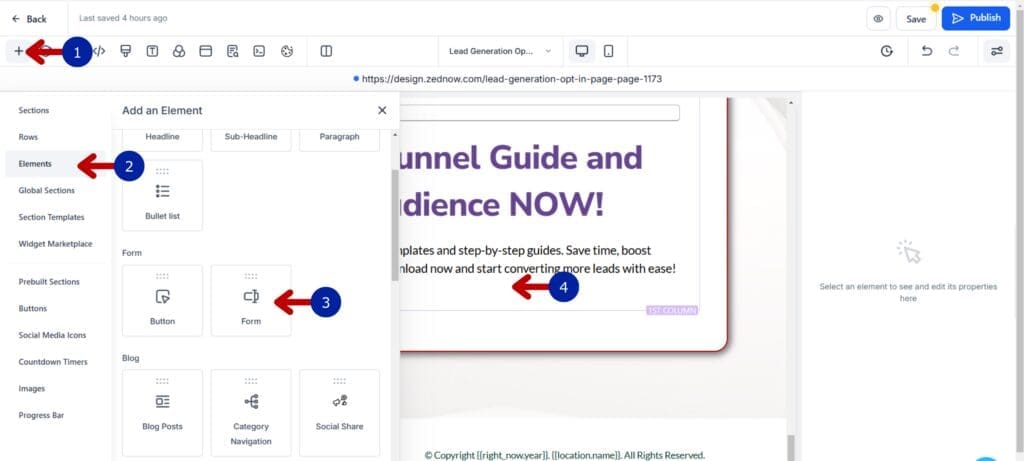
Step 09: On the page builder canvas:
- Click the “+” icon.
- Click the Elements tab.
- Drag the form element.
- Drop the form element in your desired position.
Step 10: On the Form popup:
- Click the drop-down button.
- Choose the newly created opt-in form.

Step 11: On the page builder canvas:
- This is the added opt-in form.
- Click the Publish button.
- Click the Back button.

How to create a lead generation thank-you page
Step 01: On the Funnel Steps Dashboard:
- Click the Lead Generation Thank You Page step.
- Click the Edit button.

Step 02: On the page builder canvas, edit the Congratulatory/Thank You section.

Step 03: On the page builder canvas, edit the Offer section.

Step 04: On the page builder canvas, edit the Footer section.

Step 05: After the desktop design, make the design mobile responsive.

Step 06: On the page builder canvas:
- Click the Publish button.
- Click the Back button.

How to create the lead generation email nurturing workflow
Step 01: On your GoHighLevel Dashboard, click the Automations section.

Step 02: On the Automations dashboard:
- Click the Workflows tab.
- Click + Create Workflow.
- Click Select a Recipe.

Step 03: In the recipe library, choose the Email Drip Sequence recipe by clicking the Select button.

Step 04: On the workflow canvas:
- Rename your workflow.
- Click the Add New Trigger button.

Step 05: In the Trigger section:
- Type “form” in the search bar.
- Click the Form Submitted option.

Step 06: In the Form section:
- Rename your trigger.
- Click “Form is,”.
- Select the opt-in form you previously created for the lead generation opt-in page.
- Click Save Trigger.

Step 07: On the workflow canvas:
- Click the Email element.
- Rename this email. This email will be the first email where your lead magnet is attached (in PDF form).
- Write your name as the sender.
- Type the email address you set up for email marketing.
- Write the subject of the email.
- Write the body of the email.
- Attach the lead magnet.
- Click Save Action.

Step 08: On the workflow canvas:
- Set the delay in days for the next action to take.
- This is the condition for whether the cold lead opened the first email or not.
- If the first email is not opened after a day, this email is sent. Write an email with tips for the lead magnet.
- Wait time after the second email is sent.
- This function will direct the condition to lead to the third email.
- This is the delay if the first email is opened.
- This is the last email. This email should be a promotional email for your offer.

Step 09: On the workflow canvas, since we don’t want any continuation of the email sequence (we want a three-email nurture sequence only), we need to delete the rest of the workflow:
- Click the three dots.
- Click the Delete option.
- Choose Delete all actions from here.

Step 10: On the workflow canvas, once you are done with the workflow:
- Toggle on the Publish button.
- Click the Save button.
- Click “Back to Workflows” to return to the GoHighLevel Dashboard.

How to create a free lead generation funnel
Instructions: You can repeat the following guides below; just make sure to adjust the graphics, branding colors, and text content according to your target market’s setup.
- How to create a lead generation opt-in page
- How to Create an opt-in form
- How to create a lead generation thank-you page
- How to create the lead generation email nurturing workflow
How to Create a 2-step sales funnel
How to create a product
Step 01: On your GoHighLevel Dashboard:
- Click the Payments section.
- Click the Integrations tab.
- Add a mode of payment. For this example, add your PayPal. Follow the instructions indicated until your account is connected.
- Click the Products tab.

Step 02: On the Products dashboard, click + Create Product.

Step 03: On the product settings:
- Add the title of the product. For this example, a subscription offer is labeled.
- Add a description of the product.
- Add an image of the product.

Step 04: As you scroll down in the product settings:
- Select the tax category.
- Set the included tax in prices.

Step 05: As you scroll down in the product settings:
- Add a price type. For this example, select the recurring type.
- Add the amount of the subscription price.
- Add the comparison price.
- Set the billing period.
- Set the trial period. If you don’t want to add a trial period, leave it blank.
- Set the number of payments. Since this is not an installment subscription, leave it blank.
- Add the setup fee. The setup fee is the initial and additional price on the first payment.
- Add variants of this product. Since this is a subscription product, no variants are applicable.
- Set the search engine listing.
- Once done, click Save.
- Click the back button.

Step 06: On the Products dashboard:
- This is the newly created subscription option.
- I created an improved subscription for another price.
- Click the Site section.

How to create a 2-step order page
Step 01: On the Sites dashboard:
- Click the Funnels tab.
- Click the previously created lead generation funnel.

Step 02: On the lead generation funnel step dashboard:
- Click Add New Step or Import.
- Add a name for the order page.
- Add the URL or path of the order page.
- Click Create Funnel Step.

Step 03: On the lead generation funnel step dashboard, click the Products tab.

Step 04: On the Products tab, click + Add Product.

Step 05: On the Product settings:
- Click the dropdown menu.
- Click the subscription product you previously created.

Step 06: On the Product settings:
- Click the dropdown menu.
- Click the price of the subscription product you previously created.
- Click Save.

Step 07: On the Products tab, click + Add Product.
- The newly added subscription product is added.
- Another improved product is added.
- Click the Overview tab.

Step 08: On the Overview tab of the order page, click the Edit button.

Step 09: On the page builder canvas:
- Write your compelling headline and sub-headline.
- Add the featured image of the offer.
- Add the features of the offer.
- Add the two-step order form.

Step 10: On the page builder canvas:
- Add testimonials.
- Add the improved offer in case they want a better subscription.

Step 11: On the page builder canvas:
- Ensure mobile responsiveness.
- Click the Publish button.
- Click the Back button.

How to create an order summary page
Step 01: On the funnel step dashboard:
- Click the + New Step or Import button.
- Write the name of the order summary page.
- Add the URL of the order summary page.
- Click Create Funnel Step.

Step 02: On the order summary step, click the Edit button.

Step 03: On the page builder canvas:
- Add a header section.
- Write the headline and subheadline.
- Add the order summary element.

Step 04: On the page builder canvas:
- Add the CTA button (could be a link to your homepage).
- Add a footer section.

Step 05: On the page builder canvas:
- Ensure mobile responsiveness.
- Click the Publish button.
- Click the Back button.

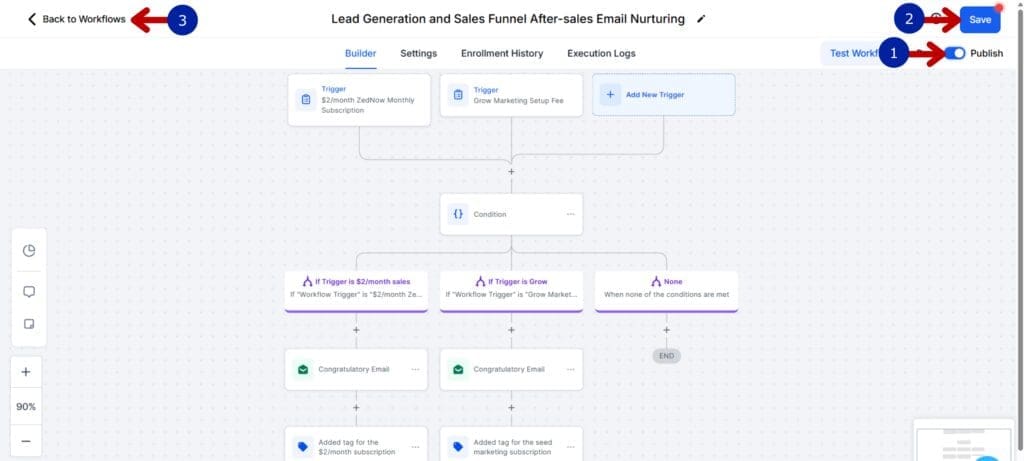
How to create an after-sale email nurture sequence
Step 01: On your GoHighLevel dashboard, go to Automation.

Step 02: In the Automations section:
- Click the Workflows tab.
- Click the + Workflow button.
- Click the + Start from Scratch option.

Step 03: On the workflow canvas:
- Rename your workflow.
- Add a trigger; this is for the $2/month subscription.

Step 04: In the trigger settings:
- Rename this trigger.
- Add a global product, then enter the name of the product you created.
- Click Save.

Step 05: On the workflow canvas:
- Add a condition element.
- Add the conditions for your two products.

Step 06: In the condition settings:
- Rename the first condition.
- Add the trigger condition to the branch.
- Click the Save button.

Step 07: On the workflow canvas:
- Add a congratulatory email for the $2/month subscription.
- Add a congratulatory email for the Grow marketing setup fee product.
- Add a tag for the $2/month subscription.
- Add a tag for the Grow marketing setup fee product.
- Add a wait condition after the $2/month subscription email.
- Add a go-to condition after the Grow marketing setup fee product.
- Add a survey email.

Step 08: On the workflow canvas:
- Toggle on the Publish button.
- Click the Save button.
- Click the Back button.
How to create the lead magnet guide
Step 01: On your Canva account, create a design:
- Use the custom size settings.
- Add the pixel size of the lead magnet.
- Click the Create New Design button.

Step 02: On the Canva canvas:
- Rename the Canva design.
- Design the cover of your lead magnet.

Step 03: Design the welcome and thank you pages.

Step 04: Design the pre-launch requirements page.

Step 05: Design the installation page.

Step 06: Add the pages for the marketing tips.

Step 07: Design the call-to-action page that will lead to your sales page.

Step 08: Once the designs are done:
- Click the Share button.
- Choose the PDF Standard file type.
- Click Download.

Wrap Up and Take Action
Creating a subscription funnel with GoHighLevel is more than just setting up a system — it’s building a reliable engine for business growth. By following these steps, you’ll have a powerful funnel that attracts leads, nurtures them, and turns them into loyal subscribers, all while simplifying your marketing process.
Whether you’re just starting out or looking to scale, this funnel gives you the tools and structure to make it happen. Now it’s time to take action, put these steps into practice, and watch your business thrive with a subscription model that works for you.
Scale Your Business Today.
Streamline your workflow with GoHighLevel’s powerful tools.
