- How to Use Chatbot AI in GoHighLevel for Prospecting & Follow-Ups
- Quick Summary Box – AI Chat Widget Key Takeaways
- What the GHL Chat Widget Is
- Why Agencies Should Use It
- How to Create and Setup an Chat Widget
- Best Practices for Setup
- Common Mistakes to Avoid
- What AI Brings to the Chat Widget
- Overview of Integration Options
- How to Connect AI to the Widget
- Tips for Balancing AI + Human Handoff
- Example Use Case
- How the AI Chat Widget Captures Lead Data
- How to Automate Follow-Up Emails to AI Chat Widget Leads
- Best Practices for Nurture Sequences
- Example Nurture Flow in Action
- Quick Tips for Maximizing AI Chat Widget Results
- What This Means for Your Business
- Expected Results & Real-World Impact of AI Chat Widget
- Conclusion – Bringing It All Together
How to Use Chatbot AI in GoHighLevel for Prospecting & Follow-Ups
Picture this. A potential client lands on your website, pokes around for a minute, and then clicks the little chat bubble in the corner. They’ve got a question. They’re ready to talk. But nobody’s there. By the time you or your client’s team checks the message, that lead is already cold—or worse, they’ve booked with a competitor.
That gap right there? That’s why the AI Chat Widget exists.
This isn’t just a generic chat tool. Inside GoHighLevel, the chat widget can act like a living, breathing rep who never clocks out. It answers questions in real time, gathers contact info, qualifies prospects, and—when set up right—kicks off automated follow-ups that keep conversations alive long after the first hello.
For agencies, this isn’t a “nice-to-have.” It’s a silent sales rep you can offer every client. A tool that works 24/7, never forgets to follow up, and never asks for a vacation day.
In this guide, I’ll break it down into three parts: how to set up the GHL chat widget, how to plug AI into it, and how to turn every single conversation into a lead that gets nurtured with smart follow-up emails.
Bottom line: when you’re done, you’ll know how to capture, qualify, and convert more leads—without throwing more money at ads.

The AI Chat Widget in GoHighLevel transforms casual site visitors into qualified leads with real-time conversations, instant tagging, and automated email follow-ups—saving you time while closing more deals.
Quick Summary Box – AI Chat Widget Key Takeaways
Purpose: The AI Chat Widget turns a simple website chat bubble into a full-time lead generation machine, powered by GoHighLevel.
Why it matters: Speed-to-lead is everything. Businesses that respond instantly close more deals, and the AI Chat Widget ensures prospects are never left waiting.
What you get: A fully branded chat widget, AI-powered conversations that qualify leads, and automated follow-up emails that keep the pipeline warm.
Time to Complete: Setting up the widget and AI integration takes less than an hour, with ongoing refinements as you optimize.
Difficulty Level: Beginner-friendly. If you can copy-paste code and follow step-by-step setup, you can launch this for clients.
Key Outcome: Agencies capture more leads, shorten sales cycles, and increase booked appointments—all while adding a sticky, high-value service to their client packages.
Module 1: GHL Chat Widget Guide
What the GHL Chat Widget Is
The GoHighLevel Chat Widget isn’t just a website add-on—it’s a live entry point for leads. Instead of static forms, it opens real conversations right on the site. For agencies, it’s a tool that shortens response times and increases conversions.
Automate marketing, manage leads, and grow faster with GoHighLevel.
Why Agencies Should Use It
People today want instant answers. The widget meets them where they are, without forcing them to call, email, or dig around. Agencies that install this tool give clients a 24/7 lead capture system that turns curiosity into conversations.
How to Create and Setup an Chat Widget
Ready to connect with your website visitors in real-time? A chat widget is the perfect tool for engaging your audience, answering their questions, and boosting conversions. This guide will walk you through how to create and set up an AI chat widget in GoHighLevel, making the process simple and straightforward.
To start, make sure you are logged in to your GoHighLevel sub-account.
Step 01 – Access the Main Left Hand Menu in GoHighLevel
The Main Menu on the Left side of your screen has all the main areas that you work in when using GHL.
1.1 Click on the ‘Sites’ menu item.
1.2 Access the ‘Chat Widget’ section of GoHighLevel.
1.3 Click the button to add a new chat widget.

Step 02 – Create a New Chat Widget
In this section, you will start the process of creating your very own chat widget.
2.1 Select the type of chat you want to create.

Step 03 – Customize the Style of Your Chat Widget
This is where you can change how your chat widget looks on your website.
3.1 Give your new chat widget a name that is easy to remember.
3.2 Go to the ‘Style’ tab.
3.3 Choose your desired chat type.
3.4 Set up your introduction message. This is the first message your visitors will see.
3.5 Customize the style of your chat widget.
- You can change the colors, fonts, and overall appearance to match your brand.
3.6 Customize the widget details.
- Add an avatar or your company logo.
- Change the position of the chat widget on the page.
- Adjust the dimensions to fit your website’s design.

Step 04 – Go to Chat Window widget
In this step, you will be able to customize the messages and set up other additional details to provide a better customer experience.
4.1 Click the Chat Window tab.
4.2 Customize the chat messages for visitors and other additional settings.
- You can set up acknowledgment and welcome messages for your visitors.

Step 05 – Set Up Your Messaging and Additional Details
This step allows you to improve the chat experience for your visitors and add important details.
5.1 Go to the ‘Messaging’ tab
5.2 Write a clear and welcoming message for visitors who are starting a chat.
5.3 Add a friendly acknowledgement message for when a visitor sends their first message.
5.4 Customize other settings, such as language support and branding.
- You can also add compliance details like a link to your privacy policy.

Step 06 – Add the Chat Widget to Your Website
You can easily add the chat widget to your WordPress website or by using a code snippet.
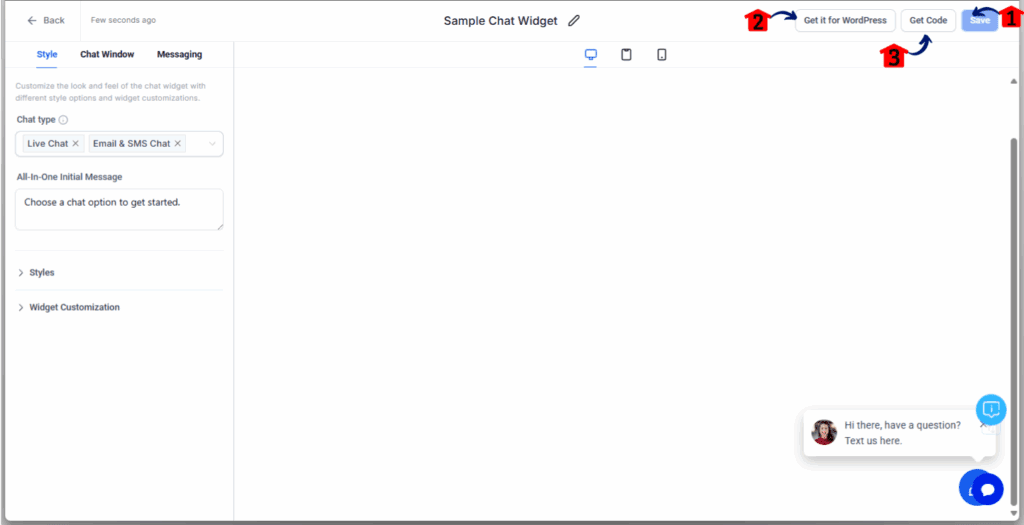
6.1 Don’t forget to click the Save button first before adding the widget to your website.
6.2 If you use WordPress, click the ‘Get it for WordPress’ button.
- You will be taken to the LeadConnector plugin download page.
6.3 To get the code for other websites, click on the ‘Get Code’ button.
- A new window will pop up with the code.
- Copy the code and paste it into the header or footer section of your website’s code. This will add the chat widget to all your web pages.
Best Practices for Setup
- Place the widget on all key pages—homepage, services, pricing, and landing pages.
- Keep the initial greeting short (e.g., “Hey there! Have a question?”).
- Avoid overloading with too many fields—capture just what you need.
Common Mistakes to Avoid
- Hiding the widget on important pages (missed leads).
- Using stiff, robotic language in the greeting.
- Forgetting to test the widget across mobile and desktop.
Once your widget is up and running, it’s more than a button—it’s your client’s frontline for capturing interest. But in its default state, it’s still just a doorbell. Next, we’ll add AI power so it becomes a full-time digital rep who talks, qualifies, and books leads on autopilot.
Module 2: AI Integration for Chat Widget
What AI Brings to the Chat Widget
A plain chat widget is reactive—it waits for leads to start typing. Add AI, and it becomes proactive.
The AI Chat Widget can:
- Answer common questions instantly
- Qualify prospects by asking smart questions
- Gather names, emails, and phone numbers without friction
- Hand off to a human when needed
This means your clients don’t just capture leads—they capture ready-to-convert leads.
Overview of Integration Options
Inside GoHighLevel, the chat widget can be paired with native Conversation AI or connected to third-party AI tools. The goal is the same: give the widget intelligence so it talks like a real rep, 24/7.
How to Connect AI to the Widget
This guide will show you how to connect AI to the widget within your GoHighLevel sub-account. By following these simple steps, you’ll be able to create and configure a Conversation AI bot that can automatically handle customer inquiries and streamline your communication. This process is key to setting up your own AI chat widget.
Step 01 – Access the Settings Area in GoHighLevel
Go to the left-hand sidebar, look all the way to the bottom.
1.1 Click on the gear icon ⚙️ labeled “Settings.”
- You’ll now be in the main Settings dashboard, where you can access:
- Business Info
- Billing
- My Staff
- and more.

Step 02 – Create your Conversation AI bot
2.1 Click on the “Conversation AI” menu item.
2.2 Click the “Create Agent” button.
2.3 Select “Create Prompt Based Bot.”

Step 03 – Choose a Template and Name Your Bot
3.1 Pick a template that fits your needs. You can choose from:
- General Q&A
- Appointment Booking
- Market Place
- or Start from Scratch.
3.2 Click the “Continue” button.

Step 04 – Set Up the Bot’s Communication Settings
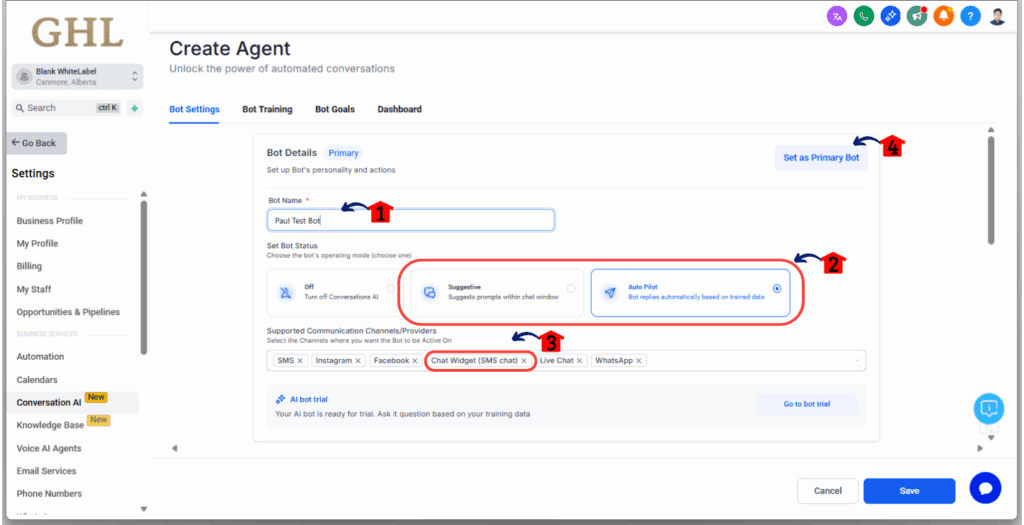
4.1 Enter a name for your bot.
4.2 Set the Mode to either “Auto-Pilot” or “Suggestive.”
- Auto-Pilot: The bot will automatically reply to messages.
- Suggestive: A human must approve the bot’s replies before they are sent.
4.3 Make sure the “Chat Widget (SMS chat)” option is enabled in the Supported Communication Channels/Providers section.
4.4 Click the “Set as Primary Bot” button to have this bot respond to all incoming messages.
Step 05 – Train Your Bot
5.1 Click on the “Bot Training” tab.
- From here, you can select an existing knowledge base. This is where you add FAQs and crawl your website or Google Docs so the bot can answer using your specific content.
- If you don’t have one, you can create a new knowledge base.

Step 06 – Define Bot Goals and Test
6.1 Click the “Bot Goals” tab.
6.2 Enter a prompt to define your bot’s personality, intent, and any other specific information.
6.3 Set up actions for your bot by clicking on them. A pop-up will appear to help you configure each action.
6.4 Once you have configured the bot, test it by sending a message to see how it responds.
6.5 Click “Save” to finalize all your settings for your new AI chat widget.

Tips for Balancing AI + Human Handoff
- Always set escalation rules (e.g., “If lead asks about pricing, alert sales rep”).
- Don’t overload AI with complicated scripts—keep it natural.
- Let AI handle FAQs and lead capture, while humans handle high-value conversations.
Example Use Case
Imagine a dental clinic client. Without AI, their widget just says, “Leave your message.” With AI, it asks: “Are you looking for a cleaning, whitening, or emergency service?” The prospect clicks “whitening.” The AI confirms their email, drops them into a pipeline, and triggers a follow-up email offering an appointment. That’s automated lead qualification done right.
At this stage, you’ve got a chat widget that doesn’t just sit there—it works. But the real power of AI Chat Widgets is what happens after the first hello. That’s where automated follow-up comes in. And that’s exactly what Module 3 covers.
Module 3: Lead Prospecting with AI Chat Widget & Follow-Up Emails
How the AI Chat Widget Captures Lead Data
Once live, the AI Chat Widget doesn’t just chat—it collects. Every name, email, and phone number is automatically pushed into GoHighLevel’s CRM. That means your clients never lose track of a lead, even if the conversation happens at 2 a.m.
How to Automate Follow-Up Emails to AI Chat Widget Leads
This guide will show you how to set up an automated email sequence for leads that interact with your AI Chat Widget. Automating follow-ups is a powerful way to stay in touch with potential customers and nurture them into paying clients.
Step 01 – Access the Main Left Hand Menu in GoHighLevel
The Main Menu on the left side of your screen contains all the main areas you’ll work in when using GHL.
1.1 Click on the ‘Automations’ Menu Item.
- Access the ‘Automations’ section of GoHighLevel.
- You’ll now be in the ‘Workflows’ section of GHL, where you can access the ‘Workflows’ section from the top menu.
1.2 Click the ‘Create Workflow’ button.
- This button is located in the top-right corner of the screen.
1.3 Choose ‘Start from Scratch’.
- This option allows you to build a custom workflow from the beginning.

Step 02 – Set the Workflow Trigger
2.1 Enter a name for your workflow.
- Give your workflow a clear, descriptive name like ‘AI Chat Widget Follow-Up’.
2.2 Click on the ‘Add New Trigger’ option.
2.3 Add a ‘Customer Replied’ trigger.
2.4 Add a filter by clicking ‘Add filters’.
- Select ‘Reply Channel’ from the dropdown menu.
- Choose ‘Chat Widget’ as the condition. This ensures the workflow only starts when a lead replies through your AI chat widget.
2.5 (Optional) Add a second filter.
- If you automatically add a tag to leads from your AI chat widget, you can add another filter for ‘Contact Tag’.
- Select ‘Contact Tag’ from the dropdown.
- Choose the tag you use for your AI chat widget leads, such as ‘AI Chat Lead’.
2.6 Click ‘Save Trigger’.


Step 03 – Add the First Follow-Up Email
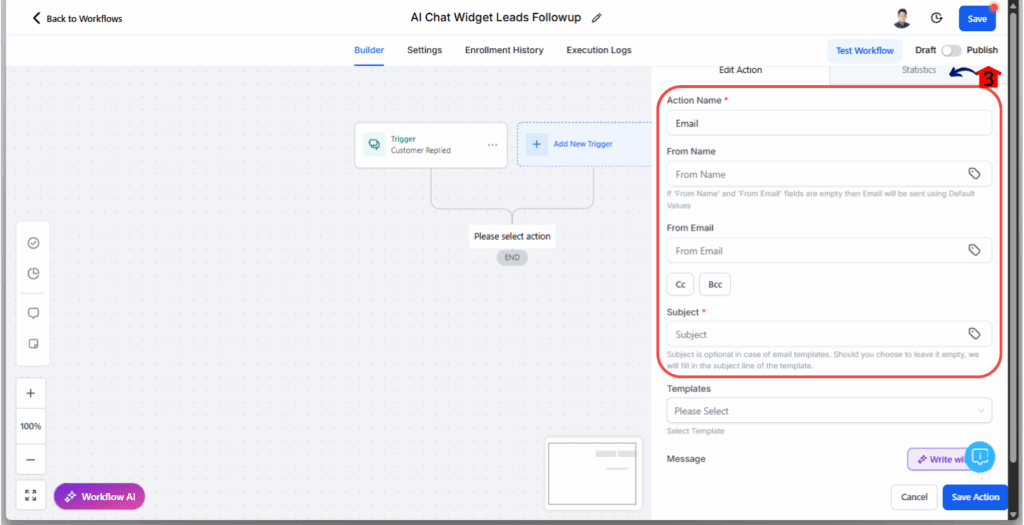
3.1 Click the ‘+’ button to add the first action.
3.2 Select ‘Send Email’ from the list of actions.
3.3 Configure the email settings.
- From Name: Enter the name you want the email to be from (e.g., your company name or your name).
- From Email: Enter the email address you want to use.
- Subject: Write a subject line for your first email, such as “Thanks for chatting with us!”
3.4 You can either select a pre-made template or write a new email in the text box below.
3.5 (Optional) Send a test email.
- Click ‘Send Test’ to preview how the email will look.
3.6 Click ‘Save action’.


Step 04 – Add a One-Day Delay
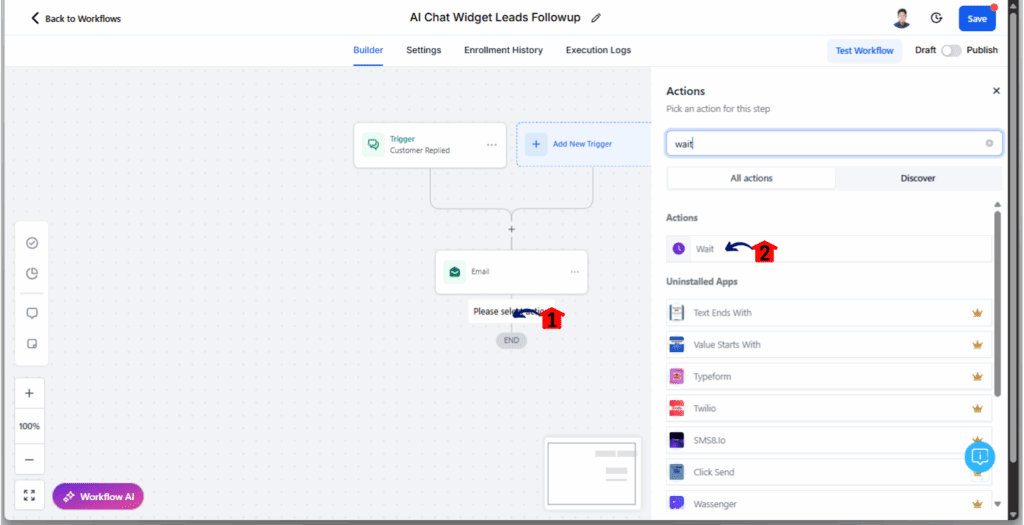
4.1 Click the ‘+’ button below your first email action.
4.2 Select ‘Wait’ from the list of actions.
4.3 Set the ‘Wait for’ option to ‘1 Day’.
- This action will pause the workflow for one full day before sending the next email.
4.4 Click ‘Save action’.
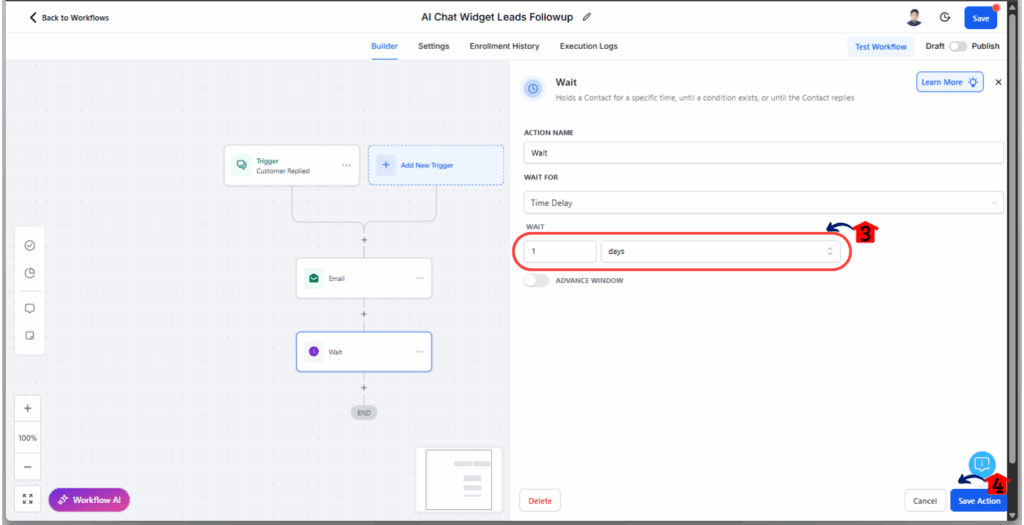
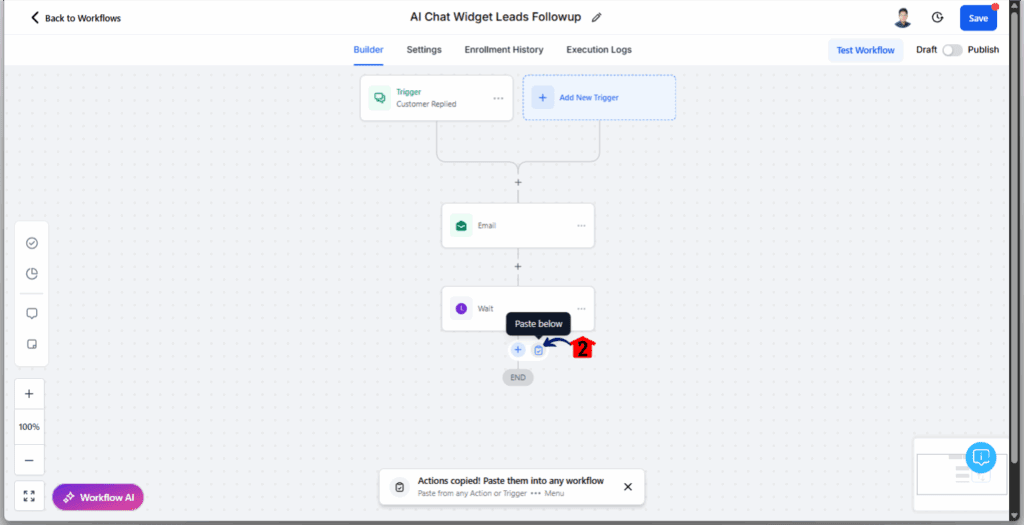
Step 05 – Add the Second Follow-Up Email
5.1 Copy the first email action.
- Click the three dots on the top-right of the ‘Send Email’ action.
- Select ‘Copy’.
- Click on ‘Copy Action’.
5.2 Paste the copied action.
- Hover over the ‘+’ icon below the ‘Wait’ action.
- A paste icon will appear. Click it to add the copied email action.
5.3 Edit the newly added email action.
- Click on the pasted ‘Send Email’ action.
- Update the Subject and Body of the email to provide more information about how you can help the lead.
5.4 Click ‘Save action’.


Step 06 – Add a Second One-Day Delay
6.1 Copy the first wait action.
- Click the three dots on the top-right of the ‘Wait’ action.
- Select ‘Copy’.
- Click on ‘Copy Action’.
6.2 Paste the copied action.
- Hover over the ‘+’ icon below your second email action.
- A paste icon will appear. Click it to add the copied wait action.
- You can edit the duration or just keep it.

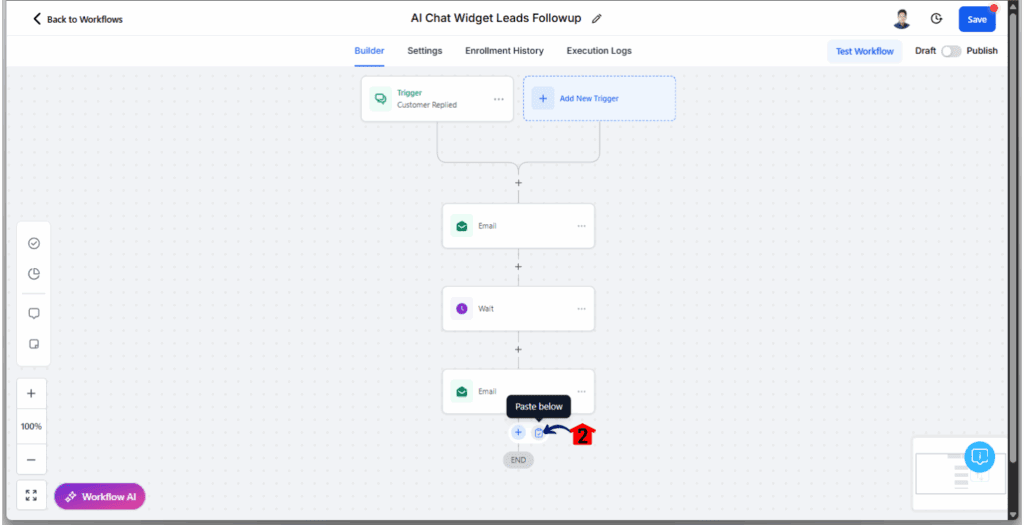
Step 07 – Add the Final Follow-Up Email and Publish Workflow
7.1 Copy the second email action.
- Click the three dots on the top-right of the second ‘Send Email’ action.
- Select ‘Copy’.
- Click on ‘Copy Action’.
7.2 Paste the copied action.
- Hover over the ‘+’ icon below your second ‘Wait’ action.
- A paste icon will appear. Click it to add the copied email action.
7.3 Edit the newly added email action.
- Click on the pasted ‘Send Email’ action.
- Update the Subject and Body of the email. This should be a clear call to action, such as “Let’s book a quick call” or “Let’s set up a time to chat.”
7.4 Click ‘Save action’.
7.5 Click the ‘Save’ button at the top-right of your screen to save your workflow.
7.6 To make the workflow active, toggle the ‘Draft’ button to ‘Publish’ at the top-left of the screen.
7.7 You can also test the workflow by clicking ‘Test Workflow’ and selecting a contact to run the sequence on.


Best Practices for Nurture Sequences
- Don’t spam—stick to 3–5 emails over the first week.
- Mix value (tips, resources) with offers (appointments, demos).
- Keep emails short, conversational, and consistent with the chat tone.
Example Nurture Flow in Action
A prospect asks about “roof repair” in a client’s widget. The AI collects their info and tags them “Roof Repair Lead.” The workflow then:
- Sends Email #1 instantly: “Thanks for reaching out! Here’s our service info.”
- Sends Email #2 the next day: “3 signs your roof needs urgent attention.”
- Sends Email #3 with a booking link: “Let’s schedule your free inspection.”
That’s a cold website visitor turned into a warm lead on autopilot.
At this point, your AI Chat Widget isn’t just a chat tool—it’s a complete prospecting engine. From capturing data to qualifying leads to nurturing them with emails, it runs the sales process in the background.
Quick Tips for Maximizing AI Chat Widget Results
Even with the AI Chat Widget set up and automated follow-ups in place, a few tweaks can make the difference between “meh” results and a steady stream of qualified leads. Here are some quick wins:
Use Smart Lists for Better Segmentation
Every conversation the widget captures can be filtered into Smart Lists. Want to see everyone who asked about “pricing” last week? Done. Need a list of leads who booked a call but didn’t show? Easy. Smart Lists keep your follow-ups targeted and relevant.
Track Conversations and Outcomes
Don’t just set and forget. Review chat transcripts weekly to spot patterns. Are people asking questions your AI isn’t answering well? Update your AI rules. Do most leads drop off after the first message? Adjust your greeting. The data is your cheat sheet for improving conversions.
Add Lead Magnets to the Widget
Sometimes a nudge helps. Offer a discount code, free consultation, or downloadable resource directly in the chat flow. Example: “Drop your email, and we’ll send you our free [industry checklist].” It’s a small hook that grabs big results.
Rotate Conversation Prompts
Leads tune out repetitive messages. Switch up your widget’s opening line every few weeks. Instead of the same “How can we help?” try “Ready to book a free strategy call?” or “Want to see how we can save you 20%?” Keep it fresh, keep it engaging.
Blend AI with Real Humans
AI is powerful, but don’t let it replace human touch completely. Set alerts for your sales team when a hot lead comes through. The fastest agency wins. AI starts the conversation, but people close the deal.
What This Means for Your Business
Here’s the reality: speed to lead is everything. Businesses that respond quickly win, and those that wait lose. The AI Chat Widget gives your agency and your clients an unfair advantage—it eliminates the waiting game.
Faster Lead Response Times
Instead of letting hours slip by, the widget responds instantly. Even if it’s 2 a.m., a prospect gets answers, feels heard, and shares their info. That immediate touchpoint can double conversion rates compared to delayed responses.
Better Customer Experience
Prospects hate being ghosted. An AI chat widget makes every website feel alive, responsive, and helpful. That small detail can be the difference between a visitor bouncing and a visitor booking.
Agencies Can Sell This as a Service
Don’t forget—this isn’t just a feature, it’s a revenue stream. Agencies can bundle AI Chat Widget setup, workflows, and nurture campaigns into premium packages. That means recurring income while delivering tangible ROI to clients.
Reduced Churn and Higher Retention
Clients stick around when they see results. With automated follow-up emails tied to every chat, your agency helps clients capture more leads, book more appointments, and close more sales. Happier clients = long-term contracts.
In short, the AI Chat Widget isn’t just a tool—it’s leverage. For agencies, it’s a way to provide measurable value, keep clients sticky, and stay ahead of competitors who are still relying on slow, outdated lead capture methods.
Expected Results & Real-World Impact of AI Chat Widget
When agencies roll out the AI Chat Widget, the results aren’t just “nice-to-have”—they’re measurable, fast, and client-friendly.
Higher Conversion Rates
Most websites convert at a depressing 2–3%. Add an AI chat widget, and you can double or even triple that number. Why? Because leads get answers immediately instead of bouncing to a competitor.
Shorter Sales Cycles
The widget doesn’t just capture info—it qualifies. By asking questions upfront (“What service are you looking for?” or “When do you need help?”), the AI passes sales teams warmer, ready-to-talk leads. That shaves days or even weeks off a typical sales cycle.
Better Appointment Booking
With follow-up emails baked in, many agencies see a noticeable spike in bookings. Instead of leads sitting idle in a CRM, they get nurtured until they book. For service businesses, this often means an extra 5–10 appointments per month—per client.
Improved ROI on Ad Spend
Think about it: if a business is already paying for traffic, every lost lead is wasted money. The AI Chat Widget makes sure more of that paid traffic turns into conversations and conversions. Agencies can prove ROI more clearly, which means fewer “Should we keep working together?” conversations.
Real-World Example
One marketing agency plugged AI into a client’s chat widget for a home services company. Within 30 days, the client saw:
- 38% more leads captured from the same traffic
- 2x increase in booked consultations
- Faster responses that turned into higher close rates
That’s not theory—it’s the power of automation doing the heavy lifting.
Conclusion – Bringing It All Together
At the end of the day, the AI Chat Widget isn’t just another shiny tool in GoHighLevel—it’s a full-blown growth engine for agencies.
You started with the basics: installing and customizing the chat widget so it fits your client’s brand. Then, you leveled it up by adding AI—transforming it from a passive chat bubble into an active lead qualifier. Finally, you tied it all together with automated follow-up emails, ensuring no lead slips through the cracks.
That’s the cycle: capture, qualify, nurture, and convert.
For agencies, this means more value to clients, new revenue streams, and a system that works 24/7 without extra staff. For businesses, it means faster responses, happier prospects, and more booked appointments.
Now it’s your move. If you haven’t deployed the AI Chat Widget yet, log into your GoHighLevel account and try it out. And if you’re already using it—are you leveraging AI and automated follow-ups to their full potential?The tools are here. The opportunity is massive. It’s time to put the AI Chat Widget to work.
Scale Your Business Today.
Streamline your workflow with GoHighLevel’s powerful tools.
