Unleashing the Power of Custom Subaccount Logos
Alright, buckle up buttercups, because this ain’t your grandma’s update – this is about slapping YOUR clients’ brand smack-dab onto THEIR GoHighLevel dashboards! For too long, you’ve been the silent ninja behind the scenes, the wizard pulling the levers. But guess what? Your clients deserve to feel like they’re logging into THEIR OWN fortress of marketing power. This ain’t just about a logo; it’s about planting their flag, boosting their sense of ownership, and making your white-label SaaS offer so sticky they’ll never look back. We’re talking about turning those “borrowing your tools” vibes into “hell yeah, this is MY platform” energy.

Slapping your clients’ logos onto their sub-accounts isn’t just a cosmetic upgrade; it’s a strategic power move that ignites client loyalty, supercharges your white-label dominance, projects an image of ultimate professionalism, and unlocks your potential to reel in bigger fish willing to pay top dollar for a truly branded experience.
Here’s Your 60-Second Guide to White-Labeling Client Dashboards
Alright, let’s break down how to slap those client logos onto their GHL dashboards like a seasoned pro. This ain’t rocket science, folks, just a few clicks to make your white-label offer look slicker than a freshly waxed hotrod. We’re heading into the belly of the beast – the Settings area within each individual sub-account. Think of it as giving your clients their own VIP entrance with their name (or logo!) on the door. Follow these simple steps, and you’ll be branding like you were born to do it.
This is where the magic happens, where you transform those generic-looking sub-accounts into personalized powerhouses. We’re going to walk you through the exact clicks you need to make, the buttons you need to press, and the logo you need to upload. Trust me, if you can point and click, you can nail this. Let’s get those dashboards looking sharp and your clients feeling like they’re rocking their own custom software.
Here’s the no-BS guide to getting those logos uploaded:
Automate marketing, manage leads, and grow faster with GoHighLevel.

How to Copy Your Location ID from a Sub-Account
Step 01 – Open Settings in GoHighLevel
- Go to the left-hand sidebar and scroll all the way to the bottom.
1.1 Click on the gear icon labeled “Settings.”
- You’ll now be in the main Settings dashboard, where you can access:
- Business Profile
- Billing
- My Staff
- And more.

Step 02 – Copy Your Location ID
2.1 In the Business Profile section, click the “Copy” icon next to your Location ID.
- The Location ID is located above the business logo column.
- Paste this ID somewhere safe like a Notepad or Word document.

How to Upload a Logo and Copy Its Link
Step 03 – Open Media Storage
- The main menu on the left includes all major areas of GoHighLevel.
3.1 Click on the ‘Media Storage’ menu item.
3.2 Press the Upload button and follow the steps to upload your image.
3.3 Once uploaded, click the image.

Step 04 – Copy the Logo Link
4.1 Click the Copy Link button to copy the logo’s direct URL.
- Store this along with your Location ID for later use.

How to Add a Custom Logo with Code in GoHighLevel Agency Account
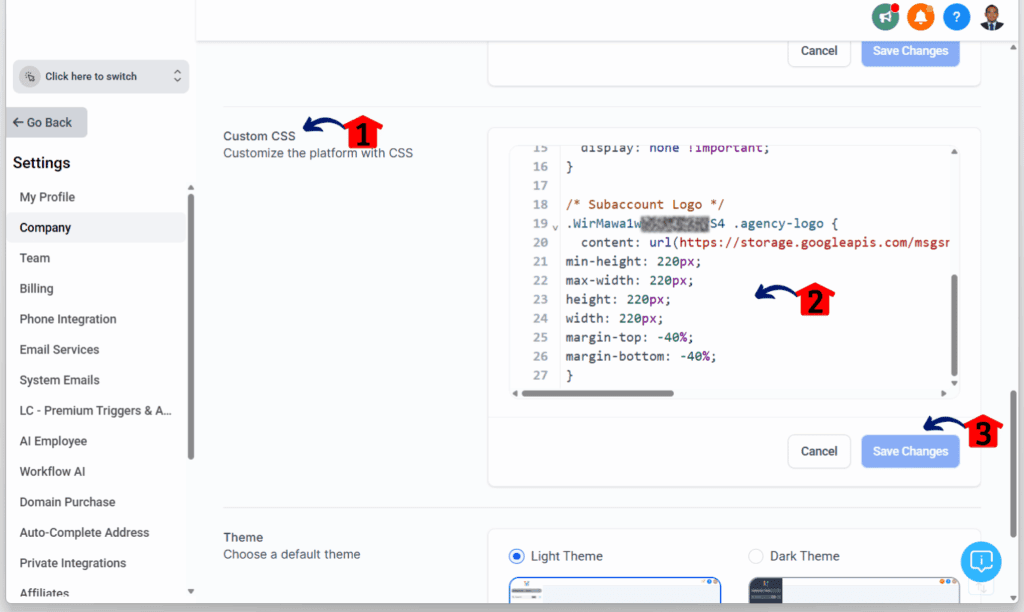
Step 05 – Customize Your CSS Snippet
- Use the code below:
/* Subaccount Logo */
.<SUBACCOUNT_ID HERE>.agency-logo {
content: url(<IMAGE_URL HERE>);
min-height: 220px;
max-width: 220px;
height: 220px;
width: 220px;
margin-top: -40%;
margin-bottom: -40%;
}
5.1 Replace <SUBACCOUNT_ID HERE> with your actual Location ID.
5.2 Replace <IMAGE_URL HERE> with the copied link to your logo.
Step 06 – Enter Agency Settings Mode
- Go to the left-hand sidebar and scroll all the way to the bottom.
- Make sure you’re in Agency Mode, not a sub-account.
6.1 Click on the gear icon labeled “Settings.”
- You’ll now be in the main Agency Settings dashboard, where you can access:
- My Profile
- Company
- Billing
- And more.

Step 07 – Navigate to Whitelabel Setting
7.1 Click on the Company option.
- This is located on the left side under “My Profile” and above “Team.”
7.2 Click the Whitelabel tab.

Step 08 – Add the CSS Code
8.1 Scroll down until you find the Custom CSS section.
8.2 Paste your edited CSS snippet into the code area.
8.3 Click the Save Changes button.

Step 09 – Confirm Your Logo Appears
9.1 Your logo should now appear on the upper left side of your sub-account dashboard.

Bottom Line: Slap Those Logos and Watch Your Business Grow!
Listen up, you GHL gladiators! Customizing those sub-account logos ain’t just a fancy add-on; it’s about planting your flag (or rather, your clients’ flags!) and building a rock-solid foundation of trust and perceived value. Think about it – when your clients see their own branding, they feel like they’re in THEIR space, not just borrowing yours. This simple switcheroo can be the difference between a client who sticks around for the long haul and one who’s always got one foot out the door.
Whether you’re white-labeling like a boss or running a full-blown SaaS empire, this update is your secret weapon. It lets you command more respect, charge premium prices, and ultimately, build a business that’s as resilient as a grizzly bear in winter. So, what are you waiting for? Go out there, brand those sub-accounts like you mean it, and watch your client loyalty and your bottom line EXPLODE!
What’s your take on this logo upgrade? Drop a comment below and tell us how you’re gonna use this to level up your GHL game!
Scale Your Business Today.
Streamline your workflow with GoHighLevel’s powerful tools.


