- Organize, lock, reorder, and review certificate elements before publishing.
- Quick Summary – Certificate Layers at a Glance
- What’s New with Certificate Layers
- Why Certificate Layers Matter
- How to Use Certificate Layers in GoHighLevel
- Quick Tips for Managing Certificate Layers
- What This Means for Your Business
- Frequently Asked Questions about Certificate Layers
- Certificate Layers Make Template Editing Easier
Organize, lock, reorder, and review certificate elements before publishing.
Certificate Layers Bring Order to Your Designs
Certificate Layers make it easier to control every part of your certificate or badge design in GoHighLevel. You can now see the full layer stack, select elements faster, move them into the right order, and lock important parts of the design.
This update also helps prevent simple mistakes. GHL now flags invalid custom-field placeholders, so you can fix broken names, dates, or course details before you publish. Manual save will also warn you when an invalid field is still in the template.
For agency owners, course creators, and team members, this means less guesswork and fewer accidental edits. Certificate Layers give you a cleaner way to build, review, and protect your designs before they are sent out.

Certificate Layers give you clearer control over every element in your design while protecting important content from accidental edits. You can also catch broken custom-field placeholders before certificates or badges are issued.
Quick Summary – Certificate Layers at a Glance
Purpose: This update helps you manage every item inside the Certificate and Badge Builder with a clear Layers panel.
Why It Matters: You can protect key design elements, control stacking order, and catch invalid custom fields before a certificate is issued.
What You Get: You can select layers, drag them into a new order, lock or unlock items, delete unlocked layers, and review error warnings.
Time to Complete: Most users can review and organize a template in about 5 to 10 minutes.
Difficulty Level: Beginner-friendly. The controls work much like the layer tools found in common design software.
Key Outcome: You get cleaner templates, fewer accidental edits, and a better chance of catching broken placeholders before publishing.
What’s New with Certificate Layers
GoHighLevel has added a new Layers tab to the Certificate and Badge Builder. Certificate Layers show every item on the canvas in one clear list, so you can quickly see what sits in front and what sits behind.
Click a layer to select the matching item on the canvas. You can also drag layers up or down to change the order. This makes it much easier to move text, logos, shapes, and custom fields without clicking around the design.
Automate marketing, manage leads, and grow faster with GoHighLevel.

You can now lock layers to prevent unwanted changes or delete unlocked layers from the panel. GHL also flags invalid custom-field placeholders with an error pill. If you try to save the design by hand, you will see a warning when a broken field is still in place.
Why Certificate Layers Matter
Certificate Layers make it easier to manage busy designs without losing track of each item. You can see the full stack, select hidden elements, and place text, logos, shapes, and custom fields in the right order.
The lock option also helps prevent simple mistakes. You can protect backgrounds, frames, and brand elements, so they cannot be moved, resized, or deleted by accident. This is useful when several team members work on the same template.
The custom-field warning adds another layer of protection. GHL flags broken placeholders before you publish, which helps prevent certificates from going out with missing names, dates, or course details.
How to Use Certificate Layers in GoHighLevel
Certificate Layers let you manage every item inside a certificate or badge template from one clear panel. In this guide, you’ll learn how to open a credential template, access the Layers panel, select an item, change its order, lock it, and remove it when needed.
Here are the steps we will follow:
- Access Certificate or Badge Template in GoHighLevel.
- Open and Use the Layers Panel.
To start, make sure you are logged in to the correct GoHighLevel sub-account.
Step 01 – Access Certificate or Badge Template in GoHighLevel
- The Credentials area gives you access to your certificate and badge templates.
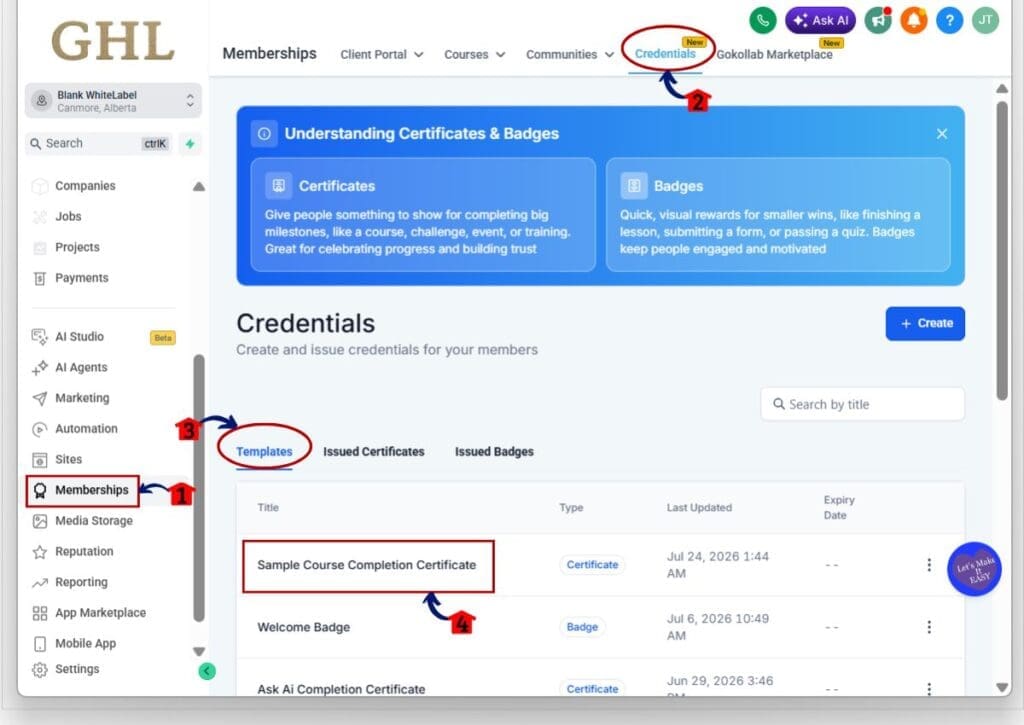
1.1 Go to the main menu on the left side of your screen.
- This menu includes the main areas you use inside your GHL sub-account.
1.2 Click Memberships.
- This opens the Memberships area.
1.3 Click Credentials in the top menu.
- The Credentials page includes your templates, issued certificates, and issued badges.
1.4 Stay on the Templates tab.
- This tab shows the certificate and badge templates saved in the account.
1.5 Click the template you want to edit.
- In this example, the Sample Course Completion Certificate is selected.
- The template will open inside the Certificate and Badge Builder.
Step 02 – Open and Use the Layers Panel
- The Layers panel shows every item used in the certificate or badge design.
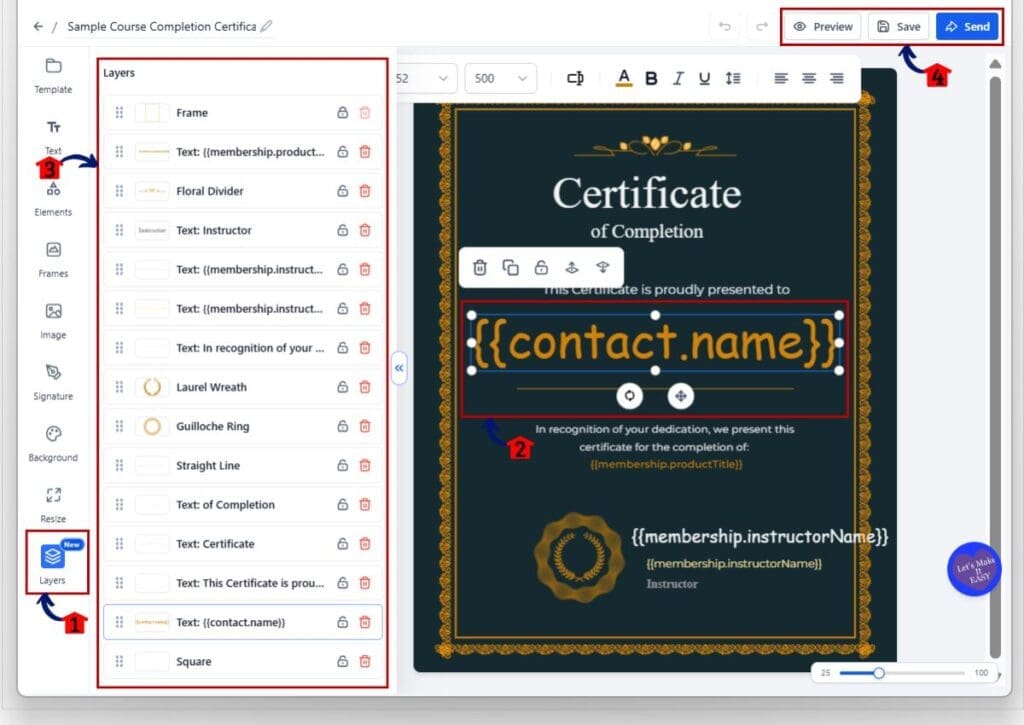
2.1 Click Layers in the left-side builder menu.
- The full list of elements will open beside the canvas.
2.2 Click an element on the certificate canvas.
- In this example, the contact name field is selected.
2.3 Confirm that the matching row is selected in the Layers panel.
- This helps you identify the exact layer connected to the item on the canvas.
2.4 Review the order of the layers in the panel.
- The list shows how the elements are stacked in the design.
2.5 Drag a layer up or down to change its position.
- Move the layer higher to place it in front of another item. Move it lower to place it behind another item.
2.6 Click the lock icon beside a layer to protect it.
- Locked layers cannot be moved, resized, deleted, or edited with shortcuts.
2.7 Click the lock icon again when you need to edit the layer.
- This unlocks the item and makes it available for changes.
2.8 Click the delete icon beside an unlocked layer to remove it.
- Check the canvas first so you know you are deleting the correct item.
2.9 Review the layer list for any custom-field error pill.
- An error pill means GHL has found an invalid custom-field placeholder that should be fixed before publishing.
2.10 Click Save after reviewing the template.
- Manual save will warn you when an invalid placeholder is still in the design.
Once the Layers panel is open, work through the list and check each item. Certificate Layers give you a simple way to control the stack, protect fixed elements, and catch broken custom fields before a certificate is issued.
Quick Tips for Managing Certificate Layers
Start by locking the parts of the design that should not move. Backgrounds, frames, logos, and other brand elements are good choices. This helps prevent small mistakes when you edit text or custom fields later.
Keep the most important content easy to find in the layer list. Certificate Layers work best when you check the stack before making changes. Select the item on the canvas, confirm the matching layer, then move or delete it only after you know it is the right one.
Always review custom-field warnings before you save. A broken placeholder can lead to missing names, dates, or course details. Fix each flagged field, then preview the certificate before it is issued.
What This Means for Your Business
Certificate Layers help your team build and update templates with fewer mistakes. Fixed items like logos, frames, and backgrounds can stay locked, while names, dates, and other custom fields remain easy to edit.
This is especially useful for agencies that manage certificates for several clients. A clear layer list makes it easier for team members to find the right item, keep the design in order, and avoid changing parts that should stay the same.
The custom-field warning also adds a useful check before publishing. That means fewer broken certificates, less rework, and a smoother experience for the people receiving them.
Frequently Asked Questions about Certificate Layers
Certificate Layers Make Template Editing Easier
Certificate Layers give you a clearer way to manage certificate and badge designs in GoHighLevel. You can control the stack, protect fixed items, remove unwanted elements, and spot broken custom fields before they cause problems.
For agencies and course creators, this means fewer mistakes and less time spent fixing templates. It also makes the builder easier for team members who need to update designs without changing the wrong element.
Open one of your existing templates and test the Layers panel for yourself. Which part of this update will help you most, layer locking, drag-and-drop ordering, or custom-field warnings?
Scale Your Business Today.
Streamline your workflow with GoHighLevel’s powerful tools.