- Why Currency Defaults Matter More Than You Think
- Quick Summary – Default Currency Setting
- User-Defined Default Currency Is Here
- From Auto-Country to Manual Control
- Real Business Impacts of Default Currency Setting
- How to Set a Default Currency Setting in GHL
- Pro Tips for Agencies and Clients
- FAQs – Default Currency Setting Feature Explained
- What This Update Means for Agencies
Why Currency Defaults Matter More Than You Think
Ever created a product in GHL and realized the currency wasn’t right? Maybe it default currency setting to USD when your client operates in AUD — or EUR showed up on a checkout page for a local-only business. It’s a small detail that can cause major headaches, especially when clients start asking, “Why is this priced in the wrong currency?”
Until now, GoHighLevel auto-selected your sub-account’s currency based on the business’s country. That was fine — until it wasn’t. If you wanted to use a specific currency across all payment flows, there was no easy way to lock it in.
That changes today.
GHL now gives you full control to set a default currency setting for each sub-account, right inside the Business Profile settings. This simple switch ensures the right currency appears automatically across products, coupons, checkout pages, and more — with zero guesswork.
And yes, you can still override it when needed.
This guide breaks down exactly what’s new, what’s changed, why this matters (big time), and how to set it up in less than 30 seconds.
Manually setting a default currency setting eliminates confusion and keeps your GHL payment setup clean and consistent. With just one change, your sub-account now reflects your preferred currency across all products, coupons, and checkout flows — no more auto-switching surprises.
Quick Summary – Default Currency Setting
Purpose: Allow businesses to set and manage their own default currency across the sub-account.
Why It Matters: Avoids currency mix-ups, improves client confidence, and keeps all payments consistent.
What You Get: A single setting that locks in your preferred currency across all payment tools.
Time To Complete: Less than 30 seconds to set up.
Difficulty Level: Easy — just a quick settings update.
Key Outcome: Consistent, professional payment experiences with no currency surprises.
User-Defined Default Currency Is Here
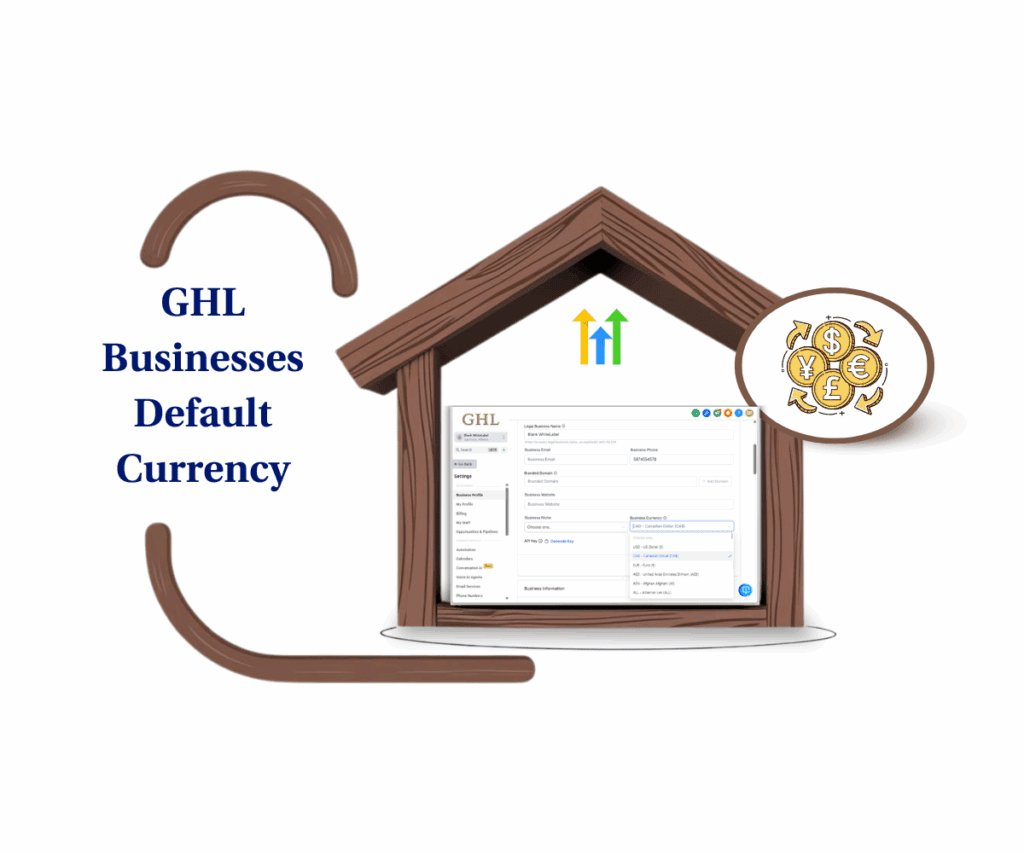
The new update allows every GHL sub-account to manually select its default currency setting — no hacks, no guesswork. You’ll find this setting directly inside your Business Profile under “Settings → Business Profile → Currency.”
Once selected, your chosen currency becomes the automatic default across all major payment-related flows, including:
Automate marketing, manage leads, and grow faster with GoHighLevel.

- Product creation and editing
- Coupon setup
- Checkout configurations
- The “Charge Now” flow
- Anywhere else a currency is shown by default
In short, whatever currency you set will now be the baseline currency for all transactions in that sub-account.
If you skip this step, GHL will keep using the country tied to your business profile to decide the currency. It’ll work, but setting your own default is the smarter way to keep everything consistent.
And just like before, you’ll still have the ability to override the currency at the product, offer, or checkout level. That flexibility hasn’t gone anywhere.This update is all about giving you control — no more relying on GHL’s best guess.
From Auto-Country to Manual Control
Before this update, GHL used your sub-account’s country to automatically determine which currency showed up in payment tools. That might’ve worked okay for local businesses — but for agencies managing global clients or handling different markets, it was a pain.
You couldn’t override the default unless you did it manually for every single product, coupon, or checkout flow. Over time, that led to inconsistency — one product in USD, another in GBP, and a checkout showing CAD by accident.
Now, with the new Default Currency Setting, you’re in control from the start.
Here’s the shift in behavior:
- Old Way: GHL assigns a default currency based on the business country
- New Way: You choose the default currency once, and it sticks across all payment tools
That means less confusion, no more retroactive fixes, and a more professional customer experience across your offers.
To find it, just head to:
Settings → Business Profile → Currency
From there, select your preferred currency from the dropdown. That choice becomes the automatic currency across the entire sub-account’s payment modules.Simple. Smart. Finally.
Real Business Impacts of Default Currency Setting
This isn’t just a cosmetic update. Setting your default currency solves real problems that agencies and businesses face every day.
First, it eliminates inconsistent pricing across funnels. If your checkout pages show one currency while your product library shows another, it’s not just confusing — it’s unprofessional. With a default currency setting, everything aligns automatically.
Second, it saves time. No more manually setting the currency every time you create a new product or checkout link. This is especially powerful for SaaS agencies or global marketers who serve clients in different currencies.
Third, it improves client trust. If a customer sees a different currency at checkout than what they expected, they might bounce. Worse, they might reach out to your client in confusion — costing time, energy, and credibility.
Finally, it gives you full global flexibility. Whether your agency works in GBP, your client in AUD, or your funnel sells in EUR — you can now set the currency once and forget it. The system will take care of the rest.
Bottom line: This feature brings consistency, clarity, and confidence to how you do business inside GHL.
How to Set a Default Currency Setting in GHL
If you’ve ever had products or checkout pages show the wrong currency, you know how frustrating it can be. With this update, you can make sure every payment tool in your sub-account shows the right currency from the start. Setting it up only takes a moment.
Step 01 – Access Business Profile Settings
1.1 From your GHL account, go to the Main Menu on the left.
1.2 Click on Settings → Business Profile.


Step 02 – Locate the Currency Field
2.1 Inside Business Profile, scroll until you see the Currency option.
2.2 This field controls the default currency for your entire sub-account.

Step 03 – Select Your Preferred Currency
3.1 Click the dropdown next to Currency.
3.2 From the list, pick the currency your business actually works with (like USD, GBP, AUD, or EUR).

Step 04 – Save Your Settings
4.1 Click Save at the bottom of the page.
4.2 Your choice now becomes the default currency across products, coupons, checkouts, and more.

Step 05 – Override if Needed
5.1 When creating a product, coupon, or checkout, you’ll still see the option to change the currency manually.
5.2 This gives you flexibility if certain offers need a different currency.


That’s all it takes. Every future payment setup in this sub-account will stick to the currency you’ve picked, which means less cleanup and smoother workflows.
Pro Tips for Agencies and Clients
Now that you can set a default currency setting in GHL, here are a few practical ways to get the most out of it — and a couple of things to watch out for.
Use Sub-Account Templates Wisely
If you’re running SaaS Mode or cloning sub-accounts for new clients, set the default currency setting in your template. This ensures every new account launches with the right currency from day one, saving you time and avoiding cleanup later.
Educate Clients About Currency Labels
The default currency setting only changes the label shown in your products, coupons, and checkouts. It does not automatically convert existing prices. For example, $100 USD won’t suddenly become £100 GBP. Make sure your clients understand this so there’s no confusion.
Match Your Stripe or PayPal Setup
While this setting standardizes the display inside GHL, remember that Stripe, PayPal, or other processors still control actual transaction currencies. Always align your GHL currency choice with what your payment processor supports to prevent payment failures.
Test Before Going Live
After setting a new currency, create a test product and run it through checkout. This quick test ensures your pages display the correct currency and that customers will see consistent pricing.
Agency Shortcut:
If you manage multiple regions, you can preset different sub-accounts with different default currency setting. That way, each market gets the local experience they expect without extra work on your end.
A simple update like this saves you from endless client questions and keeps your agency looking sharp.
FAQs – Default Currency Setting Feature Explained
What This Update Means for Agencies
The ability to set a default currency might feel like a small update, but it has a big impact on how agencies and businesses operate inside GHL.
For one, it reduces client confusion. No more checkout pages showing USD when your client only sells in GBP. Everything is now consistent and predictable.
It also makes agencies look more professional. When your funnels, coupons, and products are aligned under one currency, clients trust the system more — and you spend less time troubleshooting.
For SaaS resellers, this is especially powerful. You can preset sub-accounts with the correct local currency, making onboarding smoother and reducing setup time.
And finally, it’s another example of GHL removing friction. Agencies can now focus on scaling, selling, and serving clients — without worrying about messy payment setups.
At the end of the day, this update is about control and clarity. You decide the currency. You decide the experience. And your clients get a smoother ride because of it.
Scale Your Business Today.
Streamline your workflow with GoHighLevel’s powerful tools.