- Why Workflow Sticky Notes Matter Now
- Quick Summary – Workflow Sticky Notes Overview
- Here are this weeks HighLevel Updates
- Understanding Workflow Sticky Notes
- What’s New in Workflow Sticky Notes 2.0
- Why Workflow Sticky Notes Help Agencies
- How to Use Workflow Sticky Notes in Standard Builder
- Pro Tips for Workflow Sticky Notes
- Workflow Sticky Notes in Real Agencies
- Workflow Sticky Notes FAQ
- Why Workflow Sticky Notes Are a Smart Upgrade
Why Workflow Sticky Notes Matter Now
Before this update, Workflow Sticky Notes in GHL did their job, but understanding them later wasn’t always easy.
Once a workflow had multiple triggers, branches, delays, and conditions, it could get confusing fast. Especially if someone else built it. Or if you were revisiting it months later. There were no clear labels. No internal documentation. Just logic blocks connected by lines.
If you manage multiple client automations, that confusion adds up. One wrong edit and a workflow fires too early. Skips a step. Or stops working entirely. GHL had the power, but the visual clarity inside complex automations wasn’t always there.
GoHighLevel has now improved that experience.
Workflow Sticky Notes are now available inside the Standard Builder.
Instead of guessing what a branch does, you can document it. Instead of explaining logic in Slack, you can label it directly inside the workflow. You can add colors, formatted text, images, and even logos, right on the canvas.
What changed: GHL brought Workflow Sticky Notes 2.0 into the Standard Builder. Users can now drop visual notes anywhere inside a workflow, customize colors, add rich text, embed images or logos, and document logic without affecting automation behavior.
Who this is for: Agency owners managing client automations, virtual assistants building workflows, marketing teams launching campaigns, white-label SaaS providers delivering snapshots, and any GHL user who wants cleaner automation structure.
What we’ll demonstrate: We’ll show where Workflow Sticky Notes appear inside GHL, explain what’s new in Sticky Notes 2.0, walk through how to add and customize them step by step, and show how this update improves collaboration without changing automation logic.
The latest GoHighLevel Changelog includes several other GHL feature updates that round out your daily workflow:
- Version History Improvements: View & Restore Versions Across Builders
- [Compliance] Stay compliant with ACH payment on Stripe
- Canva Integration In Media Storage
- Bulk Import for Companies
- AI Builder: 52% Faster Workflow Generation
- Record IDs – Improved Visibility in Lists & Record Details
- Reselling Reporting on Agency Dashboard
- Blogs – Revamped URL Blog Importer Experience 🚀
Keep reading for much more on all these updates and a deep dive into the Sticky Notes feature!

Quick Summary – Workflow Sticky Notes Overview
Purpose: This guide explains how to use Workflow Sticky Notes inside the GHL Standard Builder to visually document and organize your automations without changing automation logic.
Why It Matters: Workflow Sticky Notes improve clarity inside complex workflows, reduce automation mistakes, and make collaboration easier for agencies, VAs, and marketing teams.
What You Get: You get step-by-step instructions for adding Sticky Notes, customizing colors and images, organizing workflow branches, and applying smart documentation strategies inside GHL.
Time to Complete: Most users can implement Workflow Sticky Notes into an existing workflow in under 15 minutes.
Difficulty Level: Beginner to Intermediate. No coding or advanced automation knowledge required.
Key Outcome: Cleaner, easier-to-manage workflows that improve team communication and reduce costly automation errors.
Here are this weeks HighLevel Updates
Version History Improvements: View & Restore Versions Across Builders
- What it does:
Access old versions and restore them across builders. - Where in GHL:
Found in Funnels, Websites, and other builders under version history. - Impact:
Quick fixes when changes don’t go as planned. - Who it’s great for:
Agencies and users making frequent updates.
Automate marketing, manage leads, and grow faster with GoHighLevel.

[Compliance] Stay compliant with ACH payment on Stripe
- What it does:
Helps make sure your ACH payments through Stripe follow the right rules by adding compliance checks. - Where in GHL:
You’ll see this when configuring ACH payments in the Payments and Stripe settings. - Impact:
Keeps you protected from potential compliance problems and makes payments more secure. - Who this is for:
Anyone collecting ACH payments, especially agencies and SaaS businesses.
Canva Integration In Media Storage
- What it does:
Allows you to access and import Canva designs directly into GHL’s media storage. - Where in GHL:
Media Library / Storage section when uploading or selecting files. - Impact:
Speeds up content creation by removing the need to download and re-upload assets. - Who this is for:
Marketers, designers, and agencies creating visual assets for funnels, emails, and ads.
Bulk Import for Companies
- What it does:
Enables bulk uploading of company records into GHL instead of adding them one by one. - Where in GHL:
CRM under Companies section (import/upload functionality). - Impact:
Saves time and simplifies onboarding large datasets or migrating client information. - Who this is for:
Agencies, sales teams, and businesses handling large volumes of company data.
AI Builder: 52% Faster Workflow Generation
- What it does:
Improves AI workflow generation speed, cutting build time by over half. - Where in GHL:
AI Workflow Builder inside Automation > Workflows. - Impact:
Speeds up automation creation, allowing faster testing and deployment. - Who this is for:
Agencies, automation builders, and marketers creating workflows frequently.
Record IDs – Improved Visibility in Lists & Record Details
- What it does:
Makes record IDs easier to see within lists and detailed views. - Where in GHL:
CRM records, lists, and detail pages. - Impact:
Improves tracking, integrations, and debugging when working with specific records. - Who this is for:
Developers, advanced users, and teams working with integrations or data tracking.
Reselling Reporting on Agency Dashboard
- What it does:
Adds reporting insights for reselling activities directly in the agency dashboard. - Where in GHL:
Agency Dashboard under reporting/analytics sections. - Impact:
Gives better visibility into revenue and performance from resold services. - Who this is for:
Agencies running SaaS mode or reselling GHL services.
Blogs – Revamped URL Blog Importer Experience 🚀
- What it does:
Improves the blog importer tool for pulling content from URLs into GHL. - Where in GHL:
Sites > Blogs > Import via URL. - Impact:
Makes moving your blogs over quicker and a lot easier to handle. - Who this is for:
Agencies, content marketers, and businesses migrating blogs into GHL.
Understanding Workflow Sticky Notes
Workflow Sticky Notes are visual labels you place directly inside your workflow canvas.
They don’t trigger anything. They don’t delay anything. They don’t send messages.
They simply help you explain what’s happening inside the automation.
Think of them like digital Post-it notes stuck onto your workflow builder. Except these are better. You can resize them. Color-code them. Add formatted text. Even drop in an image or logo.
In GHL, workflows tend to evolve fast. A straightforward nurture sequence can turn into multiple logic branches, layered follow-ups, booking reminders, and re-engagement paths. Without clear notes in place, remembering the original strategy behind each step becomes a challenge.
Workflow Sticky Notes solve that.
They allow you to:
- Label sections of your workflow
- Explain what a branch is doing
- Add setup instructions for team members
- Warn others not to edit specific logic
- Brand internal workflows for white-label delivery
And here’s the key difference.
Workflow Sticky Notes are completely visual. They do not affect triggers, actions, conditions, or timing. They sit on top of your automation as documentation only.
This makes them powerful for collaboration.
Instead of explaining your automation structure in a separate SOP, you can now document it exactly where it lives, inside the workflow itself.
What’s New in Workflow Sticky Notes 2.0
Sticky Notes already existed inside the Advanced Builder. But now they are fully available inside the Standard Builder — and that’s the real upgrade.
This means more users can access them without switching builders.
Here’s exactly what Sticky Notes 2.0 brings to the table.
You can now add images and logos directly inside your notes. This is huge for agencies that want branded workflows or clear visual identifiers inside client automations.
You can color-code branches.
That means:
- Green for active paths
- Yellow for conditional logic
- Red for warning areas
- Blue for onboarding instructions
Instead of staring at a wall of grey automation blocks, your workflow becomes structured and readable.
You can also format text inside the note. Add spacing. Organize instructions. Make certain lines stand out. This keeps things clean and easy to scan.
You can resize and reposition notes anywhere on the canvas. Drop them above branches. Beside triggers. Between sequences. Wherever context is needed.
And one more important reminder.
Sticky Notes 2.0 are still visual only. They do not change triggers. They do not affect delays. They do not modify actions. They simply sit on the canvas to provide clarity.
That’s what makes them safe and powerful at the same time.
Why Workflow Sticky Notes Help Agencies
If you build one simple workflow and never touch it again, this update might feel small.
But if you run an agency, manage multiple sub-accounts, or work with a team, this changes everything.
It usually starts simple. Then you add a reminder. Then a review request. Maybe an upsell. Before long, that “basic” workflow has multiple paths running at once. Without clear notes, managing it later can feel like untangling wires.
Workflow Sticky Notes bring clarity back.
Instead of guessing why a condition exists, you can explain it directly above the branch. Instead of training a new VA over Zoom for 45 minutes, you can leave setup notes inside the workflow itself.
This reduces mistakes.
When someone edits a workflow without context, things break. A tag gets removed. A trigger fires twice. A delay is shortened by accident. With Workflow Sticky Notes, you can clearly label sensitive sections and protect critical automation paths.
It also improves onboarding.
New team members can open a workflow and immediately understand:
- What the trigger does
- Why a condition exists
- What each sequence is meant to accomplish
- Which areas should not be edited
For white-label SaaS users, this becomes even more powerful. You can brand workflows with your logo and internal documentation before delivering them to clients.
The result?
Cleaner systems. Faster collaboration. Fewer support headaches.
And when you manage dozens of workflows across multiple clients, that clarity saves serious time.
How to Use Workflow Sticky Notes in Standard Builder
You will complete this update directly inside the Workflow Builder in your GHL sub-account. You’ll open an existing workflow in the Standard Builder, add a Sticky Note to the canvas, customize it with text and color, and position it to clearly document a specific section of your automation.
This process is simple and only takes a few minutes. Below are the exact steps to add and organize Workflow Sticky Notes inside the Standard Builder.
- Access Automation and Open Existing Workflow in GoHighLevel.
- Open the Standard Builder Canvas.
- Add a Workflow Sticky Note on The Toolbar.
- Customize Your Sticky Note in the workflow.
- Organize Workflow Sections and save.
To start, make sure you are logged into your GoHighLevel sub-account.
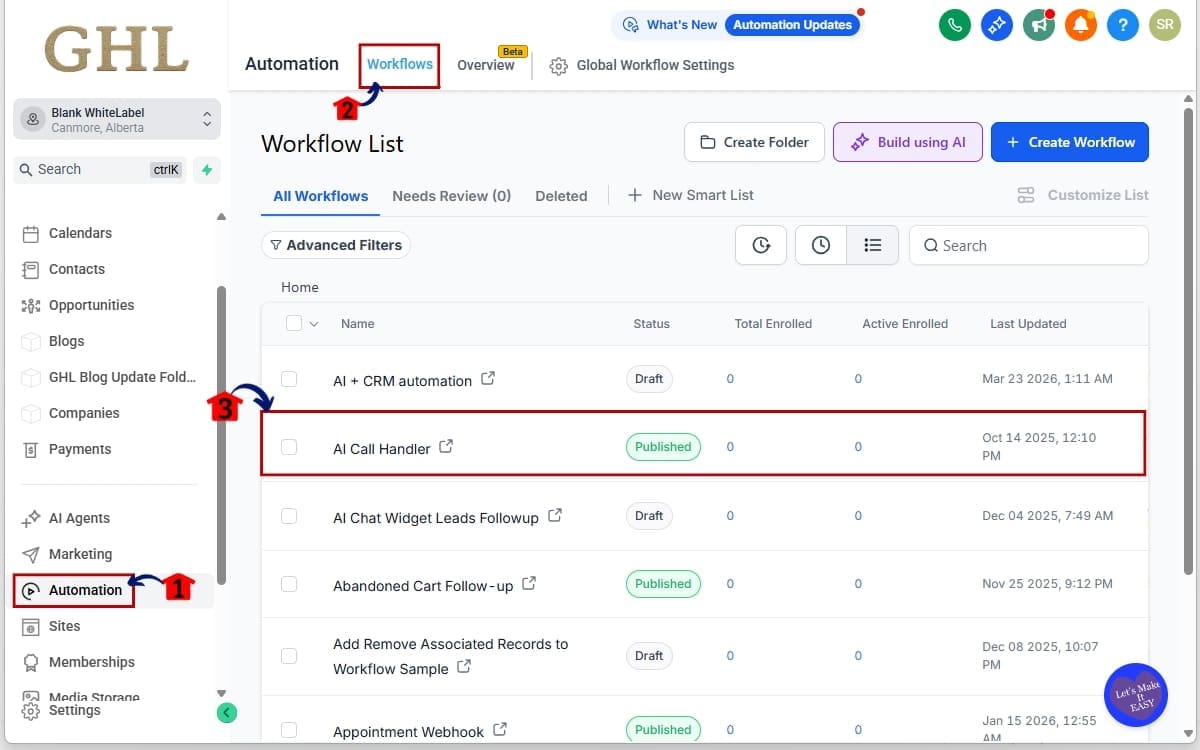
Step 01 – Access Automation and Open Existing Workflow in GoHighLevel
- The Main Menu on the left side of your screen contains all the core areas of GHL where you manage marketing, contacts, and automations.
1.1 Click “Automation” from the left-hand menu
- This opens the Automation section where all workflows and triggers are managed.
1.2 Click “Workflows”
- This takes you to the Workflow dashboard where you can view and manage existing automations.
1.3 Click an existing workflows
- This opens the selected workflow inside the Standard Builder, where you can view and edit its triggers, actions, and layout.
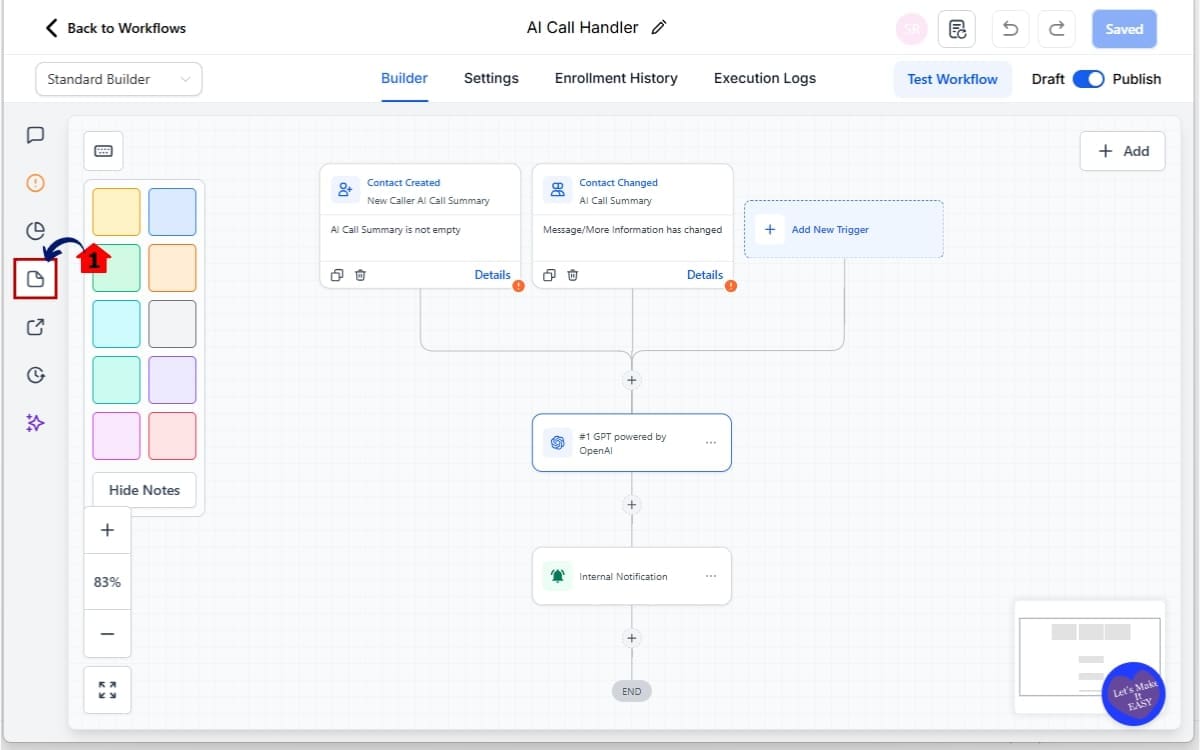
Step 02 – Open the Standard Builder Canvas
- Before adding Workflow Sticky Notes, confirm that you are working inside the Standard Builder view.
2.1 Locate the Sticky Note Tool
- From the workflow canvas, go to the left-hand toolbar and select Sticky Note to add it to your workflow.
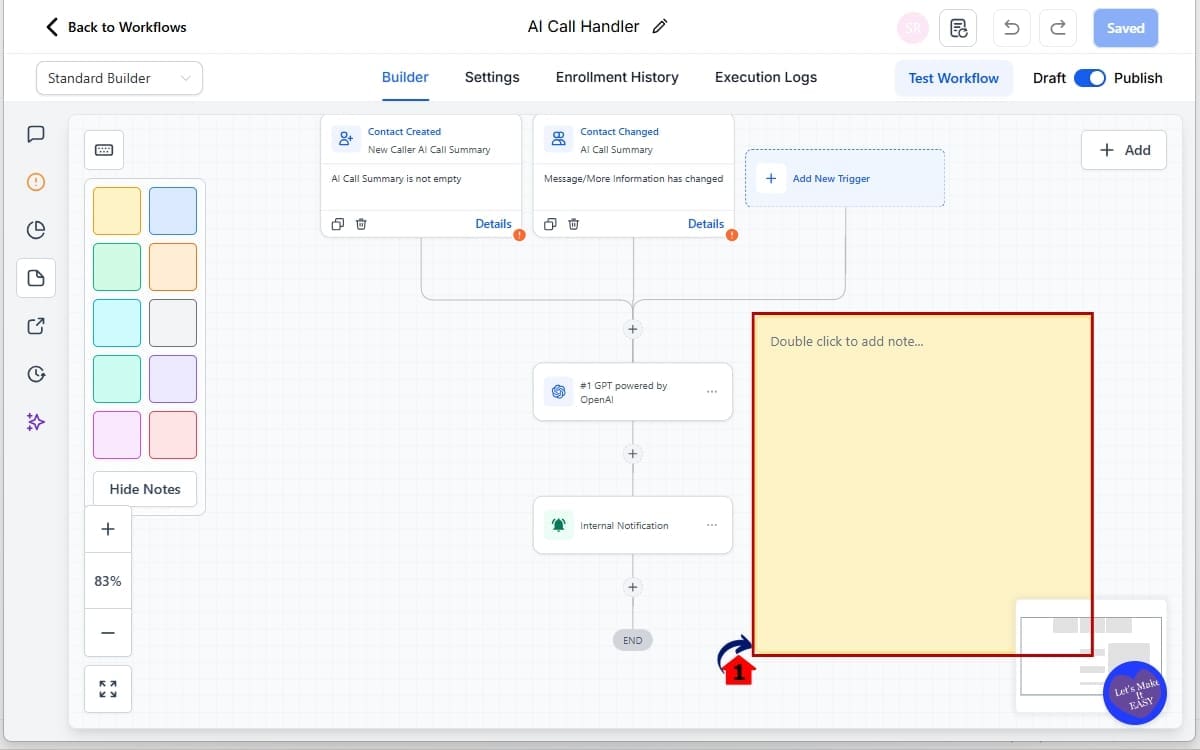
Step 03 – Add a Workflow Sticky Note on The Toolbar
- Adding a Sticky Note allows you to visually document your workflow without affecting automation logic. You can use it to label sections, explain conditions, or provide instructions for your team directly on the builder canvas.
3.1 Drag and Drop the Sticky Note
- Drag the Sticky Note from the left-hand toolbar and drop it onto your workflow canvas, positioning it above, beside, or between automation steps where documentation is needed.
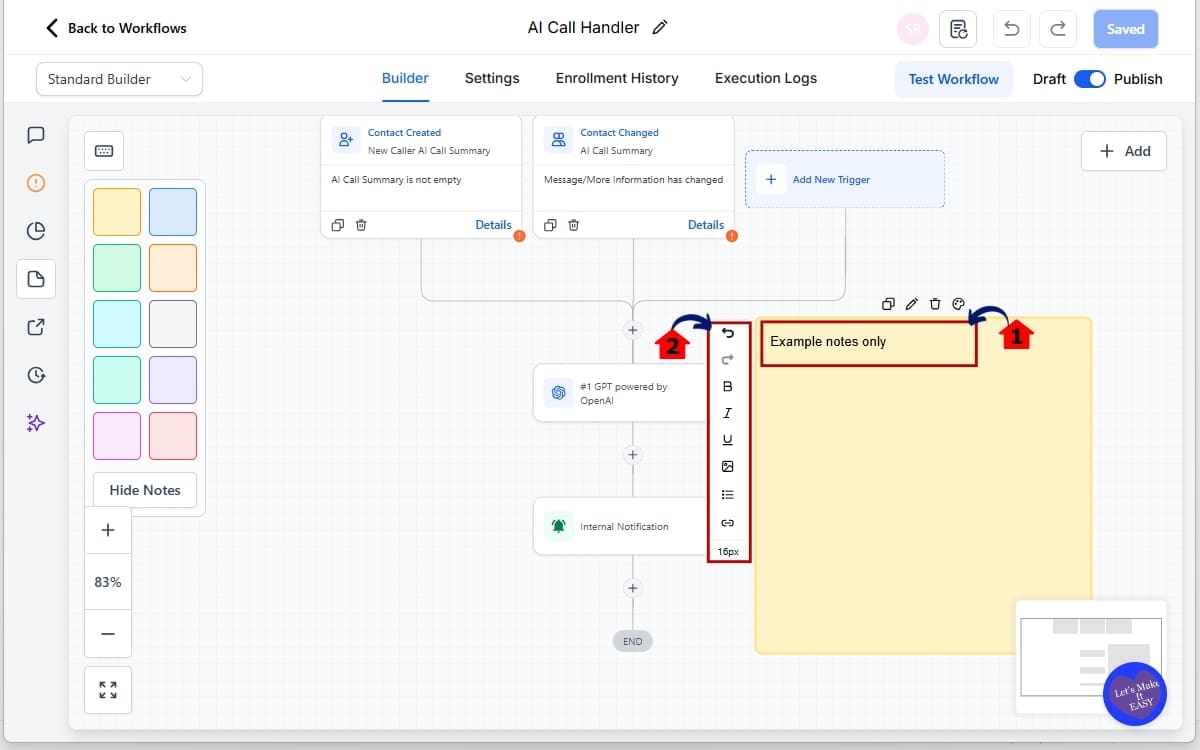
Step 04 – Customize Your Sticky Note in the workflow
- Customizing your Sticky Note helps you clearly document workflow logic and organize automation sections for better readability and team collaboration.
4.1 Add Text to the Sticky Note
- Click inside the Sticky Note and enter a short description explaining what this section of the workflow does.
4.2 Edit and Format the Sticky Note
- Customize the note by adding an image or logo (optional), formatting the text for clarity, and resizing the note by dragging its edges.
Step 05 – Organize Workflow Sections and save
- Use Workflow Sticky Notes strategically to improve clarity and prevent errors within your automation. Proper placement helps your team quickly understand workflow logic and identify sensitive areas.
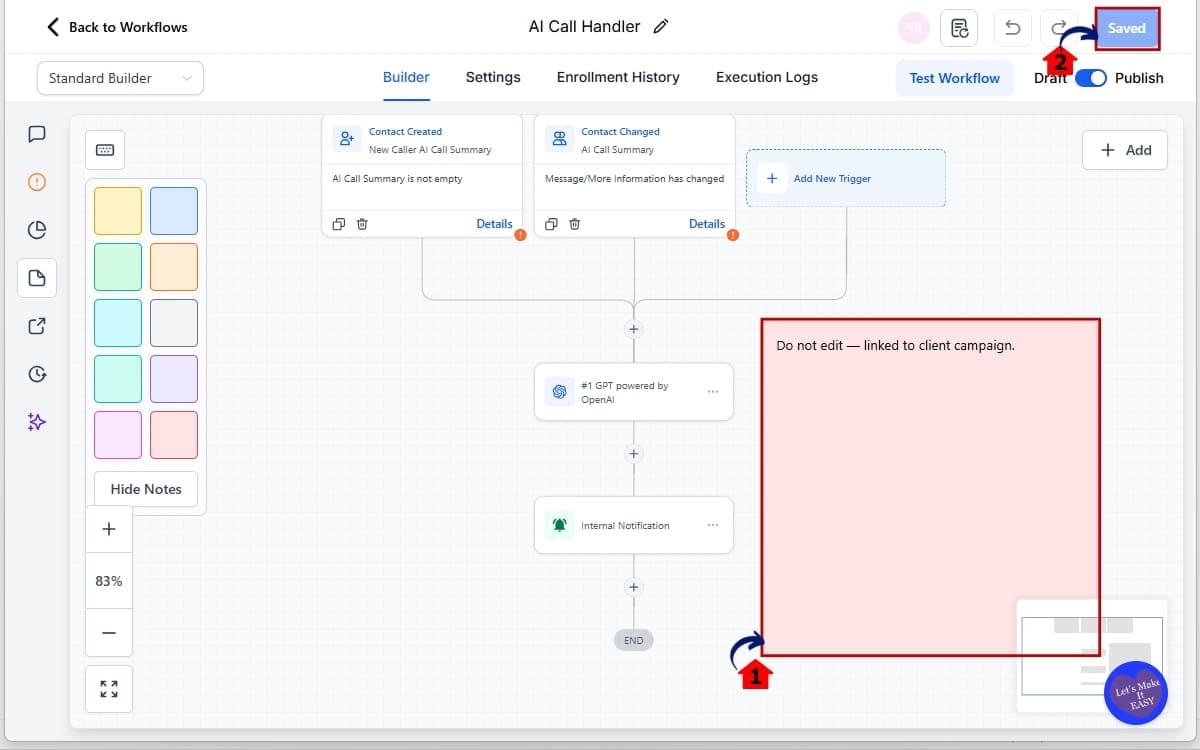
5.1 Add Warning Notes
- Place a Sticky Note near critical steps with a clear warning, such as: “Do not edit — linked to client campaign.”
5.2 Save Your Workflow
- After organizing your Sticky Notes, click Save to ensure all changes are applied and your documentation remains intact.
Important Reminder: Workflow Sticky Notes do not affect automation logic. They do not change triggers, delays, actions, or conditions. They are purely visual documentation tools. That means you can safely add, edit, or remove notes without breaking your workflow.
Pro Tips for Workflow Sticky Notes
Now that you know how to use Workflow Sticky Notes, let’s talk about using them like a pro.
Because just dropping random notes everywhere won’t help much. Structure matters.
Use a color system and stick to it.
For example:
- Green = Active path
- Yellow = Conditional logic
- Red = Do not edit
- Blue = Setup instructions
When your team understands the color rules, they can scan a workflow in seconds instead of minutes.
Keep your notes short.
Workflow Sticky Notes work best when they are clear and direct. Avoid long paragraphs. Use short instructions. Think clarity over complexity.
Document your triggers.
Many workflow issues start at the trigger level. Add a Sticky Note above your trigger explaining exactly when it fires. Future you will thank you.
Add protection warnings.
If a workflow connects to ads, payment links, or external integrations, add a red warning note. Make it obvious that editing certain steps could break revenue flow.
Brand internal workflows.
If you run white-label SaaS or deliver snapshots, add your logo inside the note area. It reinforces ownership and looks professional when sharing builds with clients.
And one more smart move.
Use Workflow Sticky Notes to explain why something exists, not just what it does. Context prevents mistakes.
Clear documentation means fewer “Wait… what does this do?” moments. Your team can move confidently instead of second-guessing every step.
Workflow Sticky Notes in Real Agencies
Let’s make this practical.
Picture this: you manage a marketing agency and you’ve built out a follow-up automation for a local home services business.
The workflow looks like this:
- Trigger: Form Submitted
- Condition: Has Tag “Hot Lead”
- SMS Follow-Up
- Email Sequence
- Call Notification to Sales Rep
- Appointment Reminder Series
- Review Request
Now fast forward three months.
A VA needs to update messaging. A new team member is reviewing automation logic. The client asks for a small tweak.
Without documentation, everyone starts guessing.
That’s where Workflow Sticky Notes change the game.
You add a blue note above the trigger:
“Fires only when Website Form A is submitted. Connected to Facebook Ad Campaign.”
You add a yellow note above the conditional split:
“If tagged Hot Lead, sends priority SMS within 2 minutes.”
You add a red note near payment or integration steps:
“Do not edit — linked to Stripe checkout and Zapier integration.”
Now anyone opening the workflow instantly understands the structure.
No Slack messages. No long Loom explanations. No accidental edits.
If you’re delivering white-label snapshots, this becomes even more powerful. You can include Workflow Sticky Notes explaining how to customize the automation before handing it off to a client.
That level of clarity makes your agency look organized and professional.
And when your systems are clean, your team moves faster.
Workflow Sticky Notes FAQ
Why Workflow Sticky Notes Are a Smart Upgrade
Workflow Sticky Notes may look like a small visual feature at first glance.
But for agencies and serious GHL users, they solve a real problem.
Workflows grow. Teams expand. Clients request changes. And without clear documentation inside your automations, mistakes happen. Things break. Time gets wasted explaining logic over and over again.
Workflow Sticky Notes bring structure back to your systems.
You can now label triggers, explain conditions, add warnings, and brand your builds directly inside the Standard Builder. No extra tools. No external SOP documents required.
And the best part?
They don’t interfere with automation logic at all. Your triggers fire the same. Your actions run the same. Your delays stay intact. You’re simply adding clarity on top of power.
If you’re managing multiple client accounts, building snapshots, or training team members, this update is more important than it looks.
Take 15 minutes this week.
Open your most complex workflow. Add Workflow Sticky Notes where confusion could happen. Label your triggers. Protect your sensitive steps.
You’ll immediately see how much cleaner your systems feel.
And cleaner systems always scale better.
Scale Your Business Today.
Streamline your workflow with GoHighLevel’s powerful tools.


