- Drag-and-Drop + Multi-Select Now Live Inside GoHighLevel’s Badge Designer
- Quick Summary – Badge Builder Layout Essentials
- Why This Matters to You
- How to Use the New Badge Builder Layout Tools
- Quick Tips for Better Badge Builder Layouts
- What This Means for Your Business
- FAQs – Using the New Badge Builder Layout
- Conclusion
Drag-and-Drop + Multi-Select Now Live Inside GoHighLevel’s Badge Designer
Tired of wrestling with clunky badge designs in GoHighLevel? You’re definitely not the only one who’s wrestled with clunky badge layouts. The good news? That’s over. GoHighLevel just rolled out two game-changing upgrades to its Badge Builder layout—drag-and-drop precision and multi-select control. Now, building certificates feels smooth, quick, and actually enjoyable.
Before this update, positioning elements felt more like trial-and-error than design. Now, you get pixel-level control with drag-and-drop and the power to group and move items together with Ctrl + Click.
Whether you’re building certificates for your courses, onboarding badges for members, or branded credentials for your clients, this change makes everything simpler. And if you’re running a white-labeled membership program, your certificates are about to look a whole lot more professional.
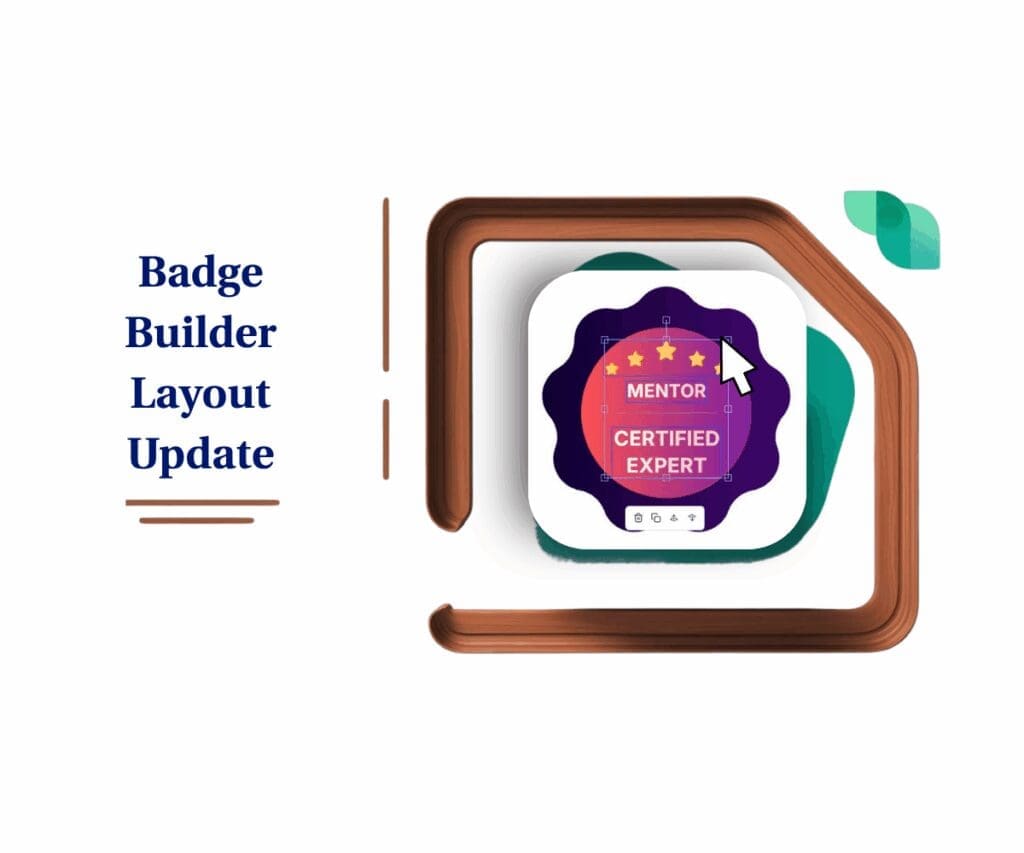
With smoother drag-and-drop controls and the ability to multi-select elements, this Badge Builder layout update makes it easier than ever to design professional, on-brand certificates inside GoHighLevel.
Quick Summary – Badge Builder Layout Essentials
Purpose: Upgrade the Badge Builder for better layout control
Why it matters: Saves time, improves design quality, and boosts brand perception
What you get: Drag-and-drop movement and multi-select for faster editing
Time to Complete: 5–10 minutes per badge
Difficulty Level: Easy
Key Outcome: Professionally styled, faster-to-build certificates and badges
Why This Matters to You
Let’s be real—designing certificates shouldn’t feel like assembling IKEA furniture with missing instructions. This Badge Builder layout update takes the headache out of the process and replaces it with intuitive, professional control.
Here’s how it benefits you:
Automate marketing, manage leads, and grow faster with GoHighLevel.

- Save Time: What used to take you 20 minutes—and way too much clicking—now takes five. No more guessing or nudging things around forever. You drop it, line it up, and move on.
- Look Sharp: With tighter control and easy group alignment, your badges don’t just get done faster—they look legit. Clean lines, balanced layouts, and fully on-brand every time.
- Elevated User Experience: Better-looking certificates mean more perceived value for your students, members, or clients.
- Easier Delegation: Virtual assistants or team members can now confidently handle badge creation with minimal training.
This is especially useful for:
- Agencies offering white-labeled course platforms – Deliver better-looking, branded results.
- Course creators or coaches – Reward learners with professional-grade badges.
- Community managers – Add flair and structure to member progress or gamification.
It’s a small update with big downstream benefits.
How to Use the New Badge Builder Layout Tools
Ready to put the new badget builder layout tools to work? Here’s a quick walkthrough on how to start building better badges using GoHighLevel’s updated interface.
You’ll learn how to access the builder, use the new drag-and-drop functionality, and apply multi-select to speed up your layout workflow.
To start make sure you are logged in to your GoHighLevel sub-account.
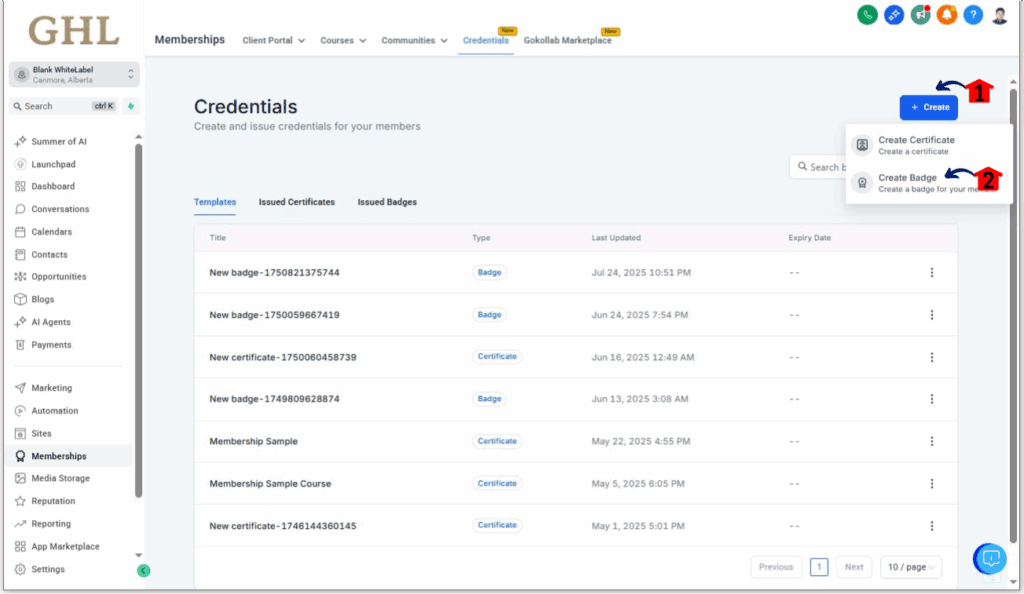
Step 01 – Access the Main Left Hand Menu in GoHighLevel
The Main Menu on the Left side of your screen has all the main areas that you work in when using GHL
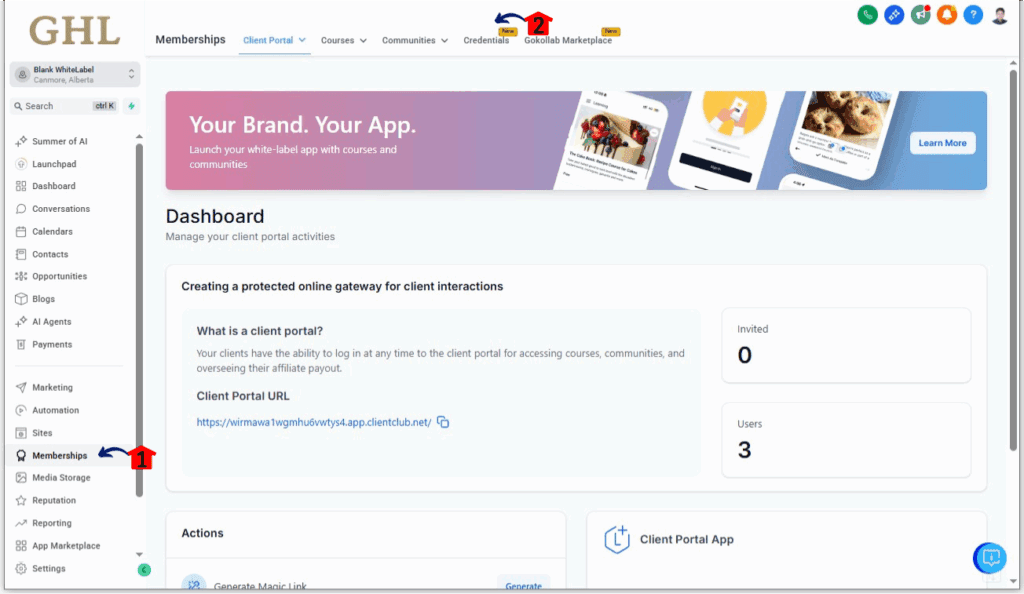
1.1 Click on the ‘Memeberships’ Menu Item.
- Access the ‘Memeberships’ section of GoHighLevel
- You’ll now be in the ‘Memeberships’ section of GHL, where you can access the ‘Credentials’ section from the top menu.
1.2 Click on the ‘Credentials’ menu link.
Step 02 – Create a Badge
2.1 Click the Create button in the top-right corner
2.2 A dropdown will appear—select Create Badge to launch the builder.
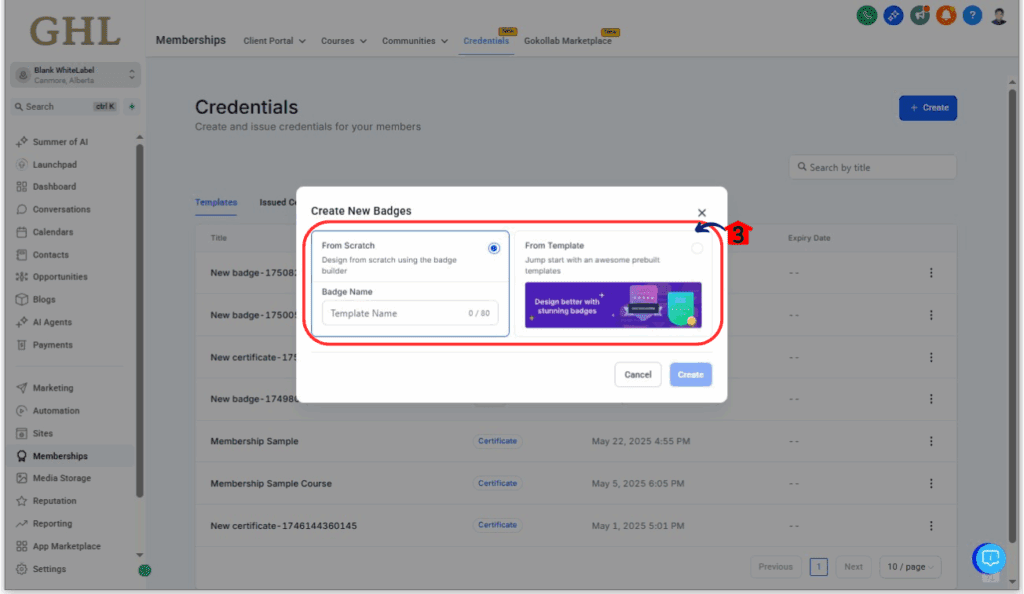
2.3 Select either you want to Start from Scratch or Use a Template.
Step 03 – Design Your Badge
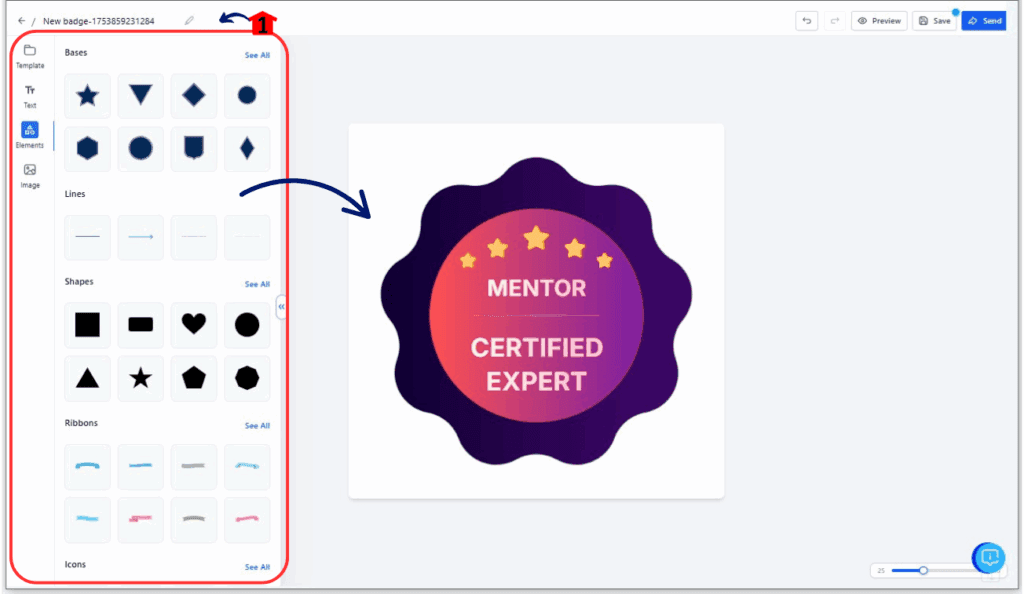
3.1 Once inside the badge editor, add elements like Text, Images, or Shapes
- Click and hold any element to drag it across the canvas
- Release the element when it’s in your desired location
Step 04 – Use Multi-Select for Faster Edits
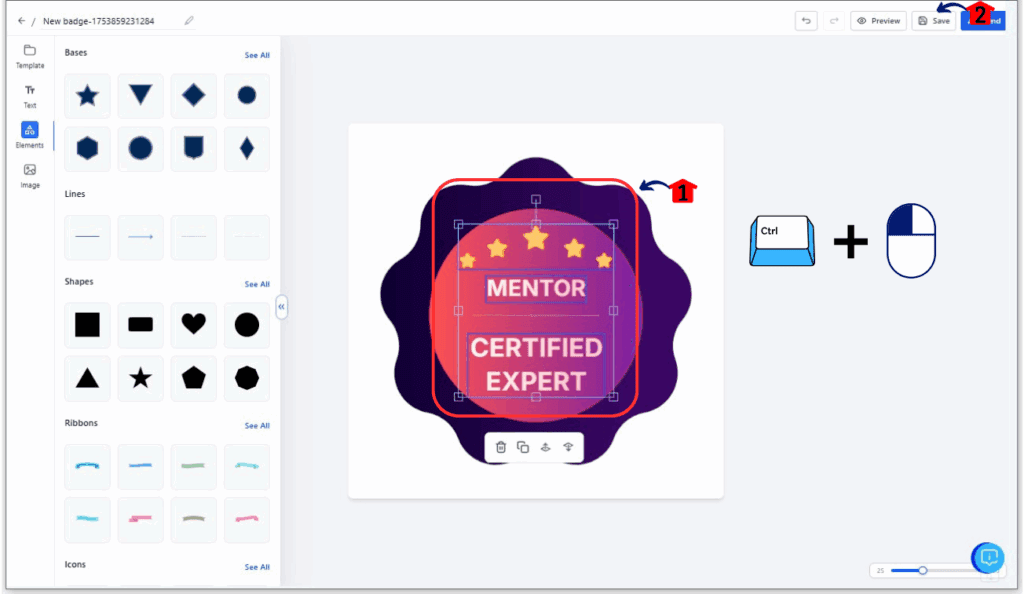
3.1 Hold down the Ctrl key (or Cmd on Mac) and click on multiple elements to select them all at once
- Drag the selected group to reposition everything together
3.2 Once you’re happy with your layout, click Save
- You can now assign this badge to a course or achievement inside the Membership portal
This isn’t just easier—it’s cleaner, quicker, and opens up more creative control for your brand.
Quick Tips for Better Badge Builder Layouts
Now that the badge editor doesn’t fight back, here’s how to make your badge layouts even sharper and more efficient.
Use Multi-Select to Group Elements Before Moving
Don’t waste time dragging five elements one at a time. Select them all, move once, done.
Align with Intention
Use the alignment guides that appear during dragging. These help center text, images, and logos for a pro look.
Keep Consistent Padding
Space between elements matters. Even a few extra pixels can make or break your layout. Use consistent spacing for balance.
Duplicate and Edit
Created one layout you like? Duplicate the badge and tweak it for another level, course, or team. Saves tons of time.
Avoid Overcrowding
Badges are small canvases. Stick to the essentials: name, logo, achievement, and maybe a date.
Use Brand Colors
Keep fonts, borders, and highlights aligned with your client’s brand. It boosts their credibility—and yours.
Little touches go a long way when your badges are customer-facing. These layout tools make it possible to turn a quick edit into a slick final product.
What This Means for Your Business
This update isn’t just about making things look better—it’s about doing more with less time and delivering a higher standard to your clients or members.
Here’s how this layout upgrade can make a real difference:
Add Value Without Extra Work
You can now offer professional-quality digital badges as part of your courses or memberships—without needing design skills or outside tools.
Differentiate Your Brand
Clean, consistent badge layouts help your courses stand out and show off your attention to detail. That translates to trust and authority.
Sell Credentialing as a Service
Agencies can package branded certificates as part of a white-labeled membership program, boosting perceived value and monthly retainers.
Simplify Team Workflows
With easier drag-and-drop and multi-select, you can delegate badge design to your VA, content team, or ops staff with confidence.
Deliver Faster
Less time on badge building means more time to focus on high-value tasks—like scaling your automations, onboarding clients, or growing your SaaS.
In short: this update helps you look better, deliver faster, and scale smoother.
FAQs – Using the New Badge Builder Layout
Conclusion
This update might seem small—but for anyone using GoHighLevel’s membership or certification tools, it’s a game-changer.
With smooth drag-and-drop and easy multi-select, the Badge Builder finally catches up with the rest of what makes GoHighLevel so powerful. Whether you’re handing out certificates to students, clients, or community members, you can now make them look pro—without needing to be a designer or spending hours figuring it out.
It’s faster. It’s cleaner. It makes your brand look better.
Give it a spin the next time you’re inside the Memberships area—because sharp-looking credentials build trust, boost completion rates, and show your audience that you care about the details.
Have you tested the new badge builder layout yet? Drop a comment and let us know what you’re building.Check back to the GHL Growth Garage blog for more feature breakdowns just like this one.
Scale Your Business Today.
Streamline your workflow with GoHighLevel’s powerful tools.
