- Use GPT in workflows to send smart replies
- Quick Summary – AI Workflow Automation Overview
- Video Walkthrough: GPT Workflow Setup in GHL
- AI Workflow Automation in GHL Basics
- Why AI Workflow Automation in GHL Matters
- AI Workflow Automation in GHL Setup Steps
- Pro Tips for AI Workflow Automation in GHL
- Here are some practical ways you can use it:
- Common Mistakes in AI Workflow Automation in GHL
- AI Workflow Automation in GHL FAQ
- AI Workflow Automation in GHL Summary
Use GPT in workflows to send smart replies
AI workflow automation in GHL helps you set up simple, step-by-step workflows that use GPT to reply to leads automatically after a form is submitted. You create a trigger, add the GPT action, write a clear prompt, and send the response through email so every lead gets a fast and relevant reply without manual work.
When you start using this, you will notice most people try to make the prompt too complex. In real use, simple and direct prompts work better. You get cleaner replies that are easier to use and require less editing.
Most leads expect a reply within five minutes, and response rates can drop by over 50 percent after that. That is a big gap if you are handling leads manually or missing messages.

In this guide, you will learn how to build AI workflow automation inside GHL, connect it to your forms, and send automatic replies that feel natural and personal. You will save time, reply faster, and stay consistent with every new lead.
Quick Summary – AI Workflow Automation Overview
Purpose: This guide helps you set up AI workflow automation in GHL so you can respond to form submissions without doing it manually.
Why It Matters: You can reply to leads faster and stay consistent, which helps you avoid missing simple opportunities.
What You Get: You learn how to build a workflow that creates and sends replies based on what each lead submits.
Time To Complete: You can finish the setup in about 15 to 30 minutes, depending on how simple your workflow is.
Difficulty Level: This setup is beginner-friendly and does not require any coding or advanced skills.
Key Outcome: You will have AI workflow automation in GHL running so your leads get replies right away without extra work.
Video Walkthrough: GPT Workflow Setup in GHL
Set up AI workflow automation in GHL and reply to leads without manual work. This quick guide shows you how it works step by step.
Inside this video:
Automate marketing, manage leads, and grow faster with GoHighLevel.

- Set up a workflow using a form trigger.
- Add the GPT action and write a simple prompt.
- Insert form data into your AI response.
- Send replies automatically using email.
AI Workflow Automation in GHL Basics
AI workflow automation in GHL gives you a simple way to respond to leads without doing it all by hand. Instead of sending the same message every time, you can create replies that change based on what each person submits in your form.
Inside the workflow builder, you will see the “GPT Powered by OpenAI” action. This is where you write a prompt, which is just a clear instruction telling the system what kind of reply to create. Once a form is submitted, the workflow takes that data and generates a response right away.
This is where AI workflow automation in GHL starts to make sense. You are not just saving time. You are improving how you respond to leads in a way that still feels personal and relevant.
Here’s how this helps in real use:
- You can send replies based on what each lead actually submits.
- You avoid writing the same messages over and over.
- You can handle more leads without adding extra work.
- You can connect the AI response directly to emails or follow-ups.
- You can start using AI inside GHL without needing technical skills.
Why AI Workflow Automation in GHL Matters
If you are replying to every lead by hand, you are slowing yourself down without realizing it. AI workflow automation in GHL helps you respond right away while keeping your messages clear and relevant. That speed can make a real difference when leads are still paying attention.
When someone fills out your form, they are already interested. If they wait too long for a reply, that interest fades fast. Quick responses help you stay in front of them while they are still thinking about your offer.
AI workflow automation in GHL handles this for you in the background. You set it up once, and it works every time a new lead comes in. You stay consistent without needing to check messages all day.
Here’s what that looks like in real use:
- You reply to leads instantly without being online.
- You keep your responses consistent across every inquiry.
- You reduce time spent on manual follow-ups.
- You handle more leads without missing messages.
- You send replies that feel personal based on what each lead submits.
This is not about replacing how you work. It is about making your process faster and easier so you can focus on the conversations that matter most.
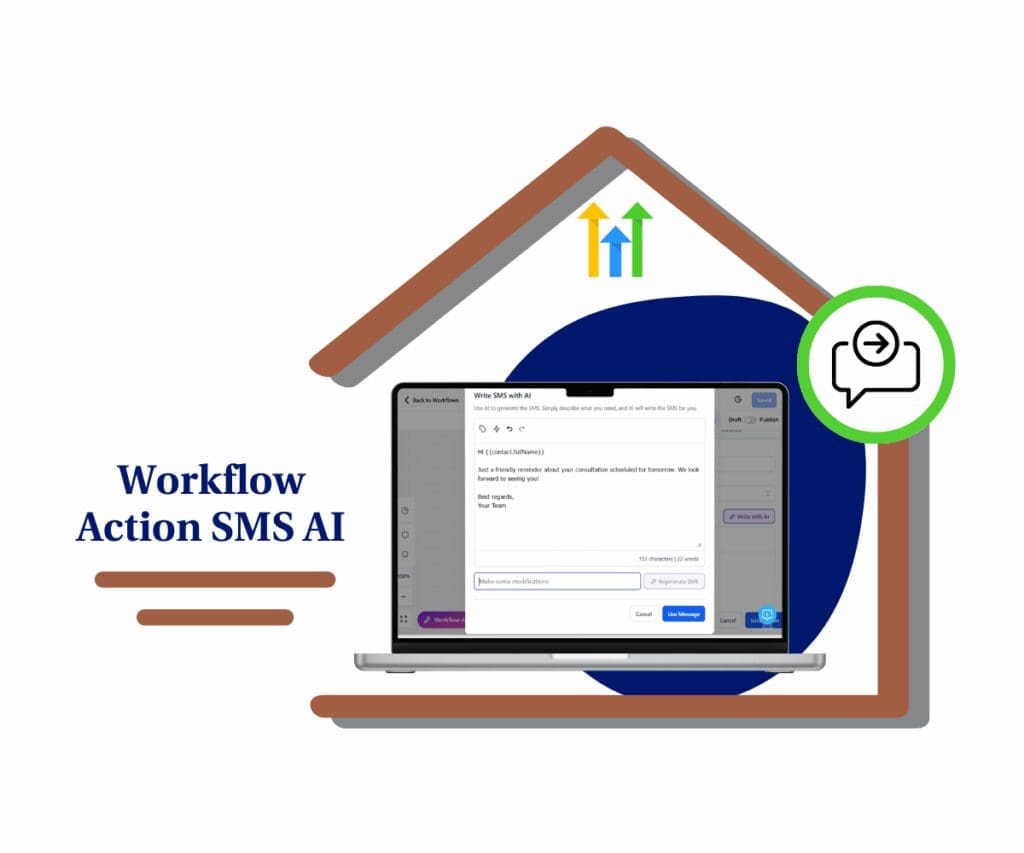
AI Workflow Automation in GHL Setup Steps
Setting up AI workflow automation in GHL is done inside the Automation section using workflows. You will create a workflow, connect it to a form submission trigger, add the GPT Powered by OpenAI action, and send the response through an email.
Each step works together, so it is important to follow the process in order. Once everything is set up and published, your workflow will automatically generate and send responses every time a new form is submitted.
- Access the Workflow Builder from the Automation section.
- Set the Form Submitted Trigger after renaming your workflow.
- Add filters after renaming your Form Submitted trigger.
- Choose your created Custom Form in the trigger filters before saving the trigger.
- Add the GPT workflow element in your workflow.
- Add and set the Form’s Custom Values in the GPT prompt.
- Add and arrange all Custom Values in the GPT prompt before saving the action element.
- Add the Send Email action element.
- Set the email subject and sender details.
- Set the GPT response in the email body before saving.
- Publish and save the AI Automation workflow.
To start, make sure you are logged in to your GoHighLevel sub-account and that you have created a custom form for this workflow. Check this blog post on how to create a custom form in GHL.
Step 01 – Access the Workflow Builder from the Automation section
- The Automation section is where you create and manage all workflows in GHL.
- The Workflow Builder lets you build automation from scratch.
1.1 Click the Automation section
- This will open the Workflows tab by default.
1.2 Click the + Create Workflow button
- A dropdown will appear with options to start a new workflow.
1.3 Click the + Start from Scratch option
- You will be taken to the Workflow Builder.

Step 02 – Set the Form Submitted Trigger after renaming your workflow
- The trigger defines when your workflow will start.
- In this case, it will run when a form is submitted.
2.1 Rename your workflow
- This helps you keep your workflows organized and easy to find.
2.2 Click the New Trigger button
- The Trigger Library will open so you can choose a trigger.
2.3 Search for and select the Form Submitted option
- You will be taken to the trigger settings.

Step 03 – Add filters after renaming your Form Submitted trigger
- Filters control which form will activate the workflow.
- This ensures the correct form is used.
3.1 Rename your Form Submitted trigger
- Use a short and clear name for easy reference.
3.2 Click the + Add Filters button
- A dropdown will appear in the Filters section.

Step 04 – Choose your created Custom Form in the trigger filters before saving
- Selecting the correct form ensures the workflow runs at the right time.
4.1 Choose the Form is option in the dropdown
- A second dropdown will appear beside it.
4.2 Choose the specific Custom Form you created
- The selected form will appear in the Filters section.
4.3 Click the Save Trigger button
- The trigger will now appear on the workflow canvas.

Step 05 – Add the GPT workflow element to your workflow
- The GPT action is where AI generates your response.
- This step connects your form data to the AI output.
5.1 Click the action element button on the canvas
- The Action Library will open.
5.2 Search for and select the GPT Powered By OpenAI action element
- You will be taken to the GPT setup screen.

Step 06 – Add and set the Form’s Custom Values in the GPT prompt
- Custom Values allow the AI to use data from your form.
- This makes responses more relevant to each lead.
6.1 Type your prompt text based on your marketing goal
- Keep your instructions simple and clear.
- The button below is a GPT Prompt Sample you are free to download.
6.2 Click the Custom Values icon
- The Custom Fields and Values library will open.
6.3 Search for and select a Custom Field from your Custom Form
- The selected value will be added to your prompt.
6.4 Check that the Custom Value syntax appears in the prompt box
- It should appear at the bottom of the prompt area.

Step 07 – Add and arrange all Custom Values in the GPT prompt before saving
- Make sure all needed values are added before saving.
- This ensures the response includes the right data.
7.1 Add all required Custom Values to the GPT prompt
- These values will appear at the bottom of the prompt.
7.2 Click the Save Action button
- The GPT action will now appear on the workflow canvas.

Step 08 – Add the Send Email action element
- This step sends the AI-generated response to your lead.
- It connects the GPT output to your email.
8.1 Click the Add Action button
- This is shown as a + icon.
8.2 Search for and select the Send Email action
- The email setup panel will open.

Step 09 – Set the email subject and sender details
- This defines how your email appears to the recipient.
- Make sure all details are correct before sending.
9.1 Rename the Action Name
- Use a clear name for easy tracking.
9.2 Enter the sender’s name
- You can also use Custom Fields if needed.
9.3 Set the sender’s email address
- Make sure this email is verified in your GHL settings.
9.4 Enter your email subject
- Keep it short and clear.

Step 10 – Set the GPT response in the email body before saving
- This step inserts the AI-generated response into your email.
- It ensures the message is sent to the lead.
10.1 Type your email message
- Keep it simple and easy to read.
10.2 Click the Custom Values icon
- The Custom Values library will open.
10.3 Select GPT, then #1 GPT Powered by OpenAI, then Response
- Follow this order step by step.
10.4 Check that the GPT response appears in the email body
- Move it into the correct position if needed.
10.5 Click the Save Action button
- The Send Email action will appear on the canvas.

Step 11 – Publish and save the AI Automation workflow
- Publishing makes your workflow live.
- Saving ensures all changes are applied.
11.1 Turn on the Publish button
- It will turn blue when active.
11.2 Click the Save button
- The red dot will disappear once saved.

Pro Tips for AI Workflow Automation in GHL
AI workflow automation in GHL works best when you keep your setup simple and clear. You do not need complex prompts or long workflows to get good results. In most cases, a clean setup will give you better and more consistent responses.
When you use this in real workflows, your focus should be on clarity. You want responses that are easy to read, easy to send, and match what the lead actually asked. That is what makes the automation useful day to day.
Here are a few practical tips you can apply right away:
- Keep your prompts short so the system understands your intent.
- Write prompts like clear instructions instead of long descriptions.
- Use form fields to make each response feel more personal.
- Test your workflow with different inputs before using it live.
- Avoid adding extra steps that make the workflow harder to manage.
- Review responses and adjust your prompt if something feels off.
These small changes help you get better results from AI workflow automation in GHL without adding more work to your setup.
AI Workflow Automation in GHL Use Cases
AI workflow automation in GHL starts to make sense when you use it in real situations. It is not just about building the workflow. It is about using it where it actually saves you time and keeps your responses consistent.
In most cases, you will use this for first replies and simple follow-ups. You let the system handle the early part of the conversation, so you can focus on leads that are ready to take the next step.
Here are some practical ways you can use it:
These are simple ways to use AI workflow automation in GHL without changing how you already work. You are just making your process faster and easier to manage.
- Send an instant reply when a new lead submits a form.
- Create follow-up emails based on what the lead entered.
- Answer common questions without replying manually.
- Confirm next steps right after a form is submitted.
- Handle basic lead qualification before you step in.
Common Mistakes in AI Workflow Automation in GHL
AI workflow automation in GHL is easy to set up, but small mistakes can slow things down or break the flow. Most issues do not come from the system. They usually come from how the workflow is built or tested.
When you set this up, your goal is to keep everything clear and working step by step. A simple check before you publish can save you time and prevent missed replies.
Here are the most common mistakes you should watch for:
- Choosing the wrong form in your trigger settings.
- Skipping filters and sending the workflow to the wrong form.
- Writing prompts that are unclear or too general.
- Placing custom values in the wrong part of the prompt.
- Forgetting to insert the GPT response into the email step.
- Not testing the workflow before turning it on.
These are easy to fix once you know where to look. If you keep your setup simple and check each step, your AI workflow automation in GHL will run the way you expect from the start.
AI Workflow Automation in GHL FAQ
You will likely have a few questions when you first set up AI workflow automation in GHL. That is normal. These answers will help you understand how the feature works and how to fix common issues as you build your workflow.
These answers should help you move forward with more confidence as you build and test your AI workflow automation in GHL.
AI Workflow Automation in GHL Summary
AI workflow automation in GHL gives you a clear way to manage lead responses without handling everything yourself. You build the workflow once, and it responds based on what each lead submits. This helps you stay consistent and reply faster without adding more work to your day.
When you use the GPT workflow element, you can create replies that match each lead’s input. You are not sending the same message every time. You are using simple prompts to guide the response so it feels more relevant.
As you get used to it, this becomes part of your normal process. You can use AI workflow automation in GHL for first replies, follow-ups, and basic lead handling while you focus on the next step in the conversation.
If you have not tried this yet, start with a simple setup and test it with your form. Make small changes to your prompt until the responses feel right for your use case.
Check back to the GHL Growth Garage blog for more GoHighLevel mini-guides and practical tutorials.
Have you tested AI workflow automation in GHL in your own workflows?
Scale Your Business Today.
Streamline your workflow with GoHighLevel’s powerful tools.