

- Tag bounces and follow up by SMS
- Quick Summary – Invalid Email Leads Guide
- Video Guide: Fix Invalid Email Leads in GHL
- How Invalid Email Leads Hurt Follow-Up
- How to Build the Invalid Email Leads Workflow
- Tips and Quick Fixes for Cleaner Lead Follow-Up
- Better Recovery for Bounced Leads
- Common Invalid Email Leads Questions
- Final Takeaway on Invalid Email Leads
Tag bounces and follow up by SMS
Invalid Email Leads are easy to fix in GHL with a simple step-by-step workflow. When an email bounces, add a tag, stop other email workflows, check for a phone number, then send an SMS or alert your team. This keeps lead follow-up moving and helps prevent missed sales.
When I first built this workflow, I noticed one problem that most people missed. They tagged the contact but left them in other email workflows. That meant the same bad email kept getting used. In my experience, stopping those extra workflows is just as important as adding the tag.
Email providers recommend keeping bounce rates low because too many failed emails can hurt sender reputation. Many businesses try to stay below a 2% bounce rate. Finding bad email addresses early helps keep your email list healthier and your follow-up more reliable.

This guide shows each step inside GHL. You’ll learn how to detect bounced emails, tag the contact, switch to SMS when a phone number exists, and notify your team when it does not. By the end, you will have a simple system that keeps your CRM clean and gives Invalid Email Leads another chance to become customers.
Quick Summary – Invalid Email Leads Guide
Purpose: This guide shows you how to fix Invalid Email Leads in GHL when an email bounces.
Why It Matters: A bounced email can stop a good lead cold if you do not have a backup path.
What You Get: You get a simple workflow that tags the contact, stops bad email paths, sends SMS when it can, and alerts your team when needed.
Time To Complete: You can build this in about 10 to 15 minutes once your tag is ready.
Difficulty Level: This is a simple setup if you know where to find workflows in GHL.
Key Outcome: You keep your CRM cleaner and give bounced leads a better chance to reply.
Video Guide: Fix Invalid Email Leads in GHL
Bad emails can stop good leads cold. This video shows you how to catch Invalid Email Leads in GHL and give them a better follow-up path.
Inside this video:
Automate marketing, manage leads, and grow faster with GoHighLevel.

- Build a workflow for bounced emails.
- Add a tag when an email fails.
- Send an SMS if the lead has a phone number.
- Alert your team when a person needs to step in.
How Invalid Email Leads Hurt Follow-Up
A bounced email is not a small tech issue. It means your message did not reach the lead. If you miss it, that lead can sit in GHL with no clear next step.
Invalid Email Leads can hurt your follow-up in simple ways:
- Your workflow may keep sending to a bad email.
- Your team may not know the lead needs help.
- Your CRM can fill up with weak data.
- Your email health may drop over time.
- A good lead may go cold before you see it.
Campaign Monitor says a healthy opt-in list often has a bounce rate near 2% to 3%. That is a tight range. So when GHL sees a bounced email, act fast. Tag the contact. Stop the bad email path. Try SMS if you have a phone number. Alert your team when a person needs to step in.
How to Build the Invalid Email Leads Workflow
This workflow is built in the Automation area of your GoHighLevel sub-account. You will use a bounced email event to spot Invalid Email Leads, add a tag, stop other workflows, and choose the next best follow-up path.
The point is simple. Do not let one bad email stop a good lead. Here are the steps to build an Invalid Email Leads workflow in GoHighLevel.
- Access the Workflow Builder from the Automation Section.
- Set the Email Events Trigger After Renaming Your Workflow.
- Rename the Email Events Trigger and Add a Filter.
- Set the Bounced Event as the Filter Before Saving the Trigger.
- Search for and Add the Add Contact Tag Element.
- Set the Lead Invalid Email Tag Before Saving the Action Element.
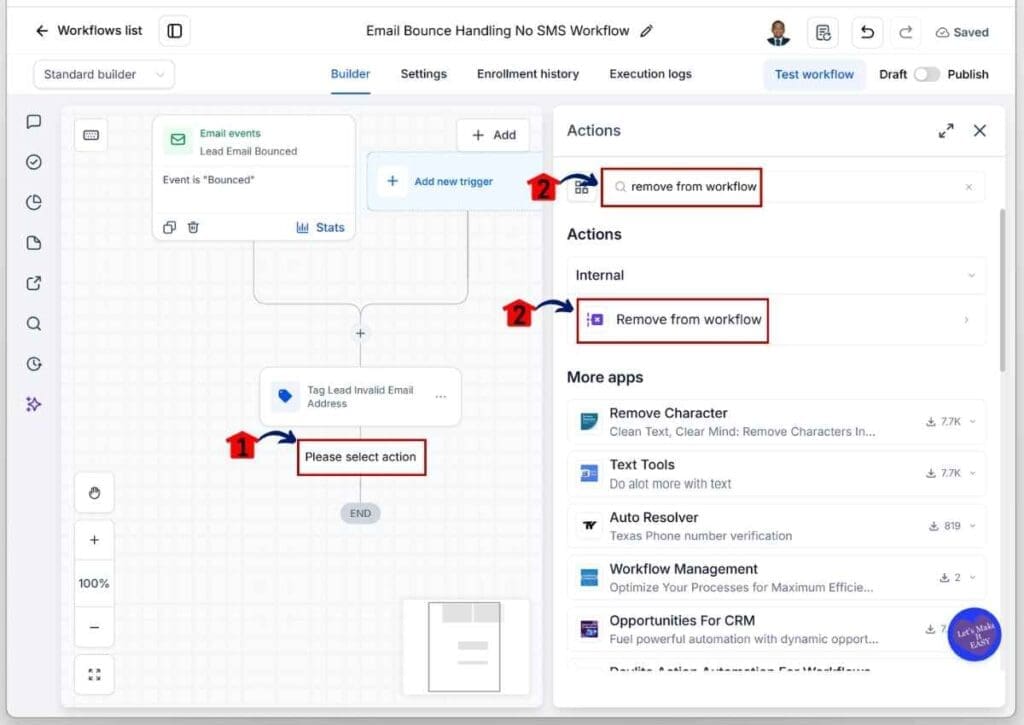
- Search for and Add the Remove from Workflow Element.
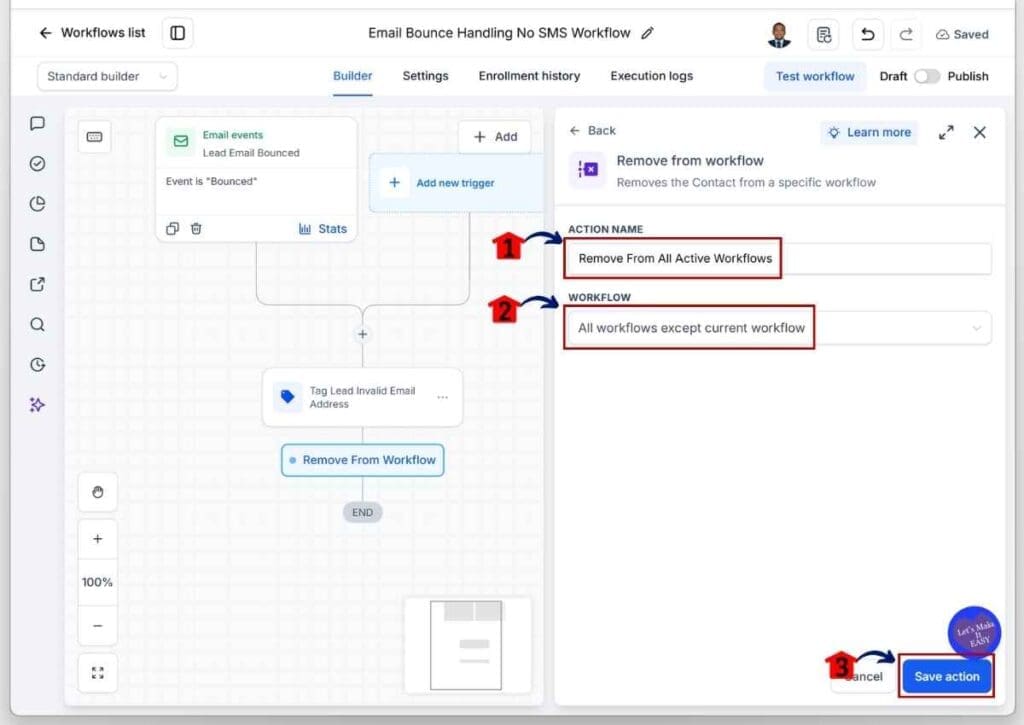
- Choose the All Workflows Except Current Workflow Option Before Saving the Action Element.
- Search for and Add the If / Else Action Element.
- Configure the Contact Phone Number Branches.
- Search for and Add the Send SMS Element.
- Set the Action Name and SMS Message for the Lead.
- Search for and Add the Send Internal Notification Element.
- Set the Action Name and Internal Notification for Your Team.
- Set the Redirect Page and Team Assignee.
- Set the Contact Timezone in the Workflow Settings.
- Publish and Save Your Workflow.
To start, make sure you are logged in to your GoHighLevel sub-account. In addition, make sure you’ve already created a Lead Invalid Email tag.
Step 01 – Access the Workflow Builder from the Automation Section
- Create the workflow in the Workflow Builder inside the Automation section.
1.1 Click Automation.
- You will be taken to the Workflows tab by default.
1.2 Click Workflows.
- You will see your workflow list. You will also see options like Create Folder, Build Using AI, and + Create Workflow.
1.3 Click + Create Workflow.
- A dropdown menu will appear with several options, including + Start from Scratch.
1.4 Click + Start from Scratch.
- You will be taken to the Workflow Builder.

Step 02 – Set the Email Events Trigger After Renaming Your Workflow
- Rename your workflow, then set the Email Events trigger.
2.1 Rename your workflow.
- Click the Pencil icon at the top of the Workflow Builder. Then enter a clear name for your workflow.
2.2 Click Add New Trigger.
- The trigger library will appear. You can search for and select a trigger here.
2.3 Search for and select Email Events.
- You will be taken to the Email Events trigger settings page.

Step 03 – Rename the Email Events Trigger and Add a Filter
- Give the Email Events trigger a clear name. Then add a filter.
3.1 Rename the Email Events trigger.
- This makes it easier to find on the workflow canvas.
3.2 Click Add Filters.
- A drop-down filter will appear below the Add Filters button.

Step 04 – Set the Bounced Event as the Filter Before Saving the Trigger
- Choose Event as the filter. Then select Bounced before saving the trigger.
4.1 Select Event from the first drop-down filter.
- Another drop-down filter will appear below the first filter.
4.2 Select Bounced from the second drop-down filter.
4.3 Click Save Trigger.
- The trigger will now appear on the workflow canvas.

Step 05 – Search for and Add the Add Contact Tag Element
- Click Add New Element. Then search for and select the Add Contact Tag action element.
5.1 Click Add New Element.
- The action library will appear on the right side of the canvas.
5.2 Search for and select the Add Contact Tag action element.
- You will be taken to the Add Contact Tag settings page.

Step 06 – Set the Lead Invalid Email Tag Before Saving the Action Element
- Rename the action element. Then select the Lead Invalid Email tag before saving it.
6.1 Rename the action element.
- This makes the workflow easier to read on the workflow canvas.
6.2 Select your created tag.
- Choose the Lead Invalid Email tag.
6.3 Click the Save Action button.
- The action element will now appear on the workflow canvas.

Step 07 – Search for and Add the Remove from Workflow Element
- Click Add New Element, then search for and select the Remove from Workflow action element.
7.1 Click Add New Element.
- The action library will appear on the right side of the canvas.
7.2 Search for and select the Remove from Workflow action element.
- You will be taken to the Remove from Workflow settings page.
Step 08 – Choose the All Workflows Except Current Workflow Option Before Saving the Action Element
- Rename the action element, then choose the All Workflows Except Current Workflow option before saving it.
8.1 Rename the action element.
- This makes the workflow easier to read on the workflow canvas.
8.2 Select All Workflows Except Current Workflow from the Workflow drop-down menu.
8.3 Click the Save Action button.
- The action element will now appear on the workflow canvas.
Step 09 – Search for and Add the If / Else Action Element
- Click Add New Element, then search for and select the If / Else action element.
9.1 Click Add New Element.
- The action library will appear on the right side of the canvas.
9.2 Search for and select the If / Else action element.
- You will be taken to the If / Else settings page.

Step 10 – Configure the Contact Phone Number Branches
- Set up one branch for contacts with a phone number and another for contacts without one.
10.1 Rename the If / Else action element.
- Use a clear and simple name.
10.2 Rename the first branch to Contact Has an SMS/Phone Number.
- This branch is for contacts who have an SMS or phone number.
10.3 Select Contact Details >> Standard Fields in the first filter.
10.4 Select Is Not Empty in the second filter.
10.5 Rename the second branch for contacts who do not have an SMS or phone number.
10.6 Click the Save Action button.
- The If / Else action element will now appear on the workflow canvas.

Step 11 – Search for and Add the Send SMS Element
- Click Add New Element, then search for and select the Send SMS action element.
11.1 Click Add New Element.
- The action library will appear on the right side of the canvas.
11.2 Search for and select the Send SMS action element.
- You will be taken to the Send SMS settings page.

Step 12 – Set the Action Name and SMS Message for the Lead
- Rename the Send SMS action element, then enter the SMS message for the lead.
12.1 Rename the Send SMS action element.
- Use a clear and simple name.
12.2 Enter the SMS message for the lead.
- Keep the message polite and direct. Ask the lead to provide their correct email address.
12.3 Click the Save Action button.
- The action element will now appear on the workflow canvas.

Step 13 – Search for and Add the Send Internal Notification Element
- Click Add New Element, then search for and select the Send Internal Notification action element.
13.1 Click Add New Element.
- The action library will appear on the right side of the canvas.
13.2 Search for and select the Send Internal Notification action element.
- You will be taken to the Send Internal Notification settings page.

Step 14 – Set the Action Name and Internal Notification for Your Team
- Rename the Send Internal Notification action element, then create the notification for your team.
14.1 Rename the Send Internal Notification action element.
- Use a clear and simple name.
14.2 Choose the Notification Type.
- The Title, Message, and other notification fields will appear for you to complete.
14.3 Enter the notification title.
- Keep it short and easy to understand.
14.4 Enter the Send Internal Notification message for your team.
- Write clear instructions so your team knows what to do next.
14.5 Click the Save Action button.
- The action element will now appear on the workflow canvas.

Step 15 – Set the Redirect Page and Team Assignee
- Set the redirect page so your team can open the contact record directly from the notification. Then choose who will handle the lead that has no valid email address and no phone number.
15.1 Set the Redirect Page to Contact.
15.2 Choose the User Type.
- For this example, Particular User is selected.
15.3 Click the Save Action button.
- The action element will now appear on the workflow canvas.
15.4 Click the Settings button.
- You will be taken to the workflow settings page.

Step 16 – Set the Contact Timezone in the Workflow Settings
- Open the workflow settings, set the Contact Timezone, then return to the workflow builder.
16.1 Set the timezone to Contact Timezone.
- This helps messages go out based on each contact’s local time.
16.2 Click the Builder tab.
- You will return to the workflow canvas.

Step 17 – Publish and Save Your Workflow
- Turn on Publish, then save your workflow.
17.1 Turn on the Publish toggle.
- The toggle will turn blue to show that the workflow is active.
17.2 Click Save.
- The red dot on the Save button will disappear, confirming that your workflow has been saved.

Tips and Quick Fixes for Cleaner Lead Follow-Up
This workflow gives you a solid start. Still, a few small habits can make it work much better. Clean data wins. Messy data makes your team chase ghosts.
Use these simple checks to keep Invalid Email Leads easier to manage:
- Use one clear tag for all bounced email contacts.
- Keep your SMS short and ask for the right email.
- Write a clear team alert with the next step.
- Check Invalid Email Leads once each week.
- Remove the tag when the email is fixed.
- Test the workflow before using it on real leads.
- Review your forms to reduce typing errors.
- Keep the SMS helpful and easy to answer.
These small moves help your team stay sharp. They also keep bad emails from slowing down good leads. When your follow-up is clean, your sales process has a much better shot.
Better Recovery for Bounced Leads
A bounced email does not mean the lead is done. It often means the email was wrong, old, or typed too fast. You still may have a real person who wants help.
That is why SMS is a smart next move. If you have a phone number, ask for the right email in a short text. Keep it simple. Make it easy to answer.
For Invalid Email Leads with no phone number, your team alert is the backup plan. It tells the right person to check the record and choose the next step. That small handoff can save leads that would have slipped through the cracks.
Common Invalid Email Leads Questions
Here are the quick answers most GHL users need before they build this workflow. Keep these in mind so your follow-up stays clean and your team knows what to do next.
Final Takeaway on Invalid Email Leads
Invalid Email Leads do not have to be dead ends. With one GHL workflow, you can tag the contact, stop bad email paths, and move the lead to SMS or team review.
That gives your team a clean next step. It also keeps your CRM from turning into a junk drawer full of bad data.
Build the workflow, test it with one sample contact, then let GHL do the cleanup. Want more simple GoHighLevel fixes like this? Check back with GHL Growth Garage for the next mini-guide.
Scale Your Business Today.
Streamline your workflow with GoHighLevel’s powerful tools.


