- Click a link. Trigger a workflow. It’s that simple.
- Quick Summary Box – Email Link Triggers
- Why Email Link Triggers Matter
- How to Set Up Email Link Triggers in Workflows
- Real-Time Example: What Happens After the Click
- FAQs About Email Link Triggers in Workflows
- Final Thoughts: Keep It Simple—and Clickable
Click a link. Trigger a workflow. It’s that simple.
This 5-minute guide will show you how to use email link triggers in GoHighLevel Workflows to launch automations based on what your contacts actually click.
Tracking clicks in your emails isn’t just a vanity metric anymore. With email link triggers, you can act the moment a contact shows interest. That means less guessing and more doing.
Whether you’re promoting a webinar, sharing a lead magnet, or nudging someone toward a sales call, email link triggers give your workflow the right context. You’ll be able to tag leads, assign tasks, or move people in your pipeline—all automatically.
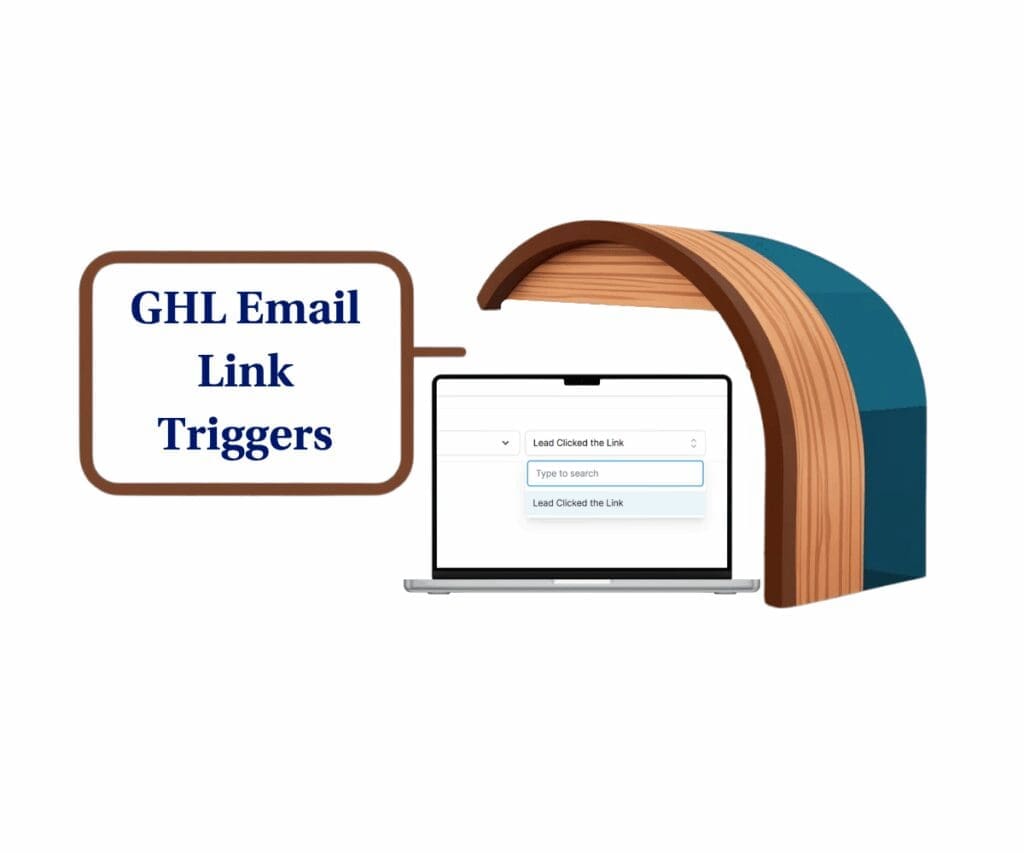
With email link triggers, your workflows react to clicks in real time. You save time, reduce manual follow-up, and make sure only the right leads get your attention.
Quick Summary Box – Email Link Triggers
Purpose: Show how to use email link triggers in workflows.
Why it matters: Helps you act fast on contact behavior.
What you get: Click-based automation without extra tools.
Time to complete: 5 minutes
Difficulty level: Easy
Prerequisites: Sub-account accessKey outcome: Auto-trigger from email clicks
Why Email Link Triggers Matter
Using email link triggers in your workflows lets you respond to real actions—not guesses.
- Quicker follow-ups: When someone clicks a link, you can tag them, start a call task, or send a text right away. No waiting. No checking manually.
- Focused engagement: Campaigns with link-based actions tend to perform better. You’re only following up with people who show interest—so your replies hit the mark.
- Clean segmentation: Want to sort contacts based on what they clicked? Email link triggers make that easy. It’s simple to build paths based on behavior, not just lists.
- Better use of time: You don’t need to follow up with everyone. Just the ones who clicked. That makes your automations more efficient—and your outreach more relevant.
Automate marketing, manage leads, and grow faster with GoHighLevel.
Email link triggers give you a quiet way to track interest and take action fast. No guessing. No overthinking. Just solid signals you can build around.
How to Set Up Email Link Triggers in Workflows
Email link triggers are easy to use once you know where to look. They live inside your workflow triggers list—right alongside all your usual tools like form submissions, tags, and pipeline changes.
The setup is quick. You pick the email, choose the link, and decide what happens next. That’s it. With email link triggers in place, your workflows respond the moment someone clicks. It’s a simple way to automate based on what people actually do—not just what you hope they’ll do.
How to Create Trigger Links
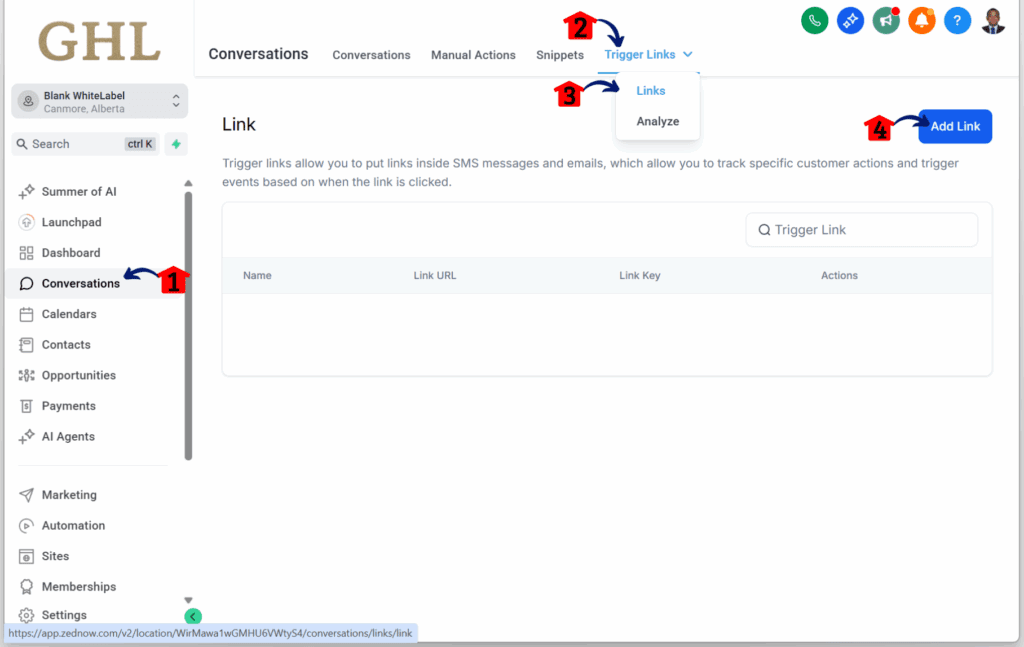
Step 01 – Access the Main Left Hand Menu in GoHighLevel
1.1 Click the Conversations menu item
- Access the Conversations section of GoHighLevel
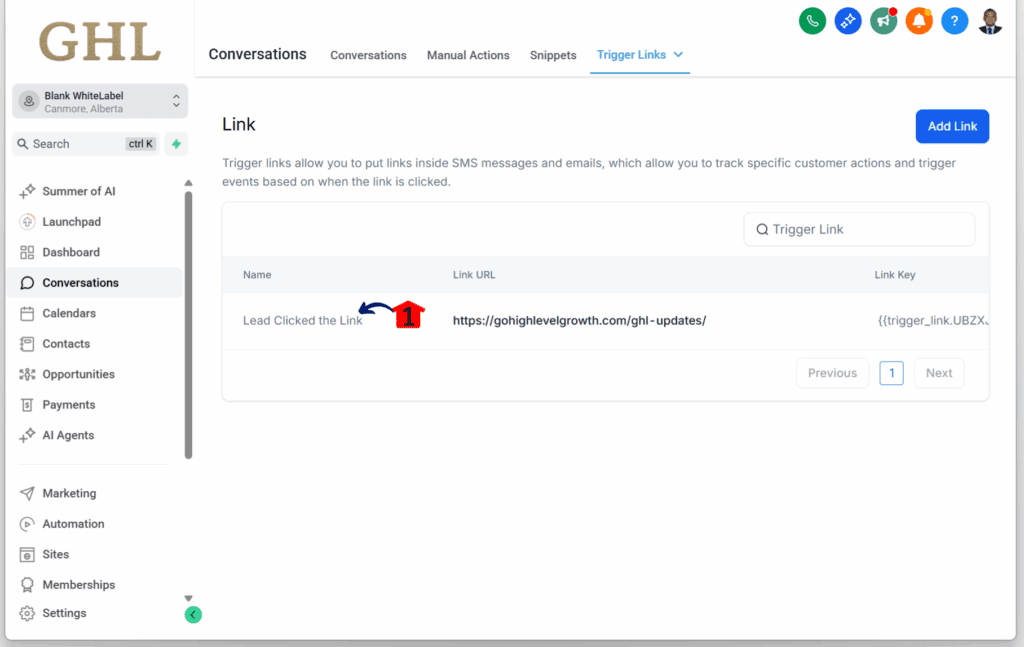
- You’ll now be in the Conversations section of GHL, where you can access the Trigger Links tab from the top menu:
1.2 Hover over the Trigger Links tab at the top.
- Two options should appear, including Links.
1.3 Click the Links option.
1.4 Click the Add Link button.
Step 02 – Add a New Trigger Link
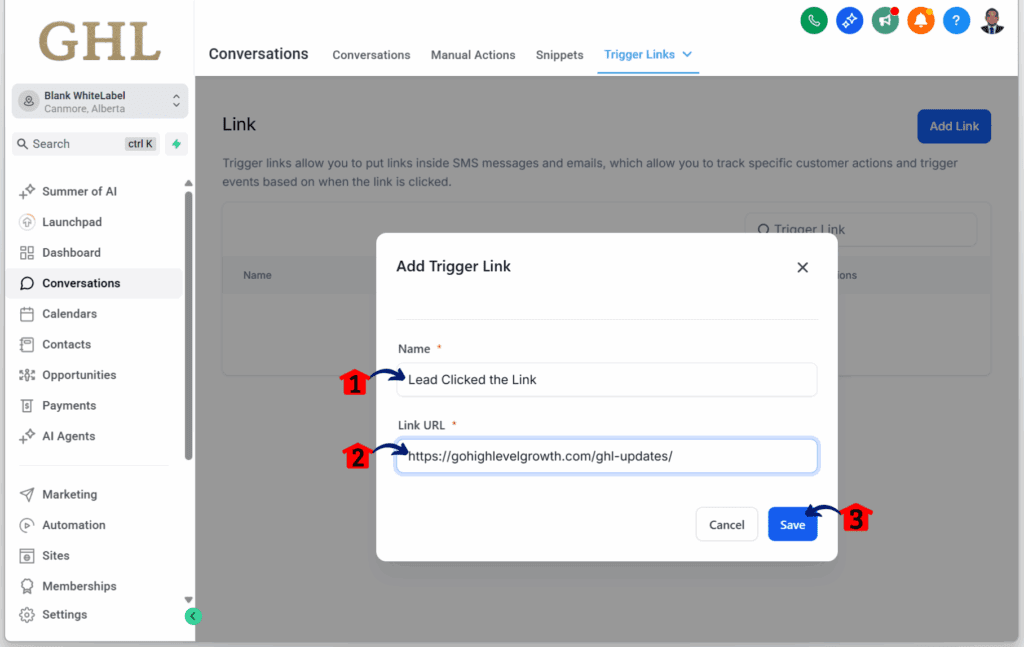
- After clicking the Add Link button, the Trigger Link pop-up should appear.
2.1 Give your trigger link a clear label.
2.2 Paste the destination URL.
- This is the page users will be redirected to when the link is clicked.
2.3 Click the Save button.
Step 03 – Verify the Link
3.1 Make sure the trigger link was added to the list.
How to Add a Trigger Link to an Email in a Workflow
Step 01 – Access the Main Left Hand Menu in GoHighLevel
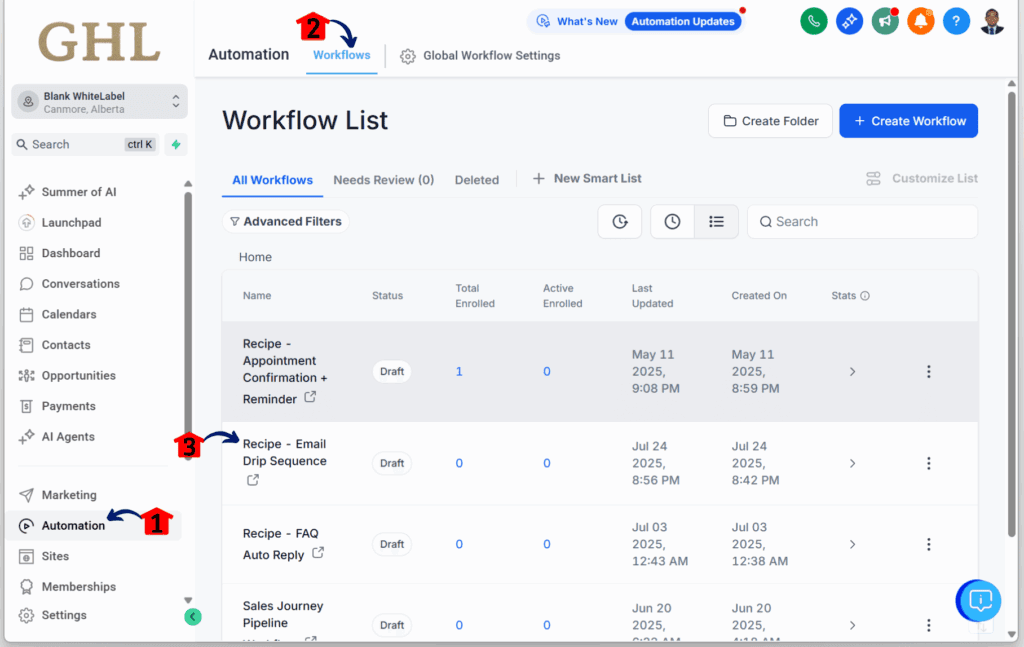
1.1 Click the Automation menu item
- Access the Automation section of GoHighLevel
- You’ll now be in the Automation section of GHL, where you can access the Workflows tab from the top menu:
1.2 Click the Workflows tab at the top.
1.3 Click on any workflow that includes an email element.
- In this example, we’re using an email drip sequence.
- Don’t know how to create a workflow? Check out this tutorial: GoHighLevel Workflow Complete Tutorial and Walkthrough
Step 02 – Edit the Email
- Once the workflow loads, you’ll be in the Workflow Editor.
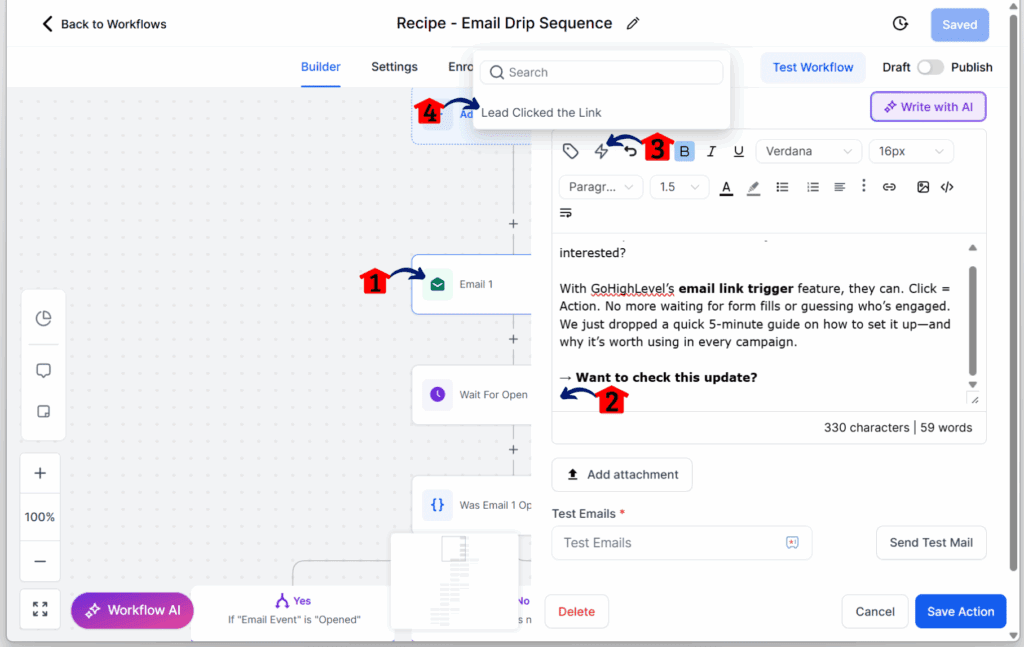
2.1 Click on the email element in the canvas.
- The email settings panel should slide in.
2.2 Click into the body of the email where you want to insert the trigger link.
- Place it where it makes the most sense for your message.
2.3 Click the Trigger Link button ⚡
- It looks like a lightning bolt icon in the email tools bar.
2.4 Choose the trigger link you created earlier.
- It should appear in the list if it’s already been saved.
Step 03 – Save Your Changes
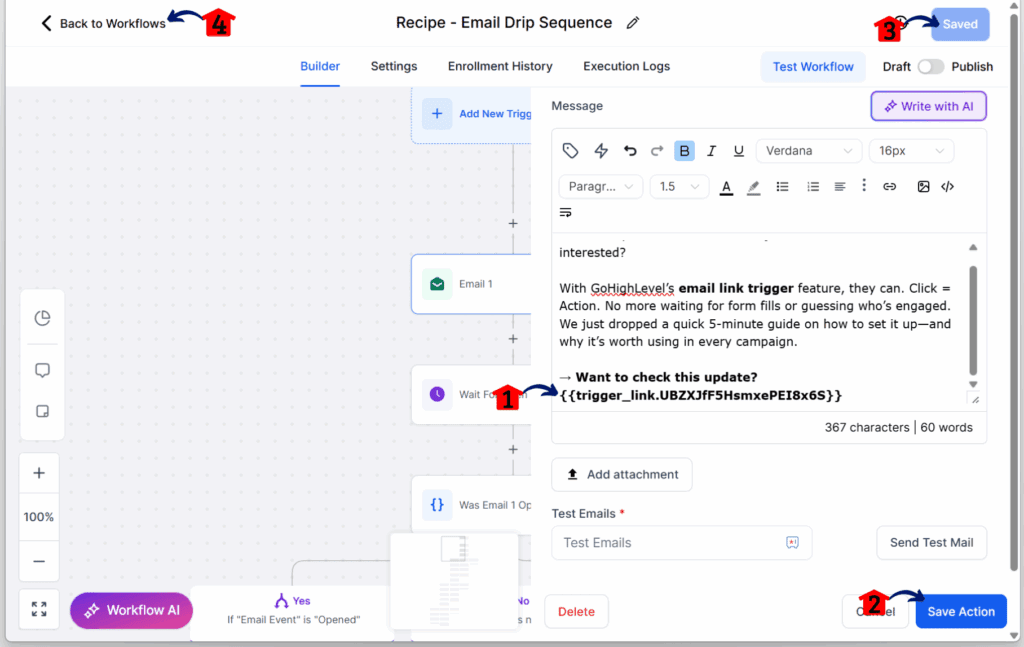
2.1 Confirm the trigger link appears in your email.
2.2 Click Save Action to save the email element.
2.3 Click the main Save button to save the workflow.
2.4 Click Back to Workflows once you’ve finalized the setup.
How to Use the “Trigger Link Clicked” Element in Workflows
Step 01 – Start a New Workflow
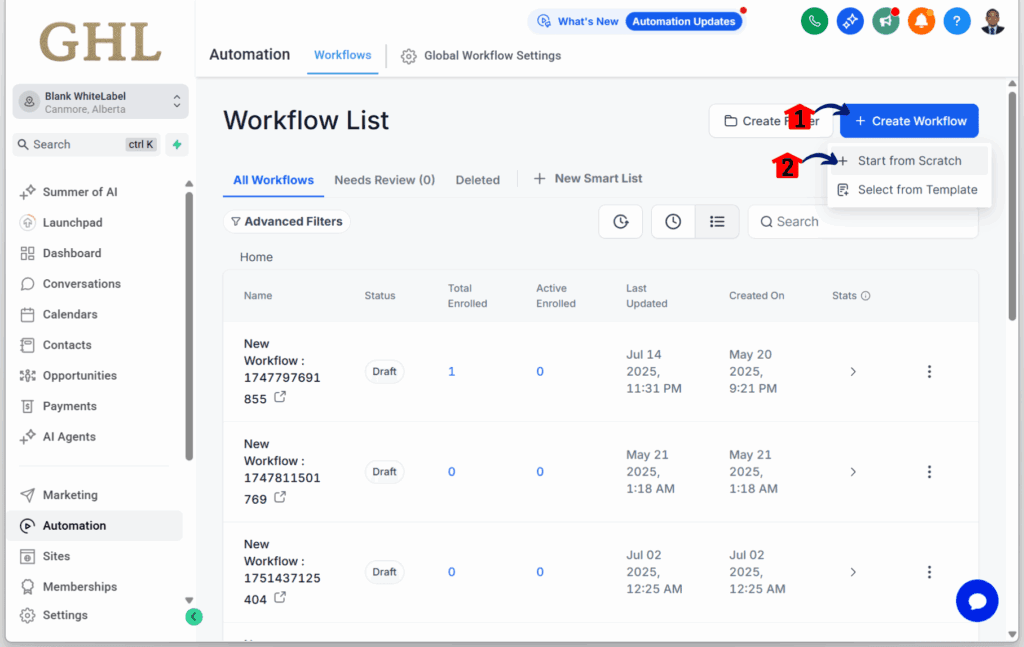
- You should now be inside the Workflows Library.
1.1 Click the Create Workflow button.
- Two options will appear.
1.2 Click Start from Scratch.
Step 02 – Add a Trigger
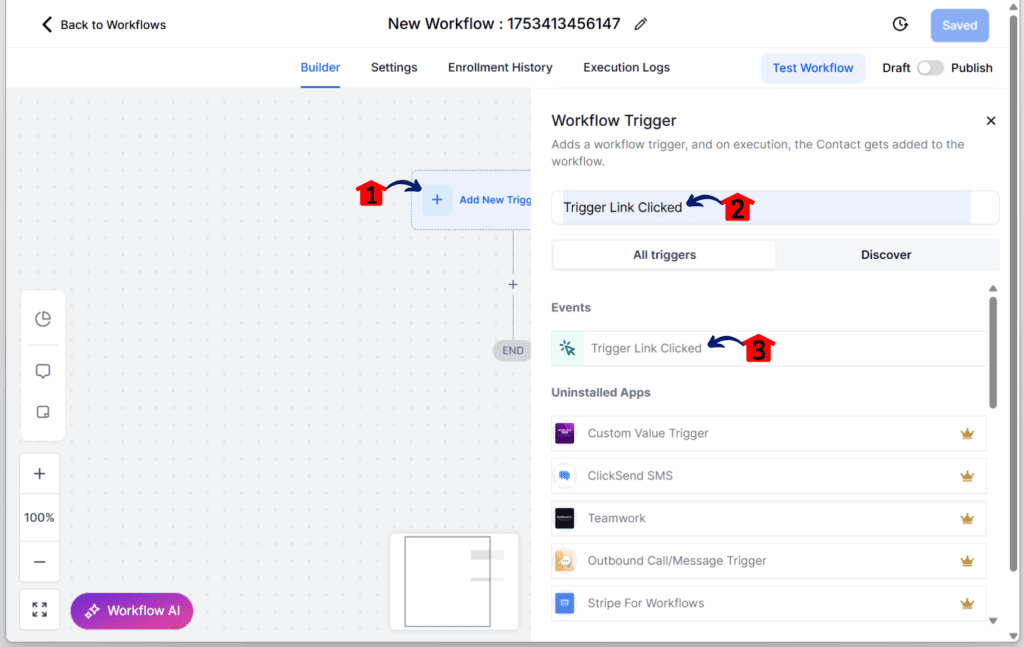
- You should now see the workflow canvas.
2.1 Click the Add New Trigger button.
- The trigger settings panel should slide in.
2.2 Type Trigger Link Clicked in the search bar.
- You’ll see the Trigger Link Clicked element in the list.
2.3 Click the Trigger Link Clicked option.
Step 03 – Customize the Trigger
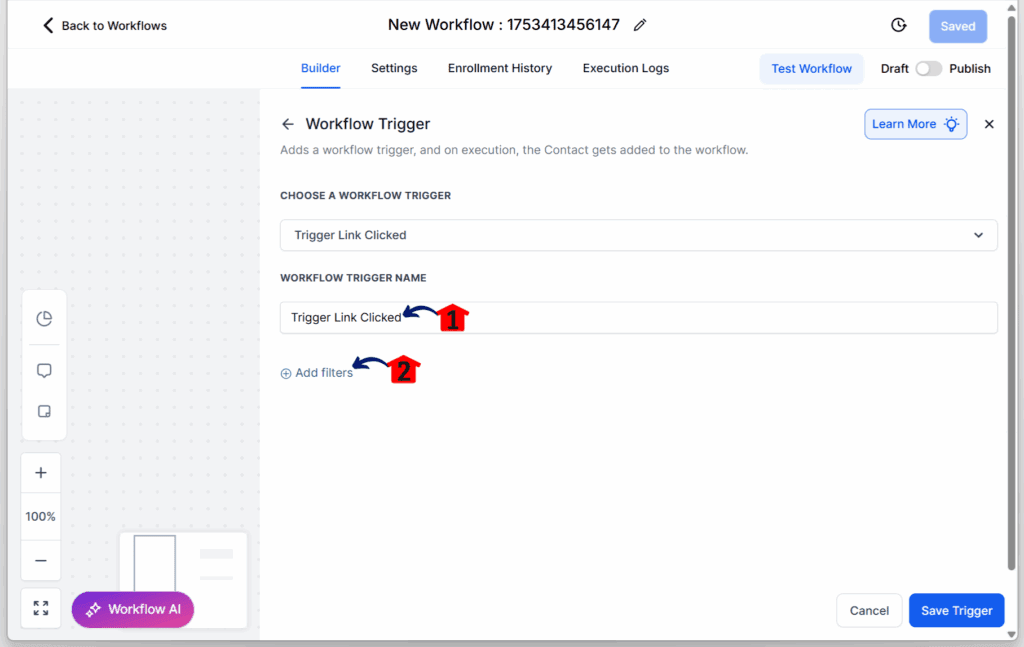
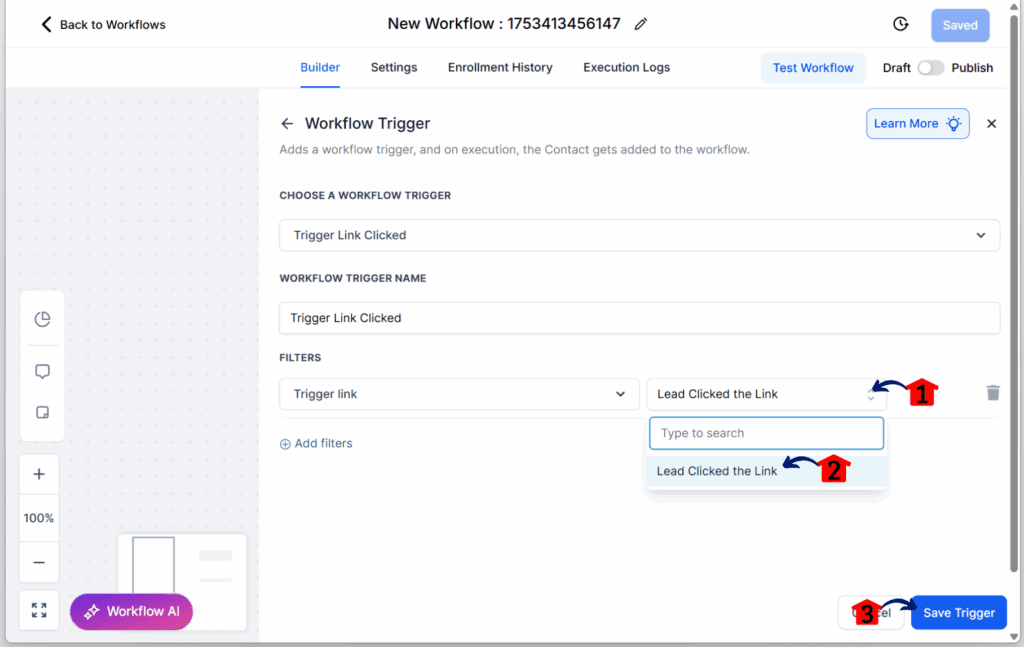
- You’ll be taken to the trigger settings for this element.
3.1 Rename the Trigger Link Clicked element to something descriptive.
3.2 Click the Add Filters button.
Step 04 – Set the Filter
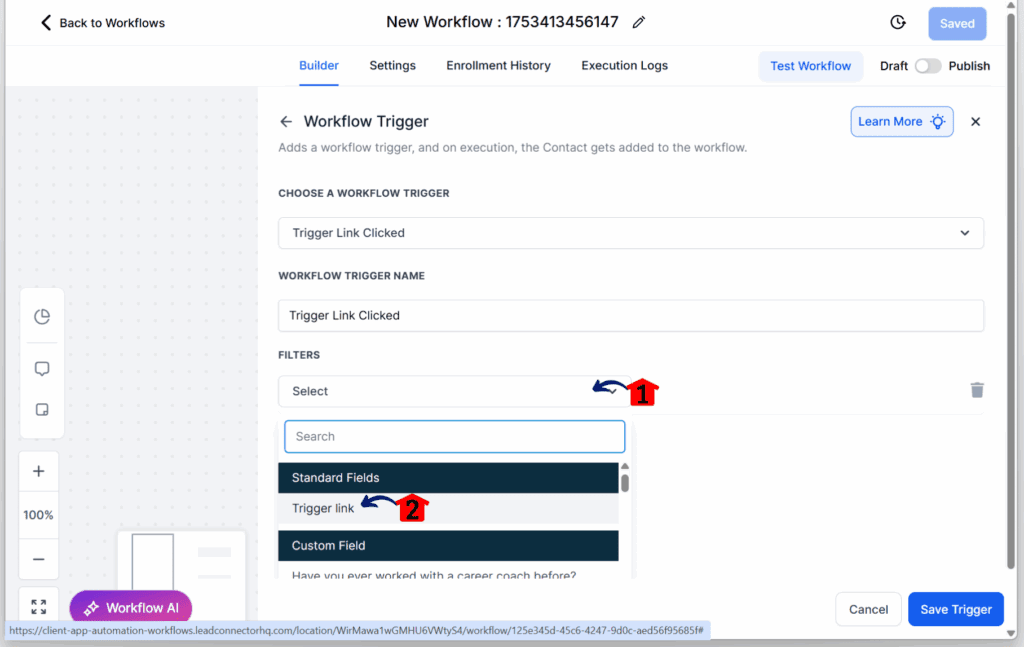
- The filter dropdown should appear.
4.1 Click the filter dropdown.
4.2 Choose the Trigger Link option.
Step 05 – Select the Link
- A second dropdown will appear after selecting the trigger link filter.
5.1 Click the second dropdown filter.
5.2 Select the trigger link you created earlier.
5.3 Click the Save Trigger button.
Step 06 – Build Your Workflow
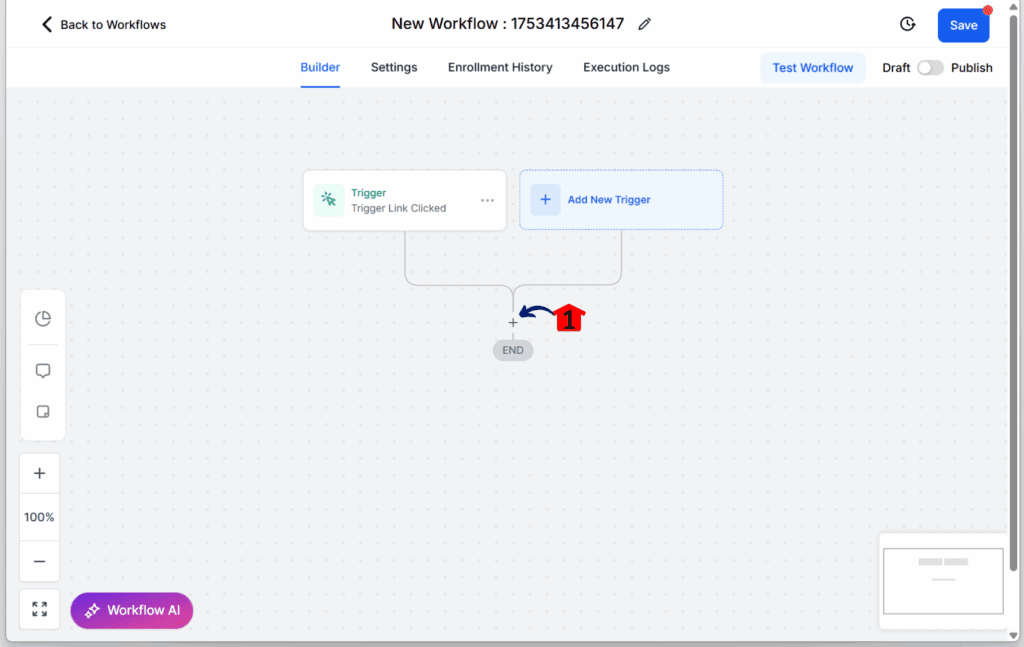
- The Trigger Link Clicked trigger will now show in your workflow.
6.1 Add the actions or steps you want to happen after the link is clicked.
Real-Time Example: What Happens After the Click
Let’s say you send a follow-up email after a webinar. One of the links invites the reader to book a free consult. With an email link trigger, you don’t have to wait for them to complete the form. The moment they click that link, your workflow can get to work.
You might tag them as “Interested,” assign them to a rep, or move them into a different stage in your pipeline. Maybe you send a short SMS that says, “Saw you clicked—need help booking your call?” It’s simple, direct, and based on real behavior.
That’s the value of email link triggers. They turn passive clicks into active steps. And they help you follow up while the interest is still fresh.
FAQs About Email Link Triggers in Workflows
Final Thoughts: Keep It Simple—and Clickable
Email link triggers don’t need to be fancy to be useful. They help your workflows respond when it counts—right after someone clicks.
If you’re sending emails but not using click-based triggers, you’re missing easy wins. Add one, test it, and watch how it sharpens your follow-up.
Already using email link triggers? Tell us what you’re building—we’d love to hear how you’re making it work.
Related Posts You’ll Find Useful:
- Smarter Mobile Conversations with Trigger Links, Custom Values and more
- Create Email Campaign Tags on the Fly No More Prepping Ahead
- Recurring Invoice Automation with GHL Workflows
Scale Your Business Today.
Streamline your workflow with GoHighLevel’s powerful tools.
