

- Send certificates and request testimonials automatically
- Quick Summary – Course Completion Certificate Essentials
- Video Guide: Set Up a Course Completion Certificate in GHL
- Why Course Certificates and Testimonials Matter
- How to Set Up a Course Completion Certificate Workflow
- Course Completion Certificate Quick Tips
- How This Workflow Helps Your Course Business
- Results You Can Expect From This Automation
- Course Completion Certificate Questions Answered
- Next Steps for Your GHL Course Workflow
Send certificates and request testimonials automatically
When a student finishes your course, they should know they’ve reached the finish line. A certificate gives them a clear sign of success. It also gives you a good time to ask for feedback. This is how the Course Completion Certificate workflow should work.
You don’t need to manage these steps by hand. GoHighLevel can do the work for you.
With one GHL workflow, you can send a course completion certificate as soon as a student finishes your course. The workflow can then wait one hour before sending an email that asks for a testimonial.
This makes the process simple for you and your students. They get their course completion certificate right away. You also get a set process for asking every graduate for feedback.
The workflow starts when a student completes the course you choose. GHL then sends the certificate, waits one hour, and sends your testimonial request email.
In this Mini-Guide, you’ll learn how to build this workflow step by step. We’ll set up the trigger, course completion certificate, wait time, email, and final workflow settings.
Quick Summary – Course Completion Certificate Essentials
Purpose: You’ll set up a GHL workflow to send a course completion certificate and ask for feedback when a student finishes your course.
Why It Matters: You won’t need to check who finished or send each email by hand. GHL takes care of those steps for you.
What You Get: You’ll have one workflow that sends a certificate, waits one hour, and then asks the student for a testimonial.
Time to Complete: Plan for about 15 to 20 minutes if your course and certificate are ready.
Difficulty Level: This setup is easy to follow, even if you’re new to GHL workflows.
Key Outcome: Your students get their course completion certificate when they finish. You can then ask for feedback one hour later without doing it by hand.
Video Guide: Set Up a Course Completion Certificate in GHL
You can send a course completion certificate as soon as a student finishes. You can also ask for feedback with the same GHL workflow. This video shows you how to set it all up.
Inside this video:
Automate marketing, manage leads, and grow faster with GoHighLevel.

- Create a new workflow in GoHighLevel.
- Choose the course that starts the workflow.
- Set up the course completion certificate.
- Add a one-hour wait and send an email to ask for feedback.
Follow these steps to get your workflow ready. Once it’s set up, GHL can do the work for you.
Why Course Certificates and Testimonials Matter
When a student finishes your course, it’s worth marking the moment. A course completion certificate is a simple way to do that. It shows that the student finished the course. It also gives them something they can keep and share.
This is also a good time to ask for feedback. The course is still fresh in their mind. With GHL, you can send the certificate first. You can then wait one hour before you ask for a testimonial. This gives the student some time before your next email arrives.
You also save time with this setup. You don’t need to check who finished each day. You don’t need to send each email by hand. GoHighLevel can run the same steps each time a student finishes your course.
- You send the course completion certificate right after the course is done.
- You give students time to see their certificate before the next email.
- You ask for feedback while the course is still fresh in their mind.
- You don’t need to send certificates and emails by hand.
- You give each student the same follow-up after they finish.
How to Set Up a Course Completion Certificate Workflow
You’ll build this course completion certificate workflow in the Automations area of your GoHighLevel sub-account. The workflow starts when a student finishes the course you select. GHL will then send the certificate, wait one hour, and send your testimonial request email.
You’ll set up each part in order so the process is easy to follow. Once you publish the workflow, you won’t need to check each course by hand. GHL will handle these steps each time a student finishes your selected course.
- Access the Workflow Builder from the Automation Section.
- Rename Your Workflow and Set the Product Completed Trigger.
- Rename the Product Completed Trigger and Add a Filter.
- Set Product as the First Filter and Save the Trigger.
- Find and Add the Issue Certificate Action.
- Choose the Certificate and Save the Action.
- Find and Add the Wait Action Element.
- Set the Wait Time to 1 Hour.
- Find and Add the Send Email Action.
- Set the Sender Name and Email Address.
- Add the Congratulatory Subject Line and Email Body.
- Set the Contact Timezone in Workflow Settings.
- Publish and Save Your Workflow.
Before you start, make sure your online course and certificate are already set up in GoHighLevel. Make sure you’ve already set up your online course and certificate.
Step 01 – Access the Workflow Builder from the Automation Section
- Create your Course Completion Certificate workflow using the Workflow Builder in the Automation section.
1.1 Click Automation.
- You will be taken to the Workflows tab by default.
1.2 Click Workflows.
- You will see a list of workflows, along with options such as Create Folder, Build Using AI, and + Create Workflow.
1.3 Click + Create Workflow.
- A dropdown menu will appear with several options, including + Start from Scratch.
1.4 Click + Start from Scratch.
- You will be taken to the Workflow Builder.

Step 02 – Set the Product Completed Trigger After Renaming Your Workflow
- Rename your Course Completion Certificate workflow, then set the Product Completed trigger.
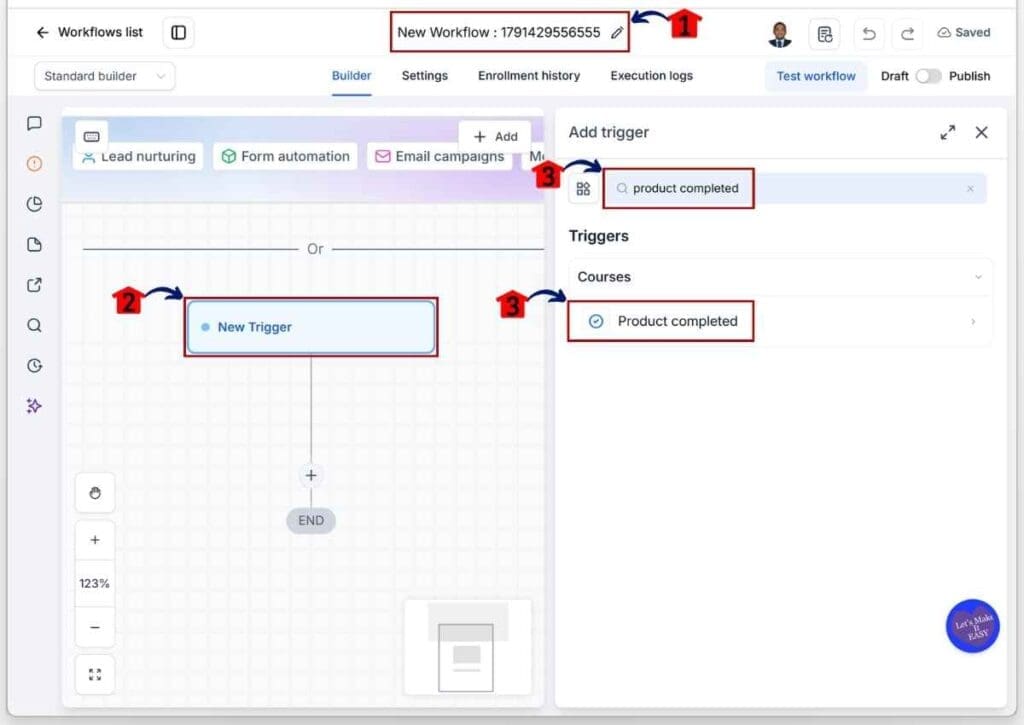
2.1 Rename your workflow.
- Click the Pencil icon at the top of the Workflow Builder and enter a new name for your workflow.
2.2 Click Add New Trigger.
- The trigger library will appear, where you can search for and select a trigger.
2.3 Search for and select Product Completed.
- You will be taken to the Product Completed trigger settings.
Step 03 – Rename the Product Completed Trigger and Add a Filter.
- Give the Product Completed trigger a clear name, then add a filter.
3.1 Rename the Product Completed trigger.
- This makes it easier to identify on the workflow canvas.
3.2 Click Add Filters.
- A drop-down filter will appear below the Add Filters button.

Step 04 – Set the Product as the First Filter Before Saving the Trigger
- Choose Product as the filter, then select your created online course before saving the trigger.
4.1 Select Product from the first drop-down filter set.
- Another drop-down filter will appear below the second filter.
4.2 Select the Is any of operator.
4.3 Choose your created online course.
- The chosen online course should appear in the second drop-down filter.
4.4 Click Save Trigger.
- The trigger will now appear on the Course Completion Certificate workflow canvas.

Step 05 – Search for and Add the Issue Certificate Element
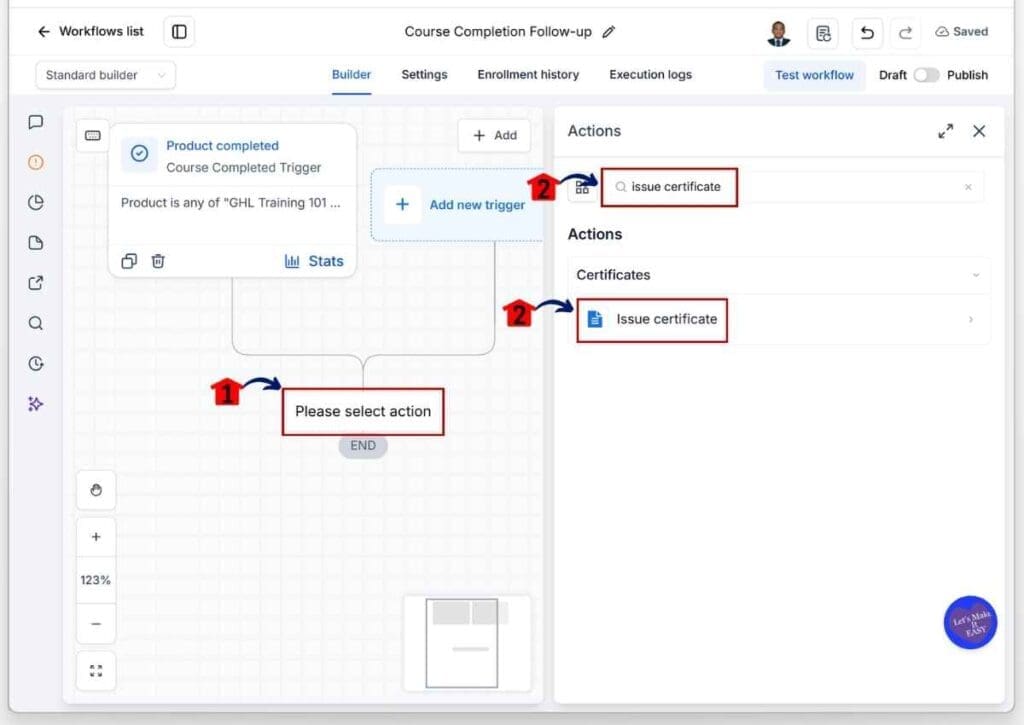
- Click the Add Actions button, then search for and choose the Issue Certificate action element.
5.1 Click Add New Element.
- The action element library should appear on the right side of the canvas.
5.2 Search for and select the Issue Certificate action element.
- You will be taken to the Issue Certificate settings.
Step 06 – Set the Certificate to Send Before Saving the Action Element
- Rename the action element, then set the certificate to send after the student completes the course.
6.1 Rename the action element.
- This helps make the Course Completion Certificate workflow easier to read on the workflow canvas.
6.2 Set your created certificate.
- Select the certificate you want to issue after the student finishes the course.
6.3 Click the Save Action button.
- The action element should now appear on the workflow canvas.

Step 07 – Search for and Add the Wait Action Element
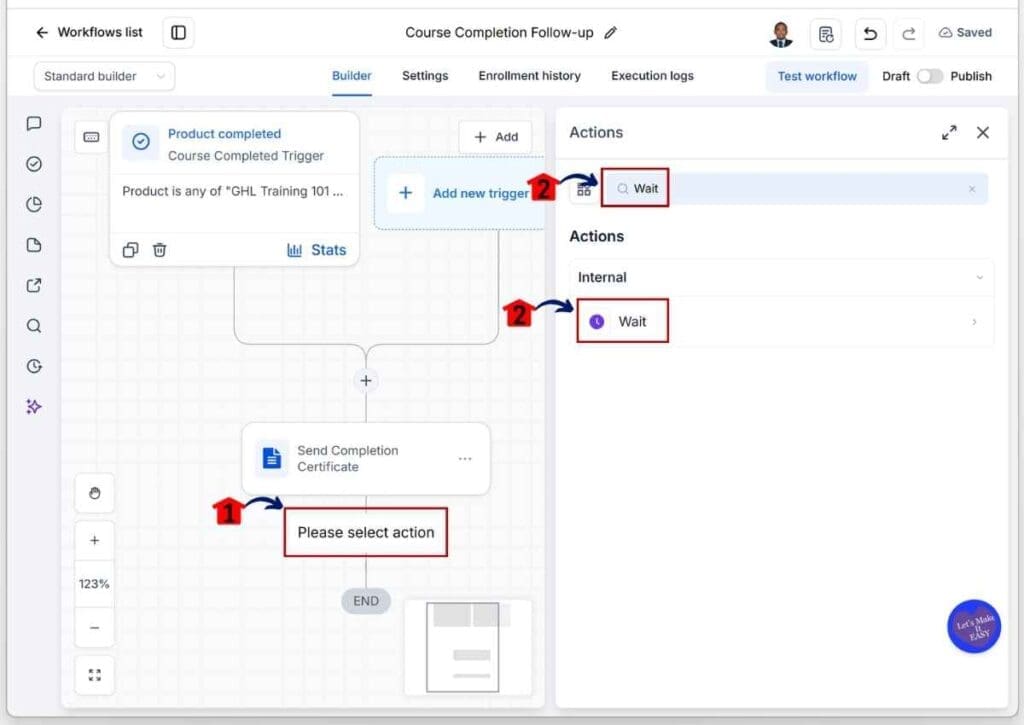
- Click the Add New Element button, then search for and select the Wait action element.
7.1 Click Add New Element.
- The action library will appear on the right side of the canvas.
7.2 Search for and select the Wait action element.
- You will be taken to the Wait settings.
Step 08 – Rename the Wait Action Element and Set the Time Period to 1 Hour
- Rename the action element and choose the For a Set Period of Time option.
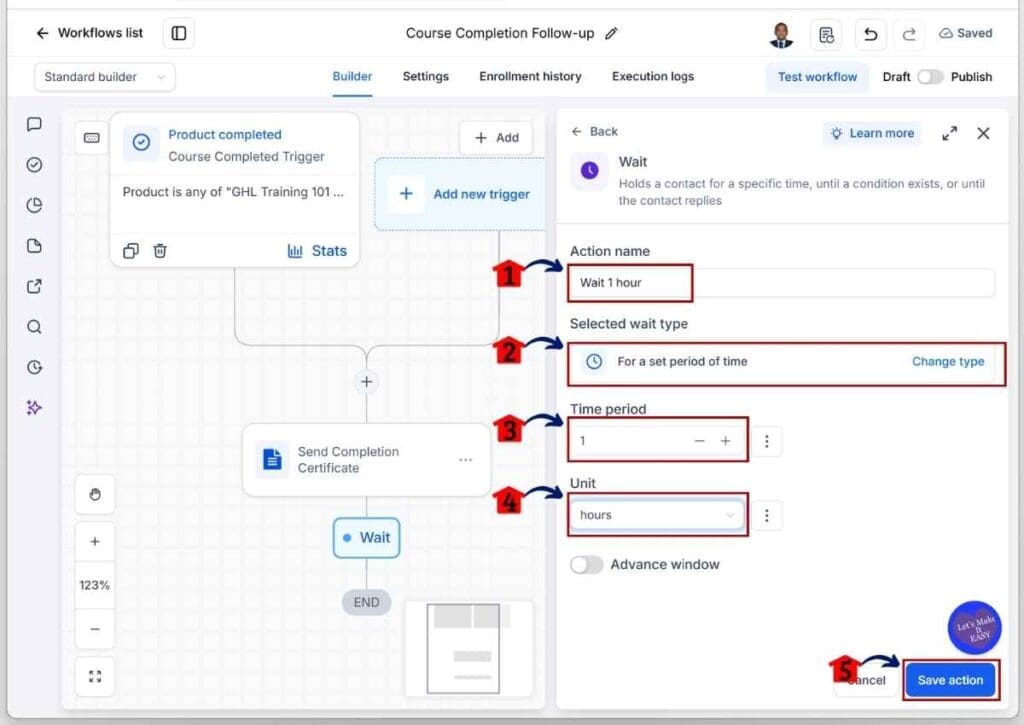
8.1 Rename the Wait action element.
- This makes the Course Completion Certificate workflow easier to read on the workflow canvas.
8.2 Select the For a Set Period of Time option.
- You will see two input boxes where you can set the time period for this action element.
8.3 Type 1 in the Time Period field.
- By default, the time period is set to minutes.
8.4 Set the Unit to Hours.
8.5 Click the Save Action button.
- The Wait action element will now appear on the workflow canvas.
Step 09 – Search for and Add the Send Email Action Element
- Click Add New Element, then search for and select the Send Email action element.
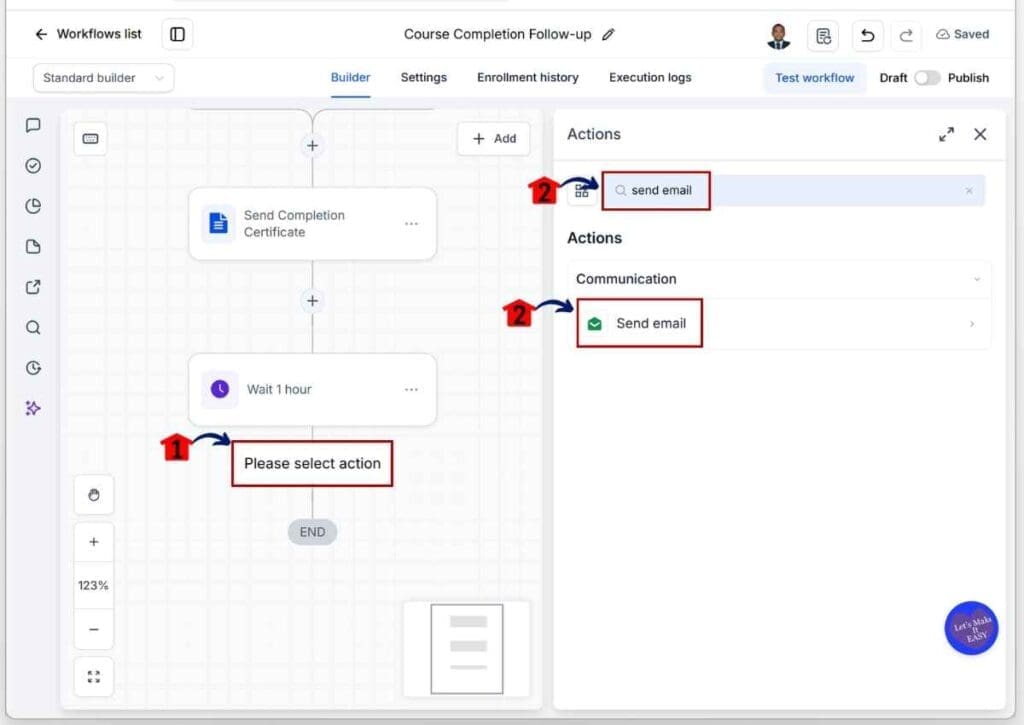
9.1 Click Add New Element.
- The action library will appear on the right side of the canvas.
9.2 Search for and select Send Email.
- You will be taken to the Send Email settings.
Step 10 – Set the Sender Name, Email Address, and Subject Line
- Set the sender details and subject line for this Course Completion Certificate workflow email.
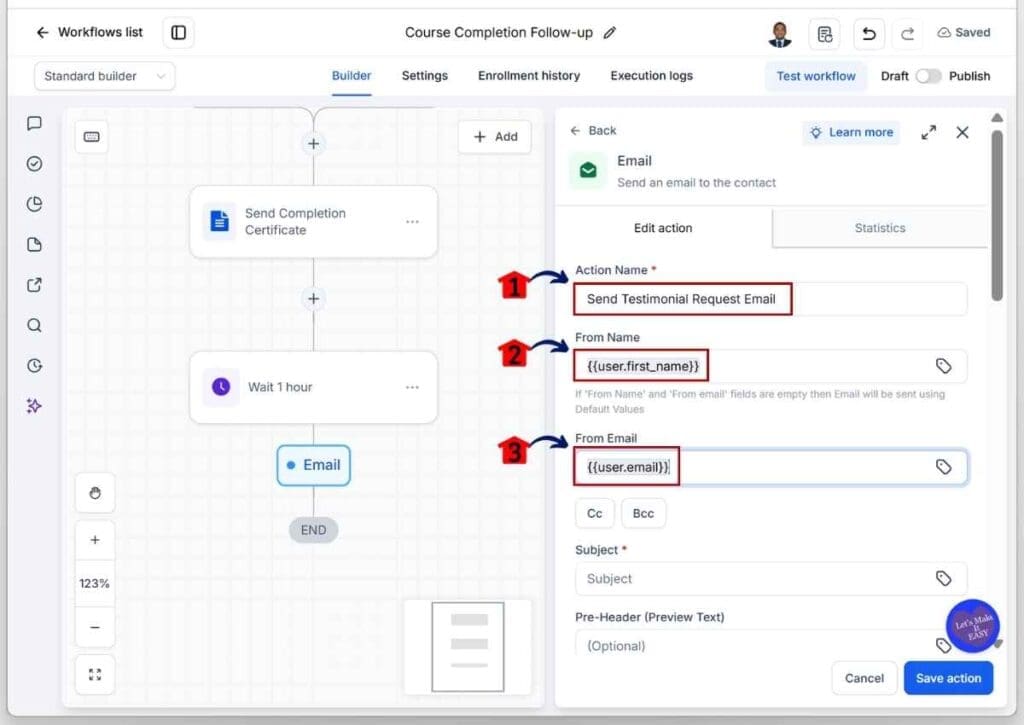
10.1 Rename the Send Email action element.
- Use a clear and simple name.
10.2 Enter the sender name.
- You can also use a custom value for the sender name.
10.3 Enter the sender email address.
- You can also use a custom value for the sender email address.
Step 11 – Add the Congratulatory Subject Line and Body
- Enter the subject line and content for your Congratulatory email.
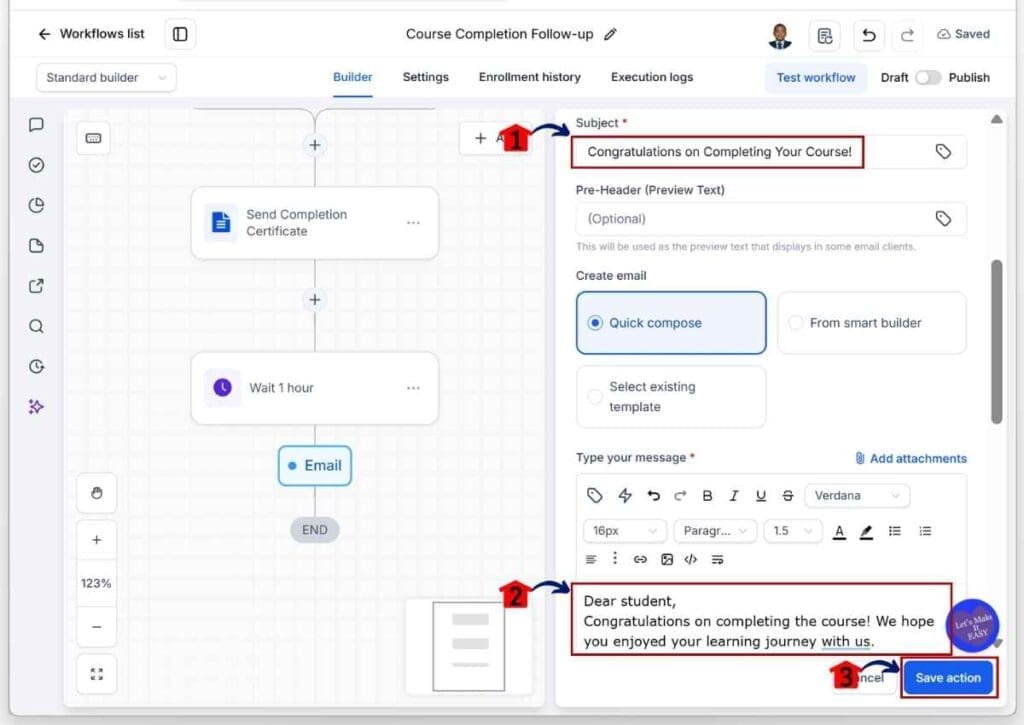
11.1 Enter the Congratulatory email subject line.
- Keep the subject short and clear.
11.2 Enter the Congratulatory Email body.
- Keep the message clear, polite, and helpful.
11.3 Click Save Action.
- The Send Email action element will now appear on the workflow canvas.
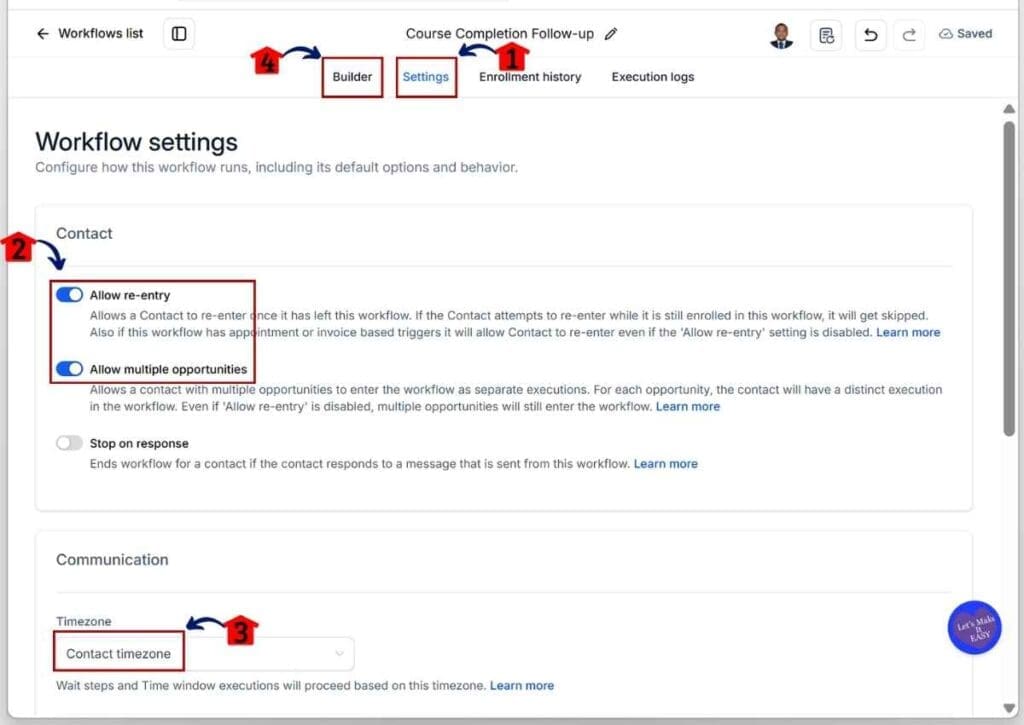
Step 12 – Open the Workflow Settings, Then Set the Contact Timezone Before Returning to the Builder
- Click the Settings tab at the top of the workflow canvas, then set the Contact Timezone in the Communication section before returning to the workflow builder.
12.1 Click the Settings tab.
- You will be taken to the workflow settings section.
12.2 Toggle on Allow re-entry and Allow multiple opportunities.
12.3 Set the Contact Timezone.
- This helps the workflow send messages based on the contact’s local timezone.
12.4 Click the Builder tab.
- You will return to the Course Completion Certificate workflow canvas.
Step 13 – Publish and Save Your Workflow
- Turn on Publish and save your workflow.
13.1 Turn on the Publish toggle.
- The toggle will turn blue to show that it is active.
13.2 Click Save.
- The red dot on the Save button will disappear, confirming that your Course Completion Certificate workflow has been saved.

Course Completion Certificate Quick Tips
Before you publish the workflow, take a few minutes to check your setup. Make sure you chose the right course, trigger, and course completion certificate. These quick checks can save you from fixing simple errors later.
You should also test the workflow as if you were the student. Check that the certificate arrives first. Then make sure the testimonial email is clear and easy to answer. The goal is to keep the process simple for you and your students.
- Give your workflow a clear name so you can find it later.
- Check that the Product Completed trigger has the right course.
- Make sure you chose the right course completion certificate.
- Keep your testimonial email short and easy to read.
- Tell the student what type of feedback you want them to share.
- Change the one-hour wait if a different time works better for your course.
- Test the full GHL workflow before you use it with your students.
How This Workflow Helps Your Course Business
When a student finishes your course, there are still a few jobs to do. You need to send their course completion certificate. You may also want to ask for a testimonial. Doing this by hand can take time, mainly when more students start to finish your course.
With this GHL workflow, you have one set process for each student. GoHighLevel sends the certificate when the course is done. It then waits one hour before it sends your testimonial request. You don’t need to check who finished or keep a list of people to contact.
This also helps you give each student the same follow-up. They get their certificate first, then a clear request for feedback. If you manage courses for clients, you can use the same type of workflow for their courses too.
- You spend less time checking who finished your course.
- You send each course completion certificate through the same process.
- You ask for feedback at a set time after the course is done.
- You don’t need to keep a manual list of students to contact.
- You can use the same workflow setup for other GHL courses.
Results You Can Expect From This Automation
Once this workflow is live, you have a clear process for each student who finishes your course. GHL sends the course completion certificate for you. You don’t need to check each student or send each certificate by hand.
The one-hour wait also keeps your follow-up in order. Your student gets the certificate first. Then they get your email asking for feedback. This gives them time to enjoy the win before you ask them to share their thoughts.
Of course, not every student will leave a testimonial. Your results will depend on your course, your students, and the email you send. What you do get is a simple process that runs the same way each time.
- You send the course completion certificate without doing it by hand.
- You ask for feedback at the time you choose.
- You spend less time checking who finished your course.
- You give each student the same follow-up process.
- You have a simple way to ask your course graduates for feedback.
Course Completion Certificate Questions Answered
Before you publish the workflow, you may have a few questions about how each part works. These quick answers cover the main settings you should know when you set up your course completion certificate workflow in GHL.
Next Steps for Your GHL Course Workflow
When a student finishes your course, you want to end on a good note. A course completion certificate helps you do that. It gives your student proof of their work and a reason to feel proud.
With GoHighLevel, you can send the certificate as soon as the course is done. GHL can then wait one hour before it sends your email to ask for feedback. You don’t need to send each one by hand.
Before you turn on the workflow, run a quick test. Check the course trigger, certificate, wait time, and email. Make sure each step works as planned. This can help you catch errors before your students finish the course.
Once your test goes well, you can publish the workflow. You can also use this setup for other courses. It’s a simple way to save time and keep your follow-up on track.
How will you use this course completion certificate workflow for your courses or your clients?
Scale Your Business Today.
Streamline your workflow with GoHighLevel’s powerful tools.


