- A step-by-step guide to building thriving membership groups and communities
- Quick Summary – Online Community Management Essentials
- What’s New in GoHighLevel's Communities
- From Memberships to Full Community Management
- The Power of Online Community Management
- Creating and Managing a Community in GHL
- Pro Tips for Better Engagement
- What This Means for Your Business
- Results You Can Expect from Using Communities
- Frequently Asked Questions (FAQ) You Need to Know
- Final Thoughts on Online Community Management
A step-by-step guide to building thriving membership groups and communities
Online community management in GoHighLevel means building a private, branded space where members can connect, learn, and engage. Instead of relying on outside platforms, agencies and businesses can now create their own communities directly inside GHL.
The community feature lives in the Memberships area. From here, users can create groups, set up branding, and manage member access. Communities also allow posts, media sharing, and gamification, making them more than a simple membership portal.
For agency owners, coaches, or educators, this makes online community management practical and powerful. It offers full control over who joins, what content is shared, and how members interact, all while keeping the experience professional and aligned with the brand.
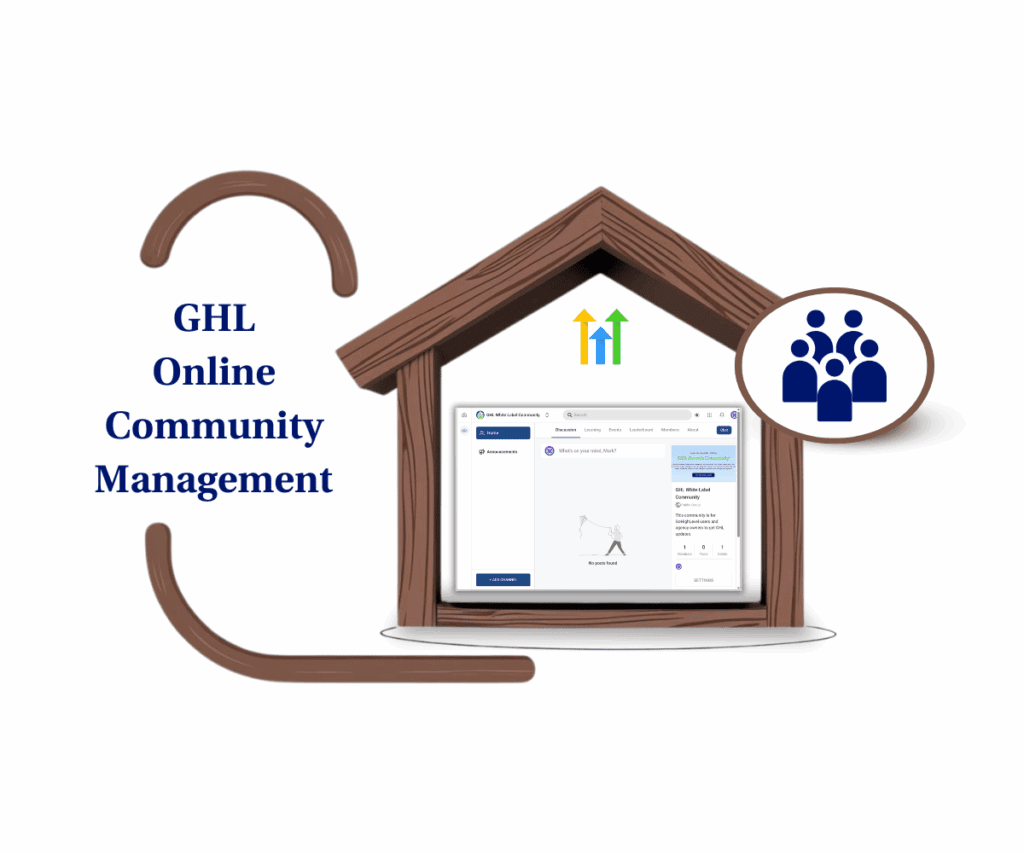
With GoHighLevel Online Community Management, businesses can create branded spaces where members connect, learn, and engage. This leads to stronger retention, better loyalty, and recurring revenue opportunities.
Quick Summary – Online Community Management Essentials
Purpose: This guide shows how to set up and manage online community management in GoHighLevel, giving businesses a way to create private and branded spaces for members.
Why It Matters: Communities bring people together, encourage interaction, and help build loyalty that lasts.
What You Get: Clear steps for creating groups, adding branding, inviting members, posting content, and using rewards to drive activity.
Time to Complete: Most communities can be created and customized in under an hour, with ongoing updates managed over time.
Difficulty Level: Beginner friendly. The setup process is simple and does not require technical skills.
Key Outcome: A branded community that keeps members engaged and connected, all managed within GoHighLevel.
What’s New in GoHighLevel’s Communities
Online community management in GoHighLevel has become much more practical with the release of Communities. What used to be a simple membership tool is now a space where agencies and businesses can build real engagement.
When setting up a new community, users can:
Automate marketing, manage leads, and grow faster with GoHighLevel.
- Create a group with a custom name, slug, and description
- Upload a favicon, cover image, and logo to match their brand
- Add a password for private access if needed
The settings allow deeper customization, giving admins the ability to:
- Offer subscription options and select group themes
- Add membership questions to screen new members
- Turn on gamification and rewards to encourage participation
- Share promotional links inside the group
Once a community is live, the dashboard provides:
- A Learning tab for hosting courses and lessons
- A Member list that makes management simple
- Engagement statistics that show activity and track progress
This update makes GoHighLevel Online Community Management more than just content delivery. They now act as branded social spaces where members connect, learn, and stay involved.
From Memberships to Full Community Management
Online community management in GoHighLevel has grown from simple membership hosting into a full experience for engagement. In the past, memberships worked mainly as places to store courses and training. They delivered content well but lacked interaction.
The new Communities feature changes that. It moves beyond one-way delivery and brings members into real conversations. Some of the key differences include:
- Adding posts, media, and comments that make interaction easy
- Tracking member activity with statistics that feed into rewards
- Allowing gamification that motivates members to stay active
- Expanding branding options so each group reflects the business identity
For agencies, coaches, and educators, this is a major shift. A membership site is no longer just a place where people log in to view lessons. It is now a hub where members share ideas, respond to updates, and feel part of a connected group.
GoHighLevel has turned memberships into communities, giving businesses a stronger way to build trust and engagement.
The Power of Online Community Management
Online community management in GoHighLevel matters because it gives businesses more than just a place to deliver content. It creates a space where people connect, learn, and stay engaged with a brand over time.
A community is different from a membership site. A membership site is built for access. A community is built for connection. That shift makes a real impact.
With communities, businesses can:
- Keep members engaged with discussions and updates
- Build stronger relationships between members and the brand
- Create an active space for both learning and interaction
- Use rewards and recognition to encourage participation
For agencies, coaches, and educators, this means higher retention and better results. Members who feel connected are more likely to stick around, buy again, and even bring in referrals.
By moving into community-driven engagement, GoHighLevel gives businesses a clear way to strengthen loyalty and create steady growth.
Creating and Managing a Community in GHL
Online community management in GoHighLevel starts in the Memberships area. From here, a business can set up a group, customize it with branding, invite members, and manage activity. The process is simple when followed step by step.
How to create a community
Step 01 – Access the Main Menu in GoHighLevel
- The main menu on the left side of your screen includes all the main areas you work in when using GoHighLevel (GHL).
1.1 Click on the Memberships menu item to access the Communities section.
- You’ll now be in the Memberships section, where you can access the Communities tab from the top menu.
1.2 Hover over the Communities tab.
- A dropdown with options will appear, including the Settings option.
1.3 Click the Settings option.
1.4 Label the subdomain of your community.
1.5 Add a domain if you already have one.
1.6 Click the Update Domain button.
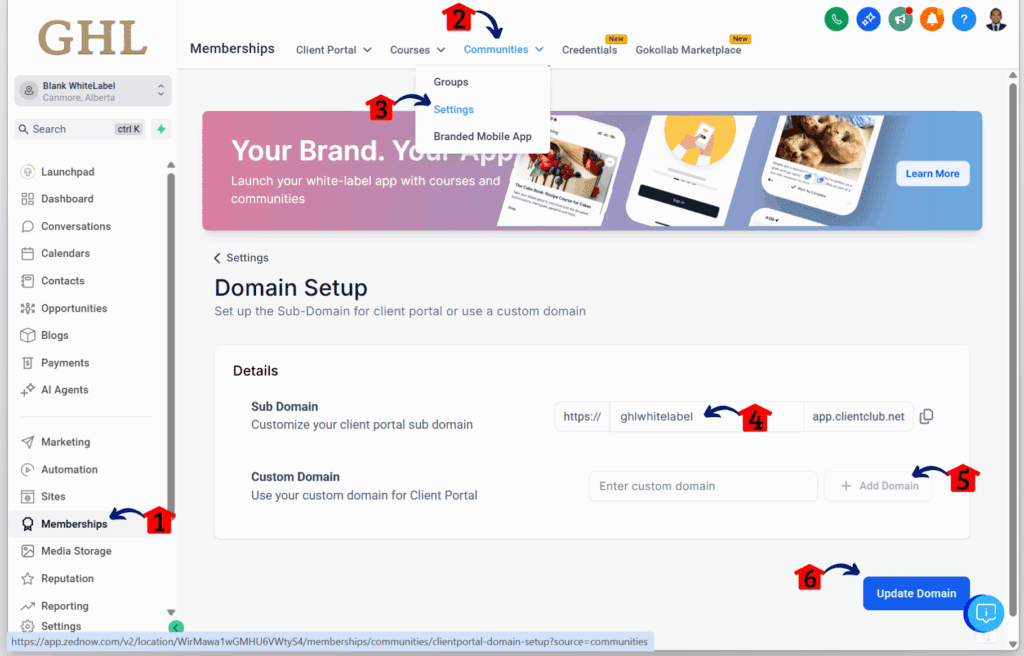
Step 02 – Access the Groups in Communities
2.1 Click on the Memberships menu item to access the Communities section.
- You’ll now be in the Memberships section, where you can access the Communities tab from the top menu.
2.2 Hover over the Communities tab.
- A dropdown with options will appear, including the Settings option.
2.3 Click the Groups option.
2.4 Click the + Create Group button.
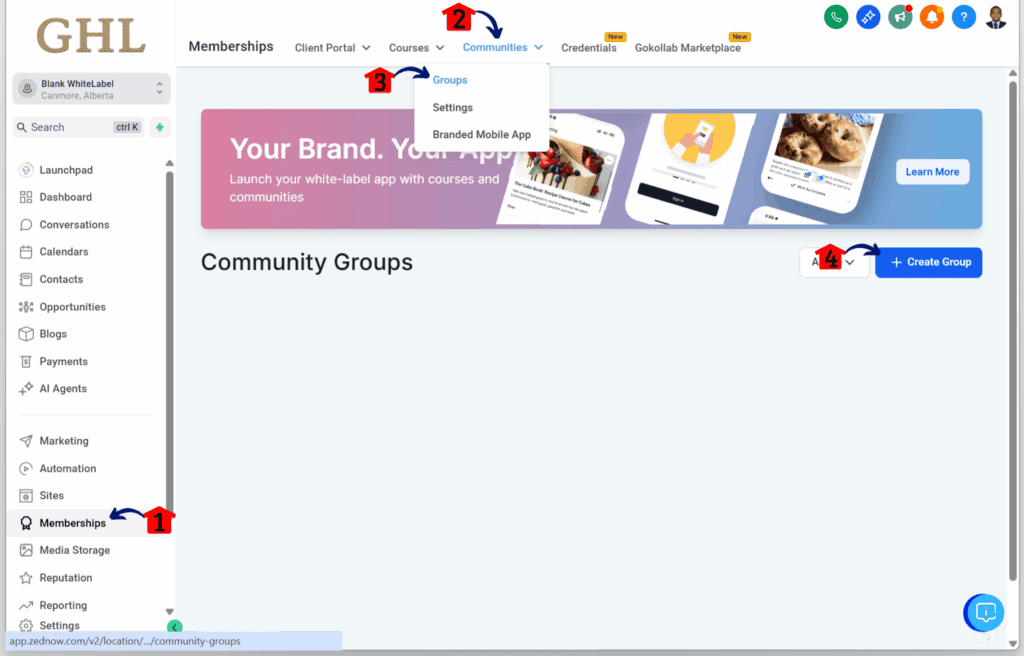
Step 03 – Create Your Community Group
- You should now be in the Create Group section. This is where Online Community Management starts.
3.1 Label your community or group name.
3.2 Edit the URL of your community.
3.3 Add a short and inviting description for your community.
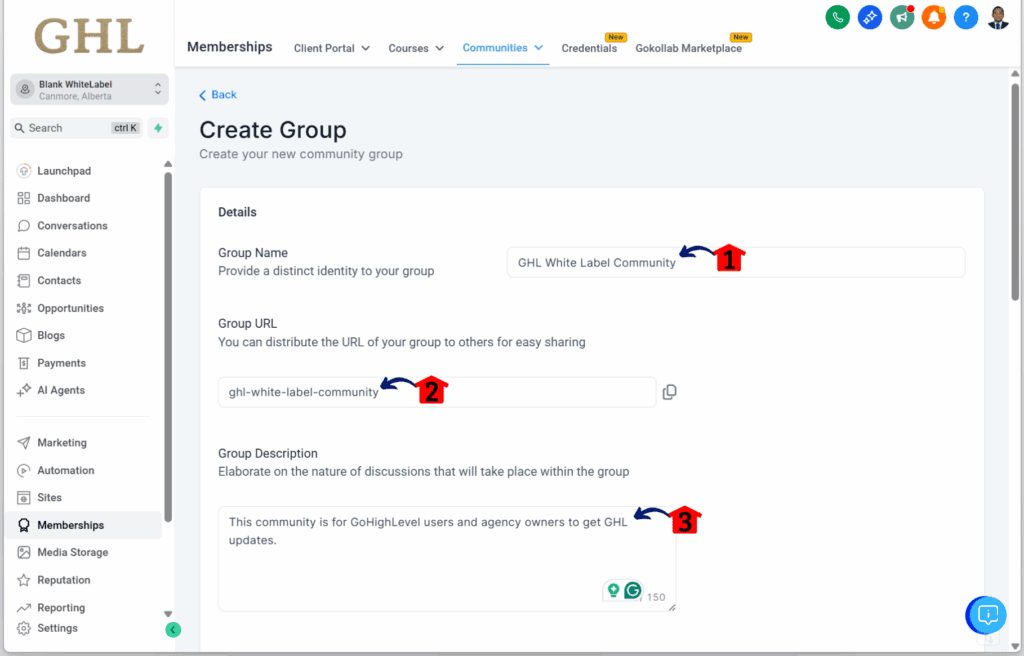
Step 04 – Add Branding to Your Group
- Scroll down the Create Group section to reach the branding settings.
4.1 Upload a favicon for your group.
4.2 Add a cover photo for your group.
4.3 Add a logo for your community.
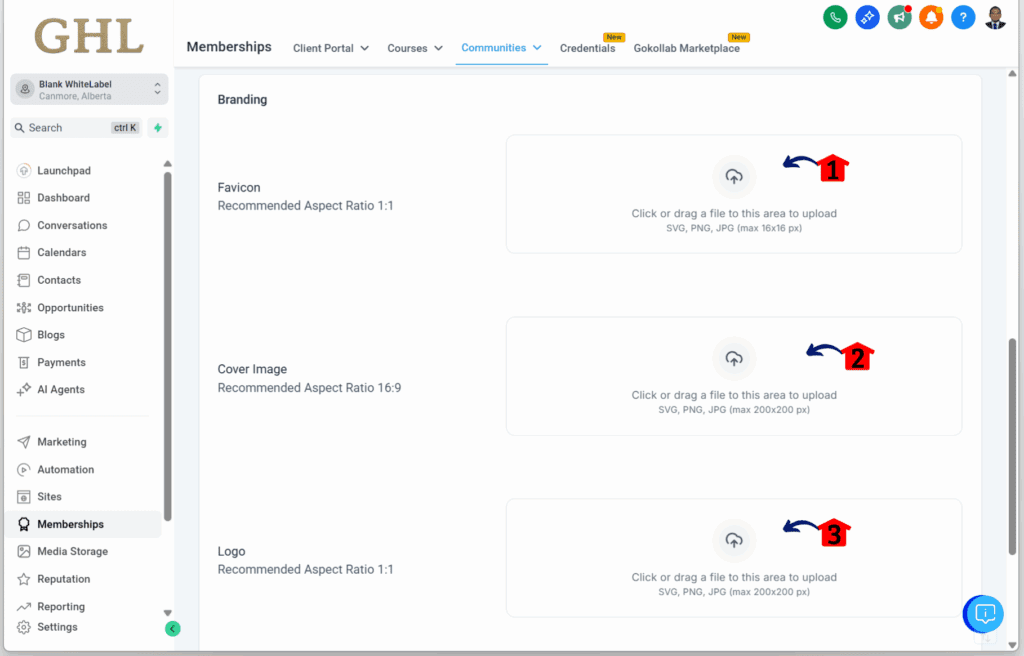
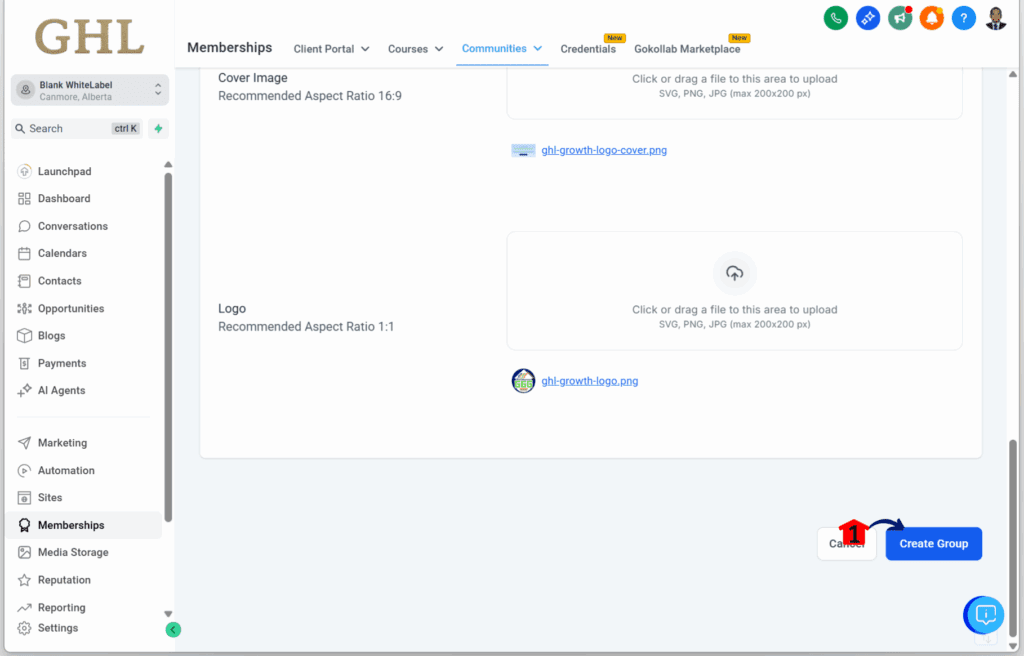
Step 05 – Finalize Group Creation
- Scroll down the Create Group section to find the final action. This step is part of good online community management, making sure everything is set up correctly before you move forward.
5.1 Click the Create Group button.
Step 06 – Set Up Your Client Portal
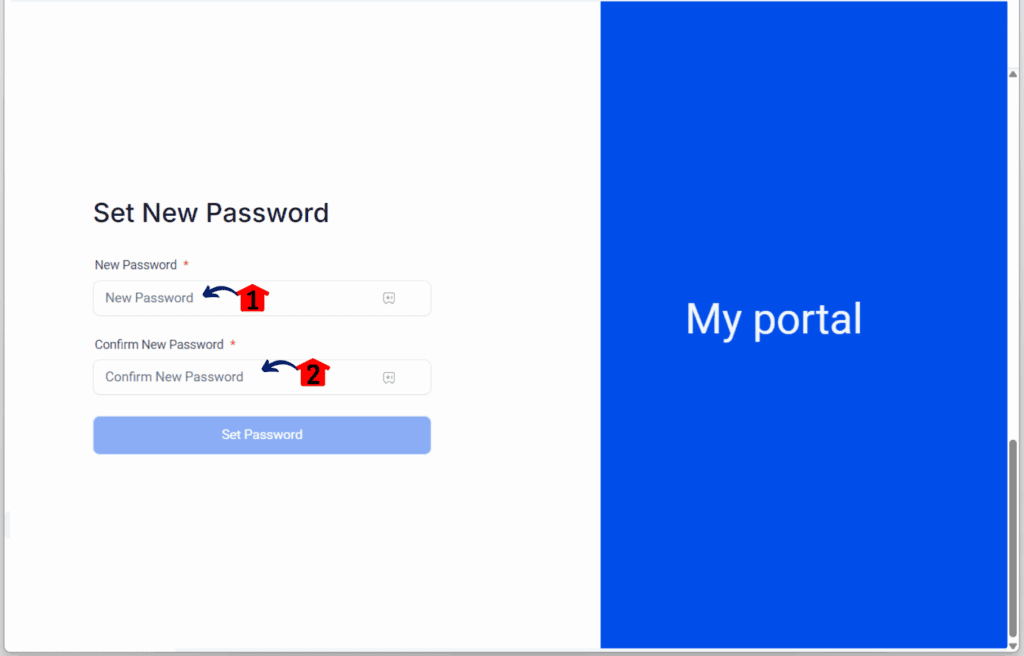
- Once you click the Create Group button, a new window will appear showing the client portal.
6.1 Set your password for this community.
How to Configure the Community’s Settings
Step 01 – Access Community Settings
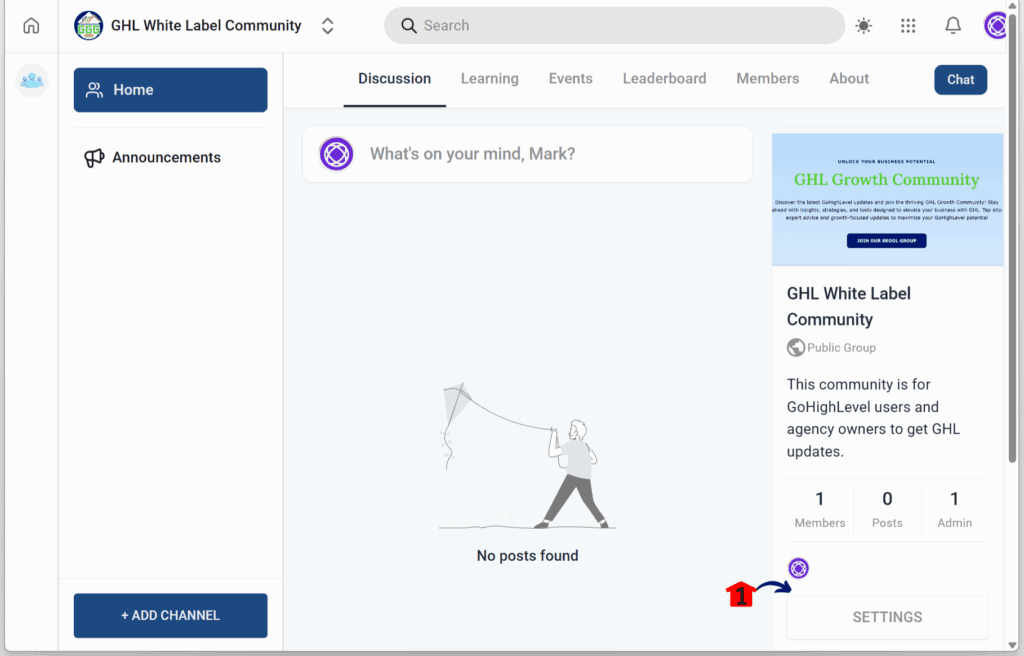
- You should now be in your Community’s dashboard or your Online Community Management’s dashbaord.
1.1 Click the Settings button.
- This is located on the right side of your community dashboard.
Step 02 – Update Community Details
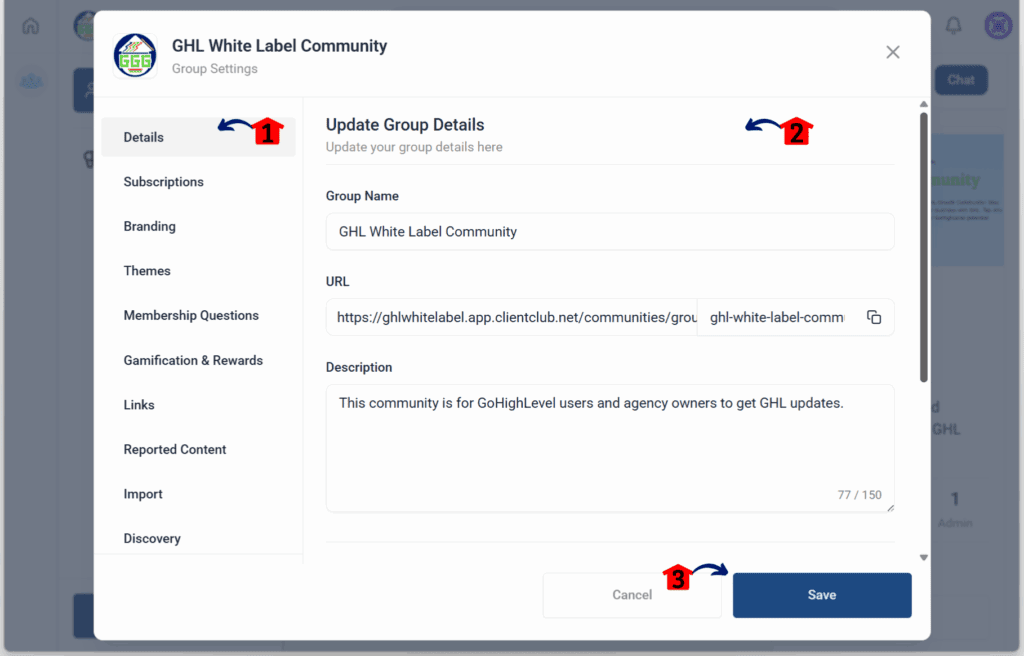
- The settings popup will appear with different subsections.
2.1 Click the Details subsection.
2.2 Update the group details.
- Think of it as part of Online Community Management, small updates that build trust and keep everything organized.
2.3 Click the Save button.
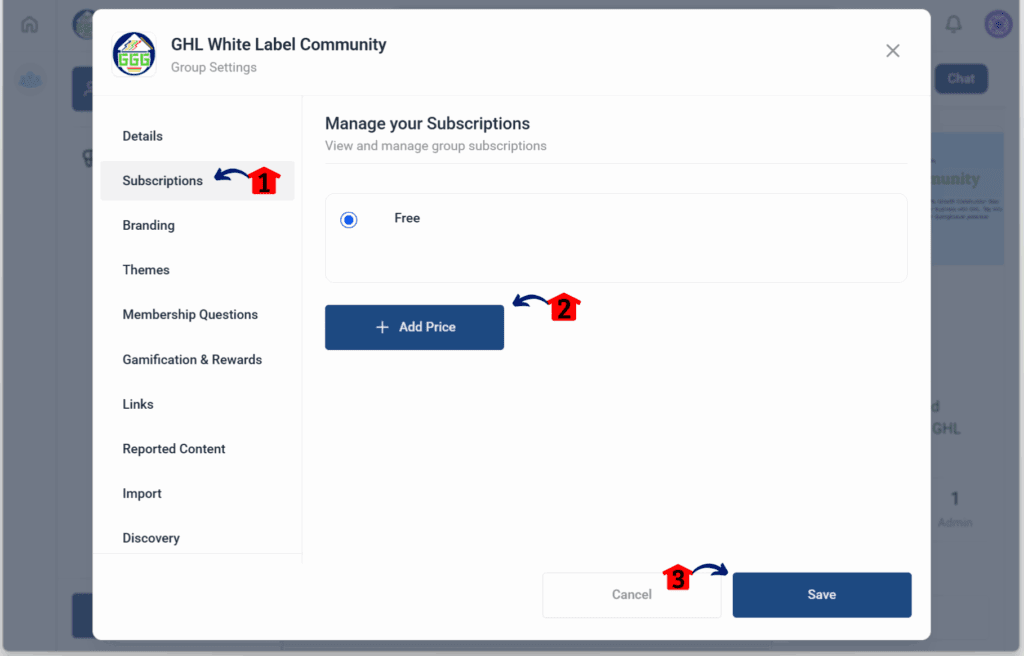
Step 03 – Manage Subscriptions
3.1 Click the Subscription subsection.
3.2 Manage your subscription.
- Set it if you prefer your group to be free for everyone or under a subscription plan.
3.3 Click the Save button.
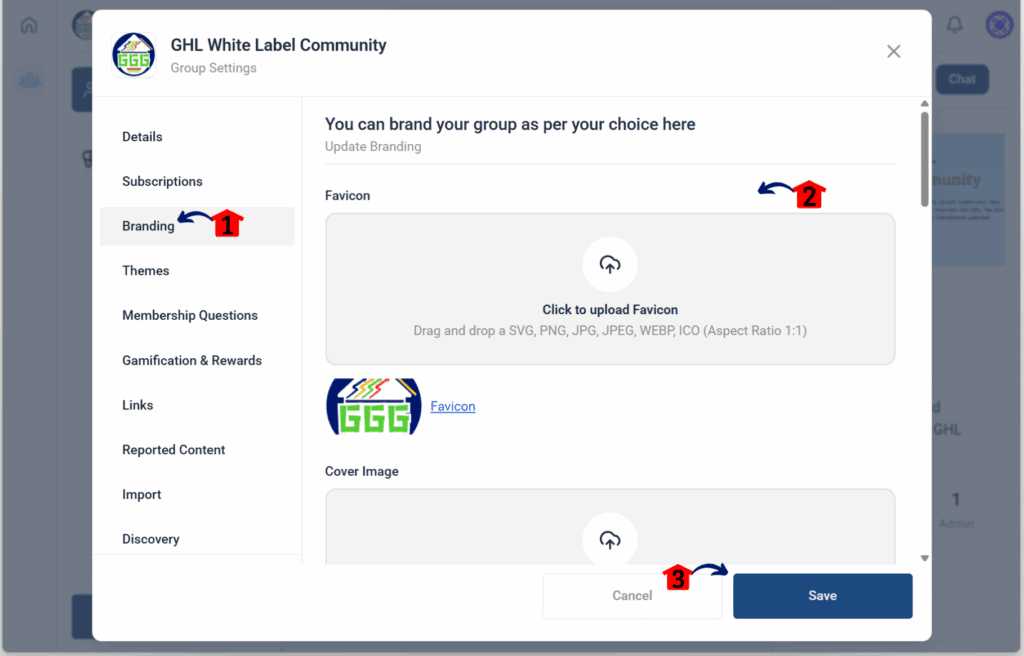
Step 04 – Apply Branding
4.1 Click the Branding subsection.
4.2 Apply your branding so it reflects your community.
4.3 Click the Save button.
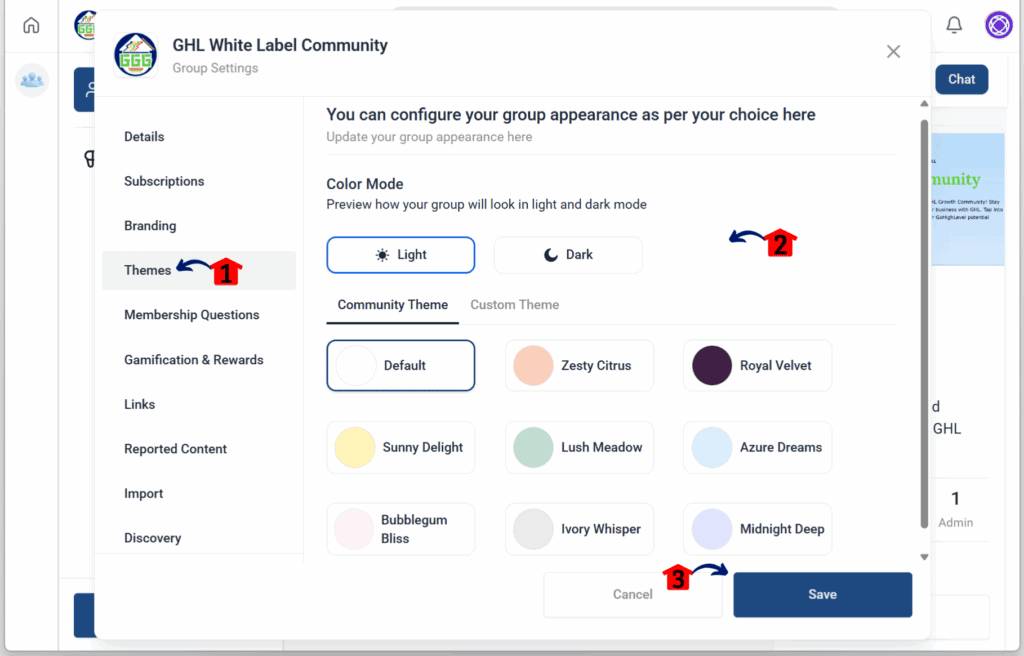
Step 05 – Configure Themes
5.1 Click the Themes subsection.
5.2 Configure your group’s appearance by choosing your preferred background color or theme.
5.3 Click the Save button.
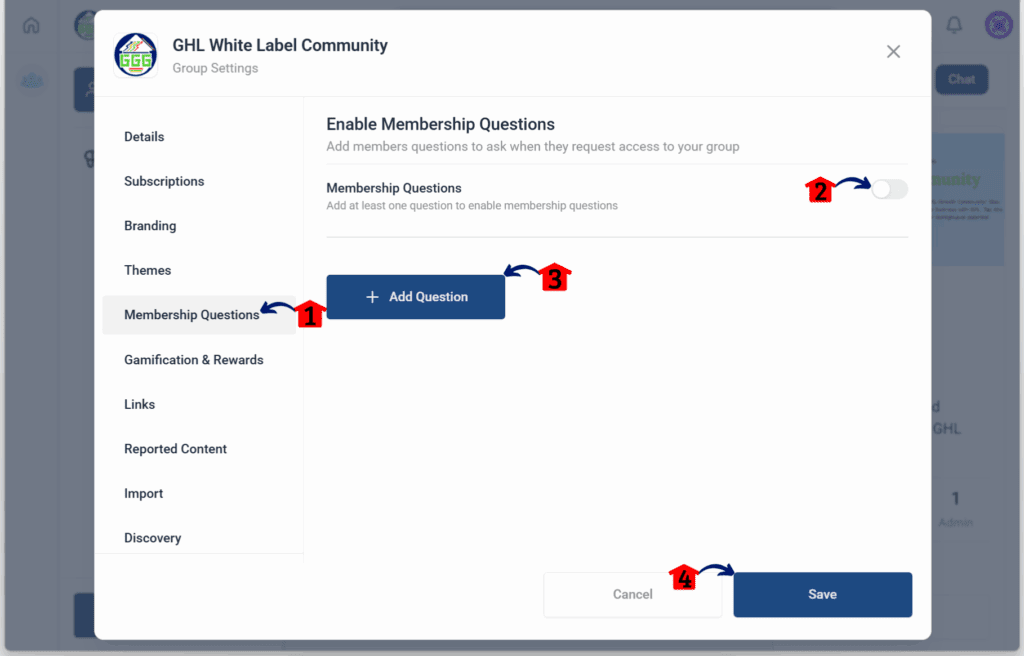
Step 06 – Add Membership Questions
6.1 Click the Membership Questions subsection.
6.2 Toggle on the membership questions if you want to add them for new members.
- These questions will appear when someone tries to join your group.
6.3 Click + Add Question and enter your question.
6.4 Click the Save button when done.
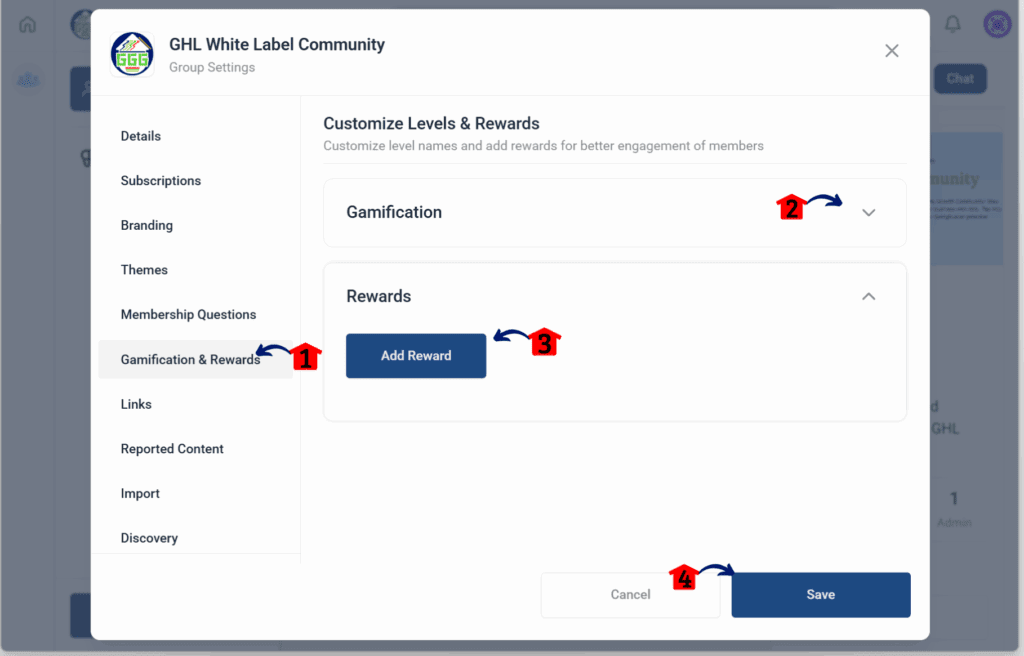
Step 07 – Set Up Gamification and Rewards
7.1 Click the Gamification and Rewards subsection.
7.2 Set up gamification for your group.
- This scoring system gives members points based on their activity and interactions. Members can then earn rewards based on your rules.
- It’s a simple way to boost engagement and make online community management more rewarding for everyone.
7.3 Add a reward.
- The reward can be a coupon code, an ebook, or anything valuable for your members.
7.4 Click the Save button.
Step 08 – Add Links
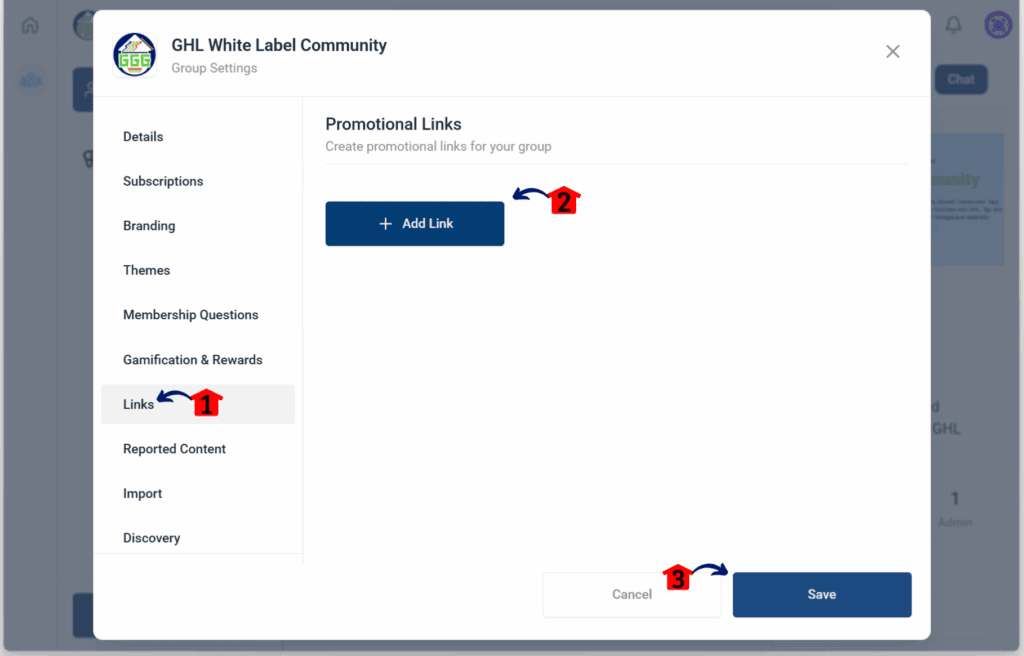
8.1 Click the Links subsection.
8.2 Click + Add Link to add a promotional link.
- This could be your website, Linktree, social media, or any business-related links.
8.3 Click the Save button.
Step 09 – Manage Reported Content
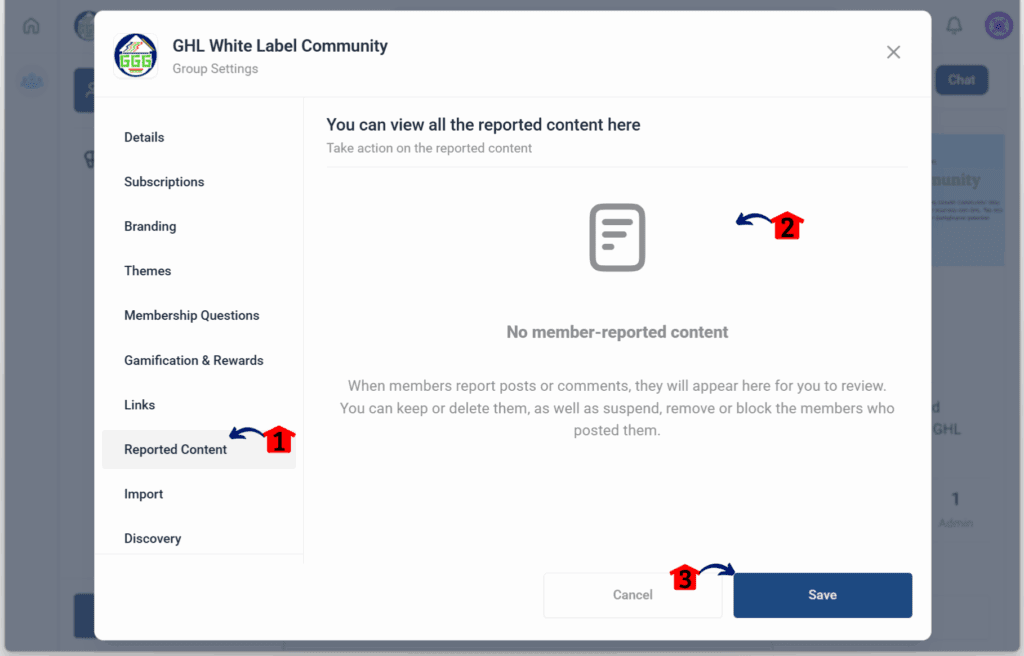
9.1 Click the Reported Content subsection.
9.2 Approve or take action on any posts reported by members.
- This list shows posts flagged for malicious or inappropriate content.
9.3 Click the Save button.
Step 10 – Import Content
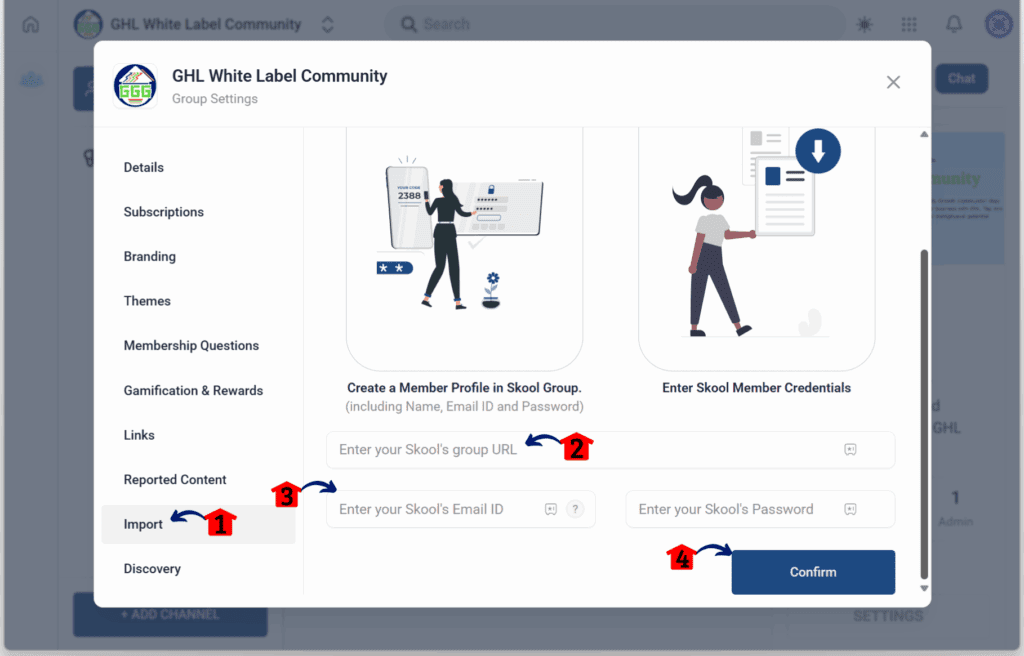
10.1 Click the Import subsection.
10.2 Enter your Skool credentials if you want to import content from Skool into your GHL community.
- This makes Online Community Management smoother by keeping your resources in one place.
10.3 Click the Confirm button.
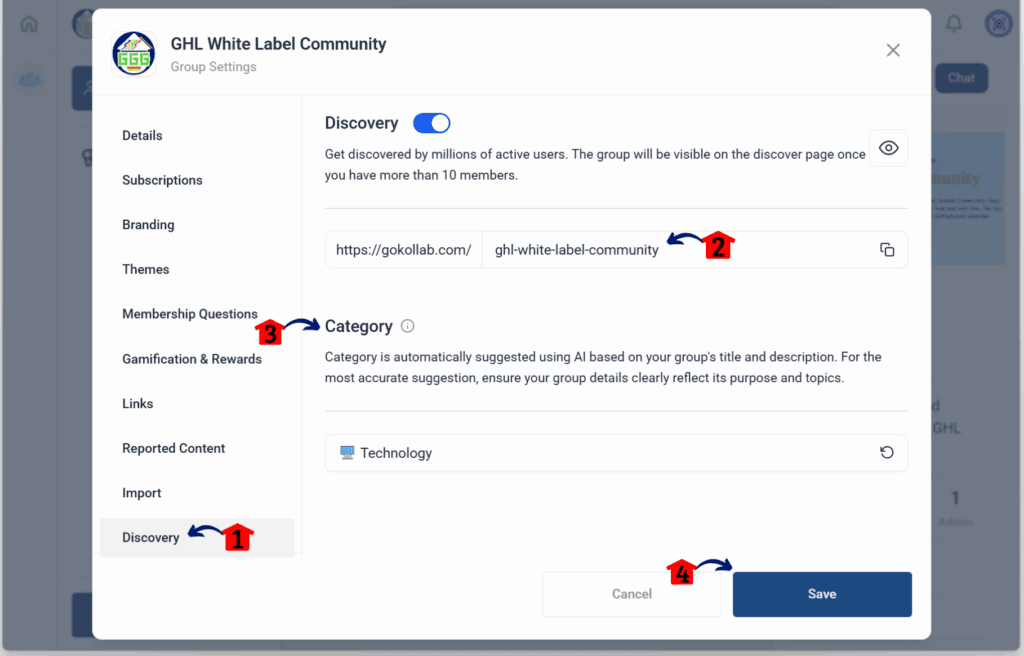
Step 11 – Configure Discovery Settings
11.1 Click the Discovery subsection.
11.2 Edit the URL for GoKollab.
- GoKollab is a straightforward app for online community management, keeping conversations and members organized in one place.
11.3 Add a category that best describes your community.
11.4 Click the Save button.
How to Check the Community Main Tabs
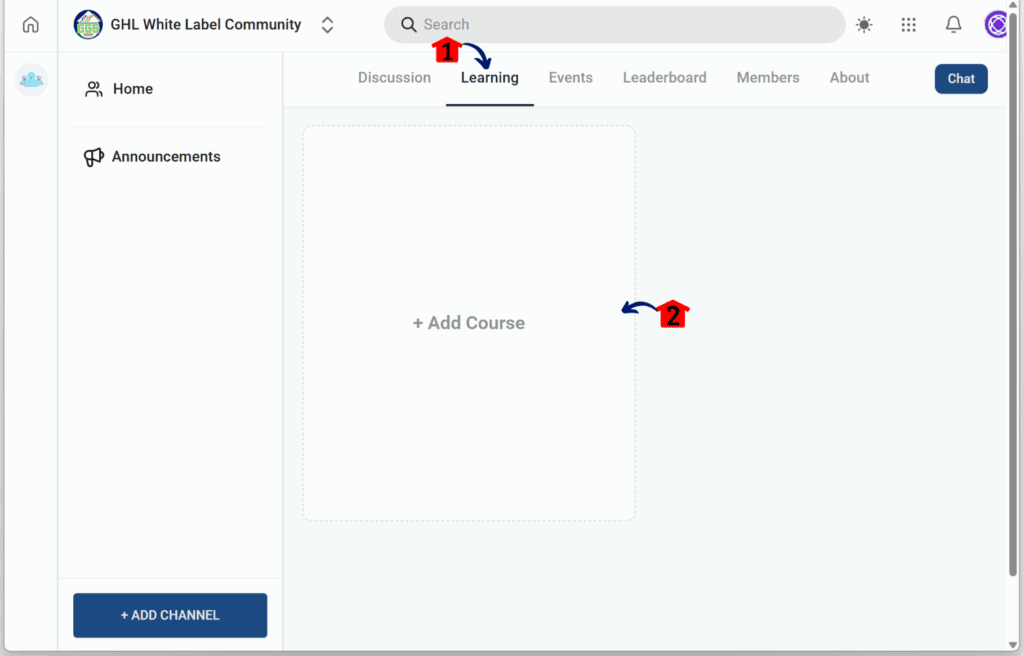
Step 01 – Upload Learning Content
- You should now be back in your group’s dashboard.
1.1 Click the Learning tab.
1.2 Upload any courses for your members.
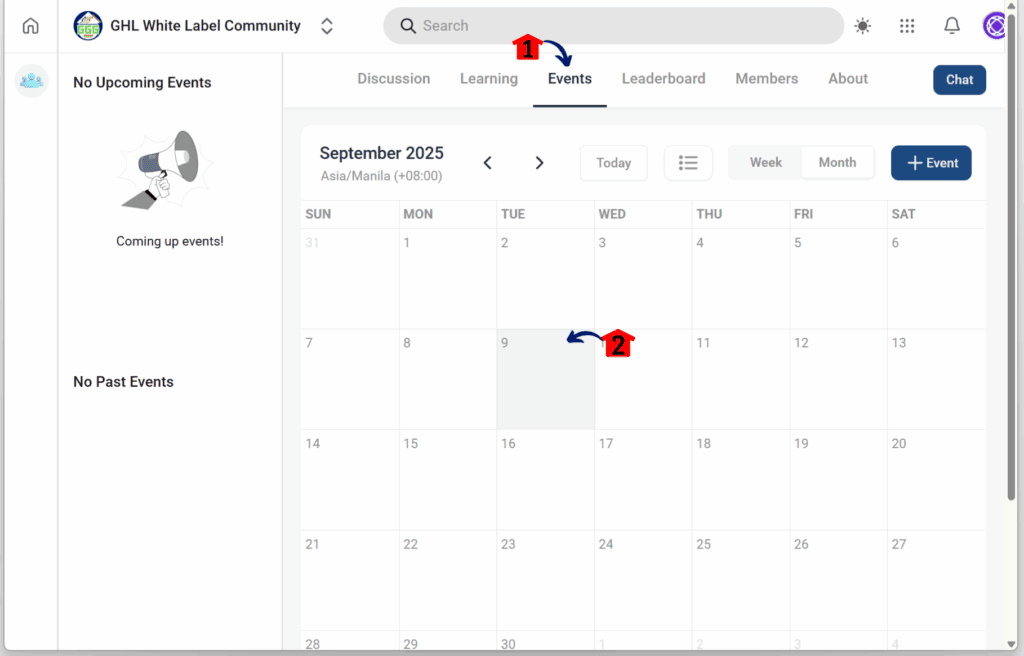
Step 02 – Review Scheduled Events
2.1 Click the Events tab.
2.2 Check and confirm scheduled events.
- This is where you’ll manage webinars or upcoming updates.
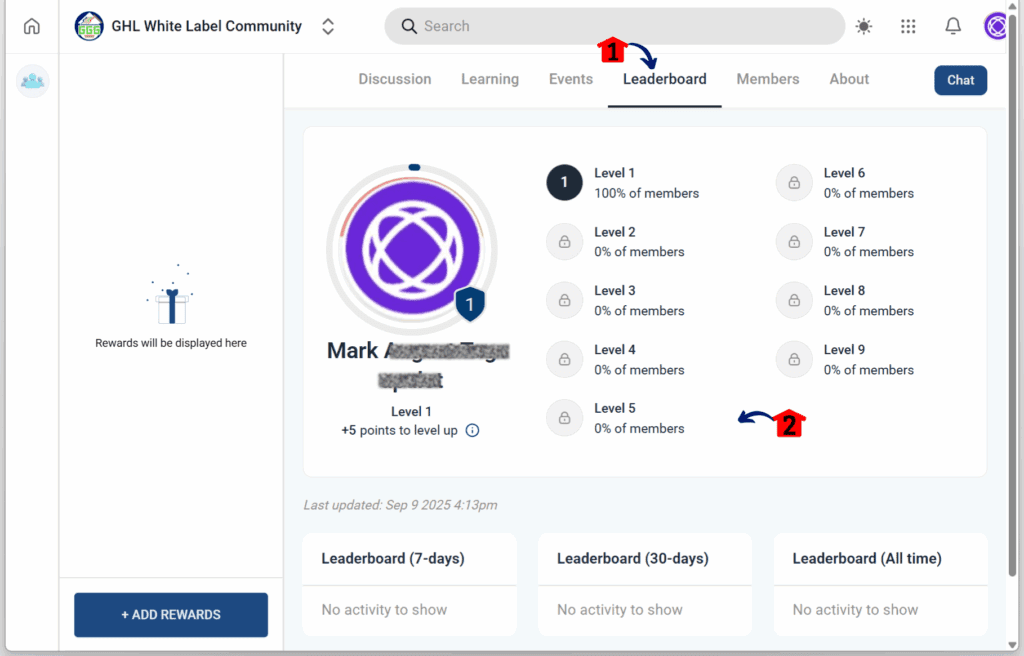
Step 03 – Track Leadership Board
3.1 Click the Leaderboard tab.
3.2 Review which members are excelling in the gamification system.
- Tracking progress like this is a simple but effective part of Online Community Management
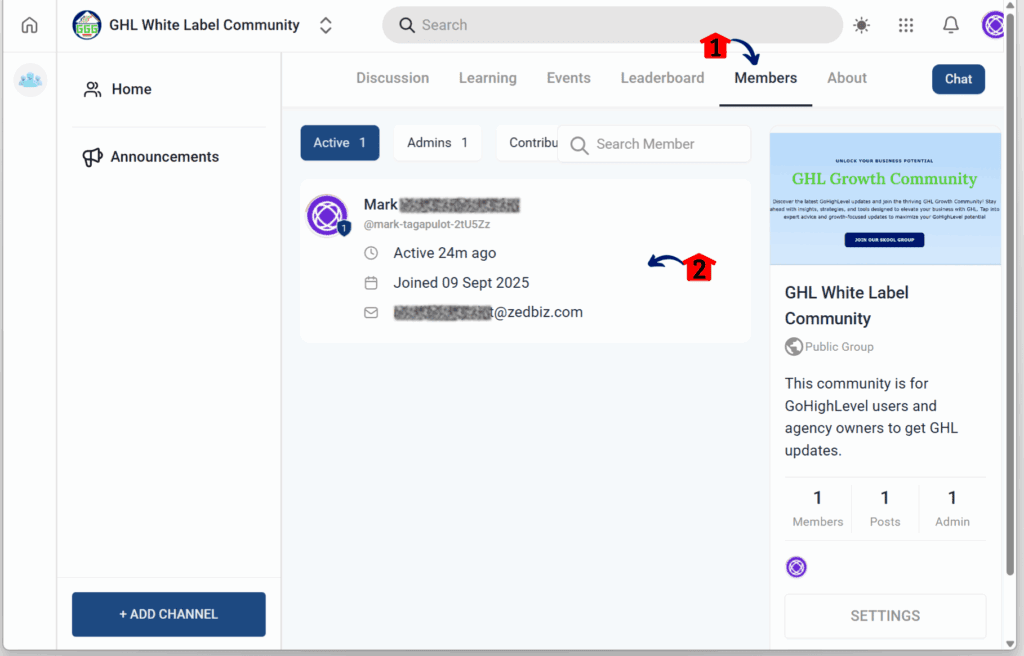
Step 04 – View Members
4.1 Click the Members tab.
4.2 Review the number of members.
Step 05 – Add Content to the About Section
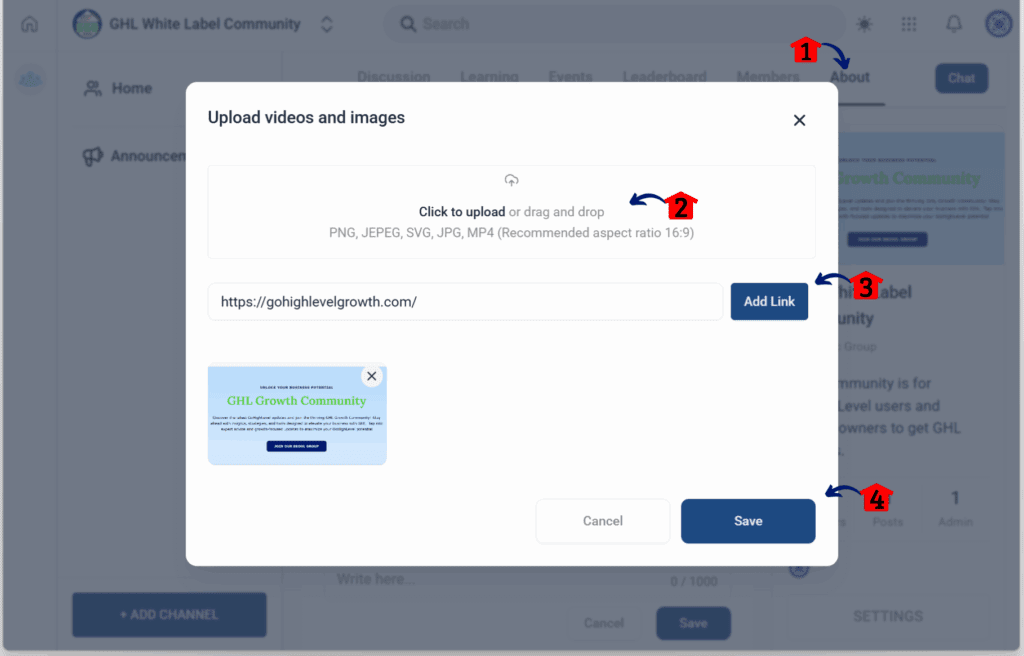
5.1 Click the About tab.
5.2 Upload a welcome video or image.
- This is the first thing new members see before joining.
5.3 Add a link to your About page.
- This could be a promotional link or your website.
5.4 Click the Save button.
How to Invite Members
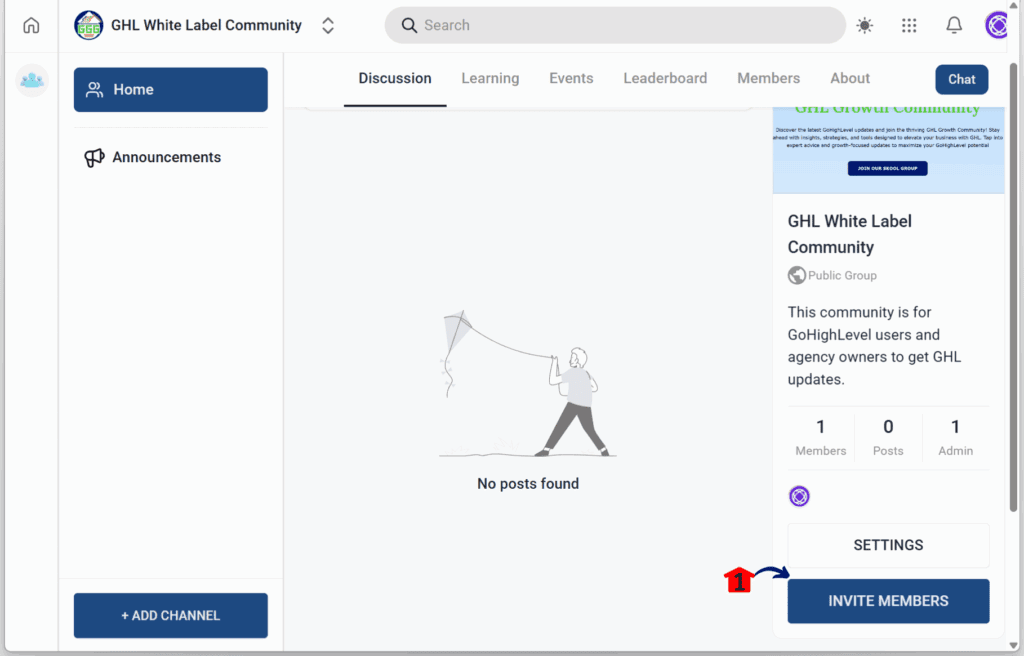
Step 01 – Open Invite Members
- You should now be back in your group’s dashboard.
1.1 Click the Invite Members button.
Step 02 – Send Invitations
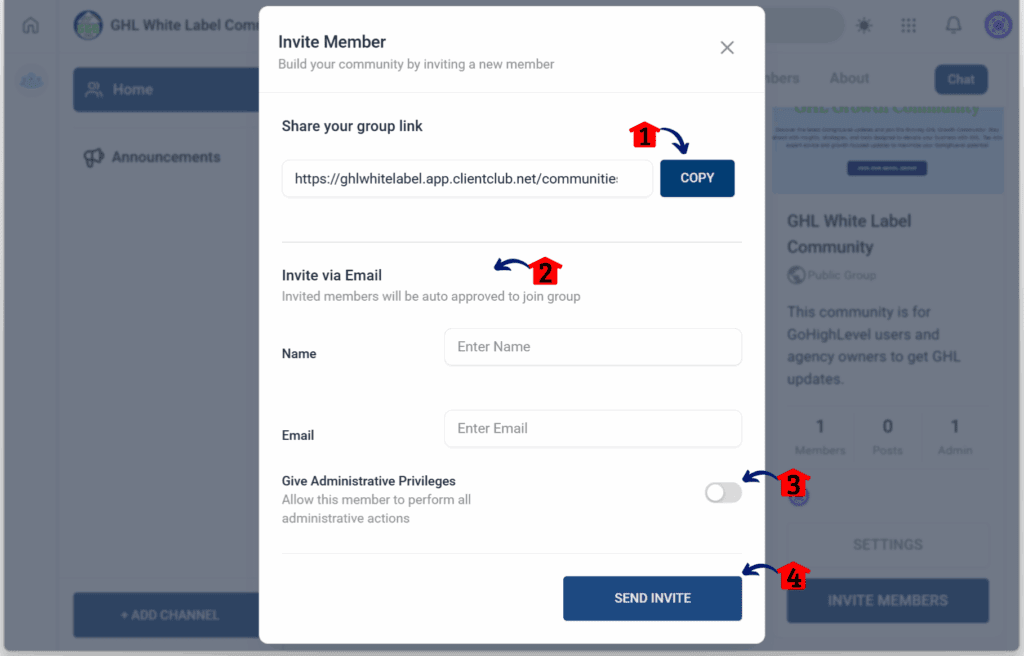
- The Invite Members popup will appear.
2.1 Copy the group link to share across platforms.
- This is one way to invite new members.
2.2 Enter the name and email address of the member.
- This is another way to invite.
2.3 Toggle on or off if you want to grant Administrative Privilege.
2.4 Click the Send Invite button.
How to Create a Post
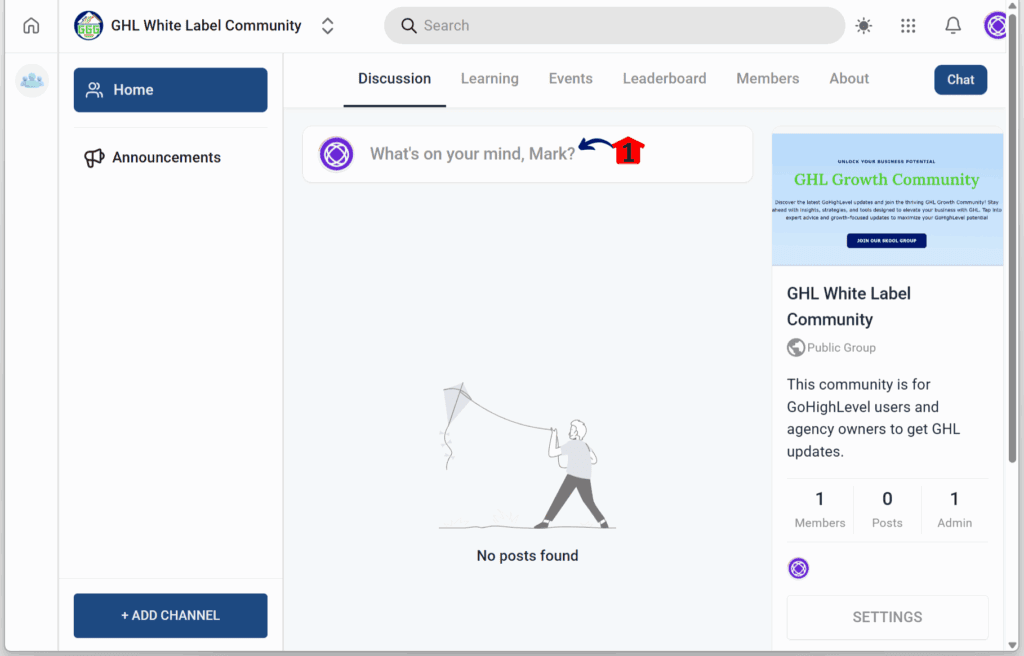
Step 01 – Open Post Creator
- You should now be back in your group’s dashboard.
1.1 Click the What’s on your mind button.
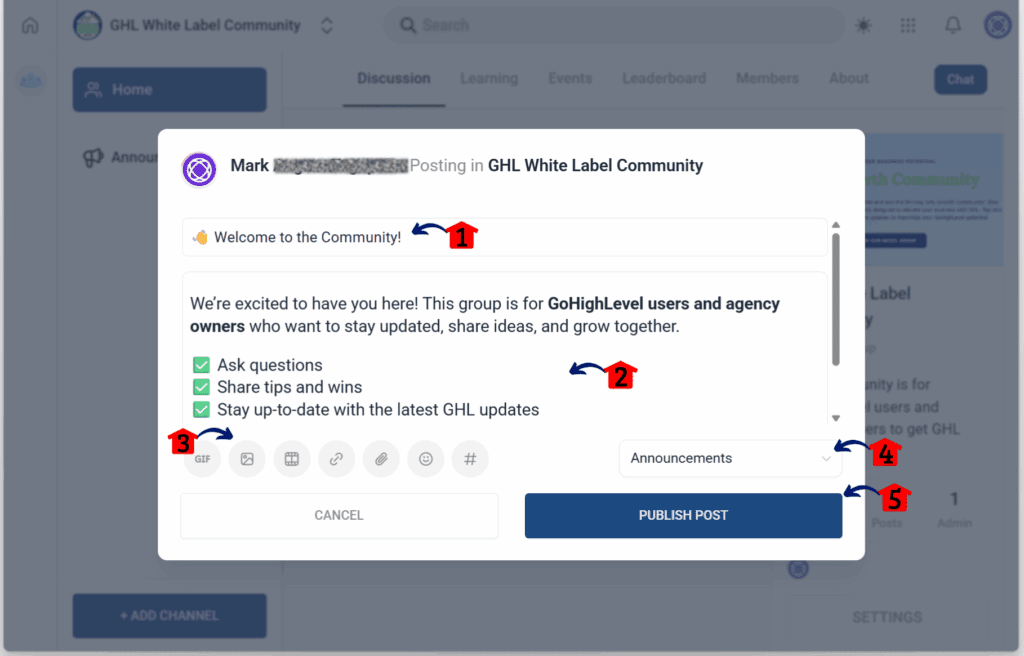
Step 02 – Publish a Post
- The post popup will appear.
2.1 Write the title of the post.
2.2 Add details to your post.
2.3 Upload a media file.
2.4 Choose the channel to post in.
2.5 Click the Publish button.
This structure makes it clear how to build and run a GoHighLevel community. Once it is live, the real work is in keeping members active and providing a space where they want to return.
Pro Tips for Better Engagement
Online community management in GoHighLevel is not just about creating a group. The real impact comes from keeping members active and giving them reasons to return. A well-built community can turn into a place where people connect, share, and stay involved with a brand.
A few practical tips can make a big difference:
- Use gamification with purpose. Points and rewards motivate members, but they should support meaningful interaction.
- Keep branding consistent. A logo, cover image, and clear theme give the community a professional look that members recognize.
- Mix content styles. Share educational posts alongside questions and discussions so members feel part of an active conversation.
- Ask simple entry questions. Screening questions help set expectations and bring in members who will contribute.
- Stay consistent. Posting on a regular schedule keeps the group alive and encourages members to check back often.
Communities grow stronger when people see value in showing up. By focusing on steady interaction and thoughtful branding, agencies and businesses can create spaces that last.
What This Means for Your Business
Online community management in GoHighLevel gives businesses a practical way to build deeper connections with their audience. Instead of relying only on email or courses, a community creates a central place where people can interact and stay engaged.
For agencies, a branded community can be offered as a service to clients. It becomes a private hub where clients connect with their own customers, making the agency more valuable. Coaches and educators can pair their courses with communities so students not only learn but also share progress and ideas with each other.
Even local businesses can benefit. A private group can work as a loyalty space where customers ask questions, give feedback, and stay informed about updates. That level of interaction builds trust and keeps people coming back.
Effective online community management leads to stronger retention, more referrals, and steady growth. Running your community inside GoHighLevel keeps everything in one place while giving members a space they’ll want to come back to.
Results You Can Expect from Using Communities
Online community management in GoHighLevel delivers more than a place to host content. It creates a system that encourages members to stay active and connected. When used well, communities can drive both engagement and business growth.
The results are straightforward:
- More engagement. Members come back to join conversations instead of only logging in for courses.
- Better loyalty. A community helps people feel part of something, which strengthens trust in the brand.
- Recurring revenue. When members are involved, they are more likely to renew subscriptions or join new offers.
- Clear insights. Activity data shows which posts and topics get the most attention, giving businesses direction.
For agencies, educators, and local businesses, these outcomes mean stronger relationships and steady growth. Communities built inside GoHighLevel work because they combine branding, interaction, and management in one place. The key is consistency, and when members see ongoing value, they keep showing up.
Frequently Asked Questions (FAQ) You Need to Know
Final Thoughts on Online Community Management
Online community management in GoHighLevel has grown into a tool that helps businesses do more than just deliver content. It creates a space where members can connect, stay active, and engage with a brand on a deeper level.
For agencies, coaches, and educators, this means a stronger way to deliver value. Communities can host courses, open discussions, and give clients a place to stay connected. Local businesses can also benefit by turning communities into loyalty spaces that keep customers engaged.
The real advantage is control. With a branded community, businesses manage who joins, what is shared, and how members interact. The result is better retention, stronger loyalty, and opportunities for recurring revenue.
Communities in GoHighLevel aren’t just another feature, they’re a strategy. When businesses take Online Community Management seriously, they create spaces that build trust, spark engagement, and drive long-term growth. The payoff isn’t instant, but the impact lasts.
Check back with the team at GHL Growth Garage for more guides on how to use GoHighLevel features to create growth and deliver results.
Scale Your Business Today.
Streamline your workflow with GoHighLevel’s powerful tools.
