Stop Chasing Calendars: Let AI Handle Your Appointment Booking!
Seriously, are you still playing phone tag trying to nail down meeting times? In today’s crazy-fast business world, time is cash, plain and simple. GoHighLevel gets it. That’s why they dropped the “Appointment Booking Conversation AI” workflow action – a slick way to let AI be your booking ninja. Picture this: AI chats with your leads like a natural, figures out when they’re free, and bam! Appointment booked. Automatically. This ain’t science fiction; it’s happening right now in your GHL account. And this little guide? It’s your map to making it happen with AI Appointment Booking.
This “Appointment Booking Conversation AI” thing? Think of it as your tireless, digital scheduling sidekick. It jumps into conversations and turns those “maybe laters” into solid calendar entries. Get how powerful that is? By getting the hang of its nuts and bolts, you’re not just saving hours; you’re giving your clients a smooth booking experience, which, let’s be honest, makes you look like a total pro. All powered by smart AI Appointment Booking.
Ditch the scheduling headaches and skyrocket your booking efficiency by setting up GoHighLevel’s “Appointment Booking Conversation AI” workflow action. Let AI Appointment Booking handle the calendar chaos so you can focus on the real hustle.
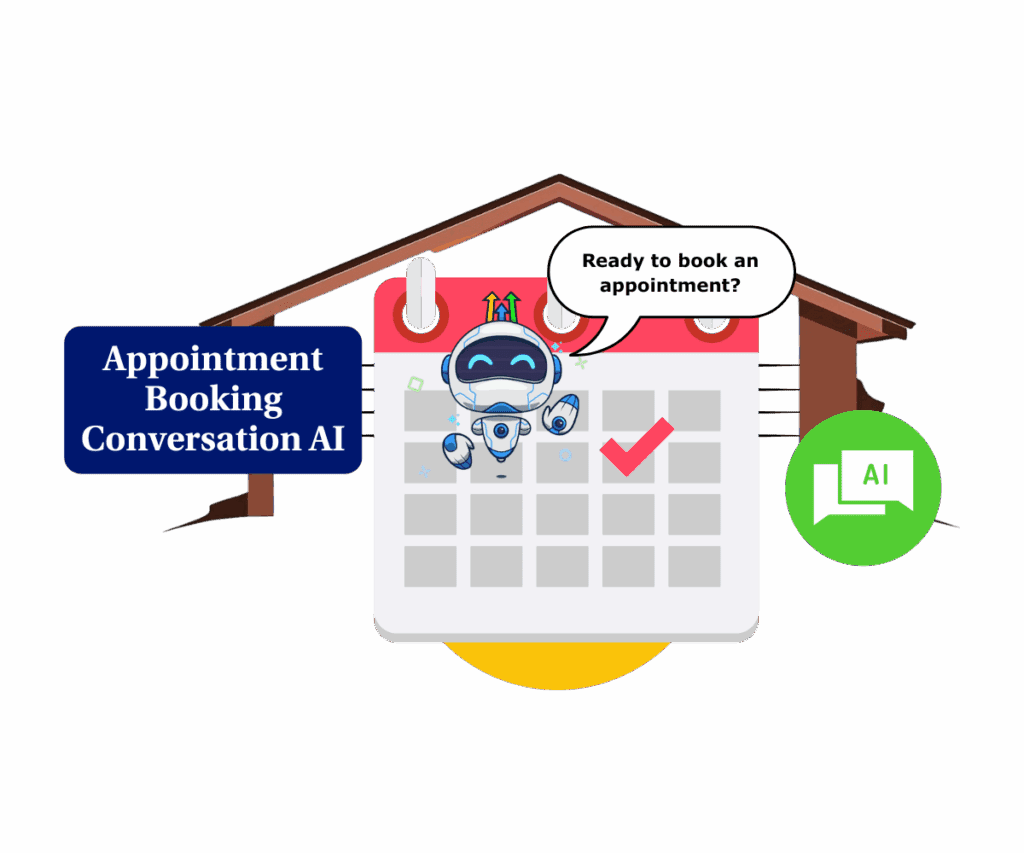
Understanding AI Appointment Booking in GoHighLevel
The “Appointment Booking Conversation AI” workflow action is a straight-up game-changer in GoHighLevel’s automation arsenal. It lets you build workflows where AI talks to your people, finds out when they’re available, and auto-magically slots them into your calendar. No more manual emailing marathons – just smooth, efficient bookings thanks to smart AI Appointment Booking. You’ll find this bad boy when you’re building or tweaking workflows in the Automation tab of your GoHighLevel dashboard.
Key Components of the AI Appointment Booking Workflow Action
Alright, so you’re thinking about letting AI handle your bookings? Smart move. But before you unleash the robots, you gotta know what makes this AI Appointment Booking engine tick. It’s all about understanding the different knobs and dials you can tweak to make it work just the way you need. Let’s break down the essential parts that make up this powerful feature.
Automate marketing, manage leads, and grow faster with GoHighLevel.
- Calendar: This is where you pick the GoHighLevel calendar where the AI will actually book the appointments. Heads up: Recurring calendars aren’t invited to this AI Appointment Booking party.
- Personality and Additional Instructions: This is your chance to tell the AI how to act and what to say. Think of it as giving your AI bot a personality transplant to match your brand. Clear instructions here mean smoother AI Appointment Booking conversations.
- Maximum Messages Limit before it goes to “APPOINTMENT NOT BOOKED”: This sets the limit on how many back-and-forths the AI will have before throwing in the towel on booking. Around 15 messages is the sweet spot. If it goes over, the contact heads down the “Appointment not Booked” path in your workflow, giving you a chance to jump in if AI Appointment Booking hits a snag.
- Time Out Value and Unit: This tells the AI how long to wait for a reply before moving on. Set the time (like 5, 10, 30) and the unit (minutes, hours). Pro tip: Use the “GoTo” action in the “Time Out” branch to give it another shot at AI Appointment Booking with a follow-up.
- Channel: This is where you choose how the AI will chat – SMS, Facebook Messenger, or Instagram DM. Pick the one where you connect best with your people for optimal AI Appointment Booking.
Don’t let the bot send confirmation message: By default, the AI sends a “You’re booked!” message. Check this box if you want to handle the confirmation yourself in the “Appointment Booked” branch. Just don’t forget to actually send a confirmation if you disable the bot’s – gotta keep those folks in the loop after a successful AI Appointment Booking!
Implementing AI Appointment Booking Step-by-Step
Enough talk, let’s get down to brass tacks and actually set this thing up. Implementing AI Appointment Booking might sound high-tech, but GoHighLevel has made it surprisingly straightforward. Just follow these simple steps, and you’ll be letting AI handle your calendar in no time. Trust me, once you see it in action, you’ll wonder why you didn’t do this sooner.
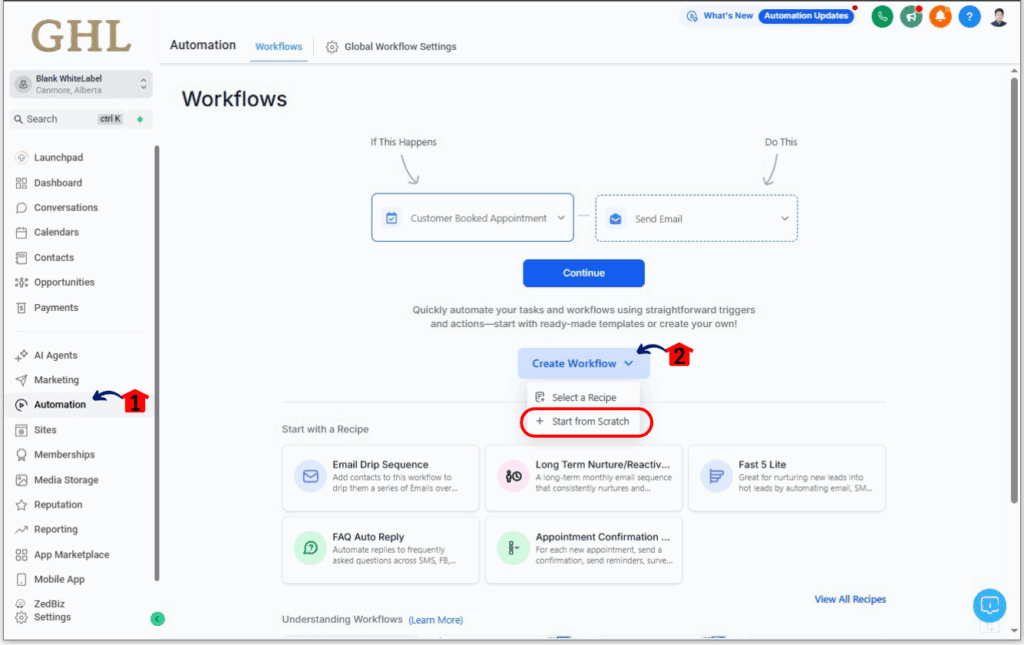
Step 01 – Access the Main Left Hand Menu in GoHighLevel
- The Main Menu on the Left side of your screen has all the main areas that you work in when using GHL
1.1. Click on the ‘Workflows’ Menu Item.
- Access the ‘Workflows’ section of GoHighLevel
- You’ll now be in the ‘Workflows’ section of GHL, where you can build and manage automated processes.
1.2. Create a Workflow from scratch.
Step 02 – Set Up the Workflow Trigger
- This step involves defining what event will start your appointment booking automation.
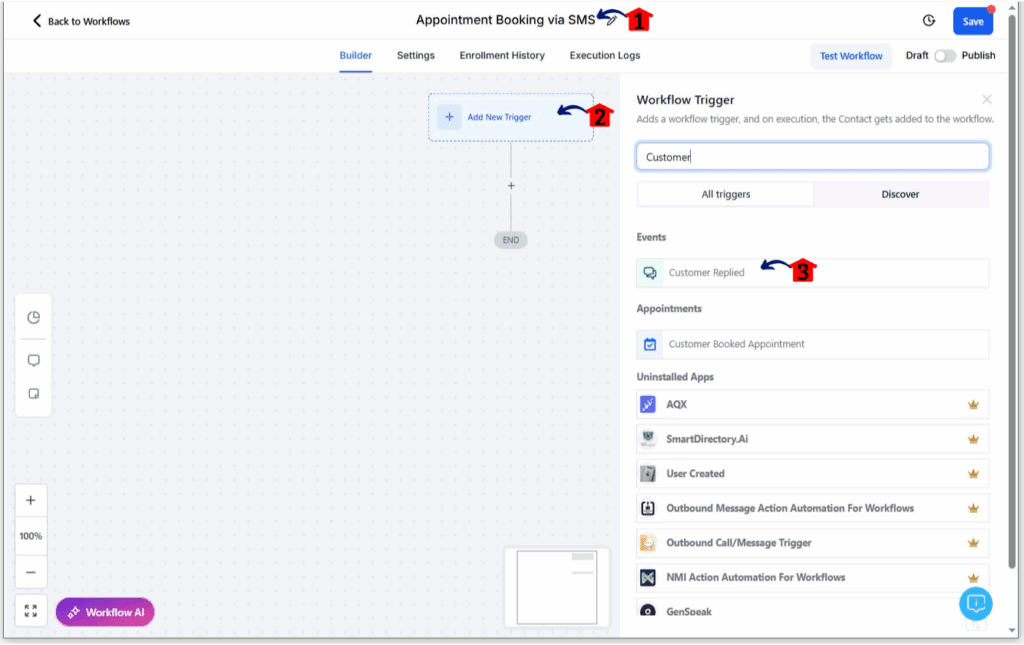
2.1. Name your workflow.
- Give your workflow a descriptive name (e.g., “Appointment Booking via SMS”). This will help you easily identify it later.
2.2. Add a New Trigger.
- In the workflow builder, you will see a section labeled ‘Trigger’. Click on ‘Add New Trigger’.
- A sidebar will appear with a list of available triggers.
2.3. Choose the ‘Customer Replied’ trigger.
- Scroll through the list or use the search bar to find ‘Customer Replied’.
Step 03 – Configure the ‘Customer Replied’ trigger.
- This step involves setting up the specific conditions under which this workflow will be activated.
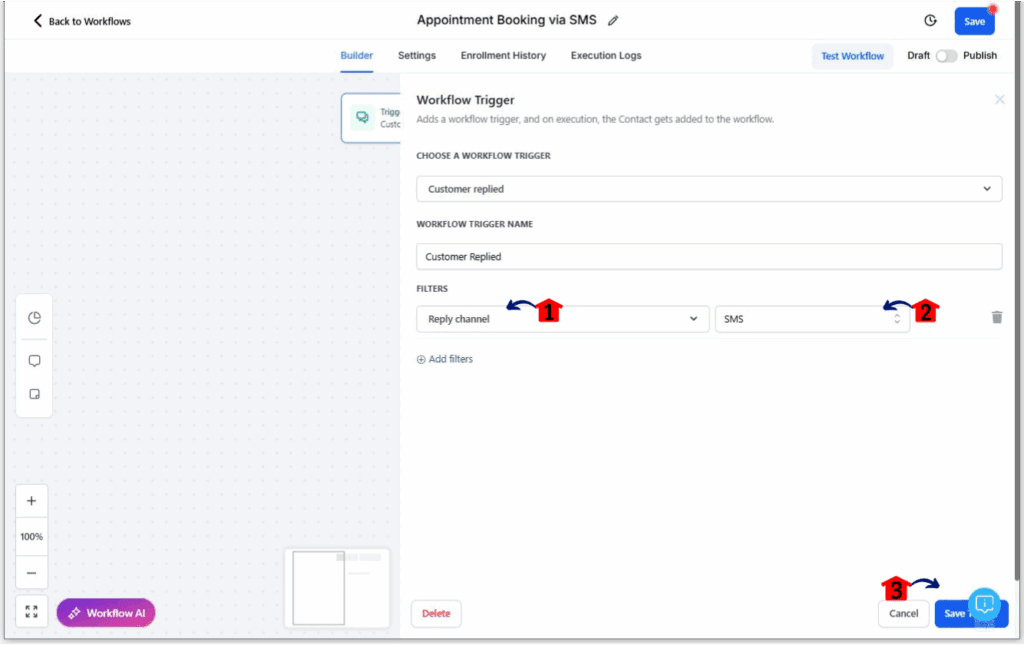
3.1. Add the ‘Reply Channel’ filter.
- Click on the ‘+ Add Filter’ button. This will allow you to narrow down when this trigger should fire.
- A dropdown menu will appear with various filter options.
- Scroll through the list and click on ‘Reply Channel’.
3.2. Choose a channel.
- Another dropdown menu will appear next to the ‘Channel’ filter.
- Choose a channel from the list. This ensures that the workflow will only be initiated when a customer replies via this channel.
3.3. Save the trigger configuration.
- Once you have set up your desired filters, click the ‘Save Trigger’ button.
Step 04 – Add the Conversation AI Bot Action
- This step sets up the action that will handle the appointment booking conversation.
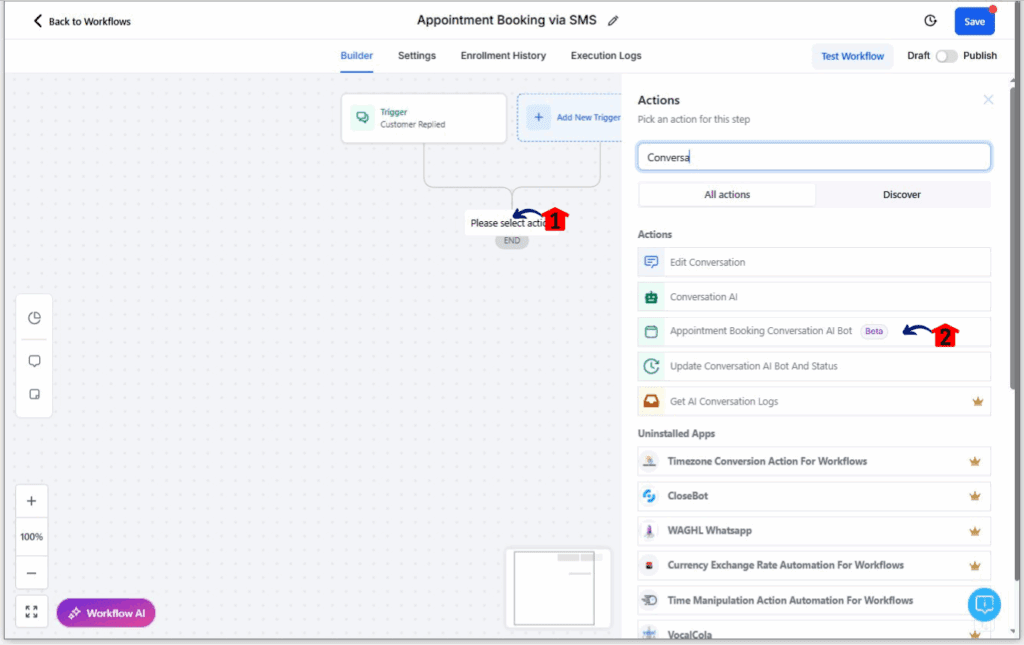
4.1. Click on the ‘+’ icon below the ‘Customer Replied’ trigger.
- This will allow you to add an action that will run after the trigger is activated.
4.2. Select the ‘Appointment Booking Conversation AI Bot’ action.
- A new sidebar will appear with a list of available actions. Scroll through the list or use the search bar to find ‘Appointment Booking Conversation AI Bot’.
Step 05 – Configure the ‘Appointment Booking Conversation AI Bot’ action.
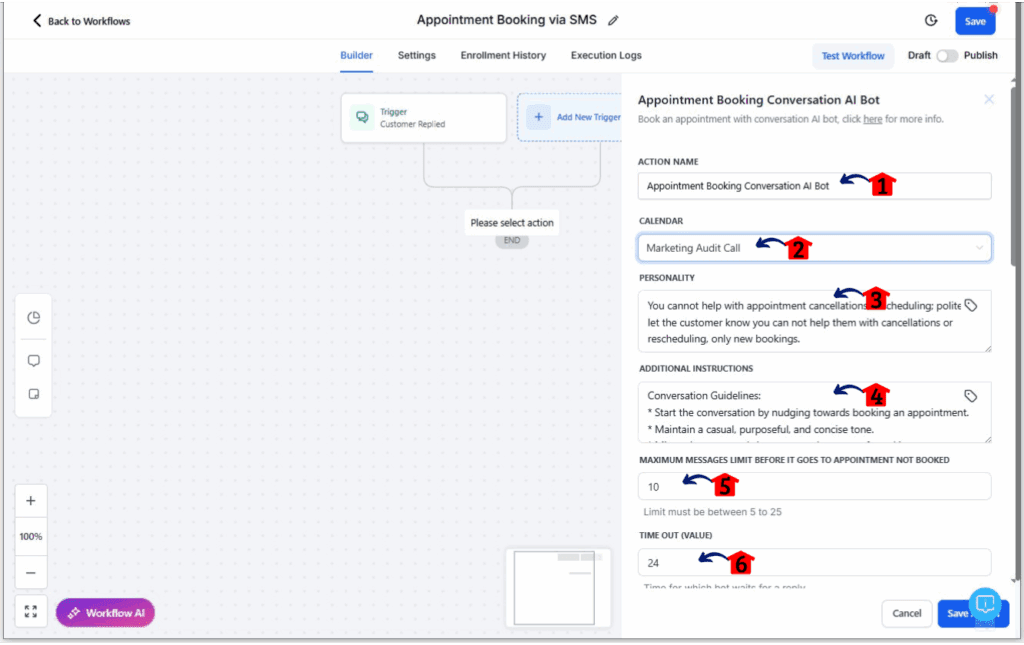
- A new window will appear allowing you to customize the AI appointment booking.
5.1. You can give this action a specific name (e.g., “AI Appointment Bot”).
5.2. Choose your desired non-recurring calendar from the dropdown menu.
- Make sure this is the calendar where you want the appointments to be booked.
5.3. Create a personality for the AI.
- This will influence how the bot interacts with the customer.
5.4. Put some Additional Instructions.
- You can provide specific instructions to the bot in this text area. For example, you might want to tell it to prioritize certain days or times, or ask specific qualifying questions. Be clear and concise in your instructions.
5.5. Set a Message Limit
- Set the maximum number of messages the bot will exchange with the customer before it gives up on booking the appointment and marks it as “Appointment Not Booked”.
- A value of 15 is a reasonable starting point.
5.6. Set the Timeout Value.
- Set the duration after which the conversation is considered inactive and marked as “Timeout” if an appointment is not booked.
- A value of 24 hours means if the customer doesn’t respond within 24 hours, the bot will stop trying to book.
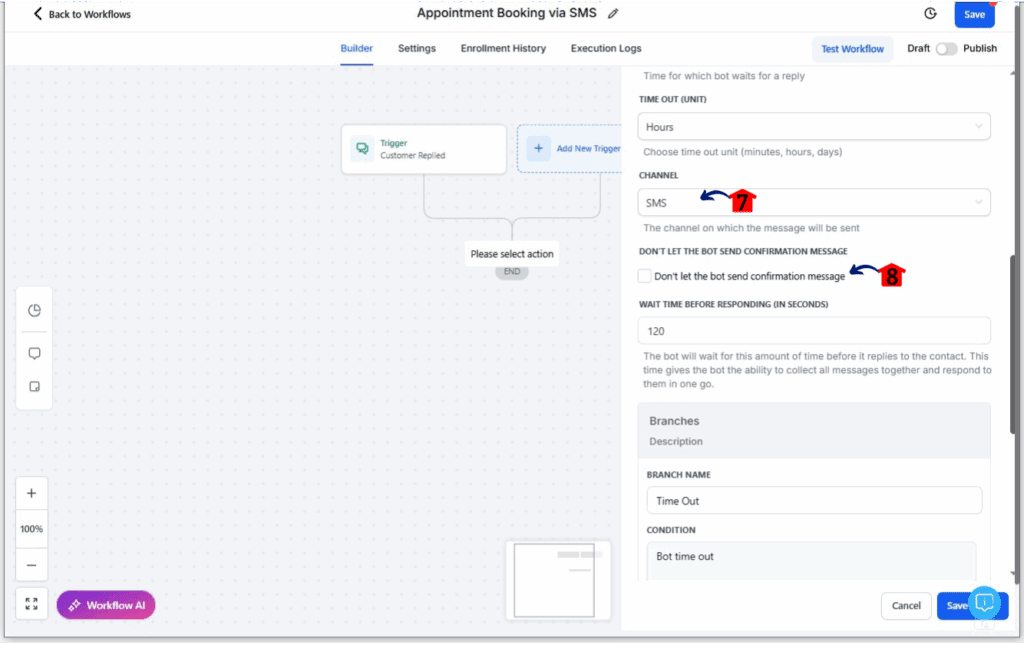
5.7. Select a Channel.
- This should automatically be set to ‘SMS’ since the trigger was based on SMS replies. Ensure it is correct.
5.8. Toggle On or Off the Confirmation Message.
- Enable this option if you want the bot to send a confirmation message to the customer after the appointment is booked.
- Disable it if you prefer to handle confirmations manually.
Step 06 – Review the Default Branches.
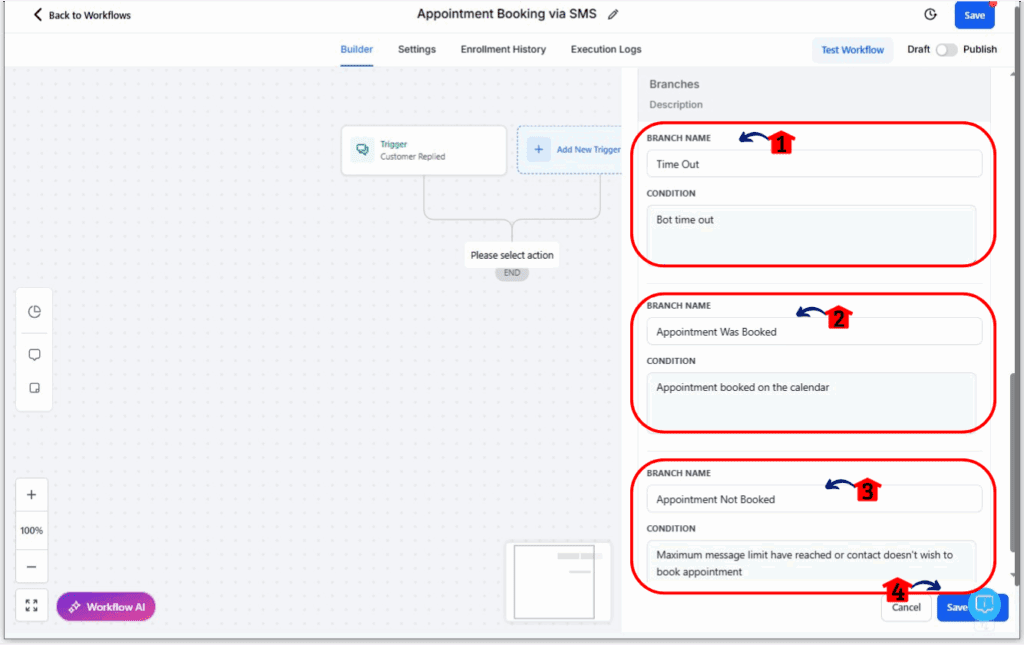
- The ‘Appointment Booking Conversation AI Bot’ action has three default branches.
6.1. Timeout.
- Actions connected to this branch will execute if the conversation times out before an appointment is booked.
6.2. Appointment Was Booked.
- Actions connected to this branch will execute when the bot successfully books an appointment.
6.3. Appointment Not Booked.
- Actions connected to this branch will execute if the bot fails to book an appointment within the message limit.
6.4. Click ‘Save Action’.
Step 07 – Add More Actions and Save the Workflow
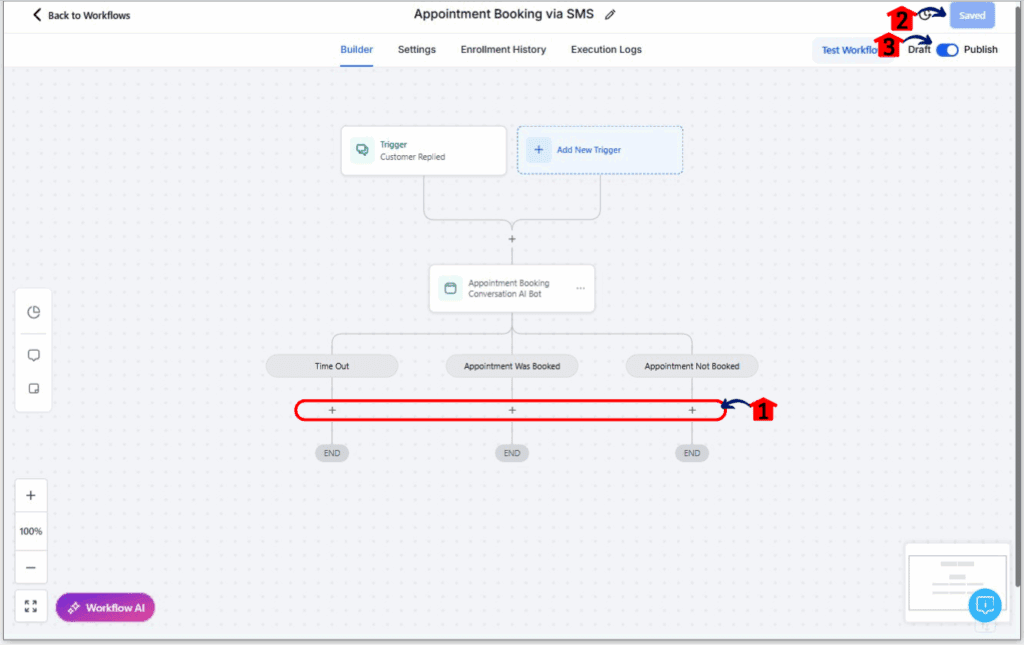
7.1. You can add further actions to each of these branches to automate follow-up processes (e.g., sending a thank you SMS for booked appointments, sending a message asking to reschedule if not booked).
7.2. Click the ‘Save’ button to save the workflow.
7.3. Toggle the ‘Draft’ switch to ‘Published’. Once published, the workflow will be active and will start listening for the trigger you defined.
Real Benefits of AI Appointment Booking
Alright, so you’ve gone through the setup – what’s the real win here? Implementing AI Appointment Booking isn’t just about being fancy with the latest tech; it’s about seeing tangible improvements in your day-to-day operations and, ultimately, your bottom line. Let’s talk about the real-world benefits you can expect.
- Scheduling on Autopilot: Say goodbye to the manual grind of booking appointments.
- Supercharged Efficiency: Faster confirmations mean less wasted time.
- Happy Clients: A smooth, AI-powered booking experience makes you look good.
- More Bookings: Engaging leads quickly and efficiently can seriously boost your booking rates.
Step Up Your Game with AI-Powered Booking
The “Appointment Booking Conversation AI” in GoHighLevel isn’t just a fancy feature; it’s a straight-up opportunity to ditch the scheduling headaches and get more appointments on the books – automatically, thanks to AI Appointment Booking. Follow this guide, get it set up, and watch your efficiency soar. Don’t be the last one to the party – embrace the power of AI Appointment Booking and level up your business today!
Scale Your Business Today.
Streamline your workflow with GoHighLevel’s powerful tools.
