- Easily Connect Stripe and Create One-Time Payment Links for Fast, Secure Checkout
- Quick Summary – Stripe Payment Link Essentials
- What Stripe Integration Does Inside GoHighLevel
- Why One-Time Payment Links Matter
- How to Connect Stripe to Your GHL Account
- Tips to Customize and Share Payment Links
- Common Mistakes to Avoid
- How This Helps Your Business Workflows
- Results You Can Expect
- FAQs – Need Help with Stripe Payment Links? Start Here
- Simple, Fast Payments Made Easy
Easily Connect Stripe and Create One-Time Payment Links for Fast, Secure Checkout
Why Every Agency Needs Stripe Payment Links ?
Getting paid shouldn’t be complicated. With a GHL Stripe payment link in GoHighLevel, you can send a simple link, get paid fast, and skip the invoice back-and-forth.
Stripe works inside GoHighLevel to help you collect payments for services, offers, or one-time products. You don’t need a full store or checkout page. Just a link that your client clicks, pays, and you’re done.
In this guide, we’ll show you how to connect Stripe to your GoHighLevel account and set up a one-time payment link. You’ll have a working payment link by the end, ready to send to any client.This is one of the fastest ways to collect money for simple offers, especially if you’re just getting started.
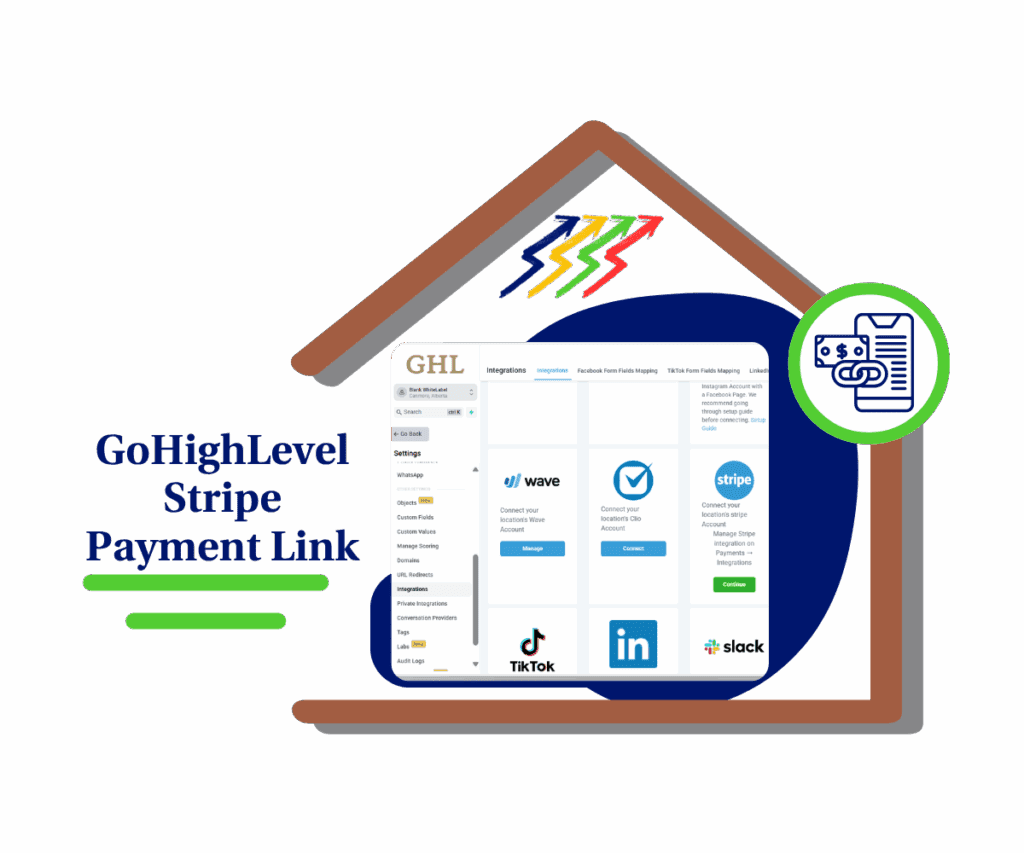
This guide walks you through setting up Stripe and creating a one-time payment link in GoHighLevel. Perfect for fast checkouts, one-time services, and streamlined client billing.
Quick Summary – Stripe Payment Link Essentials
This guide helps you connect Stripe and create a one-time payment link directly in GoHighLevel.
It simplifies how you collect payments from clients for fixed services or one-off offers.
You don’t need a full store, invoice system, or subscription setup just a single link.
Stripe integration takes only a few clicks and works right inside your GHL workflows.
Once live, you can track payments, automate follow-ups, and get notified instantly.
The entire setup takes under 15 minutes, even for beginners.
You’ll reduce friction in the sales process and get paid faster.
It’s a clean way to bring payments, automation, and CRM into one place.
What Stripe Integration Does Inside GoHighLevel
When you connect Stripe to GoHighLevel, you unlock a simple way to collect payments from clients. No extra tools, no outside software, just one connection that handles the money side of your business.
Stripe helps you process credit and debit card payments safely. Inside GoHighLevel, it powers things like payment links, funnel checkouts, invoices, and recurring subscriptions. You can track payments, link them to contacts, and trigger automations based on purchases.
Automate marketing, manage leads, and grow faster with GoHighLevel.
Once it’s set up, you can create a Stripe payment link with just a few clicks. It’s fast, reliable, and designed to work right inside your workflows. You don’t need to log into Stripe every time. Everything stays in one place.
This makes getting paid feel less like chasing and more like checking a box.
Why One-Time Payment Links Matter
Sometimes, you just need to send a simple link and get paid. That’s where a Stripe payment link comes in. It’s great for one-off services, audits, consults, or any offer that doesn’t need a subscription.
These links are easy to use. You create the product, generate the link, and send it by email, SMS, or inside a funnel. Clients click, pay, and you get notified. No logins, no friction.
They also help with speed. You don’t have to wait for someone to open an invoice or log into a portal. Just send the link, and they can pay in seconds on any device.
If you sell fixed-price services or run time-sensitive offers, one-time payment links save time and move money faster.
How to Connect Stripe to Your GHL Account
Before you can create a Stripe payment link, you need to link your Stripe account to GoHighLevel. This gives you access to all the built-in payment tools inside GHL. It only takes a few minutes, and once it’s done, you won’t have to do it again.
Step 01 – Access the Settings Area in GoHighLevel
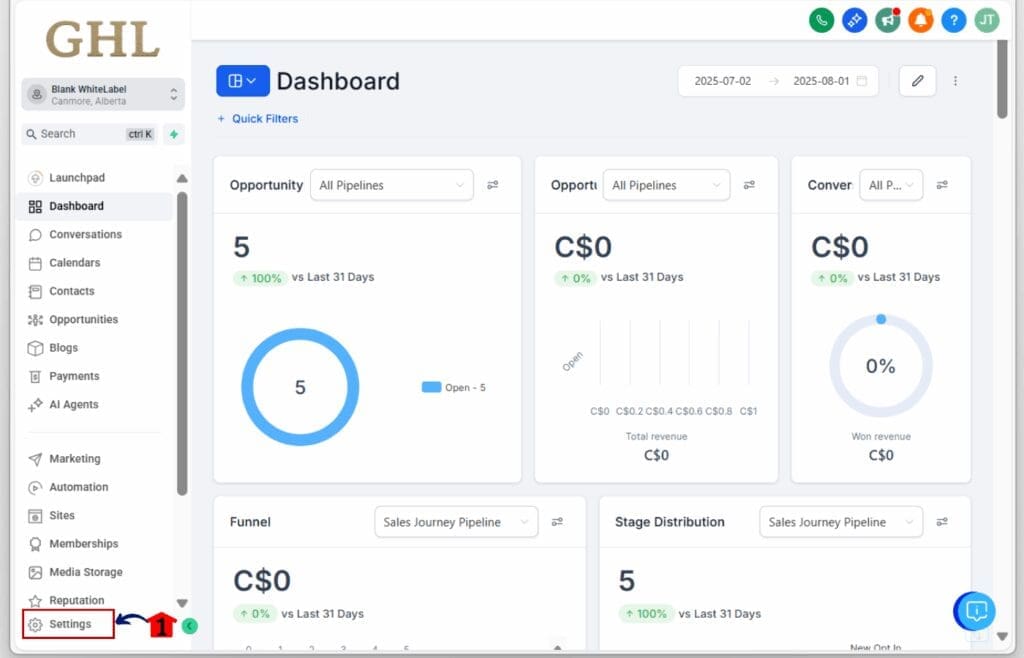
- Go to the left-hand sidebar, look all the way to the bottom.
1.1 Click on the gear icon ⚙️ labeled “Settings.”
- You’ll now be in the main Settings dashboard, where you can access:
- Business Info
- Billing
- My Staff
- Phone Numbers
- Integrations
- and more.
Step 02 – Access Integrations
- On the left menu, look for integrations
2.1 Click on the “Integrations” tab.
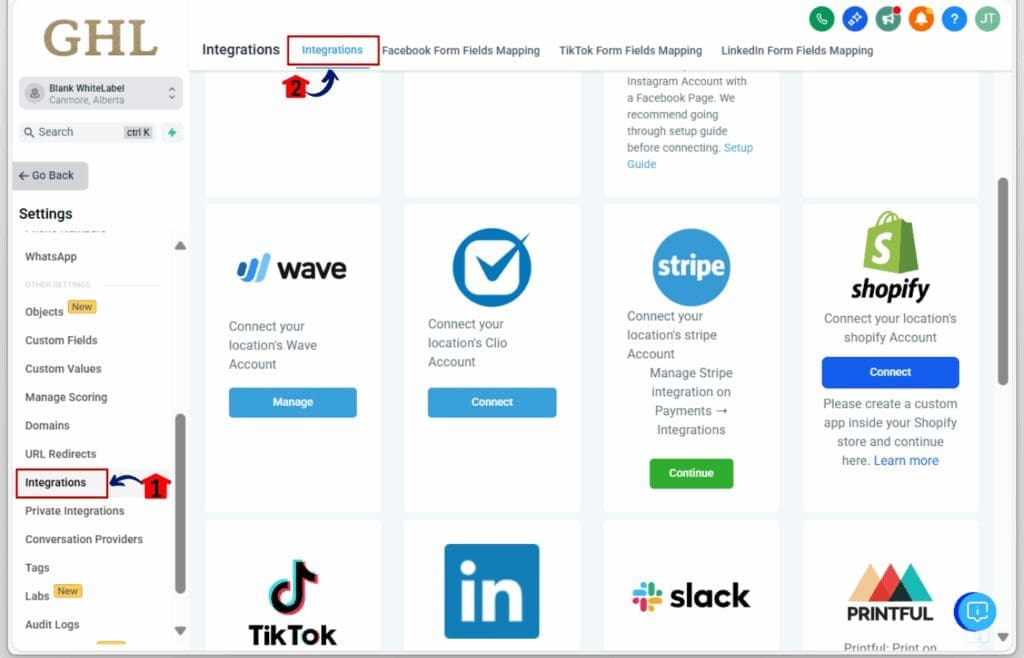
Step 03 – Connect to Stripe
3.1 In the Integrations section, find the Stripe option and click “Continue.”
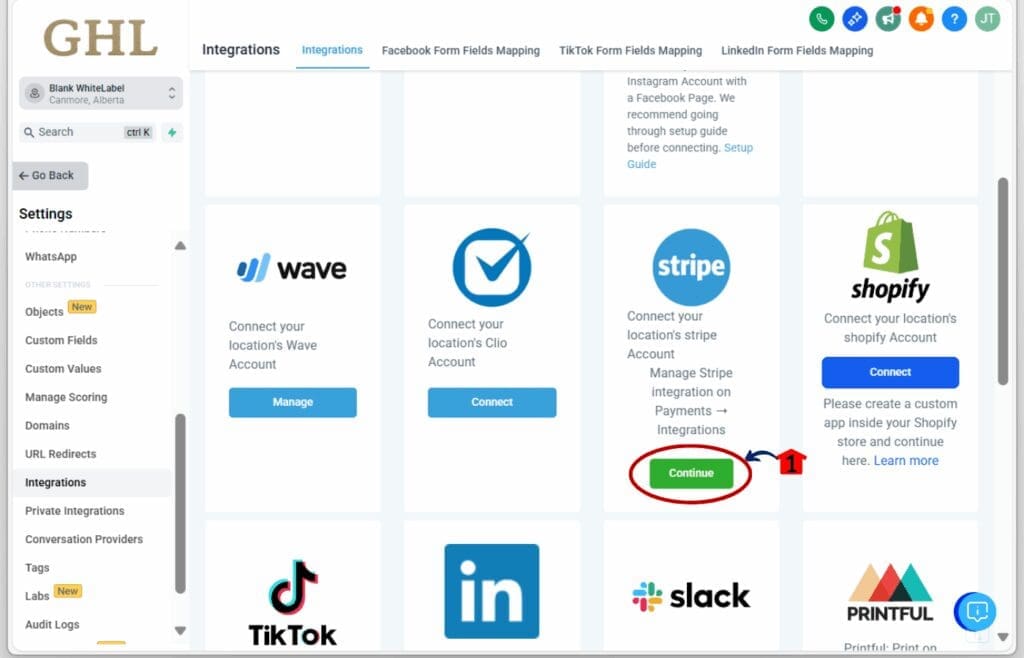
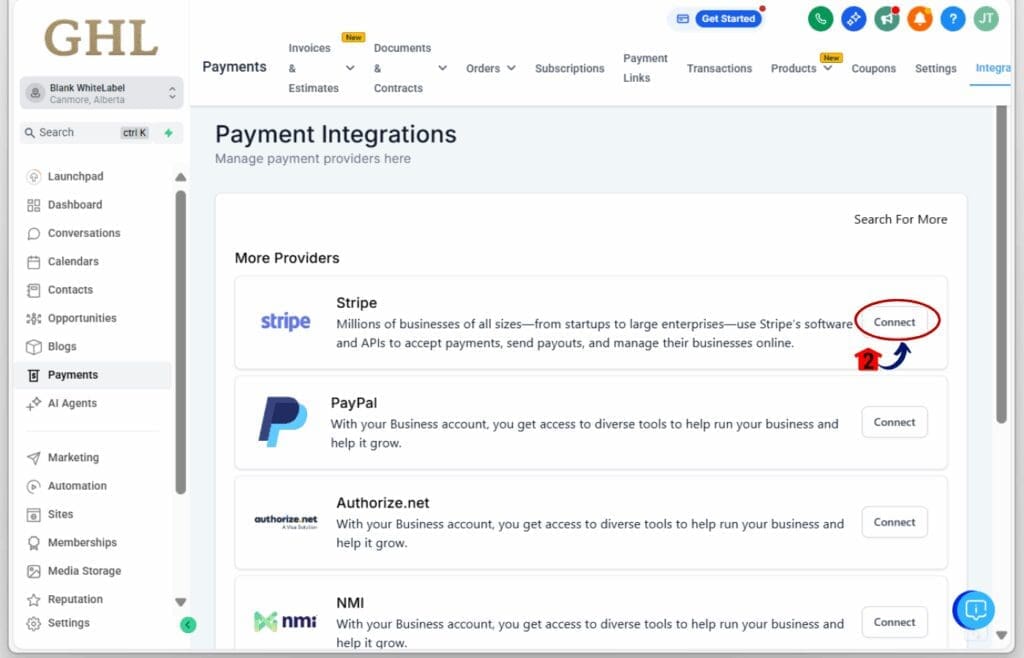
- A new window will open, then find Stripe
3.2 Click Connect
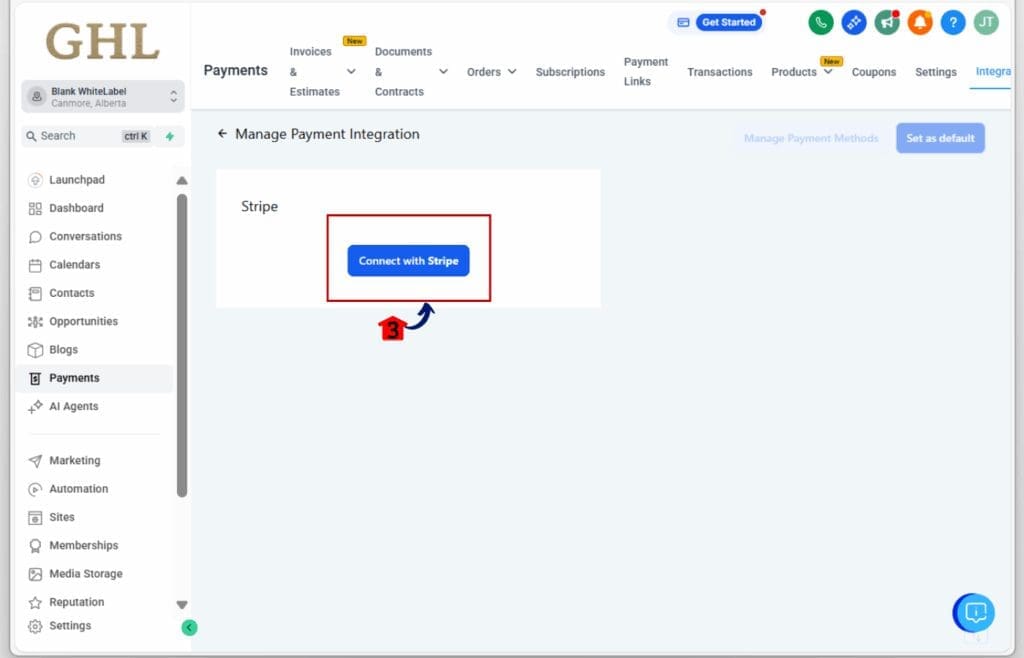
- Another window will open
3.3 Click ‘Connect with Stripe’
3.4 A new window will open where you can sign in to your Stripe account. Use your existing login.
3.5 Follow the prompts to authorize GoHighLevel to connect with Stripe.
3.6 Once connected, you’ll see a confirmation message, and Stripe will appear as “Connected” in your integrations list.
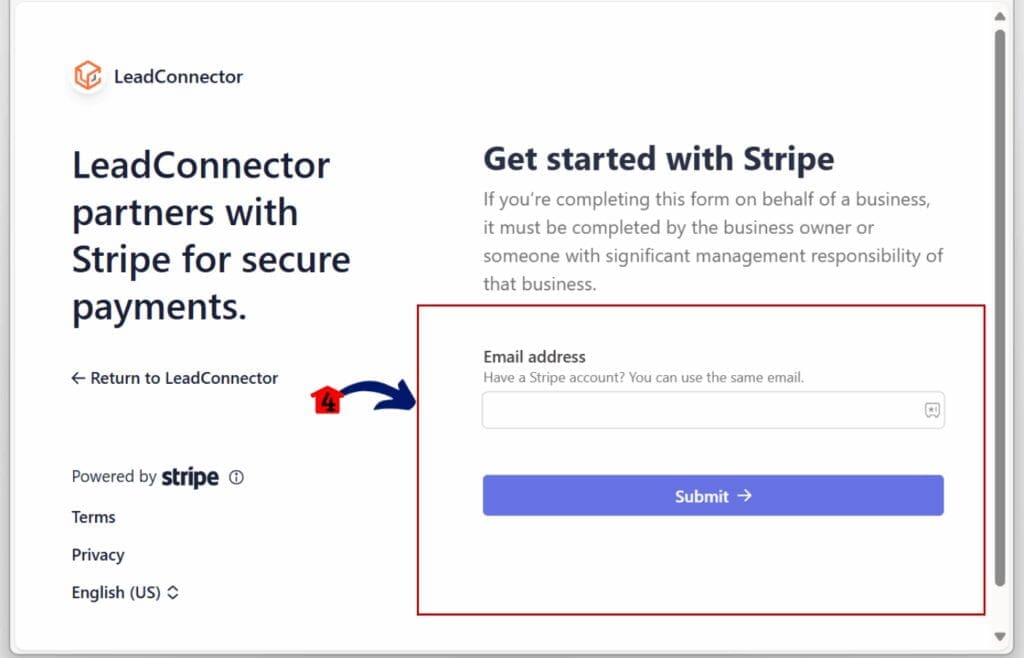
Now you’re ready to create your first Stripe payment link and start collecting payments.
Step-by-Step: Create a One-Time Stripe Payment Link
Once the Stripe is connected, you can build a one-time payment link that lets clients pay you quickly. This is perfect for fixed-price services or single-session offers. The process is simple and only takes a few steps.
Step 01 – Go to Payment
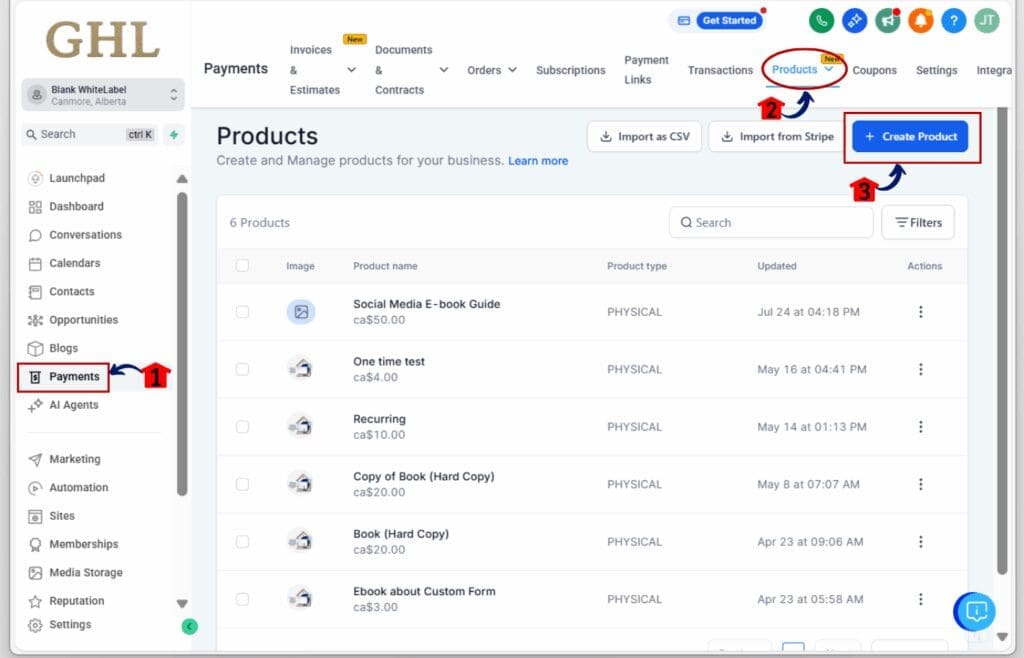
- The Main Menu on the Left side of your screen has all the main areas that you work in when using GHL
1.1 From the main menu, click on “Payments.”
1.2 Select “Products” and then click “+ Create Product.”
1.3 Give your product a clear name, like “Consultation Call” or “One-Time Setup.”
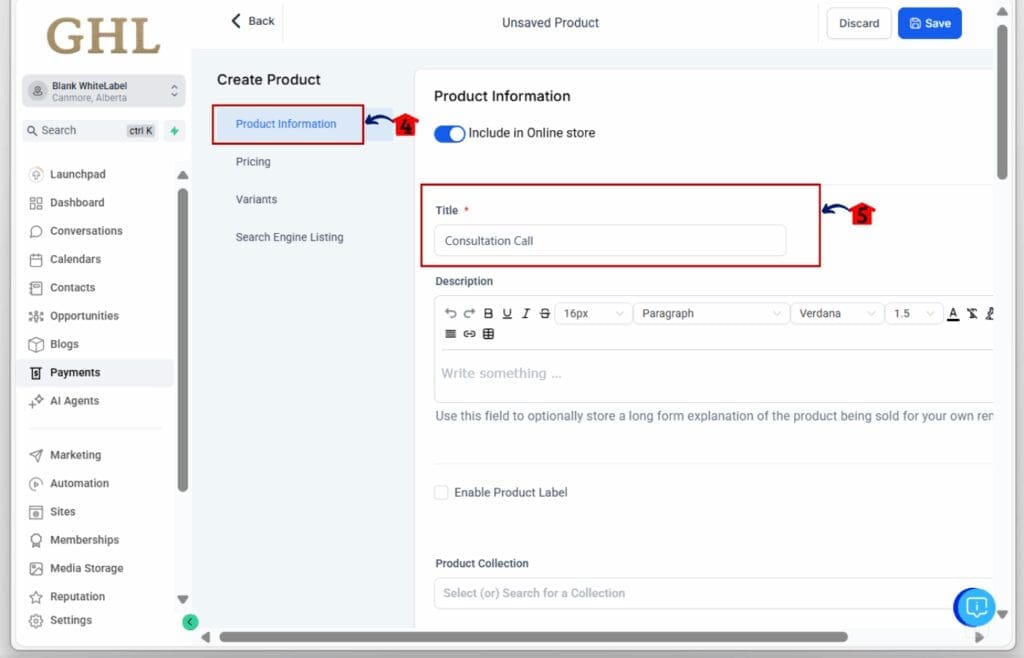
1.4 Set the price and make sure the payment type is set to “One-Time.”
1.5 Save the product.

Step 02 – Show Link Placeholder
2.1 Notice that without Stripe connected, the “Copy Link” button or Link icon is:
- Disabled, or
- Missing completely
2.2 “Once Stripe is connected, a Copy Link icon will appear here to share your one-time payment link.”

Tips to Customize and Share Payment Links
Once you’ve made your Stripe payment link, you can change a few things to make it look and feel more like your business. These small touches help people trust the link and know what they’re paying for.
Start by naming your product in a way that’s clear. Use a short description so your client knows what the payment is for. If you have a logo or brand colors, add those to your thank you page. It makes the whole process feel more professional.
Think about what should happen after someone pays. You can send them to a thank you page, a calendar to book a time, or a simple form to get started. This helps keep things moving smoothly.
When it’s time to share your Stripe payment link, keep it simple. You can send it in a text, email, or as part of an automation. If you’re putting the link in a funnel or on social media, test it on your phone first. Make sure it loads quickly and looks good.
The goal is to make the payment easy. Your client should be able to click the link, see what they’re paying for, and finish the payment without any confusion.
Common Mistakes to Avoid
Creating a Stripe payment link in GoHighLevel is straightforward, but there are a few common mistakes that can slow you down if you’re not paying attention.
First, double-check that your Stripe account is actually connected before you try to create a product or link. If it’s not connected, the system won’t let you move forward. This one’s easy to miss, especially if you’re just getting started.
Next, when you set up the product, make sure the payment type is “One-Time.” If you accidentally choose “Recurring,” your client might get charged more than once.
Watch out for product mix-ups too. If you have several products with similar names, it’s easy to link to the wrong one. Take a minute to confirm you’re picking the right item before you hit save.
Before sending out the Stripe payment link, always test it. Open it in a private browser window to make sure it works and looks right. You want clients to have a smooth payment experience from start to finish.
Also, don’t forget mobile. A lot of people will open your link on their phone. Make sure the link loads fast and any thank you pages or redirects look good on small screens.
These are simple checks, but they can prevent a lot of confusion and help you get paid without delays.
How This Helps Your Business Workflows
Adding Stripe payment links to your GoHighLevel setup gives you a faster, cleaner way to collect payments. It keeps everything under one roof; your contacts, automation, and now payments all live in the same system.
When a client pays through a Stripe payment link, you can track it instantly. The payment shows up under their contact record, and you can trigger automations like confirmation emails, appointment reminders, or onboarding steps.
It also makes your services easier to sell. Instead of building a full checkout funnel or sending a manual invoice, you just create the link once and use it as needed. It’s perfect for limited-time offers, one-on-one services, or add-on products.
For teams and agencies, it saves time. Your team can reuse payment links, plug them into emails or SMS, and know exactly where each payment came from.
It’s a simple change that tightens up your whole client experience from first click to final payment.
Results You Can Expect
Once you start using Stripe payment links in GoHighLevel, you’ll likely see a few immediate wins.
First, clients pay faster. You’re removing steps like downloading an invoice or opening a separate app. They just click, pay, and move on. That means more cash flow and less chasing.
You’ll also notice fewer questions about how to pay. A clean link with a clear title keeps things simple for your clients. And when the process feels easy, people are more likely to follow through.
Over time, it helps you track which offers or services are converting best. You can tie payment links to specific campaigns, funnels, or automations and see what’s working.
You may also reduce admin work. No more checking different platforms to confirm payments. It’s all right there in GHL.
Bottom line: you get paid quicker, work cleaner, and keep everything in one place.
FAQs – Need Help with Stripe Payment Links? Start Here
Simple, Fast Payments Made Easy
Getting paid shouldn’t be the hard part of your business. With Stripe payment links in GoHighLevel, you have a clear, reliable way to accept one-time payments without jumping through hoops.
You’ve now learned how to connect Stripe, create a one-time product, and share a link that just works. Whether you’re charging for a consult, a fixed service, or a digital product, this process keeps it simple.
Try setting up your first Stripe payment link today. Once it’s live, you’ll have one less thing to manage and one more way to grow.
Have you used Stripe payment links in GoHighLevel yet? Let us know what worked best for you.
How to Master Manual Call Actions in Your Workflow
Master Split Testing Funnels to Boost Your Conversions
GHL Email Content Blocks for Faster Sends
Scale Your Business Today.
Streamline your workflow with GoHighLevel’s powerful tools.
