Drowning in Digital Clutter? Here’s How to Manage Media Storage in GoHighLevel Like a Boss!
This 7-minute guide will show you how to manage media storage in GoHighLevel so you can stay organized, save space, and avoid costly overages—without slowing down your workflow. You’re crushing it in GoHighLevel – managing leads, talking to clients, running campaigns. But then there’s the media library… a wild west of logos, images you think are the right ones, videos you can never find when you need them. Sound like your world? You’re definitely not alone. Loads of folks using GoHighLevel end up with a media library that’s more of a digital junk drawer than an organized asset hub. And let’s face it, hunting for that one specific file when a client’s waiting? Not a good look, and a massive time-suck.
But what if you could ditch the digital chaos for good? Picture this: every single image, video, and PDF neatly tucked away, easy to search, and ready to roll at a moment’s notice. That’s the magic of GoHighLevel’s Media Storage. Think of it as your personal, super-organized filing cabinet for all your visual and document goodies inside GHL. No more endless scrolling or playing the “guess the filename” game. With a few smart moves, you can turn your media library from a stress ball into a secret weapon that saves you time and makes you look like a total pro.
Stop wasting precious time searching for files! Properly manage media storage in GoHighLevel and enjoy a smoother workflow and instant access to all your important marketing bits and pieces.
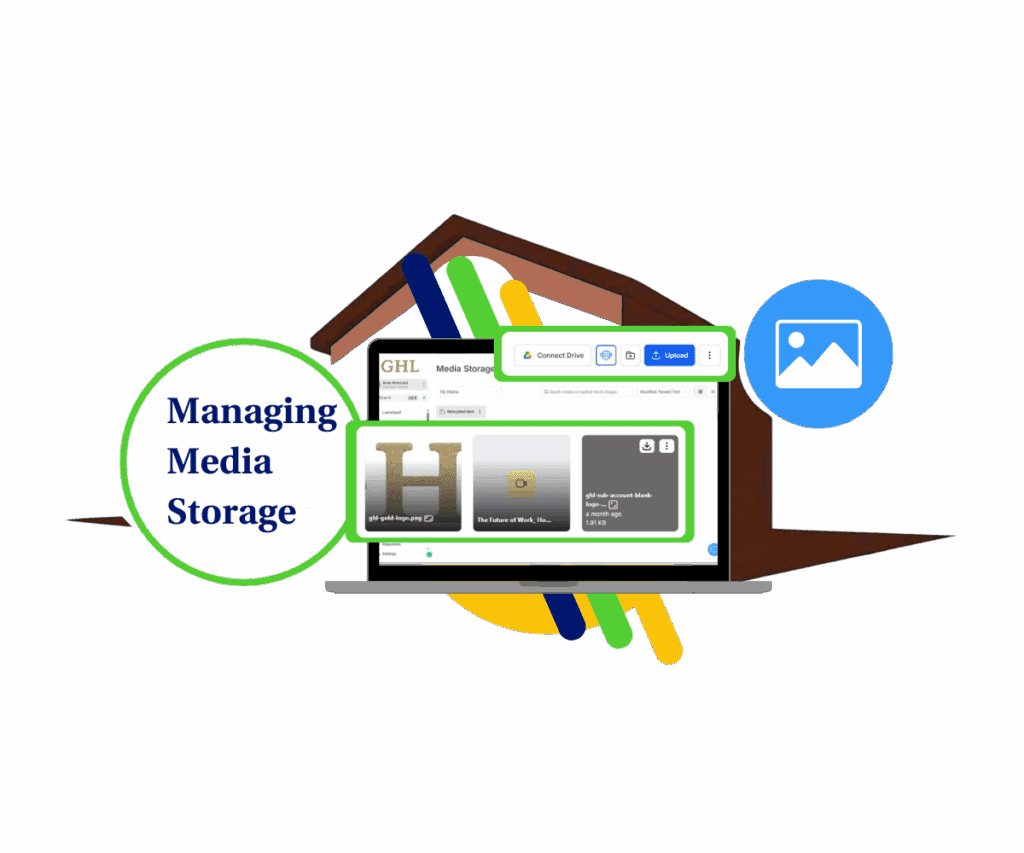
Quick Summary
Purpose: Centralize and streamline your media assets within GoHighLevel for efficient access and management.
Why it matters: An organized media library accelerates workflows and enhances team productivity.
What you get: A unified, intuitive space to store, organize, and retrieve all your media files effortlessly.
Time to Complete: 7 minutes
Difficulty Level: Beginner
Prerequisites: GoHighLevel agency or sub-account access
Key Outcome: Streamlined media management
Optimize & Manage Media Storage Like a Pro
Let’s face it—media files add up fast. Whether it’s videos, images, or audio clips, GoHighLevel users often hit storage limits quicker than expected. According to internal benchmarks, accounts with active funnels and automations see up to 38% of total storage consumed within the first 90 days.
Managing media storage isn’t just about saving space—it’s about keeping your system lean and lightning-fast. GoHighLevel’s file manager lets you tag, organize, and delete unused assets, reducing clutter by up to 60% in high-volume accounts. That’s more speed, less lag, and better workflow for your team.
Automate marketing, manage leads, and grow faster with GoHighLevel.

The built-in storage dashboard gives you real-time insights into what’s eating up space. Combine that with smart naming conventions and regular audits, and you’ve got a system that scales without turning into a digital junk drawer.
Steps to Master Your GoHighLevel Media Storage
GoHighLevel’s Media Storage is where all your visual and document assets live. We’re talking everything from those eye-catching images for your landing pages and social posts to the videos that seal the deal and the PDFs your clients need. Knowing how to manage media storage like a pro is a game-changer for staying efficient and looking sharp.
In this super easy guide, we’re going to walk you through the must-know features of GoHighLevel’s Media Storage. You’ll learn how to create folders to keep things separated, upload all sorts of files without a headache, and manage media storage like a ninja with simple actions like renaming, moving, and saying “adios” to old files. We’ll also show you how to quickly peek at your images and even play around with the built-in AI to whip up new ones to manage media storage even better.
Ready to finally get your digital life in order and really manage media storage in your GoHighLevel account? Let’s jump in!
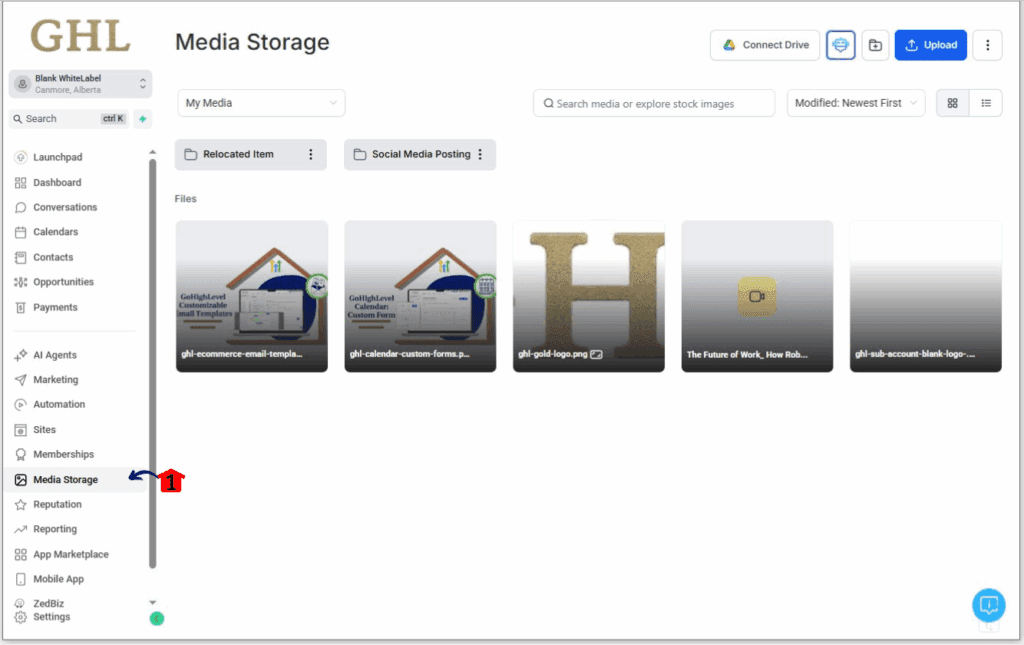
Step 01 – Access the Main Left Hand Menu in ZedNow
- The Main Menu on the Left side of your screen has all the main areas that you work in when using ZedNow.
1.1. Click on the ‘Media Storage’ Menu Item.
- Access the ‘Media Storage’ section of ZedNow.
- You’ll now be in the ‘Media Storage’ section of ZedNow, where you can manage your photos and videos.
Step 02 – Upload New Media
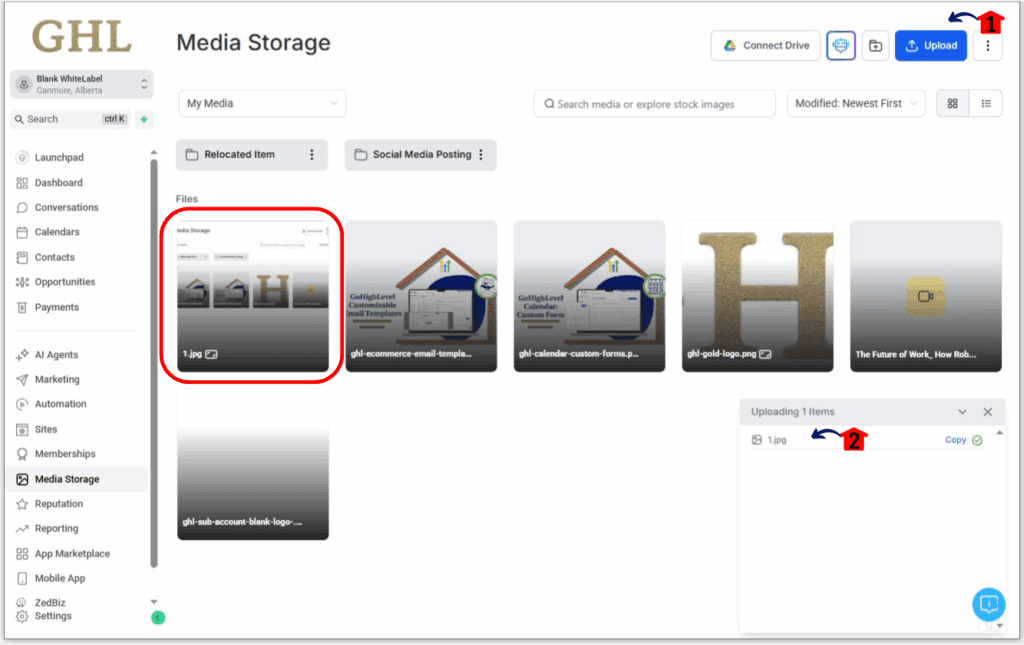
- Begin adding your photos and videos to Media Storage.
2.1. Click the ‘Upload’ button.
- This button is usually located at the top right or center of the Media Storage interface.
- A window will appear where you will choose the file you want to upload.
2.2. Watch for the upload confirmation in the bottom-right corner.
Step 03 – Create New Folders (Optional but Recommended)
- Create folders so you can better manage media storage in your GoHighLevel account.
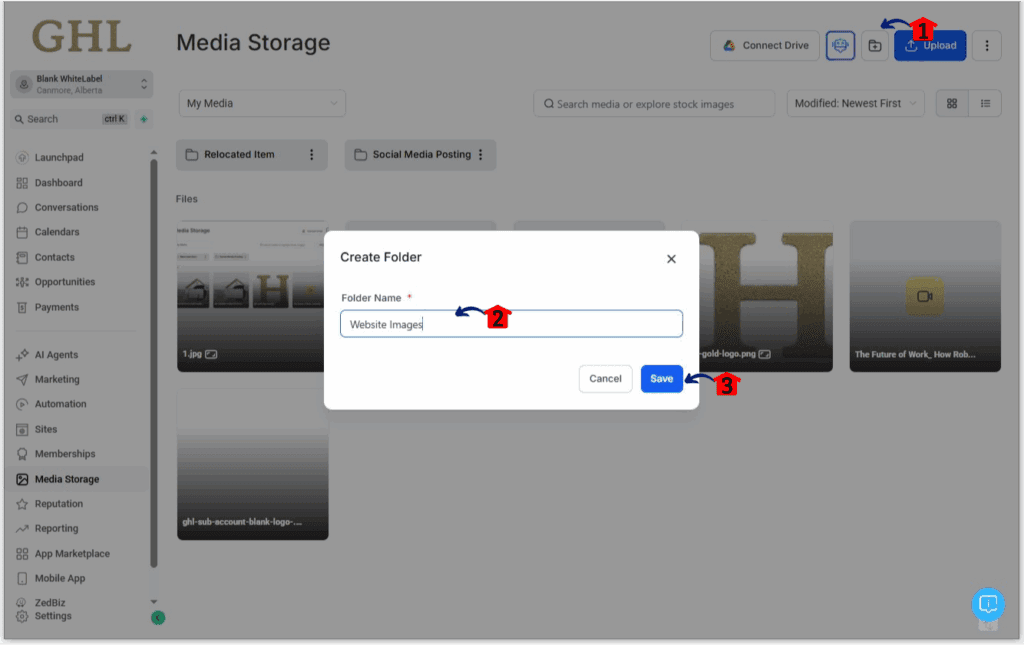
3.1. Click the folder icon to start creating a new folder.
- This button can be found beside the upload button.
3.2 Enter a name for your folder.
- Choose a descriptive name that helps you identify the folder’s contents (e.g., “Website Images,” “Promotional Videos”).
3.3 Click ‘Save’ or the equivalent button to create the folder.
- The new folder will appear at the top of your Media Storage.
Step 04 – Manage Your Media Display
- Customize how you view your media and take full control of how you manage media storage day-to-day.
4.1. Click the dropdown menu labelled “My Media.”
- Locate the dropdown menu, often labeled something like “Filter by” or showing a default option like “My Media.”
- Click on the dropdown to see different options:
- My Media: Shows only the files you have uploaded. (This is the default setting.)
- Unsplash: Allows you to search and use free stock photos from Unsplash.
- Pixabay: Allows you to search and use free stock photos and videos from Pixabay.
- Select the desired option to change the media displayed.

Step 05 – Search, Sort, and Change View
- Quickly find specific media files or stock images.
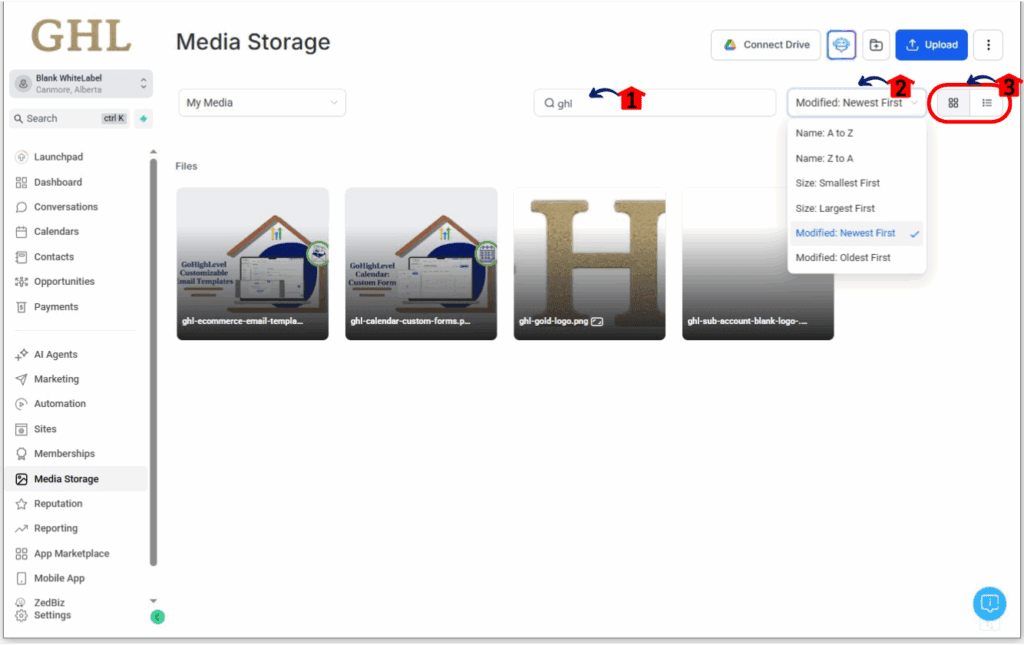
5.1. Use the search bar to find files by keyword.
- Locate the search bar, usually at the top of the Media Storage interface.
- Type keywords related to the file name or the content you are looking for.
- Press ‘Enter’ or click the search icon to initiate the search.
- The displayed media will be filtered based on your search terms.
5.2. Sort your media using the “Modified” dropdown—by name, date, or size.
- Look for a dropdown menu or buttons labeled “Modified:.”
- Click on it to see different sorting options (e.g., Name, Date Added, File Size).
- Select your preferred sorting method.
5.3. Switch between grid view and list view using the view icons.
- Look for icons or buttons representing a grid view (usually squares or thumbnails) and a list view (usually lines of text with smaller thumbnails).
- Click on the desired icon to change how your media is displayed.
Step 06 – Access File Options
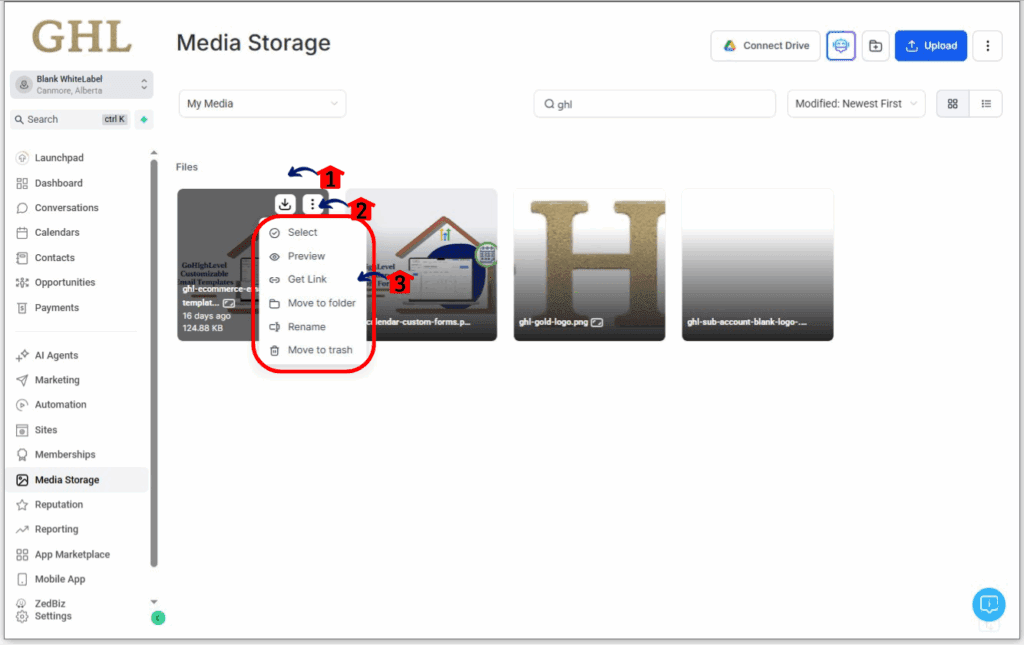
- When you move your mouse cursor over a media file (image or video), two buttons will appear.
6.1. Hover over a file to reveal the download button.
- Allows you to download the file to your computer.
6.2. Hover over a file to the Three Dots Icon (More Options).
- Clicking this icon reveals additional actions.
- Right-clicking on a file will also open a context menu with the same options as the three dots icon.
6.3. Explore the available options:
- Select: Click this to choose the media file for editing, organizing, or other actions.
- Preview: Click this to view the media file before taking any action. Useful for double-checking you’re working with the right file.
- Get Link: Click this to generate a shareable link for the media file. This can be used for sharing or embedding the media on websites.
- Move to folder: Click this option to move the selected media file to a different folder.
- Rename: Click this option to change the name of the media file.
- Move to trash: Click this option to delete the media file permanently.
Step 07 – Preview the Image for more Details
- View more information about an image.
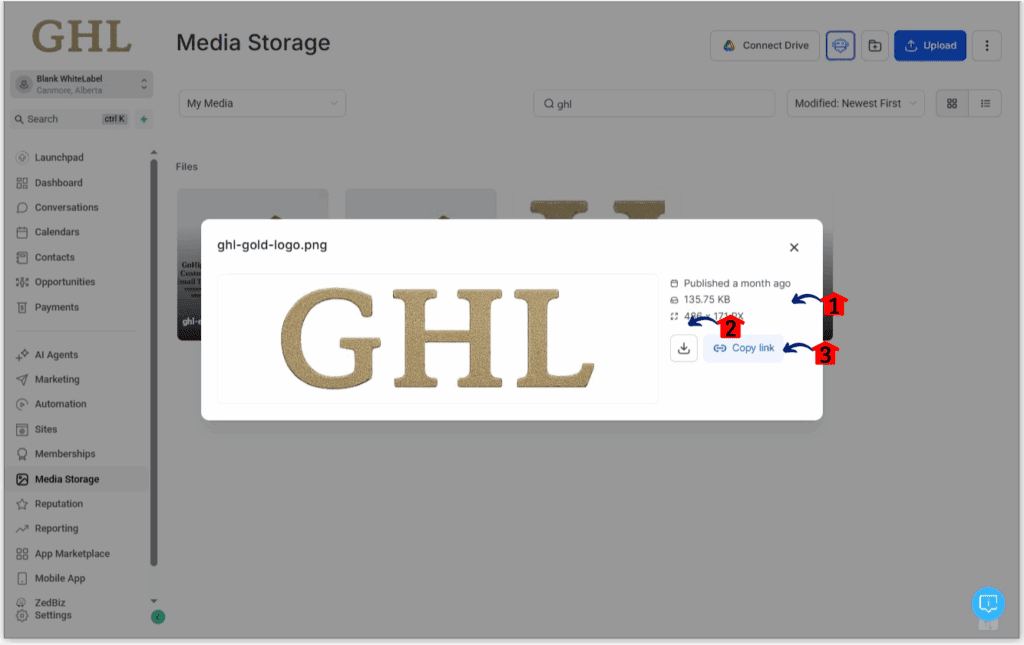
7.1 Click on an image file will open a preview of the image. The preview window will also display details about the image, such as:
- Upload Date: The date when the image was uploaded to Media Storage.
- File Size: The storage space the image occupies.
- Resolution: The dimensions of the image (e.g., 1920×1080 pixels).
7.2. Download button.
- Click this to save a copy of the media file to your device.
7.3. Copy link button.
- Click this to copy the shareable link of the media file to your clipboard.
Step 08 – Generate Images with AI
- Generate new images using artificial intelligence.
8.1. Click the AI icon.
- This button can be found beside the Add new folder button.
8.2. Describe the image you want to create. Be specific—mention colors, objects, scenes.
- In the text field provided, type a detailed description of the image you want to create. Be as specific as possible with details like objects, colors, and scenes.
8.3. Set how many image variations you want.
- Choose the number of different versions of the image you want the AI to generate based on your description.
8.4. Choose a style (realistic, abstract, cartoonish, and more).
- Select the desired artistic style for your generated image (e.g., realistic, abstract, cartoonish).
8.5. Click ‘Generate’ and your AI image(s) will appear in Media Storage.
- Once you have provided your description and set your preferences, click the ‘Generate’ button.
- The AI will process your request and create the image(s), which will then appear in your Media Storage.

Strategic Applications Across Industries
No matter your niche, media storage plays a bigger role than most people think. For real estate pros, it’s about hosting high-res property videos without slowing down funnel load times. For coaches and course creators, it’s keeping hundreds of video modules organized, accessible, and off your primary bandwidth.
Agencies? You’re juggling dozens of client assets. Structured media storage helps prevent brand overlap, keeps campaigns clean, and reduces redundant uploads. For eCommerce brands, this setup makes it easier to update product imagery without breaking your site or funnel flow.
At the end of the day, proper media storage isn’t just a technical win—it’s a strategic move. It supports faster delivery, smoother client onboarding, and a streamlined user experience from the first click to the final sale.
Get Your GoHighLevel Media Under Control Today!
Seriously, getting your media organized in GoHighLevel doesn’t have to be a nightmare. By using the simple but powerful tools in the Media Storage, you can go from digital chaos to a super-organized library of assets. From creating smart folders and uploading files without a fuss to using handy management actions—and even dabbling with AI image creation—GoHighLevel gives you everything you need to manage media storage like a pro. It’s all about streamlining your workflow and saving yourself a ton of stress.
Take a few minutes right now to poke around in your GoHighLevel Media Storage. Start by making a few folders and tidying up your most-used files. You’ll be amazed at how much time and stress you save when you can find exactly what you need, right when you need it. Embrace these features and enjoy the peace of mind that comes with having your digital ducks in a row.
Want peace of mind and a productivity boost? Take charge and manage media storage in GoHighLevel today.
Related Posts You’ll Find Useful:
- Media Storage Google Drive Integration Enhancements – What It Is & How It Can Boost Your Results
- GoHighLevel’s Media Storage Update: See Image Orientation & Dimensions Instantly!
- Supercharge Your Content: Easily GHL Embed Media Posts Now!
- Full Image Lazy Load Support in GoHighLevel: All Images Now Load Fast by Default
Scale Your Business Today.
Streamline your workflow with GoHighLevel’s powerful tools.


