

- You can now hide or show full layouts, and use IS EMPTY or IS PRESENT rules for cleaner emails.
- Quick Summary – Conditional Visibility Essentials
- What’s New in Conditional Visibility
- Why This Matters to You
- How to Use Conditional Visibility in GoHighLevel
- Real-World Use Cases for Conditional Visibility
- Pro Tips for Conditional Visibility in GoHighLevel
- Frequently Asked Questions for Conditional Visibility in GoHighLevel
- Quick Recap for Conditional Visibility
- Conclusion for Conditional Visibility
You can now hide or show full layouts, and use IS EMPTY or IS PRESENT rules for cleaner emails.
Conditional Visibility in GoHighLevel Just Got Smarter
Conditional Visibility in GoHighLevel just got a lot easier to use. If you have ever copied the same visibility rule across a bunch of blocks, you already know the pain.
Here is the quick idea. Conditional Visibility lets GHL hide or show content in the email builder based on a contact field. That is how you avoid awkward blanks, like a greeting with no first name, or a button that should not show yet.
Now you can apply Conditional Visibility to full layouts, not just single elements. You also get IS EMPTY and IS PRESENT, which makes missing data simple to handle. It works with all custom fields, including attachment fields, so your sections can show only when they should.

Conditional Visibility now lets you control full sections with one rule, so your emails stay clean even when contact data is missing. That means fewer manual edits, fewer awkward blanks, and faster template builds in GoHighLevel.
Quick Summary – Conditional Visibility Essentials
Purpose: This guide shows how to use Conditional Visibility in GoHighLevel to hide or show email sections based on contact data so your templates stay clean.
Why It Matters: Conditional Visibility now works on full layouts, so you can stop rebuilding the same rules across multiple elements and avoid messy emails when fields are missing.
What You Get: You get a clear breakdown of what changed, when to use IS EMPTY and IS PRESENT, and practical agency use cases like hiding greetings or showing a “Download Invoice” section only when an attachment is present.
Time To Complete: Most users can update one email template in about 10 to 20 minutes, including a quick preview test.
Difficulty Level: This is beginner-friendly if you can edit emails in GHL, and it becomes very easy once you have done it once.
Key Outcome: You will build more polished emails faster, with fewer mistakes, because sections only show when they should.
What’s New in Conditional Visibility
Conditional Visibility in GoHighLevel just got a real upgrade, and it fixes the most annoying part. You can now set Conditional Visibility on a whole layout, so one rule can control an entire section instead of every single element inside it.
You also get two new conditions that make missing data easy to handle: IS EMPTY and IS PRESENT. Use IS EMPTY to hide things like a greeting when first_name is blank. Use IS PRESENT to show things like a “Download Invoice” button only when an attachment exists.
Automate marketing, manage leads, and grow faster with GoHighLevel.

Last, the field picker now supports all custom fields, including attachment fields. That means Conditional Visibility can control more of your content without weird workarounds. Your old rules still work the same; you just have better options when you need them.
Why This Matters to You
Conditional Visibility is not just a excellent tweak. It saves time and it cuts down mistakes. If you build emails for clients, you know how easy it is to miss one small element and end up with a broken section.
Layout rules are the big win. One Conditional Visibility rule can now control a full section, so you stop repeating the same setup across buttons, text, and images. That makes your templates easier to manage, especially when you clone emails or standardize a layout across multiple accounts.
The new IS EMPTY and IS PRESENT options also solve a common problem: missing data. You can hide a greeting when first_name is blank, or show a button only when an attachment exists. The result is cleaner emails that look intentional, even when the contact record is not perfect.
How to Use Conditional Visibility in GoHighLevel
This How To section will walk you through using Conditional Visibility in GoHighLevel the right way, so your emails stay clean, your sections only show when they should, and you do not waste time rebuilding the same rules every time.
Here are the steps to set up Conditional Visibility in GoHighLevel.
- Open Email Marketing Campaigns in GHL.
- Open the email you want to edit.
- Select the section you want to control.
- Open the Visibility tab for the section.
- Turn on Conditional sending.
- Select and Save the field you want to evaluate.
To start make sure you are logged in to your GoHighLevel sub-account.
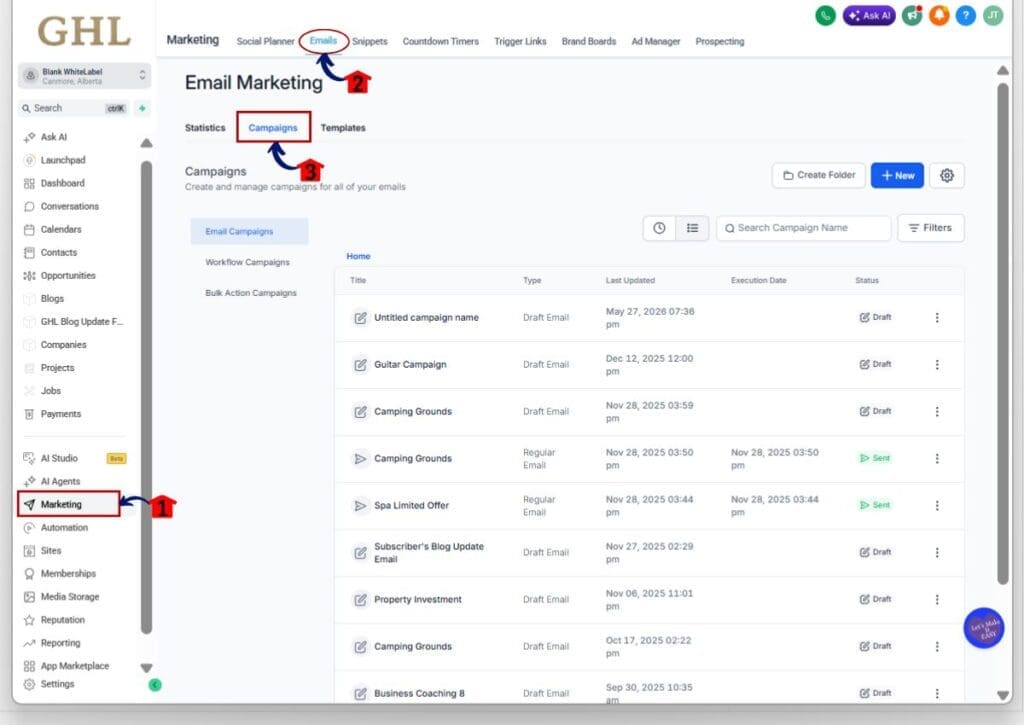
Step 01 – Open Email Marketing Campaigns in GHL
- The main menu on the left side of your screen has all the key areas you work in when using GHL.
1.1 Click Marketing in the left-hand menu.
1.2 At the top, click Emails.
1.3 Click the Campaigns tab to view your email campaigns.
Step 02 – Open the email you want to edit
- This is where you choose the draft or campaign email you want to apply Conditional Visibility to.
2.1 Find the campaign you want to update.
2.2 Click the campaign name to open it.
2.3 Open the draft email so it loads in the email builder.

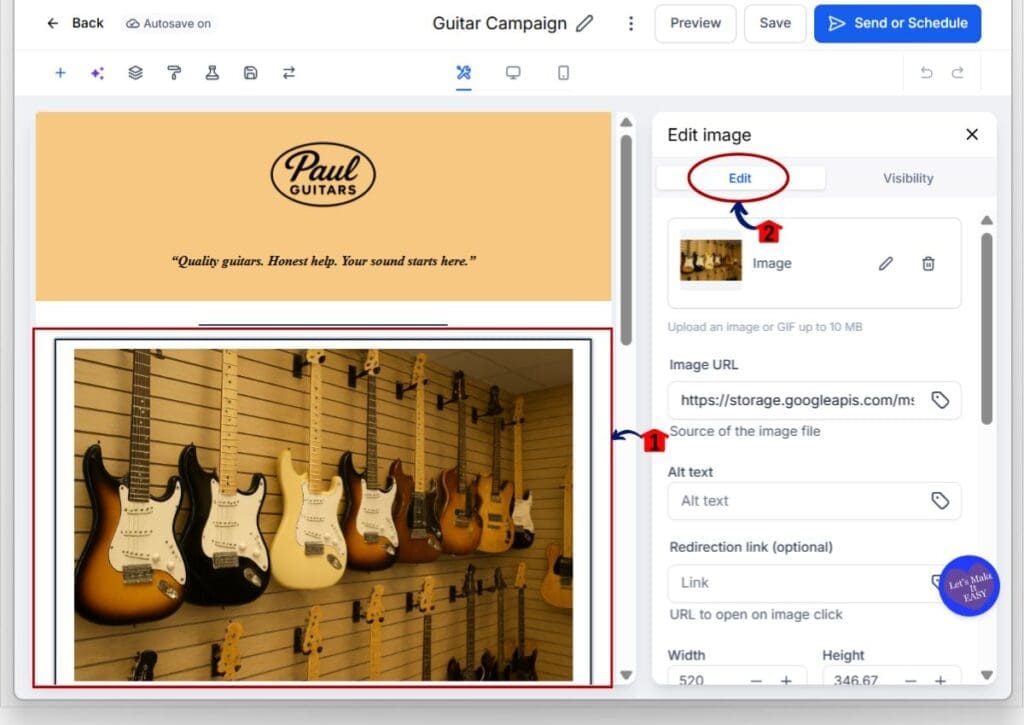
Step 03 – Select the section you want to control
- This decides what your Conditional Visibility rule affects.
3.1 Click the section or layout on the email canvas.
3.2 Confirm the right-side panel shows the Edit section.
- This confirms you are editing a section, not a single text line.
Step 04 – Open the Visibility tab for the section
- This is where Conditional Visibility lives for the selected section.
4.1 In the right-side panel, click the Visibility tab next to Edit.
4.2 Scroll until you see Conditional sending.
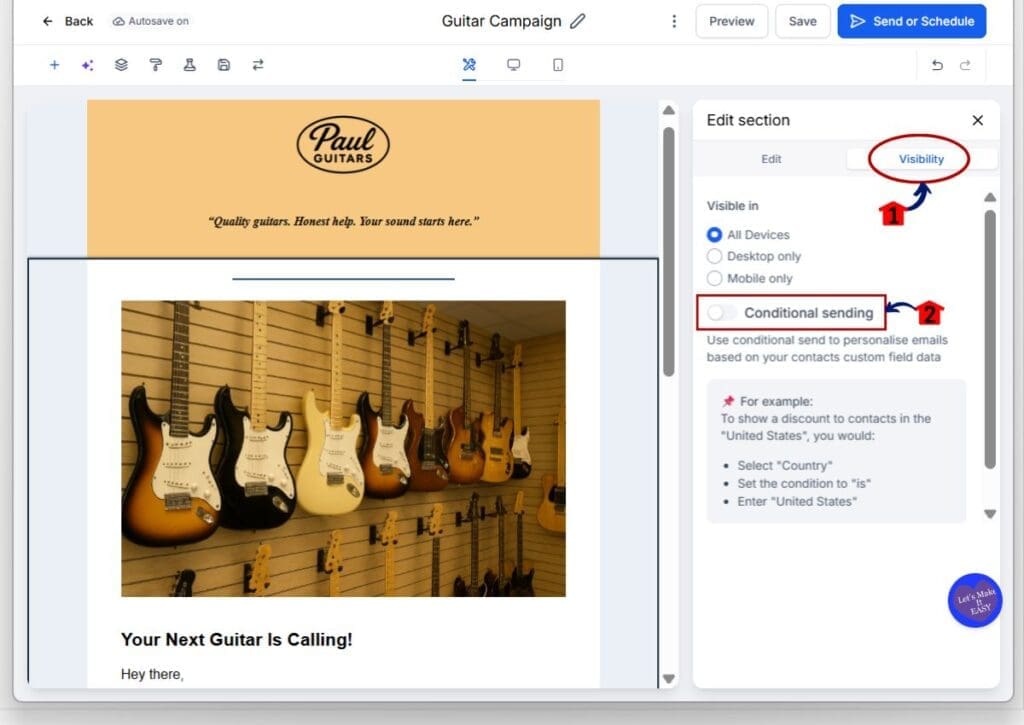
Step 05 – Turn on Conditional sending
- You need this enabled before you can set the rules.
5.1 Toggle Conditional sending to On.
5.2 Confirm the conditions area becomes active so you can select a field and a rule.
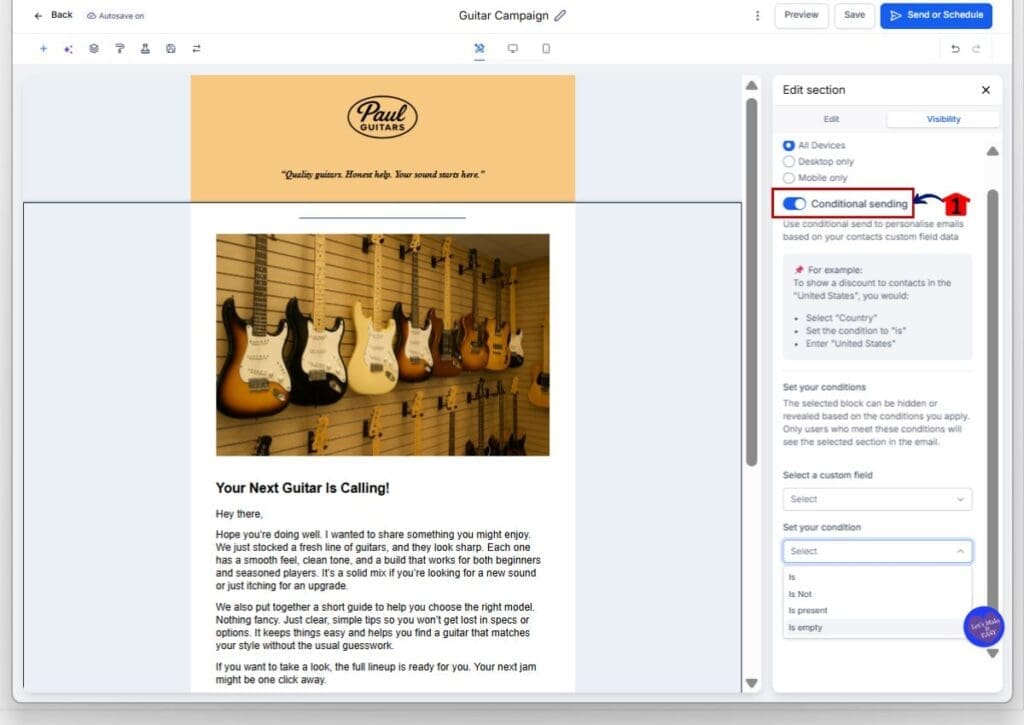
Step 06 – Select and Save the field you want to evaluate
- The field is what GoHighLevel checks before it shows or hides the section.
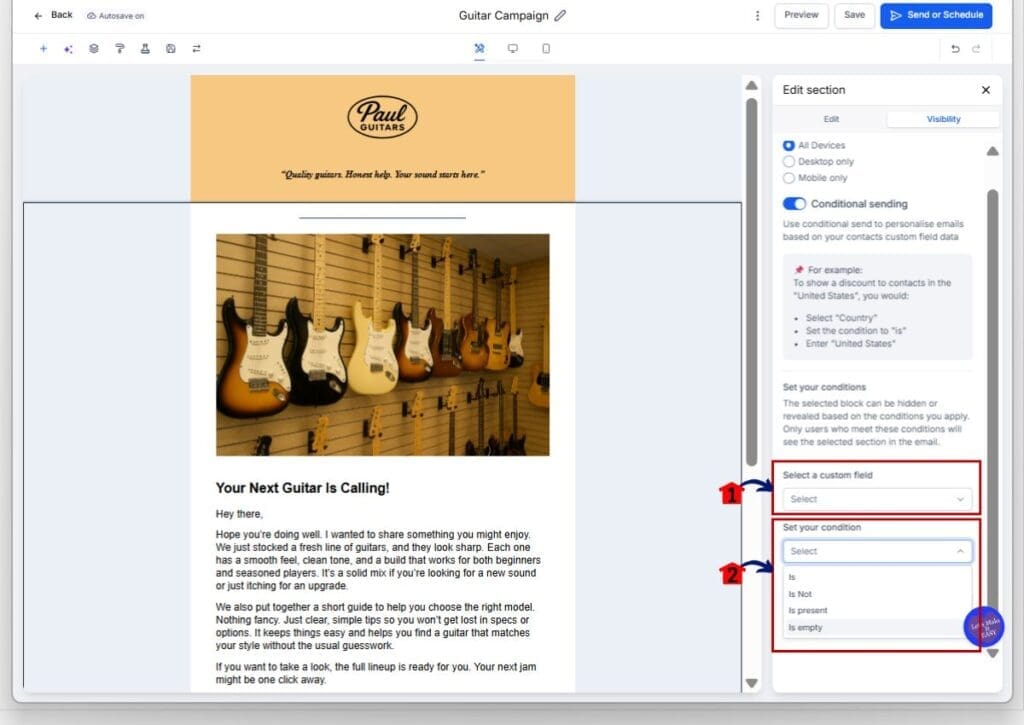
6.1 Click Select a custom field.
6.2 Choose the field you want to use.
Examples:
- first_name if you want to hide a greeting when the name is missing
- an attachment field if you want to show a “Download Invoice” button only when a file exists
6.3 Click Set your condition.
6.4 Choose the option you need.
- Is: Use when you want an exact match to a value
- Is Not: Use when you want to exclude a value
- Is present: Use when the field has any value
- Is empty: Use when the field has no value
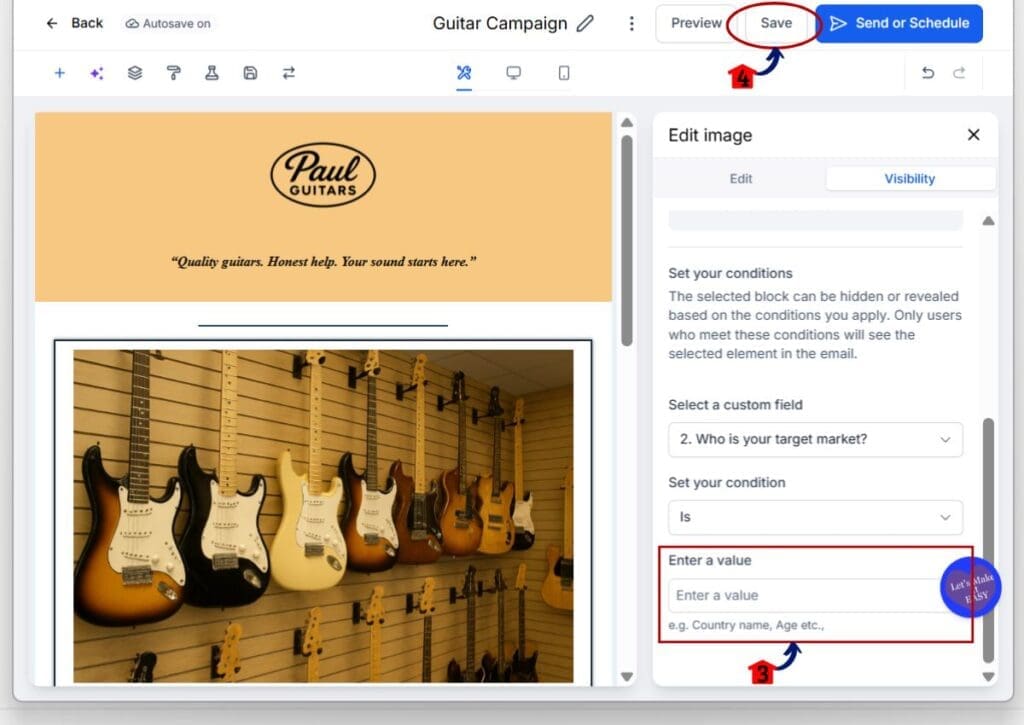
6.5 If you chose Is or Is Not, enter the value required.
6.6 Click Save button.
Real-World Use Cases for Conditional Visibility
Conditional Visibility is one of those agency features that saves you time without making a big fuss. You build one solid email, then GoHighLevel only shows the parts that make sense for that contact. No more “half-right” emails that look sloppy when data is missing.
Use Conditional Visibility for the stuff that usually breaks templates. Show a “Download Invoice” button only when an attachment is present. Hide a greeting when first_name is empty. Or keep an entire “Next Steps” section hidden until a custom field says the client is ready.
The smart move is to put each idea into its own layout, then control the whole block with one rule. That keeps your emails clean, keeps edits simple, and makes your templates easier to reuse across clients.
Pro Tips for Conditional Visibility in GoHighLevel
Conditional Visibility works best when you keep it simple. Think of it as a cleanup tool that protects your emails from messy data. If your contact fields are not perfect, and they rarely are, this is how you keep the email looking professional.
Use layout rules whenever a whole section should hide together. Put the headline, text, and button inside one layout, then apply Conditional Visibility once. If you set rules on ten separate elements, you will eventually miss one, and the email will look broken.
When the issue is missing data, use IS EMPTY and IS PRESENT. Do not try to force it with IS and a blank value. Then test fast with two contacts, one with the field filled in and one without it. If it works in both previews, you are good to go.
Frequently Asked Questions for Conditional Visibility in GoHighLevel
Quick Recap for Conditional Visibility
Conditional Visibility in GoHighLevel is now easier to manage because you can control a full layout with one rule. That means you can hide or show an entire section without repeating the same setup on every button, line, and image.
The new IS EMPTY and IS PRESENT options fix the most common problem in email personalization: missing data. If first_name is blank, you can hide the greeting. If an attachment exists, you can show the “Download Invoice” section. The email stays clean either way.
If you do one thing after reading this, update one template you use all the time. Put a multi-part block into a layout, then apply Conditional Visibility at the layout level. You will save time, and your emails will look more polished in GHL.
Conclusion for Conditional Visibility
Conditional Visibility in GoHighLevel is finally easier to manage in real templates. Layout rules mean you can control a full section with one setting instead of chasing the same rule across a dozen small elements.
The new IS EMPTY and IS PRESENT options are the quiet heroes here. They help you handle missing contact data without ugly emails, broken spacing, or weird “Hi ,” moments. That alone makes your emails feel more polished in GHL.
If you want a quick win, take one email you use all the time and upgrade one section. Wrap it in a layout, add Conditional Visibility, and test it with one contact that has data and one that does not. Do that once, and you will not want to go back.
Scale Your Business Today.
Streamline your workflow with GoHighLevel’s powerful tools.


