

- Introduction – GHL Calendar Buffer Time
- Quick Summary – Calendar Buffer Time
- Here are this week's HighLevel Updates 🚀
- Why Calendar Buffer Time Matters
- What's New in the Update?
- How to Enable Calendar Buffer Time
- Pro Tips for Getting the Most from Calendar Buffer Time
- What This Means for Your Business
- FAQs – Calendar Buffer Time
- Conclusion – Calendar Buffer Time
Introduction – GHL Calendar Buffer Time
Calendar Buffer Time might seem like a small visual update. Until you’re managing a packed schedule filled with client meetings, sales calls, consultations, and team appointments.
You’ve probably experienced it before. You finish one appointment. There’s a gap before the next one. Is it free time? Is someone else booked? Or is it simply a buffer that GoHighLevel added behind the scenes? Without seeing those buffer periods, it wasn’t always easy to know.
The buffer times weren’t the problem. Appointment scheduling wasn’t the problem. The issue was that Calendar Buffer Time remained hidden from view.
For busy agencies, service businesses, and appointment-based teams, this often meant second-guessing your availability, manually checking booking settings, or accidentally assuming a time slot was available when it was actually reserved as a transition period.
Before this update, GoHighLevel automatically applied pre-buffer and post-buffer times around appointments, but those buffers were invisible in the calendar. Users could only see the appointment itself, making it difficult to understand where preparation time ended and genuine availability began.
That’s now changed.
GHL Calendar Buffer Time is now displayed directly in both the Day and Week calendar views. With a simple Show Buffer Time toggle, pre-buffer and post-buffer periods appear as clear informational blocks that are visually separate from appointments. The feature also works across Staff, Service, and Category calendar filters without changing how appointments are booked.
The biggest win isn’t simply making Calendar Buffer Time visible. It’s giving you a clearer picture of your day, making appointment spacing easier to understand, and helping you plan with confidence without changing your existing scheduling workflow.
Better visibility. Better planning. Better Calendar Buffer Time.
The latest GoHighLevel Changelog includes several other GHL feature updates that round out your daily workflow:
- Wait Action Enhancement: TikTok DM Replies
- India Recurring Mandate Support for Affiliate Indian Signup Pages
- Housecall Pro – More Workflow Actions & Triggers
- Email Services Dashboard for Agencies
- Email Sequences Now Available in Beta Labs
- Group Your Contacts by Source in Dashboards & Reporting
- MMLite Adoption Banner in Conversations
Keep reading for much more on all these updates and a deep dive into the Calendar Buffer Time feature!

Quick Summary – Calendar Buffer Time
Purpose
Learn how the new GHL Calendar Buffer Time update makes pre-buffer and post-buffer periods visible in your calendar, helping you better understand your daily schedule.
Why It Matters
Hidden buffer times often caused confusion when reviewing appointment availability. This update removes the guesswork by displaying protected time directly in your Day and Week calendar views.
What You Get
You’ll gain a clearer view of your schedule, improved appointment planning, easier team coordination, and better visibility of transition time without changing your existing booking rules.
Time to Complete
Less than 1 minute. Simply enable the Show Buffer Time toggle and start using the feature immediately.
Difficulty Level
Beginner. No technical knowledge or additional setup is required if your calendar already uses buffer times.
Key Outcome
You’ll spend less time interpreting your calendar and more time confidently managing appointments with a cleaner, easier-to-read schedule.
Here are this week’s HighLevel Updates 🚀
Wait Action Enhancement: TikTok DM Replies
What’s New:
Instead of continuing after a fixed delay, your workflow can pause until someone replies to your TikTok DM.
Where in GHL:
Found in Automation → Workflows using the Wait action after sending a TikTok DM.
Automate marketing, manage leads, and grow faster with GoHighLevel.

Impact:
Your automation responds when someone actually joins the conversation, rather than after a timer runs out.
Recommended For:
Anyone using TikTok DMs to start conversations with potential customers.
India Recurring Mandate Support for Affiliate Indian Signup Pages
What’s New:
Supports recurring payment mandates for Indian affiliates, helping subscriptions comply with local banking requirements.
Where in GHL:
Available on Affiliate Program signup pages for users in India.
Impact:
Creates a smoother signup experience while reducing payment failures for recurring subscriptions.
Recommended For:
Agencies, SaaS businesses, and affiliate programs onboarding customers in India.
Housecall Pro – More Workflow Actions & Triggers
What’s New:
Adds new workflow triggers and actions for the Housecall Pro integration, giving you more ways to automate field service processes.
Where in GHL:
Inside Automation → Workflows when using the Housecall Pro integration.
Impact:
Expands automation possibilities between HighLevel and Housecall Pro, reducing manual work and improving operational efficiency.
Recommended For:
Home service businesses, field service companies, and agencies managing Housecall Pro clients.
Email Services Dashboard for Agencies
What’s New:
Introduces a centralized dashboard where agencies can monitor email services across their accounts.
Where in GHL:
Found in the Agency View under the new Email Services Dashboard.
Impact:
Makes it easier to monitor email health, identify issues, and manage deliverability from one place.
Recommended For:
Agency owners, support teams, and admins managing multiple client email services.
Email Sequences Now Available in Beta Labs
What’s New:
Introduces Email Sequences as a Beta Labs feature, providing another way to create structured email follow-up campaigns.
Where in GHL:
Enable it from Settings → Labs, then access Email Sequences after activation.
Impact:
Cuts down the time spent checking different areas just to see how your email services are performing.
Recommended For:
Marketers, agencies, coaches, and businesses running nurture campaigns or onboarding emails.
Group Your Contacts by Source in Dashboards & Reporting
What’s New:
Lets you organize contact reports based on where your leads originated.
Where in GHL:
Available within Dashboards & Reporting when viewing contact analytics.
Impact:
Makes it easier to compare lead sources and identify which marketing channels are producing the best results.
Recommended For:
Marketing teams, agency owners, and businesses tracking campaign performance across multiple lead sources.
MMLite Adoption Banner in Conversations
What’s New:
Displays a helpful banner inside Conversations to encourage users to adopt the new MMLite messaging experience.
Where in GHL:
Appears within the Conversations module for eligible accounts.
Impact:
Helps users discover and transition to MMLite while highlighting its benefits directly inside the messaging interface.
Recommended For:
Current HighLevel users exploring the latest messaging experience and teams preparing to migrate to MMLite.
Why Calendar Buffer Time Matters
Small change? Absolutely. Helpful? More than you’d expect once you start using it.
Buffer time isn’t new. Chances are you’ve been using it already without giving it much thought. The difference now is that you can actually see those reserved periods instead of guessing whether a gap in your calendar is available.
That often created unnecessary confusion.
Ever thought you had a free slot, only to realise it was actually reserved as buffer time? That’s because those protected periods weren’t visible. You had to rely on memory or dig through your calendar settings.
Now you can tell straight away.
Visible buffer periods give you an instant understanding of your schedule. Instead of seeing disconnected appointments with mysterious gaps, you can clearly see where your protected transition time begins and ends.
For agency owners managing multiple calendars, this makes scheduling far more efficient. You can quickly review a team member’s availability without wondering whether empty spaces are actually free.
Anyone booking appointments on your behalf gets a clearer picture of your schedule. That makes it much easier to avoid filling time you’ve intentionally kept free.
For appointment-based businesses, those small gaps between bookings suddenly make a lot more sense. Staff can tell what’s actually free and what’s already been set aside, without having to ask or check the calendar settings.
The best part is that nothing about your booking rules changes. Clients still book appointments exactly as they did before. Your existing pre-buffer and post-buffer settings continue working in the background. The only difference is that you can finally see them.
Sometimes the best productivity improvements aren’t new features at all. They’re simply making existing features easier to understand. That’s exactly what GHL Calendar Buffer Time delivers.
What’s New in the Update?
This update doesn’t change how Calendar Buffer Time works. It changes how you see it.
Previously, GoHighLevel applied pre-buffer and post-buffer times automatically based on your calendar settings. These protected time blocks prevented appointments from being booked too close together, but they remained completely hidden from your calendar view.
Now, those hidden buffers are visible.
After enabling Show Buffer Time, your calendar starts showing the time before and after appointments as separate blocks. That makes it much harder to mistake buffer time for an open slot.
No matter which calendar view you use, buffer time is now easy to spot. Your appointments stay exactly the same—there’s just more information on the screen.
Another welcome improvement is that buffer visibility works across all of your existing calendar filters. Whether you’re viewing an individual staff member’s schedule, filtering by a specific service, or switching between calendar groups, the buffer blocks remain visible and easy to understand.
Perhaps the biggest advantage is what hasn’t changed.
Your appointment availability, booking rules, automation, and customer experience all stay exactly the same. Clients won’t see anything different when booking appointments, and your existing buffer settings continue protecting your schedule behind the scenes.
This update is purely a visual enhancement designed to help you understand your calendar faster.
Before This Update
- Buffer times existed but weren’t visible.
- Empty spaces between appointments could be confusing.
- Users often had to check calendar settings to understand availability.
- It was difficult to distinguish between free time and protected buffer periods.
After This Update
- Pre-buffer and post-buffer times appear directly in the calendar.
- Buffer periods are clearly separated from appointments.
- The Show Buffer Time toggle lets you display or hide buffers instantly.
- Works seamlessly in Day and Week views.
- Supports Staff, Service, and Category calendar filters.
- Makes planning your day quicker without affecting appointment scheduling.
It’s a simple change on the surface, but one that removes uncertainty every time you open your calendar.
How to Enable Calendar Buffer Time
Getting started with the new Calendar Buffer Time view only takes a few seconds. If your calendar already uses pre-buffer or post-buffer settings, you don’t need to change how appointments are booked or update any calendar configuration.
Instead, you’ll simply enable the new display option to show those existing buffer periods directly on your calendar. Once enabled, you’ll immediately see where your protected transition time sits before and after each appointment, making it much easier to understand your daily schedule.
- Access the Calendars Area in GHL.
- Select Your Calendar View.
- Turn On Show Buffer Time.
- Review Your Buffer Periods.
- Test Calendar Filters.
To start, make sure you are logged in ot your GoHighLevel sub-account.
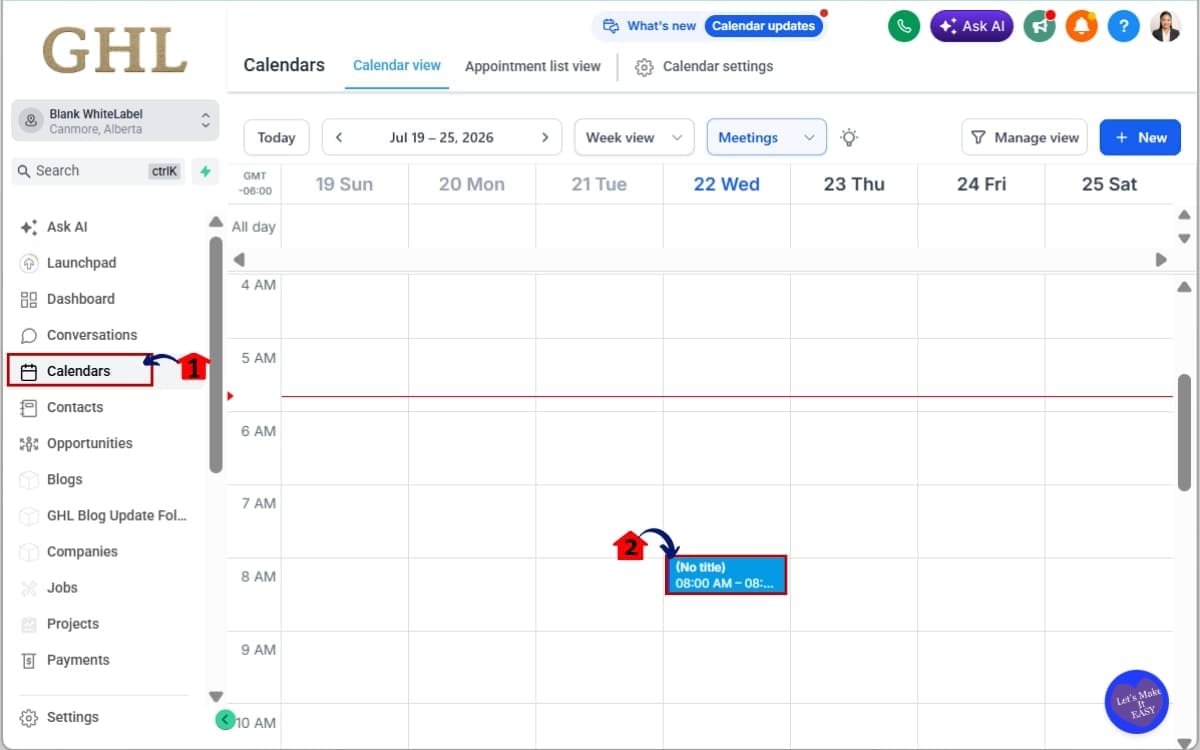
Step 01 – Access the Calendars Area in GHL
- The Main Menu on the left side of your screen contains all the primary areas you’ll use inside GoHighLevel.
1.1 Click Calendars from the left-hand menu.
- This opens the main calendar workspace where all your calendars and bookings are managed.
1.2 Open the calendar you want to view.
- Select the specific calendar you want to check so you can view its appointments and availability.
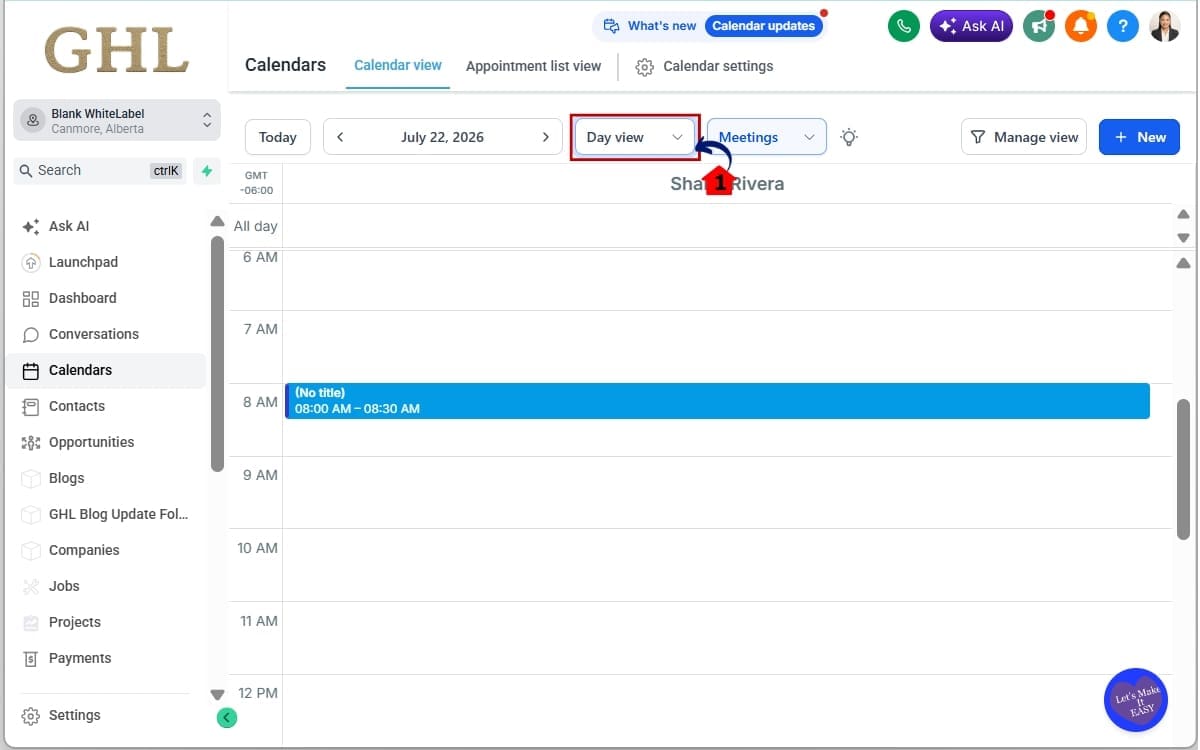
Step 02 – Select Your Calendar View
- Calendar Buffer Time is currently available in the Day and Week calendar layouts.
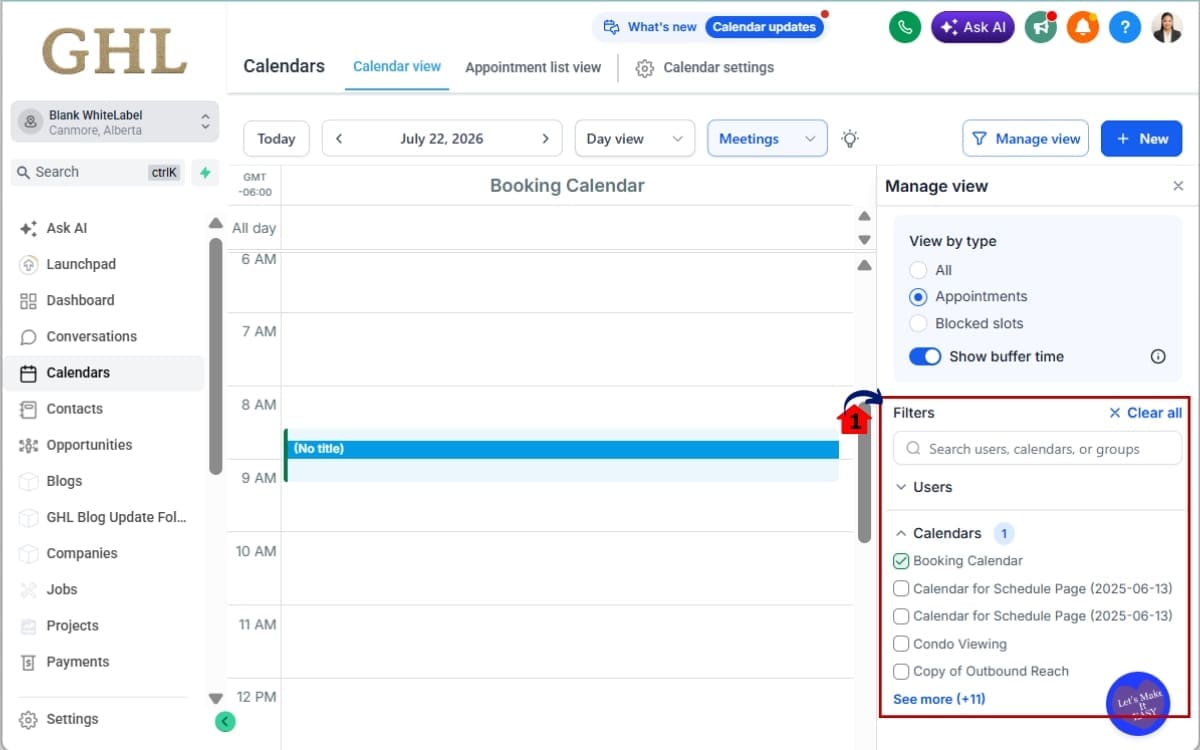
2.1 Click Day View or Week View near the top of the calendar.
- Choose the view that best suits how you manage your appointments.
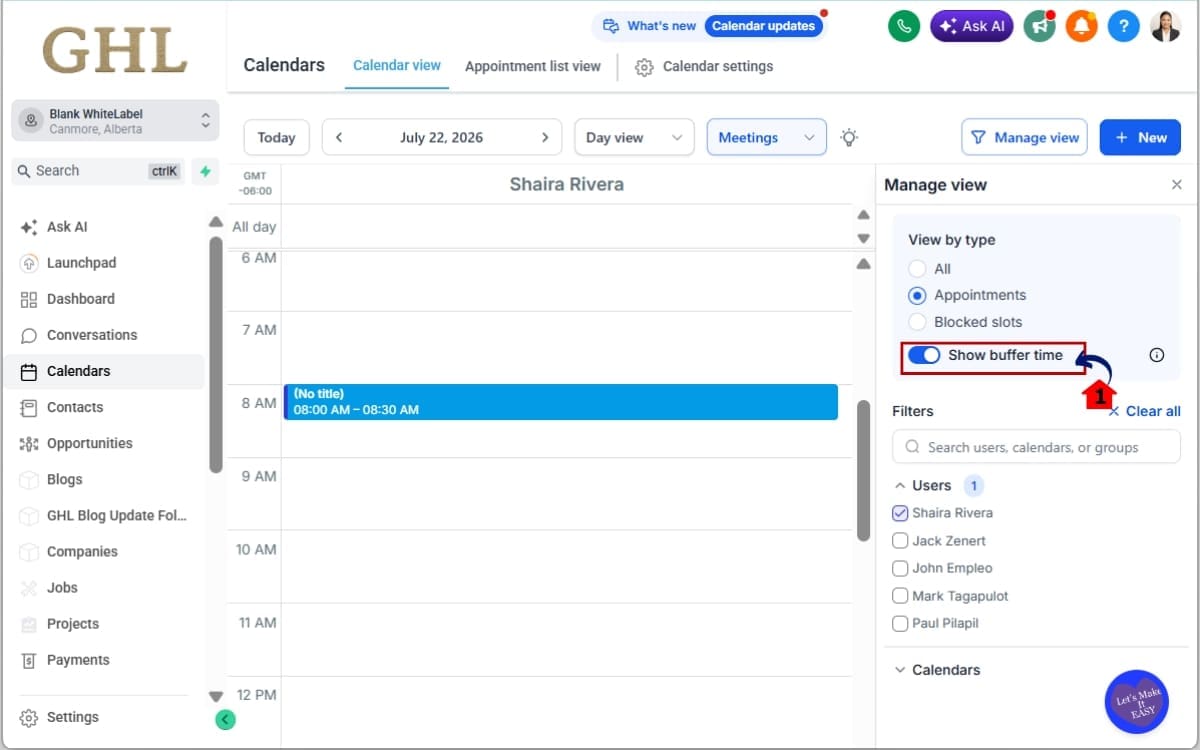
Step 03 – Turn On Show Buffer Time
- This new option controls whether buffer periods are displayed on your calendar.
3.1 Locate the Show Buffer Time toggle. Switch the toggle ON.
- Your calendar will immediately display pre-buffer and post-buffer periods as informational blocks.
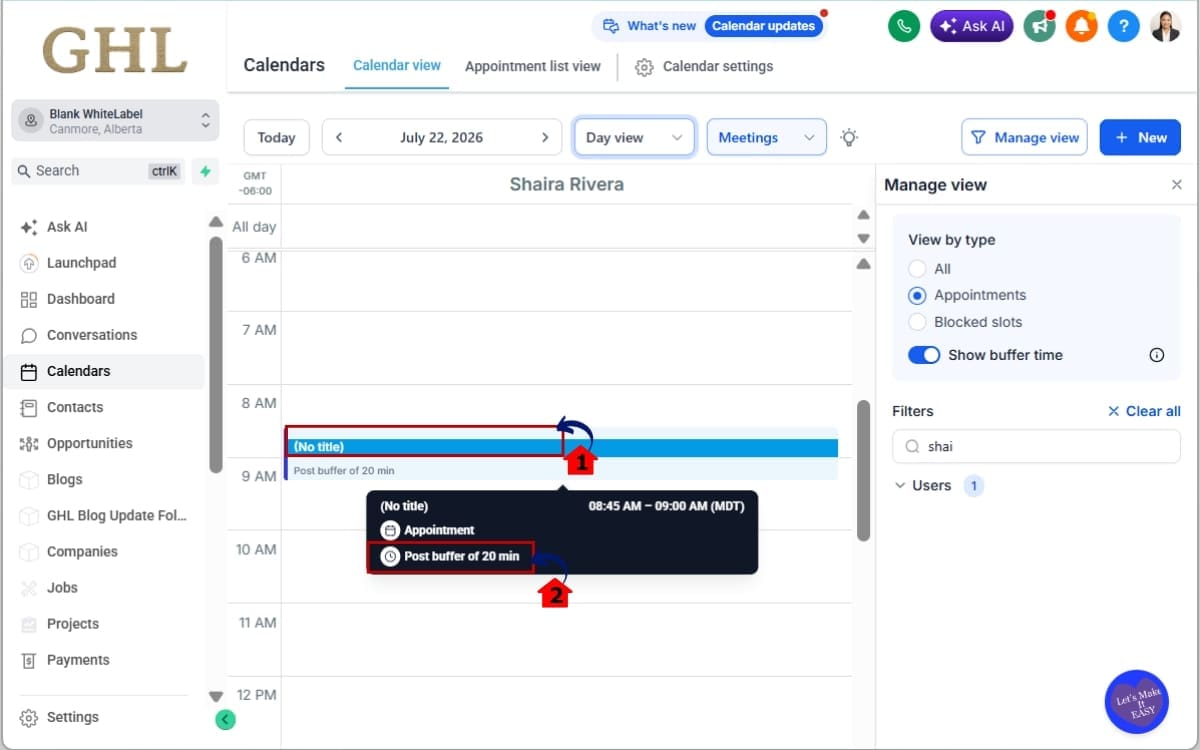
Step 04 – Review Your Buffer Periods
- With the feature enabled, you’ll immediately notice the difference.
4.1 Locate an existing appointment.
- Notice that the buffer periods are visually different from booked appointments, making them easy to identify.
4.2 Look for the highlighted block before the appointment representing the pre-buffer.
- Locate the highlighted block after the appointment representing the post-buffer.
Step 05 – Test Calendar Filters
- Buffer visibility works across all supported calendar filters.
5.1 Filter your calendar by Staff/User. Switch to a different Service or Calendar. Filter by Category or Group if applicable.
- Confirm that Calendar Buffer Time continues to display correctly regardless of the selected filter.
That’s It!
You’ve successfully enabled Calendar Buffer Time in GoHighLevel.
From now on, you’ll have a much clearer understanding of your daily schedule without changing any appointment settings or booking rules. Clients continue booking appointments exactly as before, while you gain a cleaner, more informative calendar that’s easier to read at a glance.
Pro Tips for Getting the Most from Calendar Buffer Time
The update is simple to use, but there are a few things we’ve found that make it even more helpful during a busy day.
Keep Buffer Time Visible
If your team regularly books appointments throughout the day, leave the Show Buffer Time toggle enabled. Seeing your transition periods at a glance helps you avoid overloading your schedule and makes it easier to spot genuine availability.
Review Your Buffer Settings Regularly
I was surprised how different my calendar looked once the buffer blocks appeared. It also made me realise a couple of my buffer settings probably needed updating.
Ask yourself:
- Do you need more time to prepare before appointments?
- Would an extra 10 minutes after each meeting help you complete notes or follow-up tasks?
- Are your current buffers longer than they need to be?
Small adjustments can make a big difference to your daily workflow.
Use Week View for Better Planning
If you’re managing a busy schedule or coordinating multiple staff members, the Week View gives you a much better overview of appointment spacing.
Visible buffer blocks make it easy to identify busy days, overloaded schedules, and opportunities to balance workloads across your team.
Help Your Team Understand Availability
One of the biggest benefits of this update is reducing confusion.
Instead of asking whether a gap between appointments is available, everyone can immediately see whether that time is protected by a buffer. This creates fewer scheduling mistakes and makes collaboration much smoother.
Remember Buffers Don’t Block Extra Time
It’s important to understand what this update does—and what it doesn’t do.
The visible buffer blocks are informational. They simply display the pre-buffer and post-buffer settings that already exist on your calendar.
This update doesn’t change:
- Appointment availability.
- Booking rules.
- Calendar automations.
- Customer booking experience.
It simply makes your existing schedule much easier to understand.
Avoid These Common Mistakes
Even though this is a straightforward feature, a few misconceptions can catch new users out.
Avoid these common mistakes:
- Assuming the coloured buffer blocks are appointments.
- Thinking the update changes your booking availability.
- Forgetting to enable the Show Buffer Time toggle when switching calendars.
- Ignoring your existing buffer settings now that they’re visible.
Small Change. Big Productivity Win.
Some GoHighLevel updates introduce brand-new features. Others improve the features you already rely on every day.
Calendar Buffer Time falls into the second category.
There’s less second-guessing when the buffer blocks are right there on the calendar. It’s useful for one-person businesses, but it also makes life easier for teams handling lots of appointments.
What This Means for Your Business
The best software updates aren’t always the biggest ones. Sometimes, they’re the ones that quietly remove everyday frustrations.
That’s exactly what Calendar Buffer Time does.
Instead of trying to work out whether a gap between appointments is actually available, you can see the answer immediately. It may only save a few seconds each time you check your calendar, but over weeks and months, those small time savings quickly add up.
Agencies Can Manage Team Calendars Faster
If you manage multiple staff members or client calendars, knowing who’s genuinely available is essential.
With visible buffer periods, your team can instantly see the difference between booked appointments and protected transition time. This makes assigning appointments, balancing workloads, and planning daily schedules much easier.
It also reduces unnecessary questions between team members because everyone is working from the same clear calendar view.
Service Businesses Can Deliver a Better Client Experience
Every appointment involves more than just the meeting itself.
You may need time to review client notes, prepare documents, clean equipment, travel between locations, or simply reset before welcoming your next customer.
Visible Calendar Buffer Time helps protect those moments by making them obvious to everyone managing the schedule. Better preparation often leads to better customer experiences.
Virtual Assistants Can Book with Confidence
Virtual assistants often spend their day scheduling appointments for business owners and clients.
Without visible buffers, it’s easy to mistake protected transition time for available booking space.
Now, VAs can confidently manage calendars without constantly checking buffer settings or second-guessing whether a time slot is actually free.
Less Guesswork Means Better Productivity
Every time you remove uncertainty from a workflow, you improve efficiency.
That’s exactly what this update achieves.
Instead of interpreting unexplained gaps, your calendar becomes a visual planning tool that clearly shows appointments, preparation time, and recovery time in one place.
The result is fewer scheduling mistakes, smoother daily operations, and better time management across your entire business.
A Small Update You’ll Notice Every Day
Some features only get used occasionally.
Calendar Buffer Time is different.
If your business relies on appointments, you’ll benefit from this update every time you open your calendar. It’s a simple improvement that makes scheduling easier, helps your team work more efficiently, and gives everyone a clearer understanding of the day ahead.
Sometimes, better visibility is all it takes to make better decisions.
FAQs – Calendar Buffer Time
Conclusion – Calendar Buffer Time
Not every GoHighLevel update needs to reinvent the platform to make a real difference.
The new GHL Calendar Buffer Time feature is a perfect example of a small improvement that solves an everyday problem. By making pre-buffer and post-buffer periods visible in your calendar, you can instantly understand your schedule without digging through settings or guessing whether a gap is actually available.
Whether you’re running an agency, managing multiple staff members, booking appointments for clients, or simply organising your own day, this update makes calendar management faster, clearer, and far less confusing.
The best part is that you don’t need to reconfigure your calendars or change your booking rules. Simply enable the Show Buffer Time toggle and start enjoying a more informative calendar that helps you plan with confidence.
At GHL Growth Garage, we’re always excited about updates that improve the everyday user experience. They may not grab the biggest headlines, but they’re often the features you’ll appreciate every single day.
If you haven’t tried the new Calendar Buffer Time view yet, jump into your GoHighLevel calendar and turn it on. It only takes a few seconds, but it could completely change how you plan your day.
Be sure to check back with GHL Growth Garage for more GoHighLevel feature guides, step-by-step tutorials, and practical tips to help you get even more from the platform.
Over to You
Have you enabled the new Calendar Buffer Time view yet?
Has it made managing your appointments easier, or do you have another favourite recent GoHighLevel update? We’d love to hear your thoughts.
Scale Your Business Today.
Streamline your workflow with GoHighLevel’s powerful tools.


