- Introduction – Why Workflow Trigger Descriptions Matter
- Quick Summary – Workflow Trigger Descriptions
- Here are this weeks HighLevel Updates
- What Are Workflow Trigger Descriptions in GHL?
- What’s New in the Workflow Builder
- Why Workflow Trigger Descriptions Matter
- How to Use Workflow Trigger Descriptions in GHL
- Pro Tips to Build Smarter Workflows
- Real-World Business Applications
- FAQs About Workflow Trigger Descriptions in GHL
- Conclusion
Introduction – Why Workflow Trigger Descriptions Matter
Before this update, Workflow Trigger Descriptions in GHL did their job, but figuring them out wasn’t always straightforward. A lot of them had similar names. Some only fired under very specific conditions. And unless you’d already used them before, you were left clicking, testing, and hoping you picked the right one.
If you’re managing several client automations, those small moments of uncertainty start to stack up. Pick the wrong trigger and suddenly a workflow doesn’t fire, skips a step, or just sits there doing nothing. GHL had the power, but the trigger logic wasn’t always obvious at first glance.
GoHighLevel has now significantly improved that experience.
GHL added descriptions right inside the trigger list. So instead of guessing, you can read exactly how a trigger behaves before you choose it. No digging. No decoding vague names. Just clear info where you need it.
What changed: GHL added built-in workflow trigger descriptions to every trigger inside the Workflow Builder. These descriptions are visible when browsing triggers, selecting them, or editing existing workflows. Users can now see when a trigger fires and what event activates it, directly inside the interface.
Who this is for: Agency owners building client automations, virtual assistants setting up workflows, marketing teams launching campaigns, small business owners creating follow-ups, and any GHL user who wants faster setup and fewer automation mistakes.
What we’ll demonstrate: We’ll show where workflow trigger descriptions appear inside GHL, explain how they improve automation accuracy, walk through how to access and use them step by step, and outline how this update reduces setup errors in real marketing scenarios.
The latest GoHighLevel Changelog includes several other GHL feature updates that round out your daily workflow:
- Version History Improvements: View & Restore Versions Across Builders
- [Compliance] Stay compliant with ACH payment on Stripe
- Canva Integration In Media Storage
- Bulk Import for Companies
- AI Builder: 52% Faster Workflow Generation
- Record IDs – Improved Visibility in Lists & Record Details
- Reselling Reporting on Agency Dashboard
- Blogs – Revamped URL Blog Importer Experience 🚀
Keep reading for much more on all these updates and a deep dive into the Trigger Description feature!

Quick Summary – Workflow Trigger Descriptions
Purpose: This update adds built-in workflow trigger descriptions inside the GHL Workflow Builder so you can clearly understand what each trigger does before selecting it.
Why It Matters: Choosing the wrong trigger can break your automation. Workflow trigger descriptions reduce guesswork, prevent setup mistakes, and make automation building faster and more accurate.
What You Get: You now see a clear, human-readable explanation under every trigger inside the Workflow Builder. No more switching tabs or searching documentation to confirm trigger behavior.
Time to Complete: Viewing and using workflow trigger descriptions takes seconds. Updating older workflows for clarity can take 10–20 minutes depending on complexity.
Difficulty Level: Beginner-friendly. No technical setup required. The feature is automatically available inside all GHL accounts.
Key Outcome: Cleaner automation logic, faster workflow creation, improved team training, and fewer broken follow-ups across your campaigns.
Here are this weeks HighLevel Updates
Version History Improvements: View & Restore Versions Across Builders
- What it does:
Access old versions and restore them across builders. - Where in GHL:
Found in Funnels, Websites, and other builders under version history. - Impact:
Quick fixes when changes don’t go as planned. - Who it’s great for:
Agencies and users making frequent updates.
Automate marketing, manage leads, and grow faster with GoHighLevel.

[Compliance] Stay compliant with ACH payment on Stripe
- What it does:
Helps make sure your ACH payments through Stripe follow the right rules by adding compliance checks. - Where in GHL:
You’ll see this when configuring ACH payments in the Payments and Stripe settings. - Impact:
Keeps you protected from potential compliance problems and makes payments more secure. - Who this is for:
Anyone collecting ACH payments, especially agencies and SaaS businesses.
Canva Integration In Media Storage
- What it does:
Allows you to access and import Canva designs directly into GHL’s media storage. - Where in GHL:
Media Library / Storage section when uploading or selecting files. - Impact:
Speeds up content creation by removing the need to download and re-upload assets. - Who this is for:
Marketers, designers, and agencies creating visual assets for funnels, emails, and ads.
Bulk Import for Companies
- What it does:
Enables bulk uploading of company records into GHL instead of adding them one by one. - Where in GHL:
CRM under Companies section (import/upload functionality). - Impact:
Saves time and simplifies onboarding large datasets or migrating client information. - Who this is for:
Agencies, sales teams, and businesses handling large volumes of company data.
AI Builder: 52% Faster Workflow Generation
- What it does:
Improves AI workflow generation speed, cutting build time by over half. - Where in GHL:
AI Workflow Builder inside Automation > Workflows. - Impact:
Speeds up automation creation, allowing faster testing and deployment. - Who this is for:
Agencies, automation builders, and marketers creating workflows frequently.
Record IDs – Improved Visibility in Lists & Record Details
- What it does:
Makes record IDs easier to see within lists and detailed views. - Where in GHL:
CRM records, lists, and detail pages. - Impact:
Improves tracking, integrations, and debugging when working with specific records. - Who this is for:
Developers, advanced users, and teams working with integrations or data tracking.
Reselling Reporting on Agency Dashboard
- What it does:
Adds reporting insights for reselling activities directly in the agency dashboard. - Where in GHL:
Agency Dashboard under reporting/analytics sections. - Impact:
Gives better visibility into revenue and performance from resold services. - Who this is for:
Agencies running SaaS mode or reselling GHL services.
Blogs – Revamped URL Blog Importer Experience 🚀
- What it does:
Improves the blog importer tool for pulling content from URLs into GHL. - Where in GHL:
Sites > Blogs > Import via URL. - Impact:
Makes moving your blogs over quicker and a lot easier to handle. - Who this is for:
Agencies, content marketers, and businesses migrating blogs into GHL.
What Are Workflow Trigger Descriptions in GHL?
Workflow triggers are the starting point of every automation inside GoHighLevel.
They tell the system when to begin a workflow. That could be when a contact submits a form, books an appointment, gets a tag added, makes a purchase, or hits a specific pipeline stage.
Triggers are powerful. But they can also be confusing.
A lot of trigger names are close enough to make you pause. You see “Form Submitted” and assume it covers everything — but it doesn’t. Same with “Tag Added” versus broader contact updates. One small mismatch and your workflow fires at the wrong time… or not at all.
Before this update, users often had to:
- Guess which trigger to use
- Test workflows repeatedly
- Search help docs for clarification
- Ask support for confirmation
That slowed things down.
Workflow trigger descriptions fix that.
Now, when you browse triggers inside the Workflow Builder, each one includes a short, clear explanation. It tells you exactly what event activates the trigger and when it fires.
This means:
- Less guessing
- Fewer automation errors
- Faster setup
- More confidence when building workflows
Instead of hovering over a trigger name trying to interpret it, you can just read what it does on the spot. Simple shift. Big relief.
What’s New in the Workflow Builder
This update is not flashy.
But it’s extremely practical.
GHL quietly added descriptions right into the Workflow Builder. Now when you look at a trigger, it actually explains how it works and what sets it off, without you having to figure it out yourself.
You don’t need to leave the page.
You don’t need to search documentation.
You don’t need to guess.
Here’s what’s new:
- Every available trigger now shows a short description
- Descriptions are visible while browsing triggers
- Descriptions remain visible when selecting a trigger
- Descriptions are available when editing existing workflows
- No external documentation required
Before this update, the trigger name was often the only clue. Now you get context immediately.
For example:
Instead of just seeing “Tag Added,” you’ll now see a description explaining that the workflow will start when a specific tag is applied to a contact.
That clarity matters.
Because automation logic depends entirely on when and how a trigger fires. Even small misunderstandings can cause workflows to misbehave.
This update removes that friction.
It makes trigger logic transparent. It makes workflow setup faster. And it reduces costly mistakes inside client accounts.
Small interface change. Big usability upgrade.
Why Workflow Trigger Descriptions Matter
At first glance, this might seem like a small interface update.
It’s not.
Workflow trigger descriptions solve one of the biggest hidden problems in automation building, uncertainty.
Inside GHL, the trigger is the starting point for everything. If that starting point is off, the whole automation acts weird. Emails don’t go out. Tags don’t stick. Pipeline stages don’t update. And then you’re the one explaining to a client why something didn’t run.
And before this update, selecting the right trigger sometimes felt like guesswork.
Now, that friction is gone.
Here’s why this matters for your business:
It Reduces Setup Mistakes
Clear workflow trigger descriptions help you choose the right starting event the first time. That means fewer broken automations and fewer troubleshooting sessions.
It Speeds Up Workflow Creation
You no longer have to pause and research what a trigger does. You read it. You understand it. You move forward.
It Improves Team Onboarding
If you have VAs or team members building inside GHL, this update makes training easier. They can understand trigger logic without needing constant supervision.
It Increases Automation Accuracy
When you know exactly when a trigger fires, your follow-ups become precise. That means better lead handling, smoother client journeys, and more reliable campaign results.
For agencies especially, this adds up fast.
Fewer errors. Faster builds. Cleaner systems. Happier clients.
That’s real leverage.
How to Use Workflow Trigger Descriptions in GHL
Workflow trigger descriptions are already active inside the Workflow Builder. You do not need to enable anything or adjust settings. In this section, you will access the Workflow Builder, open the trigger panel, review the new descriptions, and apply them correctly when building or editing a workflow.
Follow the steps below to locate and use workflow trigger descriptions inside GoHighLevel.
- Access Automation and Create a Workflow in GoHighLevel.
- Add a Trigger in the workflow.
- View the Trigger and Read the Description.
- Add Another Trigger in the Workflow for another example.
- Apply It in a Real Marketing Scenario.
- Save and Test the Workflow to confirm the trigger.
To start make sure you are logged in to your GoHighLevel sub-account.
Step 01 – Access Automation and Create a Workflow in GoHighLevel
- The Main Menu on the left side of your screen contains all the core areas of GHL where you manage marketing, contacts, and automations.
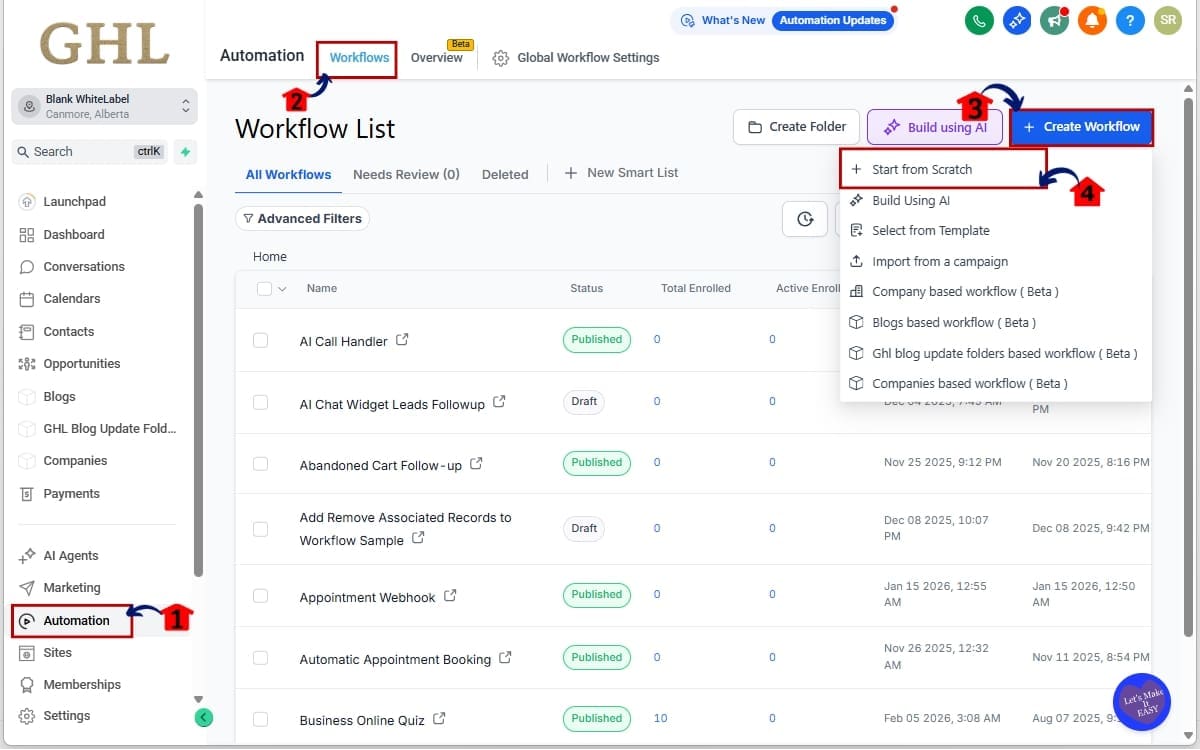
1.1 Click “Automation” from the left-hand menu
- This opens the Automation section where all workflows and triggers are managed.
1.2 Click “Workflows”
- This takes you to the Workflow dashboard where you can view and manage existing automations.
1.3 Click “+ Create Workflow”
- This allows you to begin building a new workflow from the dashboard.
1.4 Click “Start from Scratch”
- This opens a blank workflow canvas so you can create a new automation using your own trigger and actions.
Step 02 – Add a Trigger in the workflow
- A trigger defines the event that starts your workflow and determines when the automation will run.
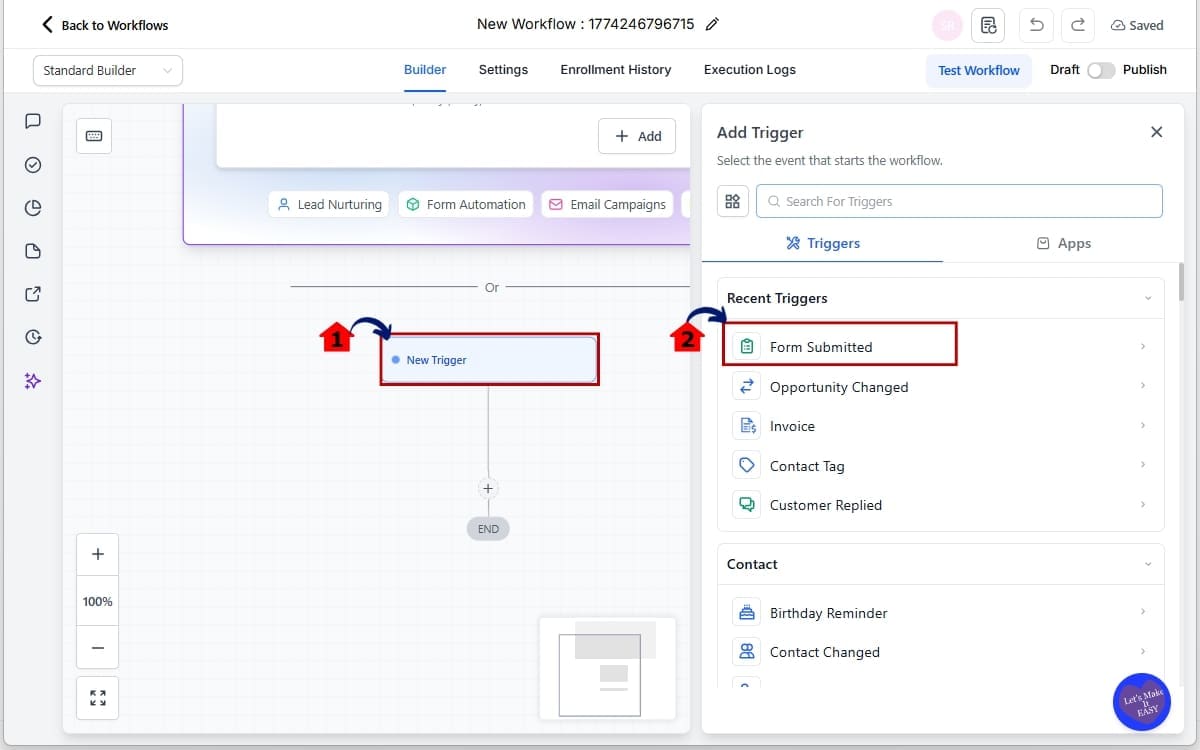
2.1 Click “Add Trigger” at the top of the workflow
- This opens the trigger selection panel where you can choose the event that will start your automation.
2.2 Browse the available triggers and select “Form Submitted”
- You will see workflow trigger descriptions displayed under each trigger name, helping you confirm exactly when the trigger fires before selecting it.
Step 03 – View the Trigger and Read the Description
- Reviewing the trigger description ensures the workflow starts at the correct event before you continue building.
3.1 Read the description carefully
- Confirm the explanation matches your intended action, for example: “Activates upon submission of the chosen form and filters.”
3.2 Click “Save”
- This confirms your trigger selection and applies it to the workflow so you can continue adding actions.

Step 04 – Add Another Trigger in the Workflow for another example
- Adding another trigger allows your workflow to start from multiple events instead of relying on only one condition.
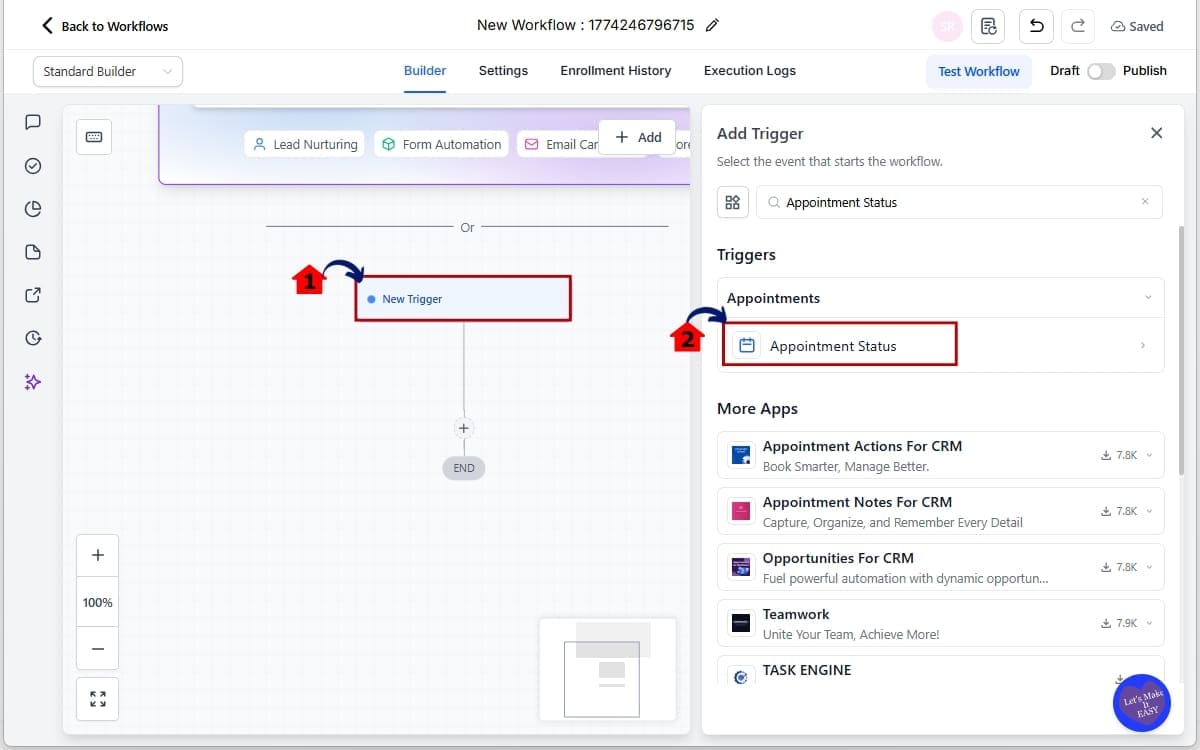
4.1 Click “Add New Trigger”
- This opens the trigger selection panel again so you can choose an additional starting event.
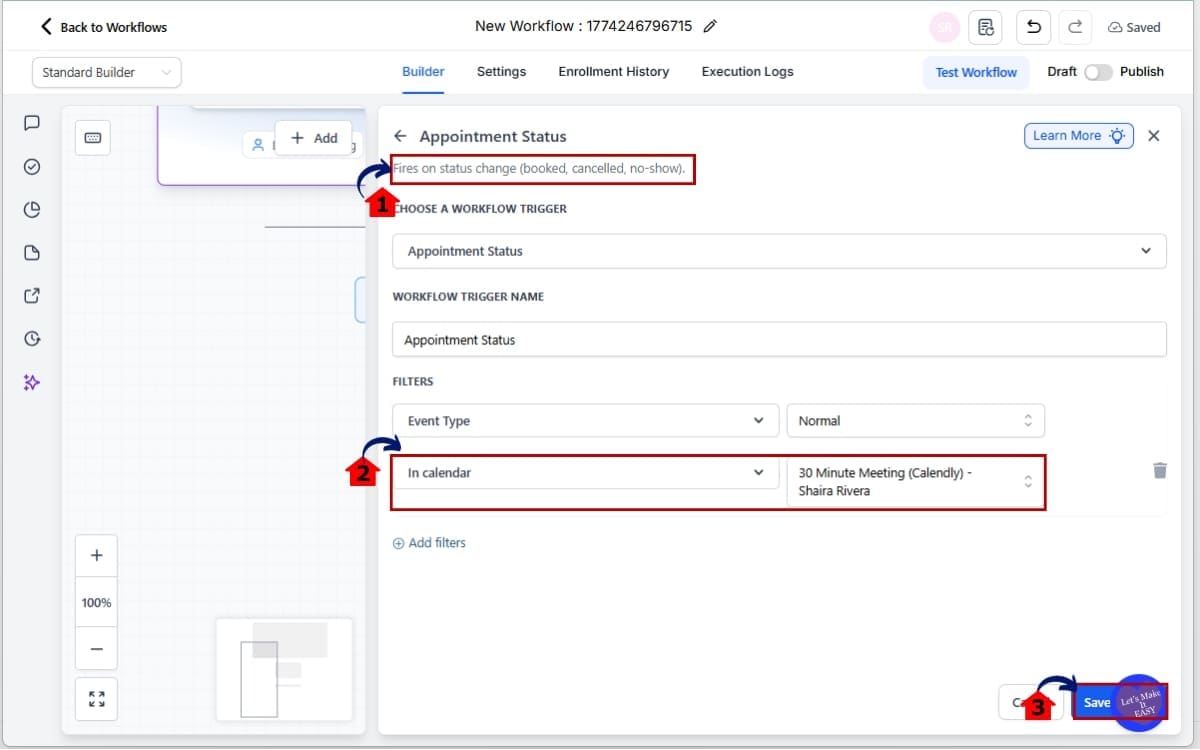
4.2 Select the “Appointment Status” trigger
- This trigger allows the workflow to activate based on appointment activity such as booked, confirmed, canceled, or completed.
Step 05 – Apply It in a Real Marketing Scenario
- This step ensures your workflow only runs when the correct real-world event happens inside your calendar.
5.1 Read the workflow trigger description
- Confirm the description clearly states that the workflow starts when an appointment is booked or confirmed.
5.2 Apply a filter for the correct calendar
- Select the specific calendar you want this trigger tied to so the workflow does not activate for unrelated bookings.
5.3 Click “Save”
- This locks in your trigger settings so the workflow fires only when that exact appointment event occurs.
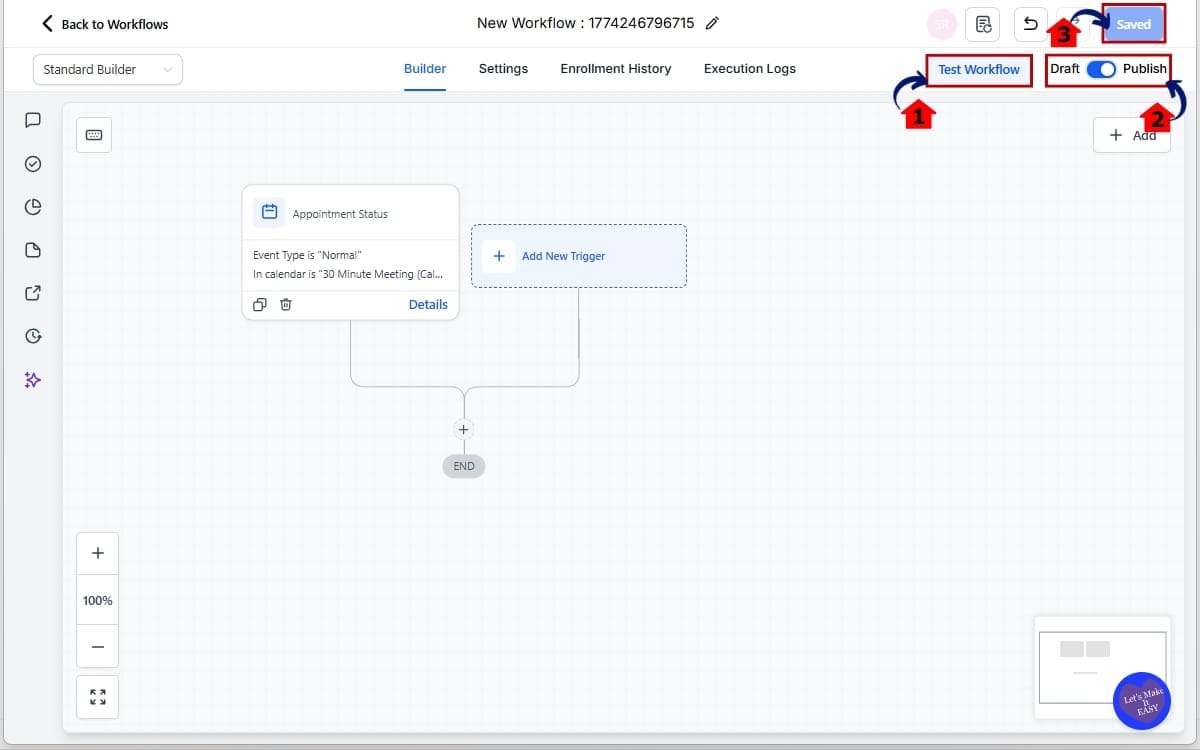
Step 06 – Save and Test the Workflow
- Testing confirms your trigger fires correctly before you rely on the automation in a live campaign.
6.1 Click “Test Workflow”
- This allows you to simulate the trigger event and verify that the workflow starts as expected.
6.2 Click “Publish”
- Publishing activates the workflow so it can begin running for real contacts and live events.
6.3 Click “Save”
- This ensures all recent changes to your trigger and workflow settings are stored properly.
That’s it. Workflow trigger descriptions don’t change how triggers work. They simply make the logic clear before you commit. And that clarity saves time every single day.
Pro Tips to Build Smarter Workflows
Now that workflow trigger descriptions are built directly into GHL, you have zero excuse for sloppy automation setup.
Here’s how to really take advantage of this update.
Always Read the Trigger Description First
Don’t just click the first trigger that sounds right.
Read the workflow trigger descriptions carefully. Similar names can behave very differently. Two triggers may look almost identical but fire under different conditions.
Five seconds of reading can save you hours of fixing.
Use Specific Triggers Over Broad Ones
If you have a trigger that fires “when contact changes” and another that fires “when tag is added,” the second one is usually more precise.
Precision equals cleaner automations.
The clearer the trigger event, the fewer unintended workflow activations you’ll have.
Pair Trigger Descriptions With Filters
The description tells you when it fires.
Filters tell you under what exact condition it should fire.
Always combine:
- The correct trigger
- The correct filter
- The correct asset (form, calendar, pipeline stage, tag)
That’s how you avoid accidental cross-campaign automation.
Train Your Team Using the Descriptions
If you have VAs or junior staff building inside GHL, workflow trigger descriptions now act as built-in training tools.
Instead of explaining every trigger manually, you can say:
“Read the description before selecting.”
This speeds up onboarding fast.
Name Your Workflows Clearly
Even with better triggers, messy naming creates confusion.
Use names like:
- Appointment Booked – New Lead
- Tag Added – Webinar Registered
- Form Submitted – Facebook Ad Funnel
Clear names + clear trigger descriptions = clean systems.
Test Before You Go Live
This one never changes.
After setting your trigger:
- Use a test contact
- Perform the exact action
- Confirm the workflow fires
- Check every step executes correctly
Even with clear workflow trigger descriptions, testing is still mandatory.
Automation is powerful.
But only when it’s precise.
Real-World Business Applications
Workflow trigger descriptions are not just a convenience feature.
They directly impact how clean, scalable, and profitable your systems become.
Here’s how.
Agency Use Case – Faster Client Automation Builds
If you manage multiple client accounts, speed matters.
Before, your team might pause while building workflows:
“Is this the right trigger?”
“Does this fire on submission or confirmation?”
Now, workflow trigger descriptions remove that hesitation.
You read it. You confirm it. You move on.
That means:
- Faster onboarding of new clients
- Cleaner automation builds
- Fewer support tickets
- Less time troubleshooting
Now imagine that happening across 10 or 20 client accounts. That’s when it really starts to snowball.
Lead Generation Campaigns – Accurate Follow-Up Timing
Imagine you’re running Facebook ads to a form.
You want:
- Immediate SMS
- Email confirmation
- Internal team notification
If you accidentally select the wrong trigger, your follow-up sequence breaks.
With workflow trigger descriptions, you can confirm:
- The trigger fires on form submission
- It applies to the correct form
- It activates immediately
That clarity ensures your leads never slip through the cracks.
Appointment-Based Businesses – Cleaner Booking Automations
If you run on booked calls and sessions, timing matters more than anything.
You might have workflows that fire when:
- An appointment is booked
- An appointment is confirmed
- An appointment is canceled
These are very different events.
Reading the workflow trigger descriptions ensures you choose the exact event you need.
That prevents:
- Sending reminders at the wrong time
- Double confirmations
- Missed follow-ups
VA and Team Training – Reduced Supervision
If you delegate workflow building to a VA, you no longer have to micromanage every trigger selection.
The descriptions act like built-in guardrails.
Instead of saying, “Be careful with that trigger,” you can say:
“Read the description before selecting.”
That’s systemized clarity.
Scaling Your Business – Fewer Automation Failures
As your GHL account grows, your workflows multiply.
With more workflows comes more complexity.
Workflow trigger descriptions reduce risk at scale.
- Less confusion.
- Less accidental overlap.
- Less messy automation logic.
Cleaner systems create smoother growth.
And smoother growth creates better results.
FAQs About Workflow Trigger Descriptions in GHL
Conclusion
Workflow trigger descriptions in GHL may seem like a small update.
But small clarity improvements create massive long-term impact.
Before this change, selecting the right trigger sometimes required testing, guessing, or digging through documentation. That slowed down builds and increased the risk of broken automations.
Now, the logic is clear.
Every trigger tells you exactly what it does and when it fires — right inside the Workflow Builder.
That means:
- Faster automation setup
- Fewer mistakes
- Cleaner systems
- Easier team training
- More confidence when building
For agencies, that translates into smoother client onboarding.
For marketers, it means accurate follow-ups.
For business owners, it means reliable automation without second-guessing.
This is what good platform evolution looks like.
Not flashy.
Not complicated.
Just smarter.
If you haven’t built a workflow recently, go into your GHL account and try it. Add a trigger. Read the description. Notice how much clearer it feels.
Then tighten up any older workflows that might have been built with guesswork.
Scale Your Business Today.
Streamline your workflow with GoHighLevel’s powerful tools.