- Customize Your Pipeline. Qualify Leads Like a Pro.
- Quick Summary – Custom Fields Opportunities Guide
- Why Custom Fields in Opportunities Matter (Big Time)
- How to Create Custom Fields for Opportunities in GHL
- Put Those Custom Fields to Work
- Frequently Asked Questions About Creating Custom Fields Opportunities
- Conclusion: Make Your Pipeline Work for You
Customize Your Pipeline. Qualify Leads Like a Pro.
This 4-minute guide will show you how to use custom fields opportunities in GoHighLevel that help you capture, segment, and manage deal data more effectively across your pipeline.
If you’re running an agency or building custom setups for clients, customizing the CRM isn’t a “nice-to-have”—it’s how you win. GoHighLevel gives you the power to define exactly what info matters in your Opportunities. That means no more guessing, no more spreadsheet hacks, and no more generic pipelines that ignore real-world sales data. Whether you’re tracking deal budgets, project types, referral sources, or internal deal scores—custom fields make your pipeline yours.
When your CRM includes thoughtfully crafted custom fields opportunities, every part of your sales process becomes clearer and more efficient
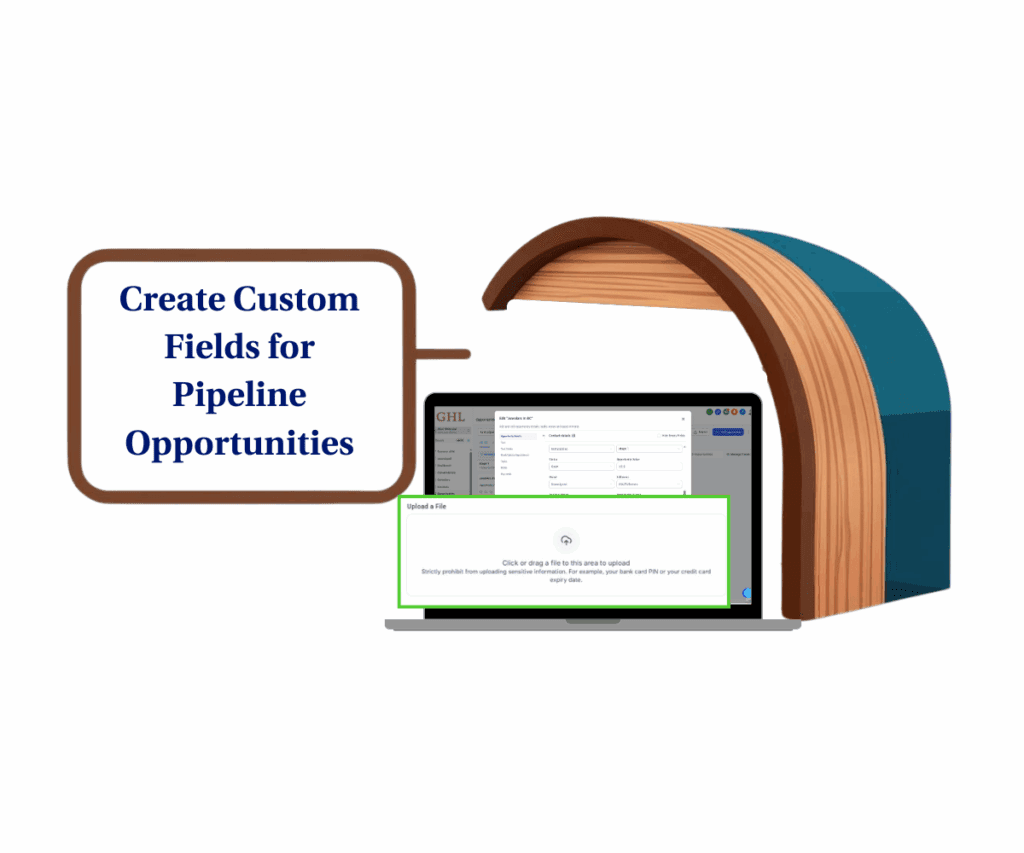
With custom fields opportunities, you can automate smarter, report faster, and close deals with more context—leading to better outcomes for your team and your clients.
Quick Summary – Custom Fields Opportunities Guide
Purpose: Add custom fields to Opportunities for smarter deal tracking
Why it matters: Get cleaner data, automate workflows, and close faster
What you get: A customized, filterable, automation-ready pipeline
Time to Complete: 3–5 minutes
Difficulty Level: Easy.
Prerequisites: Sub-account access
Key Outcome: Smarter, segmented opportunity pipeline
Why Custom Fields in Opportunities Matter (Big Time)
Here’s the deal—most agencies lose momentum because their pipelines can’t keep up with the real info that drives decisions. Generic stages and limited notes don’t cut it when you’re managing 10+ deals across multiple clients or services.
Adding custom fields in Opportunities unlocks serious advantages:
Automate marketing, manage leads, and grow faster with GoHighLevel.

- Sharper segmentation: Want to track deal sizes, industry types, or referral sources? Create a field for it. Now you can build Smart Lists that actually mean something.
- Automation made easy: Trigger workflows based on field inputs like “Service Type = SEO” or “Budget > $5,000.” No more one-size-fits-all automation.
- Cleaner reporting: Use field data to slice pipeline stats by category, close rate, or deal length. Agencies using structured fields report 30% faster close rates and fewer dropped leads.
The more you track what matters, the more efficient your sales process becomes. And in GHL, you’re just a few clicks away from total pipeline clarity.
How to Create Custom Fields for Opportunities in GHL
Here’s a how-to guide on creating and managing custom fields opportunities in GoHighLevel:
To start, make sure you are logged in to your GoHighLevel sub-account.
Step 01 – Access the Settings Area in GoHighLevel
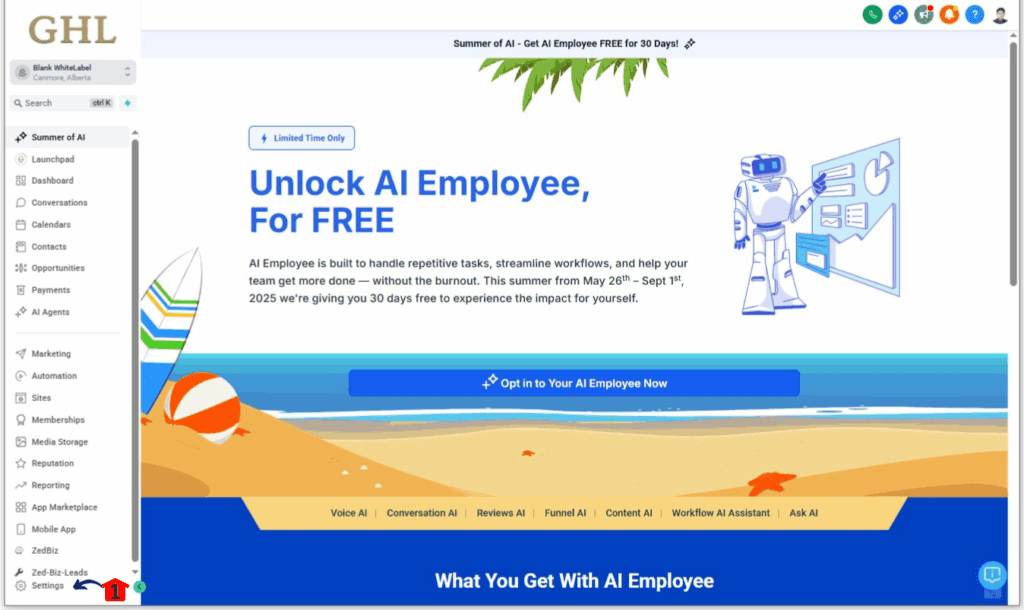
Go to the left-hand sidebar, look all the way to the bottom.
1.1 Click on the gear icon ⚙️ labeled “Settings.”
- You’ll now be in the main Settings dashboard, where you can access:
- Business Info
- Billing
- My Staff
- and more.
Step 02 – Create Custom Fields for Opportunities
Now let’s add new custom fields for opportunities within your GoHighLevel sub-account.
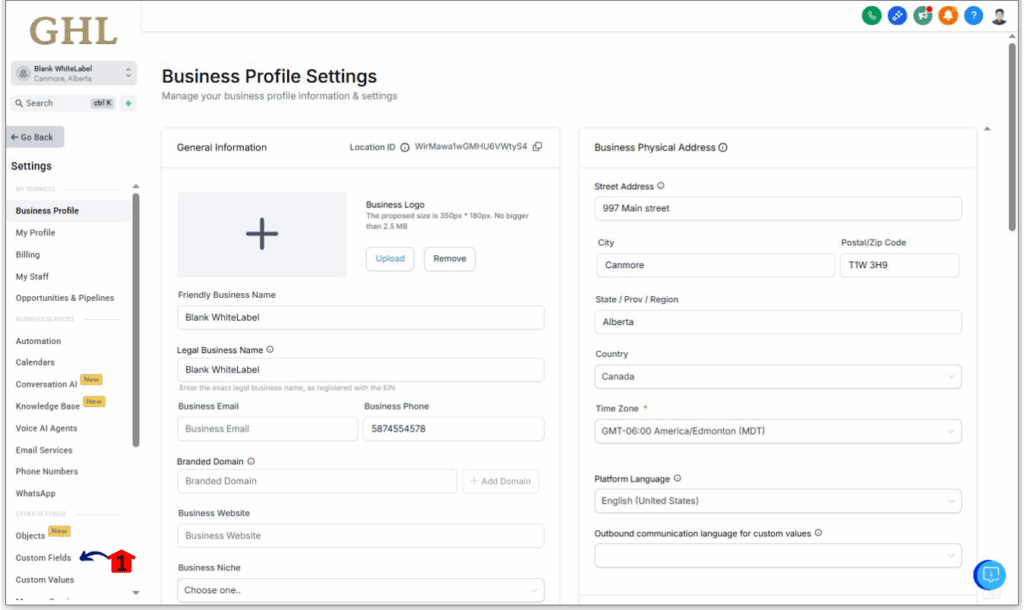
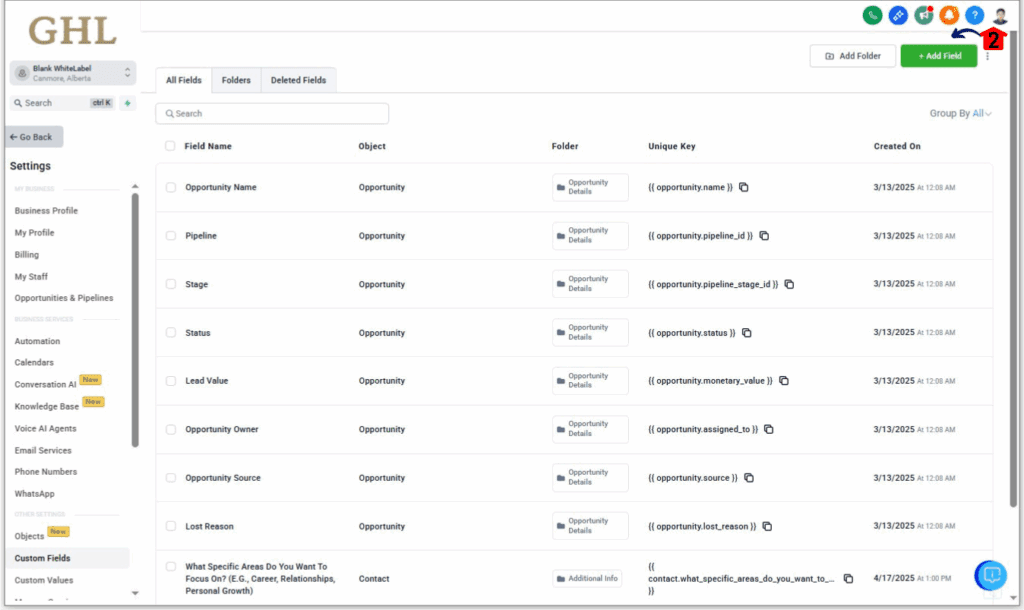
2.1 Click on “Custom Fields” from the left-hand menu.
- This will take you to the Custom Fields management page.
2.2 Click on the “Add Field” button.
- This action opens a new window where you can define your custom field.
Step 03 – Configure your Custom Field
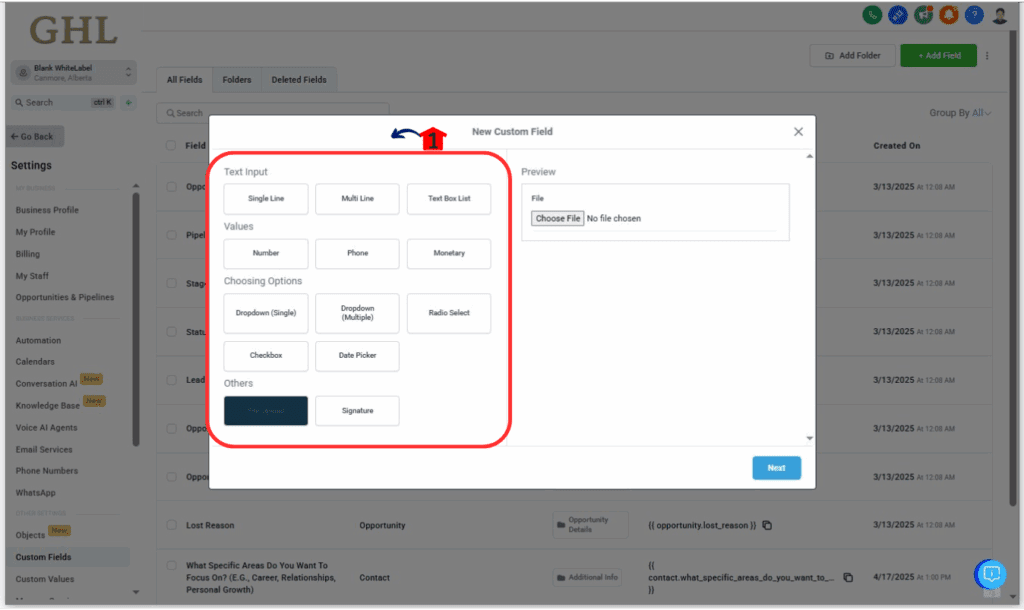
This step involves setting up the specifics of your custom field, like its type, name, and any options it might have, to ensure it captures exactly the data you need for your GoHighLevel operations.
3.1 Choose the appropriate custom field type.
- GoHighLevel offers various field types to suit your needs:
- Text Input:
- Single Line: For short text entries.
- Multi-Line: For longer text entries.
- Text Box List: For lists of values.
- Numbers:
- Number: For numerical values.
- Phone: Specifically for phone numbers.
- Monetary: For currency values.
- Choosing Options:
- Dropdown (Single): Allows selection of one option from a list.
- Dropdown (Multiple): Allows selection of multiple options from a list.
- Radio Select: Allows selection of one option from a group.
- Checkbox: For binary (yes/no) selections.
- Text Input:
- Date Picker: For selecting a specific date.
- Signature: For capturing signatures.
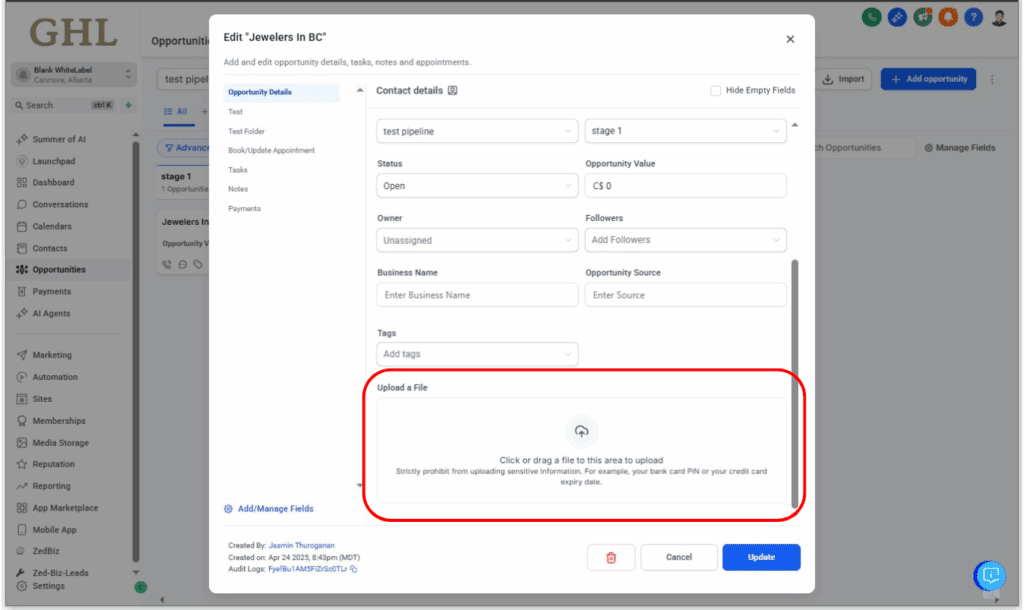
- File Upload: Allows attaching one or more files to the opportunity.
3.2 Give your custom field a clear and descriptive name.
3.3 Select “Opportunity” as your object.
- This ensures that the custom field you are creating will be associated with opportunities.
3.4 Select the group for this custom field. (More about this in Step 04)
3.5 After filling in all the necessary information, click “Save.”
- Your new custom field will now be available for use with opportunities.

Step 04 – Organize Custom Fields with Custom Folders
Grouping your custom fields for opportunities into custom folders helps keep your workspace organized and easy to navigate.
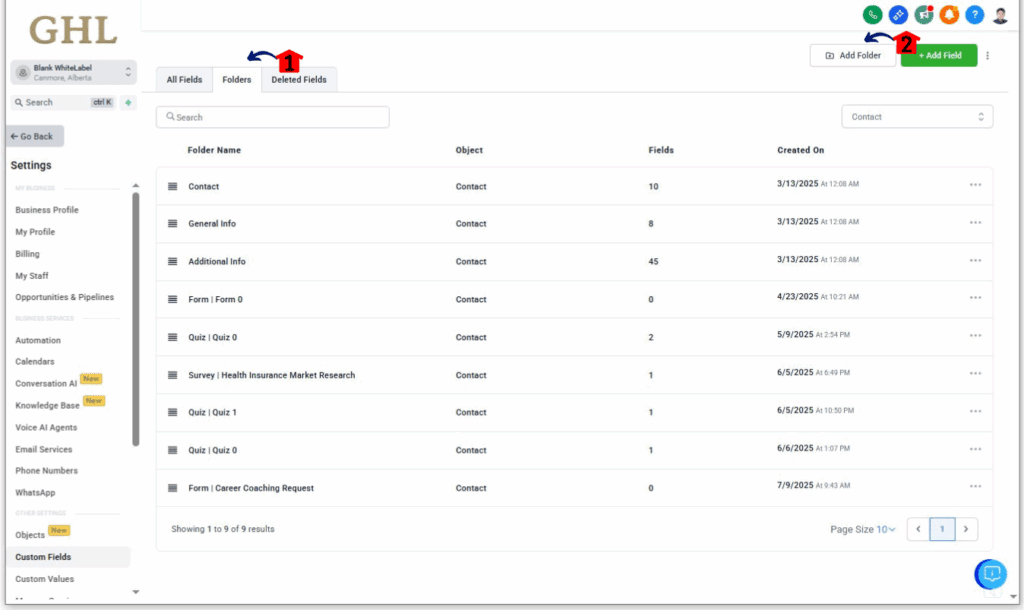
4.1 Navigate to the “Folders” tab within the “Custom Fields” section.
- This tab is located at the top of the Custom Fields page.
4.2 Click on “Add Folder.”
- A new window will appear, prompting you to define your folder.
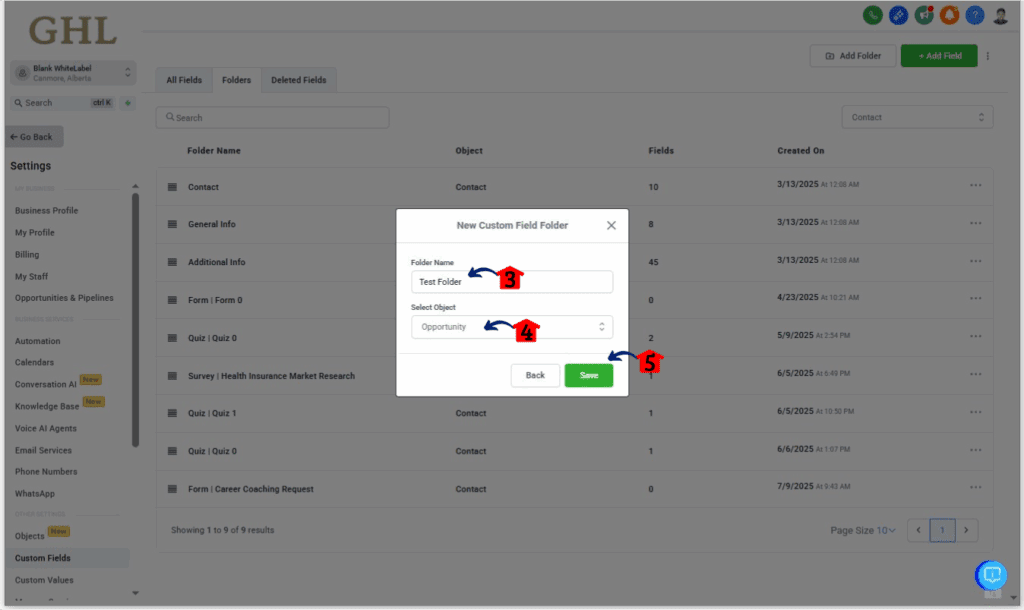
4.3 Provide a name for your new folder.
- Choose a name that clearly indicates the type of custom fields it will contain.
4.4 Select “Opportunity” as the object for the folder.
- This links the folder specifically to custom fields related to opportunities.
4.5 Click “Save” to create the folder.
- You can now move existing or new custom fields into this folder for better organization.
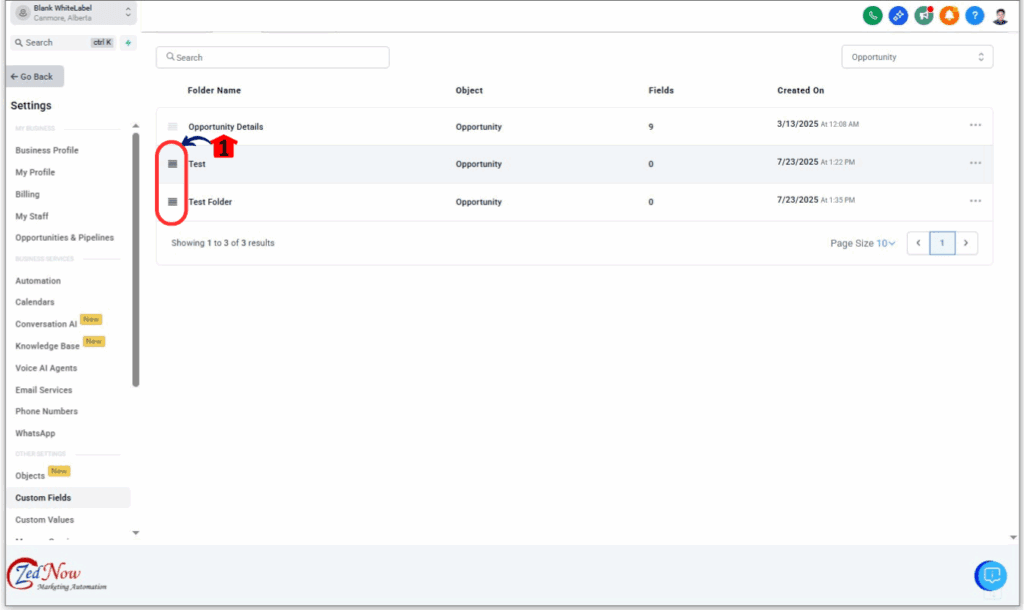
Step 05 – Reorder Custom Fields
You can easily reorder your custom fields for opportunities to display them in a logical sequence that suits your workflow.
5.1 Drag and drop your custom fields to rearrange their order.
- Stay on the “Custom Fields” page within the Settings area. You will see a list of all your custom fields.
- Click and hold on a custom field, then drag it to your desired position in the list.
Step 06 – Utilize Your Custom Fields
Once created, your custom fields for opportunities are ready to be used when managing your sales pipeline.
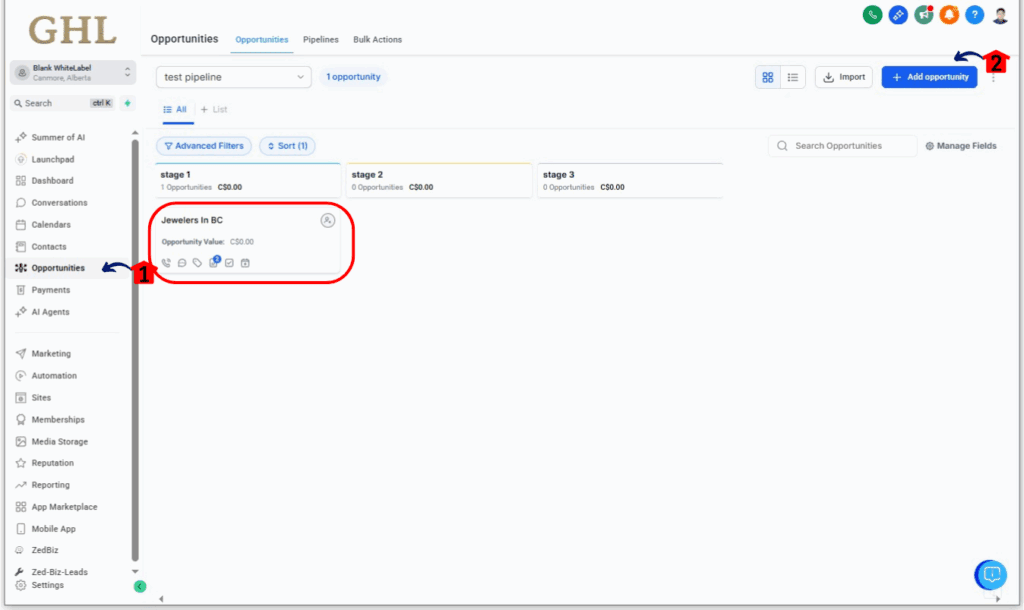
6.1 Navigate to the “Opportunities” section from the main left-hand menu.
- This is where you manage all your opportunities.
6.2 When creating a new opportunity or editing an existing one, look for your new custom fields.
- They will appear within the “Add Opportunity” or “Edit Opportunity” dialog boxes.
Step 07 – Hide Empty Custom Fields
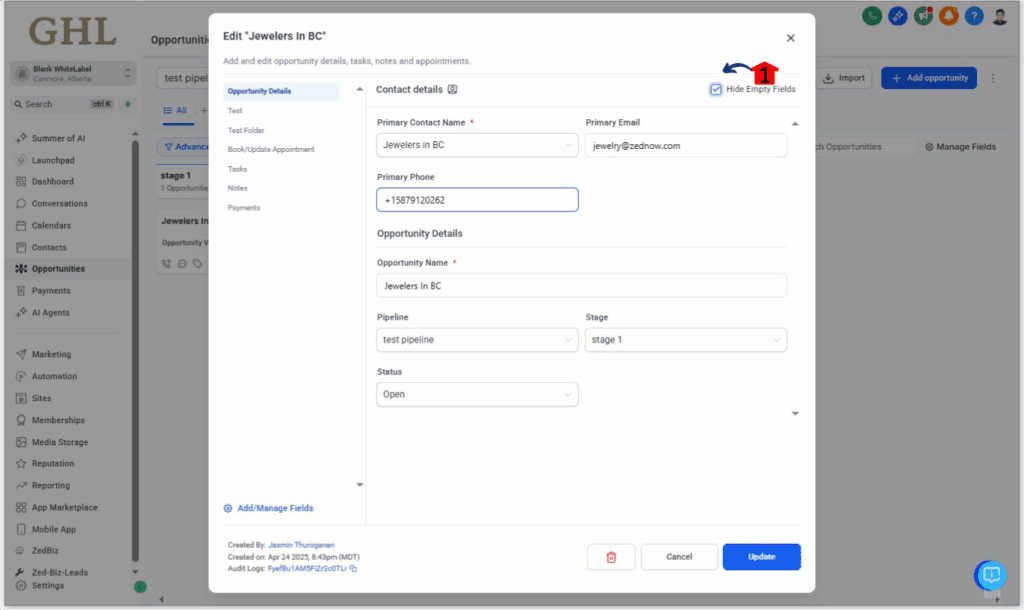
To keep your opportunity view clean and focused, you can choose to hide custom fields that do not have any data entered.
7.1 While viewing an opportunity, locate the “Hide Empty Fields” feature.
- This option is typically found at the top or side of the opportunity details section.
- Turn on the “Hide Empty Fields” toggle.
- Custom fields that currently have no value entered will no longer be visible, reducing clutter.
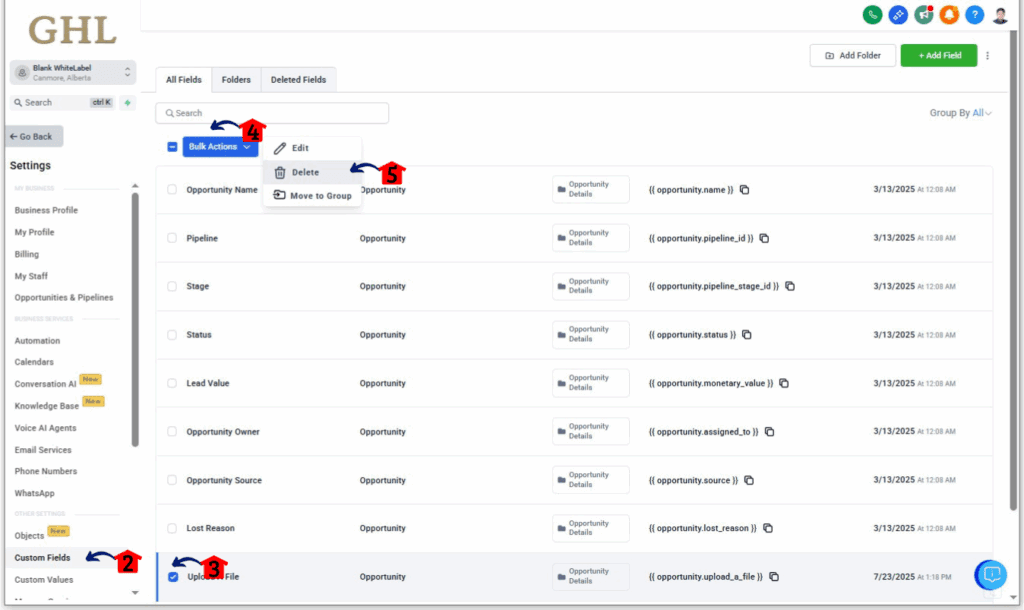
Step 08 – Delete Custom Fields Opportunities
If you no longer need some specific custom fields opportunities, you can delete it from your sub-account settings.
8.1 Access the “Settings” area in your GoHighLevel sub-account (refer to Step 01).
8.2 Click on “Custom Fields” from the left-hand menu.
8.3 Click on the checkbox located next to the custom field you want to delete.
8.4 Click “Bulk Actions”
8.5. In the menu that appears, select “Delete.”
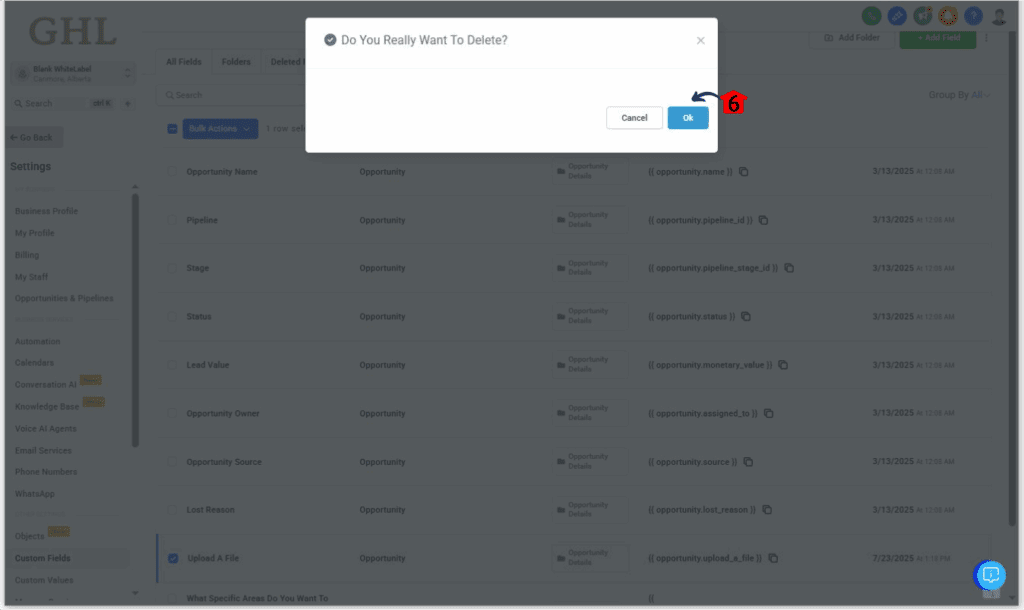
- A confirmation prompt may appear to ensure you want to delete the field.
8.6 Confirm your action to permanently delete the custom opportunity field.
- Please Note: Default custom fields opportunities cannot be deleted, but they can be moved to a different group if desired.

Once this is set up, your pipeline gets smarter, fast.
Put Those Custom Fields to Work
Let’s say you run an agency that offers SEO, paid ads, and web design. Instead of asking your sales team to “just remember” what a lead wants (good luck with that), you add a dropdown custom field called Service Type to your Opportunity object.
Now, when a new deal enters the pipeline, your team picks the service right from the dropdown. That data:
- Auto-sorts into Smart Lists
- Triggers a tailored workflow for that service
- Shows up in reports and forecast dashboards
By building logic around custom fields opportunities, you make every deal easier to manage, measure, and move forward.
Want to track high-ticket vs. low-ticket? Add a “Budget” field and filter deals by value. Want to route follow-ups differently? Set a workflow to ping a rep only if the “Urgency” field is marked high.
The point? These fields give you context with control. You make fewer mistakes, qualify faster, and run automations that actually make sense. And once you’ve set it up once, it works on autopilot.
Frequently Asked Questions About Creating Custom Fields Opportunities
Conclusion: Make Your Pipeline Work for You
Custom fields opportunities aren’t just a “nice touch”—they’re the difference between a cluttered pipeline and a crystal-clear sales system. Once you define what you want to track, GoHighLevel does the heavy lifting.
Set it once, and every lead tells you exactly what you need to know—without chasing reps or digging through notes.
Want to scale faster? Add the right custom fields opportunities, then let automation and reporting handle the rest.
Start simple: add 1–2 custom fields that reflect your actual sales process. Test it. Build automations from it. Then scale it.Tried this mini-guide? We’d love to hear how it’s working for your team. And don’t forget—check back at the GHL Growth Garage blog for all your GoHighLevel mini-guide updates!
Scale Your Business Today.
Streamline your workflow with GoHighLevel’s powerful tools.
