- Smarter Automation with the Chat Reply Trigger
- Quick Summary – Chat Reply Trigger Essentials
- Here are this weeks HighLevel Updates
- What’s New in the Chat Reply Trigger
- Why the Chat Reply Trigger Matters
- How to Use the Chat Reply Trigger in GoHighLevel
- Pro Tips for Using the Chat Reply Trigger
- What This Means for Your Business
- Real-World Automation Examples Using the Chat Reply Trigger
- Frequently Asked Questions About the Chat Reply Trigger
- Conclusion: Smarter Chat Automation with the Chat Reply Trigger
Smarter Automation with the Chat Reply Trigger
Until now, triggering automation from Chat Reply Trigger in GoHighLevel could be a little messy. Chat Reply Trigger coming from chat widgets, live chat, or other conversation channels weren’t always easy to separate. That meant workflows sometimes triggered from the wrong chat source, or required extra setup just to keep automation organized.
The new Chat Reply Trigger filtering fixes that by giving you better control over where chat replies come from. You can now trigger workflows specifically from All-in-One Chat widgets, filter by Chat Type, and select the exact widget configuration you want automation to respond to.
What changed: GoHighLevel has enhanced the Customer Replied trigger by adding support for All-in-One Chat as a Reply Channel. When configuring the trigger inside Automation → Workflows, you can now select All-in-One Chat, filter replies by Chat Type (Chat Widget or Live Chat), and choose the specific chat widget configuration that should trigger the workflow.
Who this is for: Agencies managing multiple chat widgets, businesses using website chat to capture leads, support teams handling live chat conversations, and anyone using GoHighLevel conversations who wants more precise automation based on where chat replies happen.
What we’ll demonstrate: Where to find the Chat Reply Trigger inside Workflows, how to select All-in-One Chat as the reply channel, how Chat Type filtering works, how the dynamic widget selection appears, common configuration mistakes to avoid, and how agencies can use this feature to create cleaner, more precise chat automation workflows in GHL.
The latest GoHighLevel Changelog includes several other GHL feature updates that round out your daily workflow:
- Send prospects directly to your pipelines
- Documents & Contracts: Staff Selection in Templates
- Invoices, Estimates: Open in new tab
- Import from Media Storage in Courses ( Labs )
- Manus triggers and actions in Workflows
- Introducing New Templates
- Workflows: Expanded Error Highlight feature
- Deskphone-to-Deskphone Calling & Transfer
- AI Builder: Conversational Editing for If-Else & Wait Actions
Keep reading for much more on all these updates and a deep dive into the Chat Reply Trigger feature!

Quick Summary – Chat Reply Trigger Essentials
Purpose: This guide explains how the Chat Reply Trigger update works in GoHighLevel and how to use the new All-in-One Chat filtering to trigger workflows based on specific chat widget or live chat replies.
Why It Matters: Chat conversations often generate leads and customer questions. The improved Chat Reply Trigger helps businesses control exactly which chat replies activate automation, reducing confusion and making workflows easier to manage.
What You Get: You learn how to configure the Customer Replied trigger, filter replies by All-in-One Chat, choose Chat Type (Chat Widget or Live Chat), and select the specific widget that should activate your workflow.
Time to Complete: Setting up a workflow with the Chat Reply Trigger typically takes about 5–10 minutes, depending on the actions and automation steps you want to include.
Difficulty Level: Beginner to Intermediate. Any GoHighLevel user familiar with workflows can configure the Chat Reply Trigger with just a few simple settings.
Key Outcome: You’ll be able to create cleaner, more precise chat automation that triggers only when customers reply through the exact chat widget or live chat configuration you select.
Here are this weeks HighLevel Updates
Send Prospects Directly to Your Pipelines
- What It Does:
Allows you to send prospects straight into a specific pipeline stage without manual movement after capture. Instead of creating a contact and then assigning them later, the system pushes them directly into your sales flow. - Where in GHL:
Found inside forms, funnels, workflows, and lead capture configurations where pipeline stage selection is available. You’ll see it when assigning opportunities during automation or submission actions. - Impact:
Removes friction between lead capture and sales follow-up. Reduces missed follow-ups. Ensures every prospect enters the correct pipeline stage immediately. - Who It’s Great For:
Sales teams, agencies managing multiple pipelines, appointment-based businesses, and anyone who wants tighter lead-to-opportunity automation.
Automate marketing, manage leads, and grow faster with GoHighLevel.

Documents & Contracts: Staff Selection in Templates
- What It Does:
Allows you to pre-assign or dynamically select staff members inside document and contract templates. This helps ensure the right team member is connected to the agreement. - Where in GHL:
Inside Documents & Contracts when creating or editing templates. Staff selection options now appear within template configuration. - Impact:
Improves contract accuracy and accountability. Reduces confusion around who owns a client agreement. Saves time during document generation. - Who It’s Great For:
Agencies with multiple account managers, service businesses with assigned reps, and teams that rely on clear ownership in contracts.
Invoices & Estimates: Open in New Tab
- What It Does:
Adds the ability to open invoices and estimates in a new browser tab instead of replacing your current screen. - Where in GHL:
Inside Payments → Invoices and Estimates when selecting or previewing a document. - Impact:
Improves workflow speed. Makes multitasking easier. Prevents losing your place when reviewing multiple financial documents. - Who It’s Great For:
Finance teams, agencies reviewing multiple client invoices, and users who process payments while navigating other GHL sections.
Import from Media Storage in Courses (Labs)
- What It Does:
Allows you to import files directly from Media Storage into Courses without re-uploading content. - Where in GHL:
Inside Online Courses (Labs) when adding course content. You’ll now see an option to import from Media Storage. - Impact:
Reduces duplicate uploads. Saves time. Keeps your content organized in one central media hub. - Who It’s Great For:
Course creators, membership site owners, agencies building training portals, and anyone managing large content libraries.
Manual Triggers and Actions in Workflows
- What It Does:
Introduces manual workflow triggers and/or actions that can be executed intentionally rather than automatically firing based on an event. - Where in GHL:
Inside Workflows when configuring triggers and actions. Manual options now appear in available selections. - Impact:
Adds flexibility. Gives teams more control over when automations execute. Helps prevent accidental automation runs. - Who It’s Great For:
Agencies testing workflows, teams that want approval-based automation, and businesses that need controlled execution steps.
Introducing New Templates
- What It Does:
Adds new pre-built templates inside relevant GHL builders (Workflows, Emails, Funnels, etc.) to speed up setup. - Where in GHL:
Inside template libraries when creating new assets across supported builders. - Impact:
Speeds up implementation. Reduces guesswork. Helps newer users launch faster with proven frameworks. - Who It’s Great For:
Beginners, agencies onboarding clients quickly, and teams that want plug-and-play automation.
Workflows: Expanded Error Highlight Feature
- What It Does:
Expands workflow error detection so more configuration issues are flagged before publishing or running automations. - Where in GHL:
Inside the Workflow Builder. Error highlighting appears directly on misconfigured triggers and actions. - Impact:
Prevents broken automations. Reduces troubleshooting time. Protects leads from falling through the cracks. - Who It’s Great For:
Agencies cloning workflows, advanced automation builders, and anyone managing complex If/Else logic paths.
Deskphone-to-Deskphone Calling & Transfer
- What It Does:
Enables direct deskphone-to-deskphone calling and live call transfers within GHL’s phone system. - Where in GHL:
Inside Phone settings and calling interface when deskphone integrations are configured. - Impact:
Improves internal communication. Makes call routing smoother. Reduces reliance on third-party call systems. - Who It’s Great For:
Sales teams, support desks, multi-agent businesses, and call-heavy operations.
AI Builder: Conversational Editing for If/Else & Wait Actions
- What It Does:
Allows you to edit If/Else conditions and Wait steps using conversational prompts inside the AI Builder. - Where in GHL:
Inside Workflows when using AI Builder to configure or modify automation logic. - Impact:
Speeds up workflow building. Reduces technical friction. Makes complex automation logic easier to adjust. - Who It’s Great For:
Agencies building advanced automations, users uncomfortable with logic configuration, and teams wanting faster workflow edits.
What’s New in the Chat Reply Trigger
The latest update improves how the Chat Reply Trigger works inside GoHighLevel workflows. It introduces a clearer way to identify replies coming from All-in-One Chat widgets, making automation more precise and easier to configure.
Before this change, chat replies could trigger workflows without clearly identifying whether the response came from a website chat widget or a live chat session. This sometimes required extra filters or multiple workflows to control when automations should run.
Now, GoHighLevel has added All-in-One Chat as a dedicated Reply Channel option inside the Customer Replied trigger. This gives you better visibility and control over how chat conversations trigger automation.
When you select All In One Chat as the reply channel, two new filtering options appear automatically.
The first new filter is Chat Type. This allows you to choose whether the reply came from a Chat Widget or from Live Chat. This helps separate automated website chat responses from real-time support conversations.
The second improvement is a dynamic widget filter. Once you select a chat type, GoHighLevel will only display the relevant widgets or configurations connected to that chat type. This keeps the dropdown clean and prevents unrelated chat setups from appearing.
Here’s a quick breakdown of the new capabilities:
- All-in-One Chat added as a Reply Channel option in the Customer Replied trigger
- Chat Type filter introduced to separate Chat Widget and Live Chat replies
- Dynamic widget filtering that only shows relevant chat configurations
- Cleaner workflow setup with fewer unnecessary options
This structured filtering system makes the Chat Reply Trigger far more useful for businesses that rely on chat conversations for lead generation, customer support, or appointment booking.
Instead of building complicated workflows just to manage chat replies, you can now configure one clean trigger that fires exactly when a customer replies through the specific chat widget or live chat channel you want.
Why the Chat Reply Trigger Matters
If you rely on chat conversations to capture leads or answer customer questions, automation needs to respond at the right moment and from the right channel. That’s exactly what the improved Chat Reply Trigger helps you do.
Before this update, chat replies were harder to organize inside workflows. Replies from chat widgets and live chat could appear similar, which meant automation sometimes fired when you didn’t expect it to. This often forced agencies to build extra workflows or add complicated conditions just to control how chat automation behaved.
The new Chat Reply Trigger filtering removes that confusion.
Now you can clearly define where the reply came from, and only trigger automation when that specific chat source responds. This gives you much more control over how conversations move through your marketing or support workflows.
One major benefit is more precise automation. Instead of triggering workflows from every chat interaction, you can target replies coming from a specific chat widget or live chat configuration.
Another benefit is cleaner workflow design. Since the trigger now includes built-in filtering options, you no longer need multiple workflows to separate chat types. A single workflow can be configured to respond only to the exact type of chat reply you want.
This also improves team coordination. Sales teams, support teams, and marketing automation can now react differently depending on the type of chat conversation happening.
For example, a reply from a website lead capture widget might trigger a sales follow-up workflow, while a live support chat reply could notify a customer service agent instead.
Agencies will especially benefit from this update. If you manage several chat widgets for different landing pages, funnels, or client websites, the Chat Reply Trigger now allows you to trigger automation based on the exact widget configuration being used.
This leads to faster responses, better organization, and more reliable automation across all chat conversations inside GoHighLevel.
How to Use the Chat Reply Trigger in GoHighLevel
The Chat Reply Trigger allows you to start a workflow when a customer responds through a specific All-in-One Chat widget or Live Chat configuration. With the new filtering options, you can control exactly which chat conversations trigger automation.
In this section, we’ll walk through where to find the trigger and how to configure it properly. By the end, you’ll know how to set up a workflow that activates only when a reply comes from the chat widget or live chat configuration you choose.Follow the steps below to configure the Chat Reply Trigger inside your GoHighLevel workflow.
- Access the Automation Section in GoHighLevel.
- Add the Customer Replied Trigger.
- Select All-in-One Chat as the Reply Channel.
- Choose the Chat Type in the action.
- Select the Specific Chat Widget Configuration.
- Select the Live Chat Configuration.
- Save the Trigger That Complete the Workflow.
- Add Workflow Actions to Automate Chat Responses.
To start, make sure you are logged in to your GoHighLevel sub-account.
Step 01 – Access the Automation Section in GoHighLevel
- In this step, you will open the Automation area and create a new workflow where the Chat Reply Trigger will be configured.
1.1 Locate the Main Menu on the left side of your screen. Click on Automation.
- This opens the automation tools area where workflows and triggers are managed.
1.2 Select Workflows from the Automation section.
- The Workflows page is where you create and manage automation sequences in GoHighLevel.
1.3 Click Create Workflow to start a new automation.
- This opens the workflow creation screen so you can build a new automation.
1.4 Click Start from scratch to start a new automation.
- This creates a blank workflow where you will add the Customer Replied trigger.

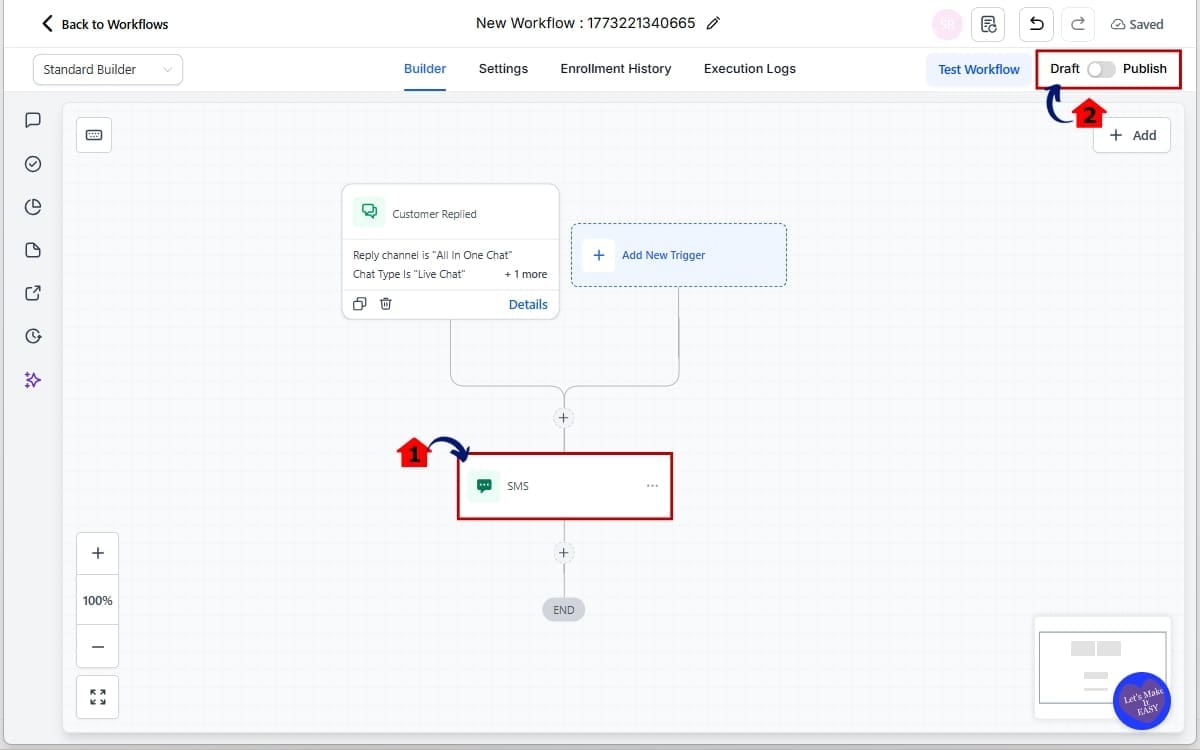
Step 02 – Add the Customer Replied Trigger
- In this step, you will add the trigger that starts the workflow when a contact replies through one of your communication channels.
2.1 Click Add New Trigger.
- This opens the trigger selection panel where you can choose what event will start your workflow.
2.2 Search for Customer Replied in the trigger list.
- Use the search bar to quickly locate the trigger that activates when a contact responds to a message.
2.3 Select Customer Replied.
- This trigger activates whenever a contact replies through one of your communication channels such as chat, SMS, email, or other supported messaging channels.
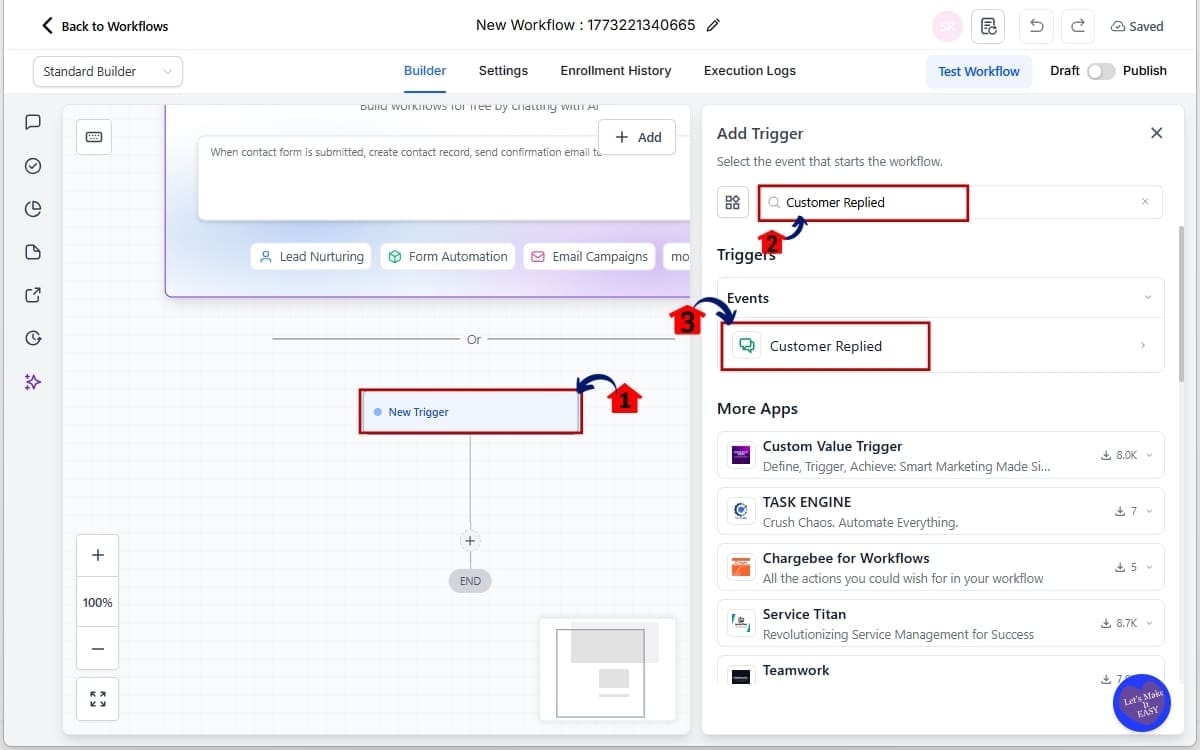
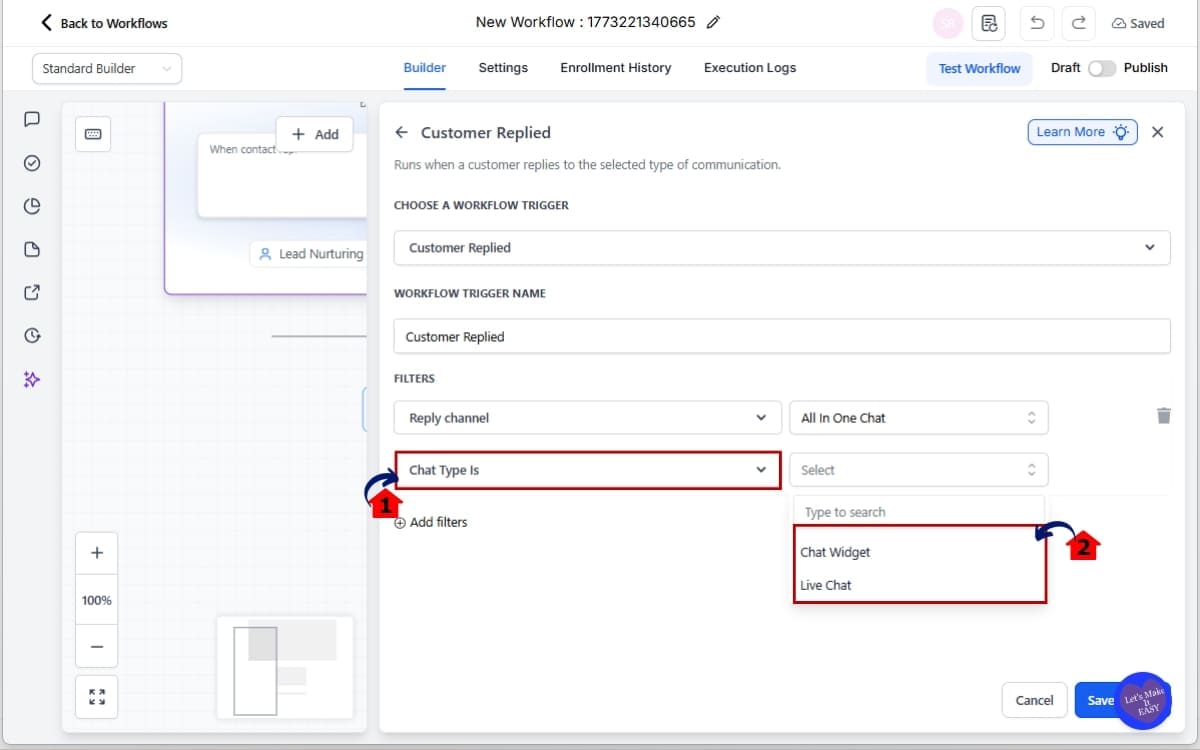
Step 03 – Select All-in-One Chat as the Reply Channel
- In this step, you will apply a filter so the workflow only triggers when a contact replies through an All-in-One Chat widget.
3.1 Locate Add Filters in the trigger settings.
- This option allows you to refine when the Customer Replied trigger should activate.
3.2 Locate the Reply Channel filter inside the trigger settings.
- This filter lets you choose which communication channel the reply must come from.
3.3 Select All In One Chat.
- Once selected, GoHighLevel will reveal additional filtering options specific to unified chat widgets.
Step 04 – Choose the Chat Type in the action
- In this step, you will choose which type of chat conversation should trigger the workflow.
4.1 Find the Chat Type is dropdown.
- This option appears after selecting All In One Chat as the Reply Channel and allows you to filter the type of chat interaction.
4.2 Choose one of the following options.
- Selecting a chat type ensures your workflow triggers only from the specific type of conversation.
- Chat Widget – Replies coming from embedded website chat widgets.
- Live Chat – Replies coming from live chat support sessions.
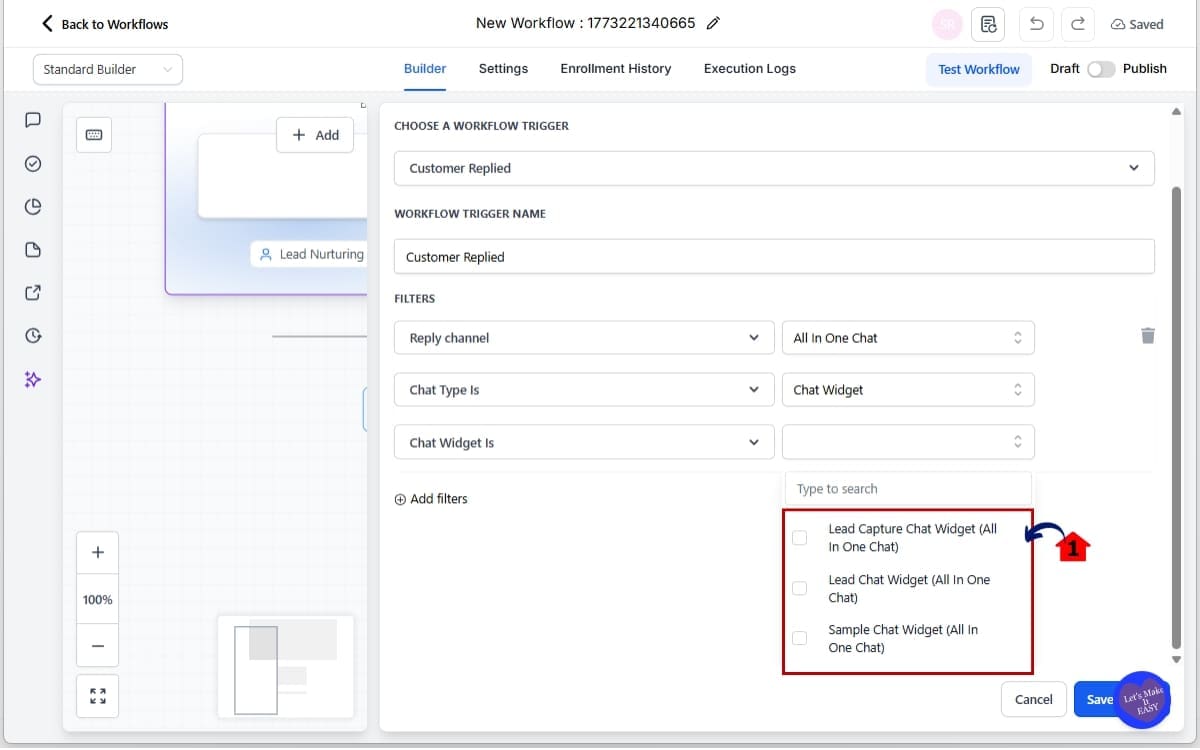
Step 05 – Select the Specific Chat Widget Configuration
- In this step, you will choose the exact chat widget or live chat configuration that should trigger the workflow.
5.1 Select the Chat Widget is dropdown and choose the specific configuration.
- The dropdown will display the available All-in-One Chat widgets or Live Chat setups based on the Chat Type you selected, ensuring the workflow triggers only from the correct chat source.
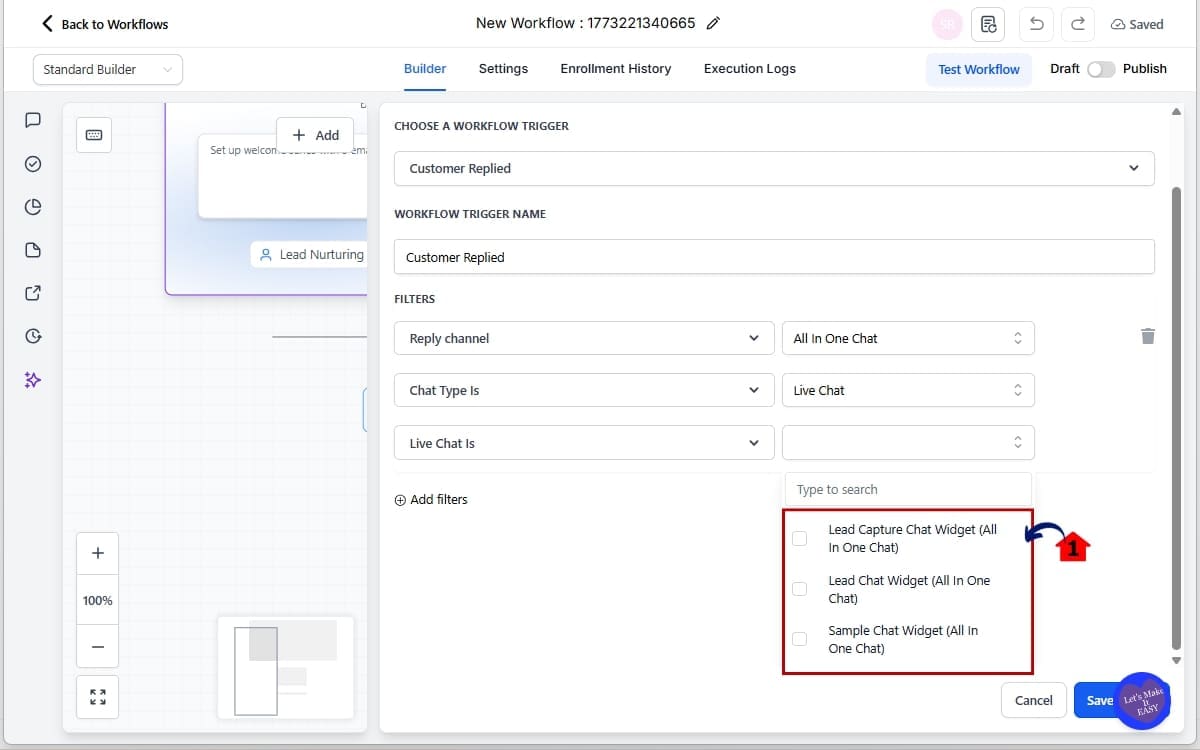
Step 06 – Select the Live Chat Configuration
- In this step, you will choose the specific Live Chat setup that should trigger the workflow when a customer replies.
6.1 If Chat Type = Live Chat, select the Live Chat is dropdown and choose the correct configuration.
- The dropdown will only display Live Chat configurations connected to your All-in-One Chat setup, helping prevent incorrect widget selections and keeping your trigger filters clean.
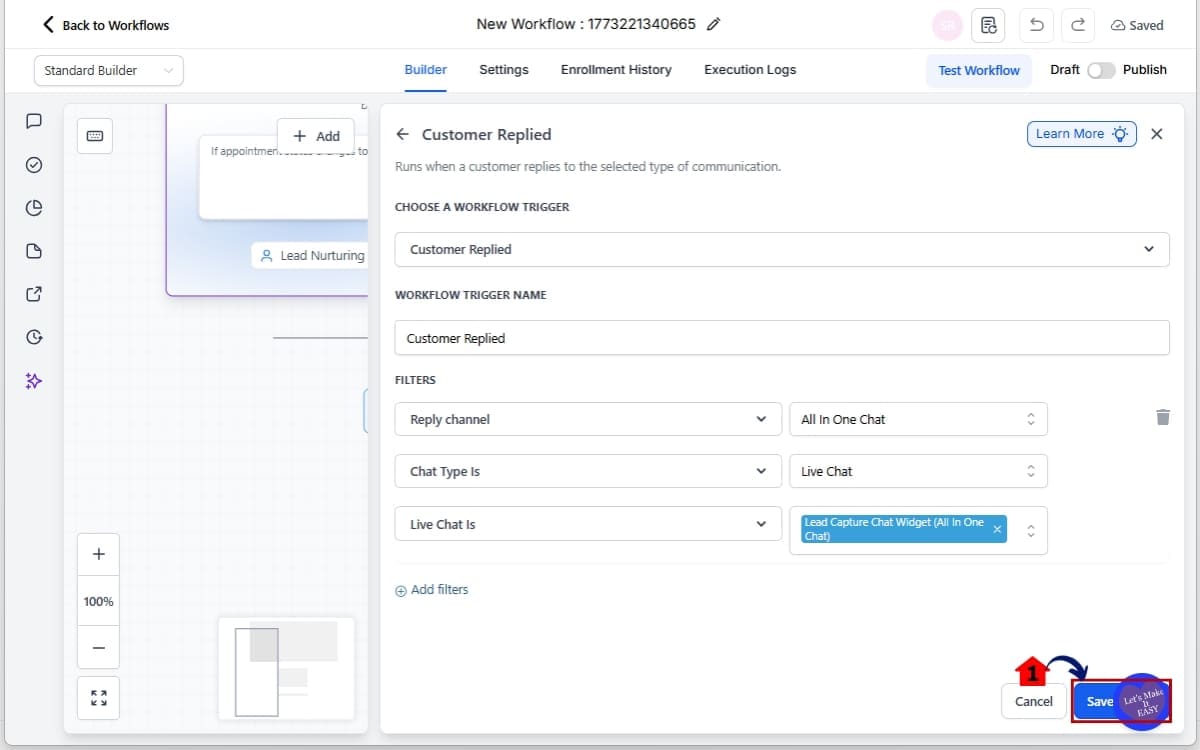
Step 07 – Save the Trigger That Complete the Workflow
- In this step, you will save the trigger settings so your workflow can start responding to chat replies.
7.1 Click Save Trigger.
- This saves the Customer Replied trigger with the All-in-One Chat filters and allows you to continue adding automation actions to your workflow.
Step 08 – Add Workflow Actions to Automate Chat Responses
- In this step, you will add the automation actions that should run when the Chat Reply Trigger activates.
8.1 Add the actions you want the workflow to perform.
- Choose the automation actions that should happen when a customer replies through the selected chat widget or live chat configuration.
Common automation actions include:
- Send SMS follow-up – Automatically send a text message to continue the conversation.
- Send automated email response – Deliver an email with helpful information or next steps.
- Add a contact tag – Label the contact so you can track chat leads or segment them later.
- Assign the conversation to a team member – Route the chat reply to the appropriate staff member.
- Create a pipeline opportunity – Add the contact to your sales pipeline for tracking.
- Notify a sales or support agent – Send a notification so your team can respond quickly.
8.2 Click Publish to activate the workflow.
- Once published, the workflow will run only when a customer reply comes from the selected All-in-One Chat widget or Live Chat configuration.
Pro Tips for Using the Chat Reply Trigger
The new Chat Reply Trigger gives you more control over how chat conversations activate automation in GoHighLevel. But like most automation tools, the real power comes from how you structure your workflows.
Below are a few practical tips to help you get the most out of this feature.
Separate Sales and Support Chat Automations
Not every chat conversation should trigger the same workflow.
For example, a website chat widget used for lead generation should usually trigger a sales follow-up. But a live chat support conversation might need a completely different automation flow.
Using the Chat Type filter, you can create separate workflows such as:
- Sales follow-up for Chat Widget replies
- Customer support notifications for Live Chat replies
This keeps your automation organized and prevents the wrong team from being notified.
Assign Conversations Automatically
One powerful use of the Chat Reply Trigger is routing conversations to the right team member.
For example, when a customer replies through a specific chat widget, your workflow can automatically:
- Assign the conversation to a sales representative
- Notify a support agent
- Create a task for a team member
This helps teams respond faster and reduces the chance of messages being missed.
Tag Contacts Based on Chat Source
Tags are extremely useful when combined with chat automation.
When the Chat Reply Trigger activates, you can automatically add tags like:
- Website Chat Lead
- Live Chat Support
- Sales Inquiry
These tags make it easier to segment contacts and track where conversations started.
Later, you can use these tags for email campaigns, pipeline automation, or reporting.
Trigger Lead Qualification Workflows
Many businesses use chat widgets to capture new leads.
When someone replies through a Chat Widget, your workflow can automatically:
- Ask qualifying questions
- Send a follow-up SMS or email
- Add the contact to a pipeline
- Notify the sales team
This creates a fast-response lead system that improves conversion rates.
Avoid Duplicate Automation Triggers
One common mistake is triggering multiple workflows from the same conversation.
To avoid this:
- Keep your Chat Reply Trigger filters specific
- Only select the chat widgets you truly want to monitor
- Avoid overlapping triggers across multiple workflows
This keeps automation predictable and prevents contacts from receiving duplicate messages.
When used correctly, the Chat Reply Trigger becomes a powerful way to automate conversations while keeping workflows organized and easy to manage.
What This Means for Your Business
The updated Chat Reply Trigger is more than just a small workflow improvement. It gives businesses using GoHighLevel a much clearer way to manage conversations and automate responses based on how customers interact with chat.
For many businesses, chat is now one of the fastest ways customers reach out. People visit a website, ask a quick question through the chat widget, and expect a fast response. Without automation, those messages can easily be missed or delayed.
With the improved Chat Reply Trigger, you can build workflows that react instantly when someone replies through a specific chat widget or live chat channel.
For example, imagine a visitor asking about a service through your website chat widget. Instead of waiting for someone on your team to notice the message, a workflow can immediately:
- Send an automated welcome message
- Notify a sales representative
- Create an opportunity in your pipeline
- Assign the conversation to the correct team member
This kind of automation helps businesses respond faster and keep conversations moving forward.
Agencies managing multiple client accounts will also find this feature especially useful. Different clients may have different chat widgets across landing pages, funnels, or websites. With the improved Chat Reply Trigger, you can control exactly which widget triggers which workflow.
This allows agencies to create cleaner automation systems that are easier to manage across multiple sub-accounts.
It also improves lead tracking. By triggering workflows based on the exact chat widget a customer replies through, you can better understand where conversations are coming from and how leads are engaging with your business.
Ultimately, the goal is simple. Faster responses, smarter automation, and more organized workflows.
And when chat conversations are handled efficiently, it leads to better customer experiences and more opportunities to turn conversations into sales.
Real-World Automation Examples Using the Chat Reply Trigger
The improved Chat Reply Trigger opens the door to smarter conversation automation inside GoHighLevel. Instead of treating all chat replies the same, you can now build workflows that respond differently depending on the chat widget or live chat configuration being used.
Below are a few practical ways businesses and agencies can use this feature in real workflows.
Example 1 – Website Lead Qualification Automation
Many businesses use chat widgets as a lead capture tool on their website.
With the Chat Reply Trigger, you can automatically start a qualification workflow as soon as a visitor responds through the website chat widget.
Here is how the automation could work:
- A visitor opens the website chat widget and asks a question about your service
- The visitor replies inside the chat conversation
- The Chat Reply Trigger activates the workflow
- The workflow sends an automated message asking qualifying questions
- The system adds the contact to a sales pipeline
- A notification is sent to a sales representative
This creates a fast-response lead capture system that keeps potential customers engaged.
Example 2 – Live Chat Support Notification
Businesses offering real-time support can use the Live Chat filter to trigger support workflows.
For example:
- A customer replies during a Live Chat session
- The Chat Reply Trigger detects the response
- The workflow notifies a support team member
- The conversation is assigned to the appropriate agent
- A task is created for follow-up if needed
This helps ensure that support requests are handled quickly and no customer messages are overlooked.
Example 3 – Funnel Chat Widget Lead Tracking
Agencies often place different chat widgets on landing pages or funnels.
Using the Chat Reply Trigger, you can track exactly where those conversations are coming from.
For example:
- A visitor replies through a chat widget on a funnel landing page
- The trigger activates a workflow specific to that funnel
- The workflow applies a tag like Funnel Lead – Chat
- A pipeline opportunity is created
- The lead receives a follow-up message with booking links or additional information
This allows agencies to track which funnels and pages are generating chat conversations.
Example 4 – Instant Follow-Up for Chat Conversations
One of the biggest benefits of automation is immediate follow-up.
Using the Chat Reply Trigger, businesses can automatically send helpful responses as soon as a contact replies through chat.
For example:
- When a contact replies through the chat widget, the workflow sends an instant response such as:
“Thanks for reaching out! One of our team members will be with you shortly.”
The workflow can also send:
- Appointment booking links
- Helpful FAQs
- Service information
This keeps the conversation active while your team prepares to respond.
These real-world use cases show how the Chat Reply Trigger can help businesses automate chat conversations, respond faster, and keep their workflows organized.
Instead of manually monitoring chat messages, GoHighLevel workflows can now react automatically based on where the reply came from and which widget was used.
Frequently Asked Questions About the Chat Reply Trigger
Conclusion: Smarter Chat Automation with the Chat Reply Trigger
The improved Chat Reply Trigger gives GoHighLevel users a much cleaner way to automate conversations. By adding All-in-One Chat as a Reply Channel, along with Chat Type filtering and dynamic widget selection, GHL now makes it easier to control exactly which chat replies activate your workflows.
Instead of guessing where a conversation came from, you can now trigger automation based on the exact chat widget or live chat configuration being used. This helps keep workflows organized, prevents automation from firing in the wrong situations, and ensures the right team members respond at the right time.
For agencies and businesses that rely on chat conversations for lead generation, support, and customer engagement, this update makes a real difference. It allows you to build smarter automation systems that react instantly when customers reply through the channels that matter most.
Even better, you don’t need to migrate existing workflows. The new options simply appear inside the Customer Replied trigger, ready to be used whenever you want to add more precise chat automation.
If you are using chat widgets on websites, funnels, or landing pages, this feature is worth testing right away.
Set up a workflow using the GoHighLevel Chat Reply Trigger, apply the new filters, and see how much cleaner your automation becomes.
The team here at GHL Growth Garage will continue sharing guides like this to help you get the most out of GoHighLevel.
Have you tried the new GHL Chat Reply Trigger yet?
How are you using chat automation in your workflows?
Scale Your Business Today.
Streamline your workflow with GoHighLevel’s powerful tools.