Easily embed and customize the native calendar form inside your GoHighLevel funnels for smoother appointment booking.
Funnels are built to convert. But here’s the thing if you make people click away just to book an appointment, you’re leaking leads. That’s where the calendar form inside GoHighLevel comes in. Instead of using a separate form and redirecting to a calendar, GHL now lets you combine both in one spot.
Your prospects can enter their info and book a time on your calendar without leaving the funnel page. That means fewer clicks, less confusion, and more appointments. This mini guide will walk you step by step through adding the native calendar form to your funnel. You’ll also learn when to use the drag-and-drop element vs. custom embed code, plus a few pro tips to make the most of it.
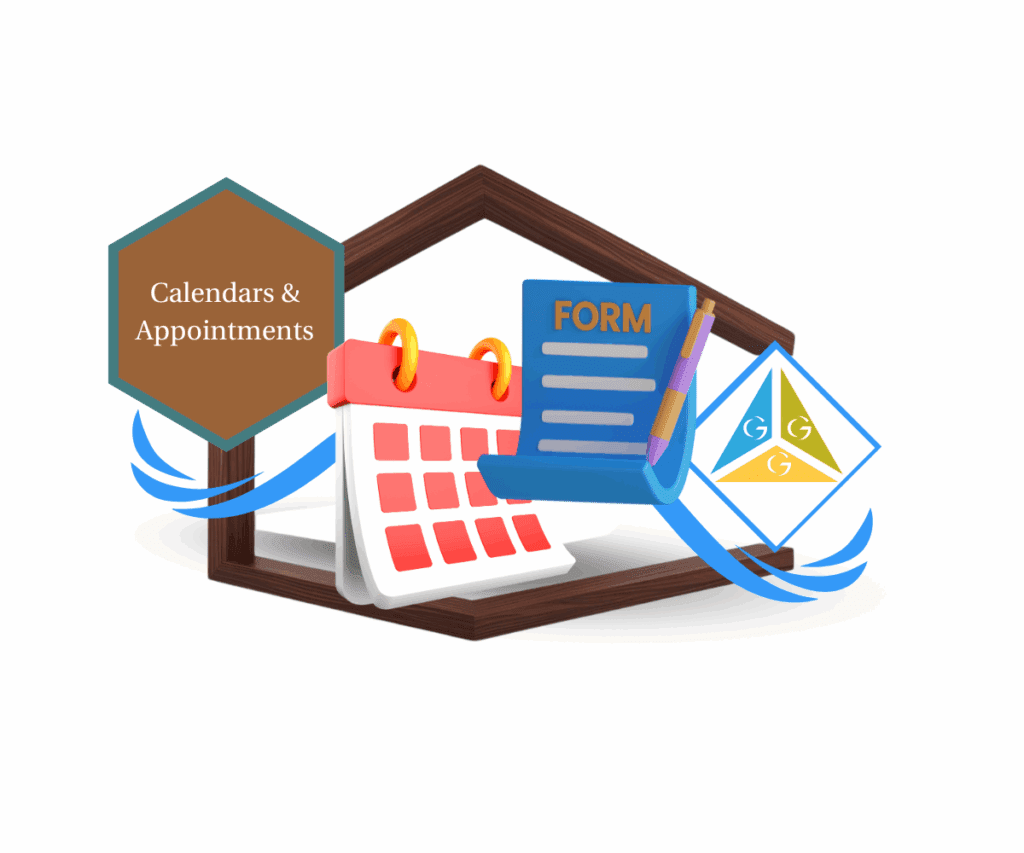
With the GHL calendar form, you can capture details and book appointments in one step. No redirects, no friction just smooth scheduling that converts.
Quick Summary – Calendar Form at a Glance
The purpose of this update is to show how the native GoHighLevel calendar form makes appointment booking inside funnels smoother and faster. It matters because it eliminates the need for separate forms and reduces drop-offs, leading to higher conversions. What you get is a built-in calendar with form fields that automatically capture contact details and schedule bookings in one step. The time to complete setup is just a few minutes, and the difficulty level is beginner-friendly since it only requires drag-and-drop actions in the page builder. The key outcome is a streamlined funnel that fills calendars more efficiently while syncing seamlessly with workflows and the CRM.
Purpose: This update makes it easy to add a native calendar form directly into your GoHighLevel funnels.
Why It Matters: It eliminates the need for separate forms and reduces drop-offs, helping you convert more leads into booked appointments.
What You Get: A built-in calendar with form fields that capture contact details and confirm bookings in one step.
Time to Complete: Just a few minutes to set up inside the GHL page builder.
Difficulty Level: Beginner-friendly — simple drag-and-drop setup.
Key Outcome: A streamlined funnel that fills calendars more efficiently while syncing automatically with workflows and the CRM.
What’s New with the Native Calendar Form
The native calendar form in GoHighLevel isn’t just another add-on. It’s baked right into the calendar element itself, which means you don’t have to juggle separate forms or build workarounds.
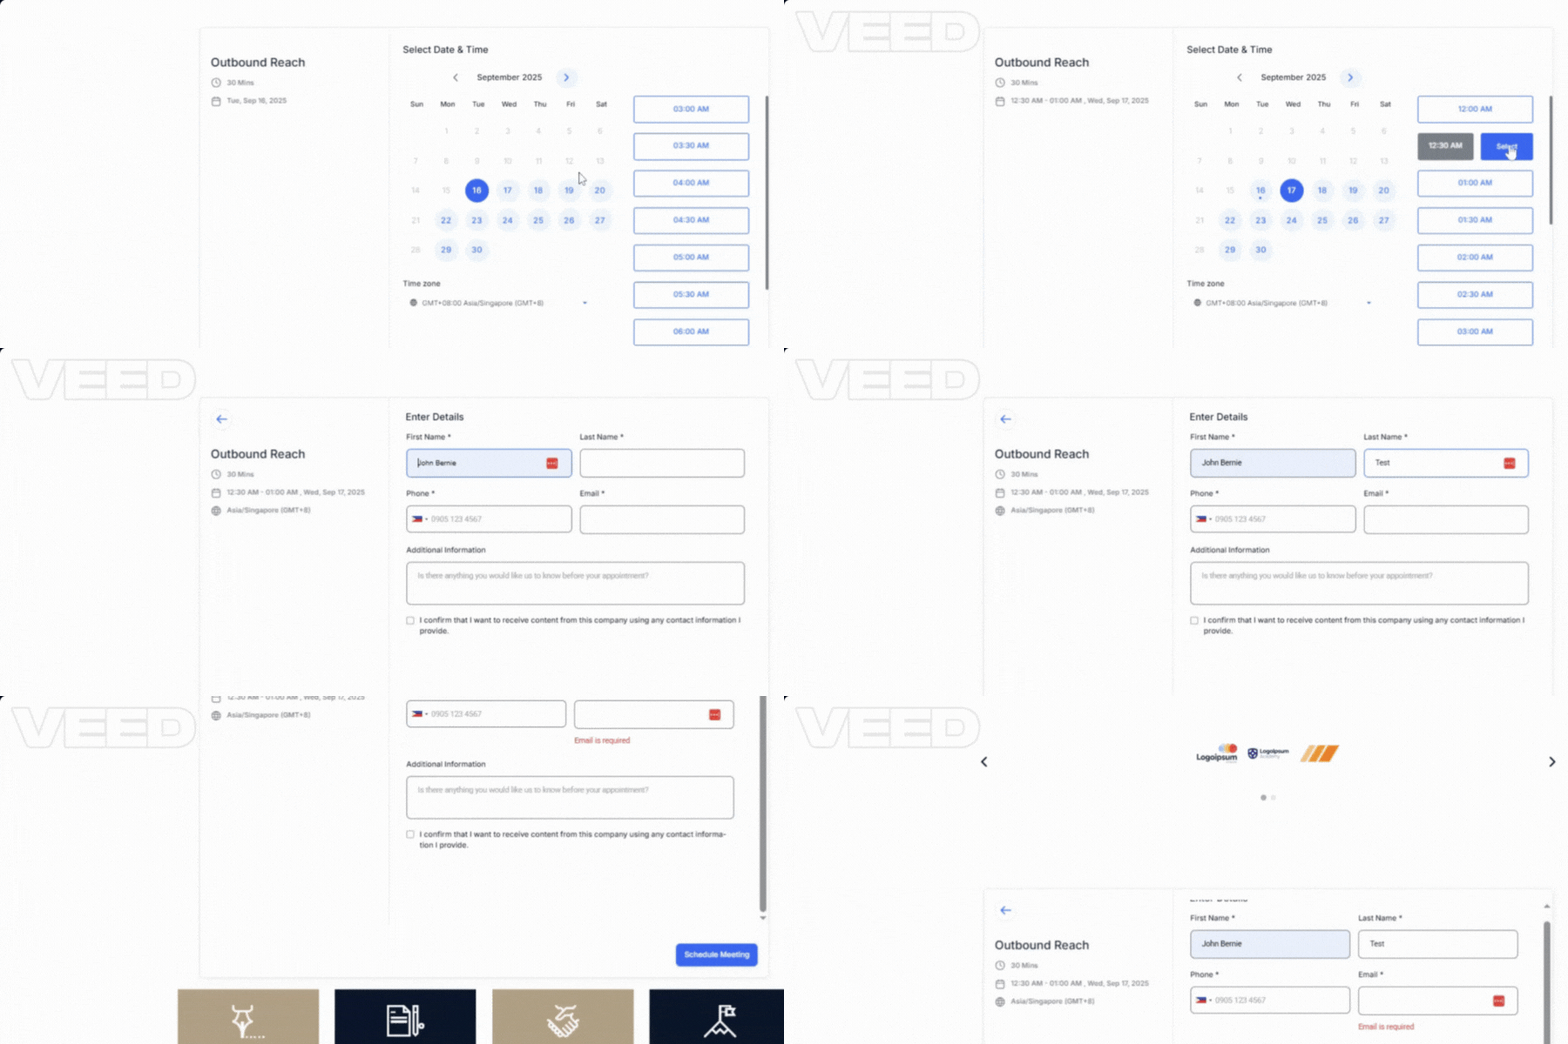
When you drag the calendar onto a funnel page, the form fields are already connected. The system automatically asks for the key details you need—like name, email, or phone number before locking in a booking. No extra setup. No duplicate forms.
Automate marketing, manage leads, and grow faster with GoHighLevel.

What’s changed is how seamless this feels. Instead of embedding a standalone form and hoping it syncs with your calendar, GHL does it natively. The calendar becomes both a form and a booking tool in one.
For agencies, this is huge. It cuts down build time, reduces mistakes, and ensures all appointment data flows directly into your CRM without extra integrations. In short, it’s the fastest way to get prospects on your calendar without adding friction.
Why the Calendar Form Matters for Funnels
Funnels work best when they eliminate distractions. Every extra click is a chance for someone to drop off. By using the calendar form, you keep everything on a single page: capture details, schedule the appointment, and confirm all without sending prospects elsewhere.
This matters for two big reasons:
- Higher conversion rates – When users don’t have to jump between a form page and a scheduling page, more of them complete the process.
- Better user experience – A clean, native flow builds trust. Prospects feel like they’re booking directly with you, not getting shuffled around.
Think of it this way: if your funnel is a sales rep, the calendar form is the closer. Instead of handing leads off to another tool, it seals the deal right inside the funnel.
For agencies, this also means less complexity when setting up funnels for clients. One tool, one flow, one conversion path. And that translates directly into booked calls and more revenue.
How to Add a Calendar Form in GoHighLevel
Adding a calendar form to your funnel in GHL is straightforward. Here’s the step-by-step:
Step 01 – Access the Main Left Hand Menu in GoHighLevel
- The Main Menu on the Left side of your screen has all the main areas that you work in when using GHL
1.1 Click on the Sites Menu Item.
- Access the ‘Site’ section of GoHighLevel
- You’ll now be in the ‘Site’ section of GHL, where you can access the Funnels section from the top menu:
1.2 Click on the ‘Funnel’ menu link.
- You can Use website also however for this guide we will use “Funnel” and its exactly works the same.
1.3 ChooseFunnel
- Choose already Made funnel or you can Create from the scratch too.
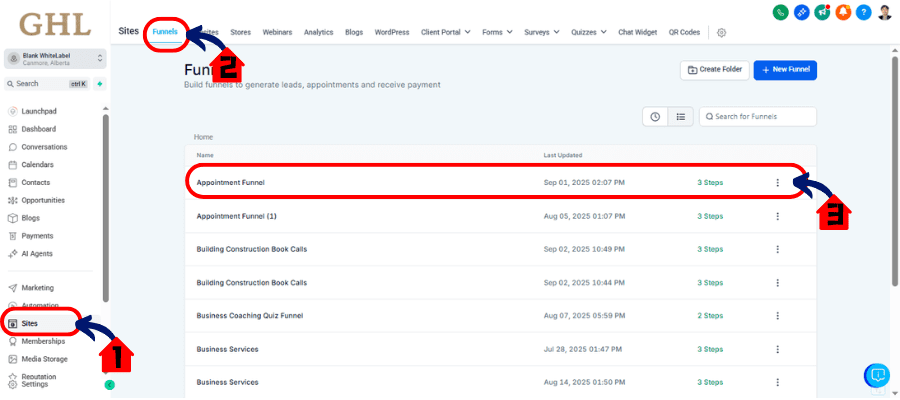
Step 02: Add the Calendar element
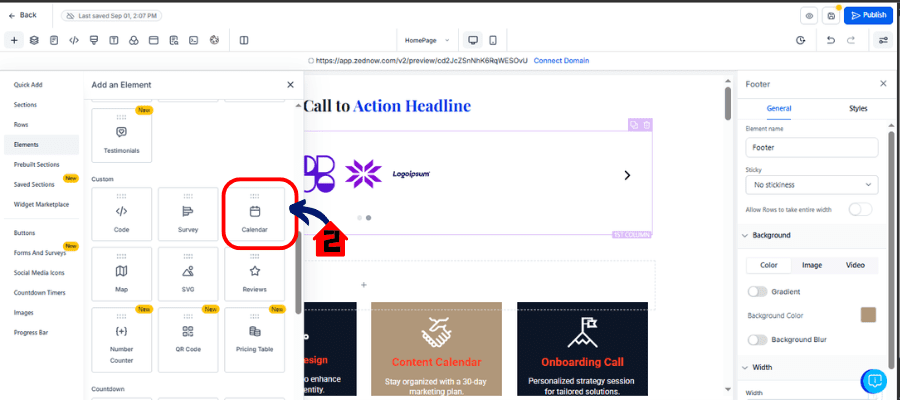
- On the left panel, click “Add Element.” Scroll until you find “Calendar,” then drag it onto your funnel page. Place it where you want the booking form to appear.
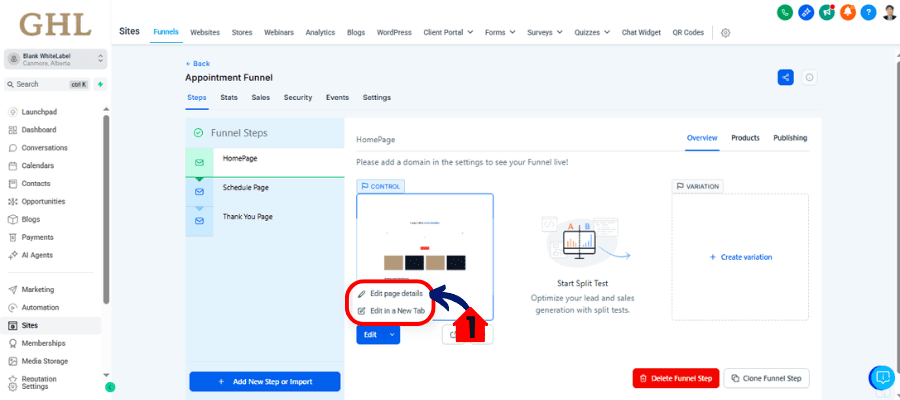
2.1 Edit Page
2.2 Add Calendar Element
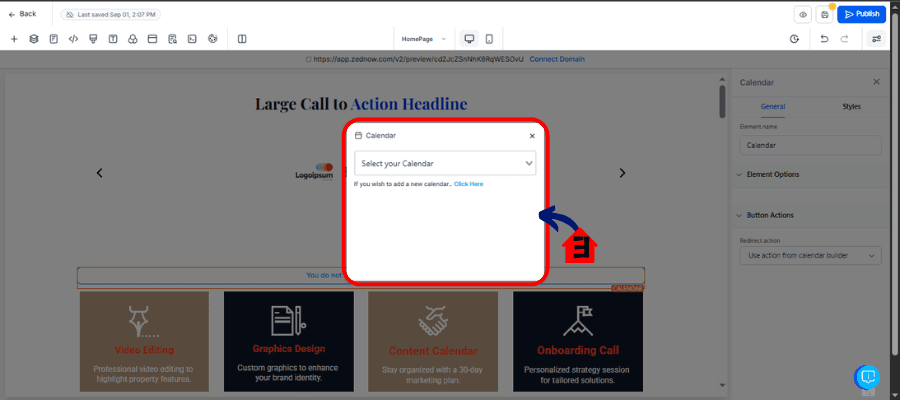
2.3 Select your calendar
- Click the new calendar block. In the settings menu on the left, choose which calendar you want to display. GHL pulls in your existing calendars, so just select the one tied to your booking process.
2.4 Set Button Action
- Set the Element Button action and Make Sure the action is “Use action from Calendar Builder”
Step 03: Configure the Calendar form fields
- The calendar comes with built-in form fields (name, email, phone, etc.). You can toggle these on or off depending on what info you need. Keep it short—too many fields can hurt conversions.
3.1 Go to Calendar
3.2 Click Calendar Settings
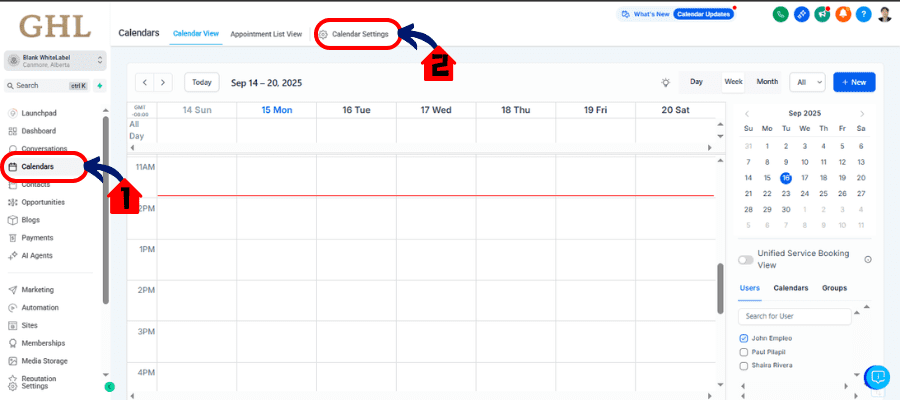
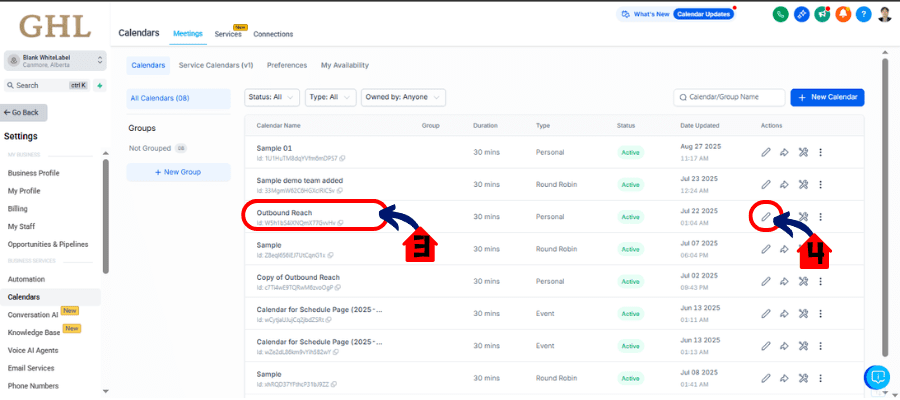
3.3 Choose Calendar
- Choose the Calendar that you use in your “Funnel”
3.4 Edit Calendar
- Click the pencil icon to edit the calendar
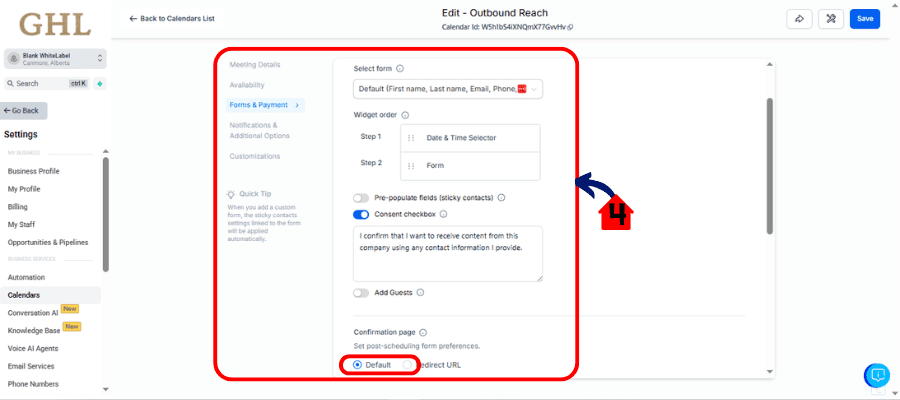
3.5 Click Form and Payment
- Configure the calendar form and make sure to set it to default. Save it after the Configuration
Step 04: Save and preview your funnel
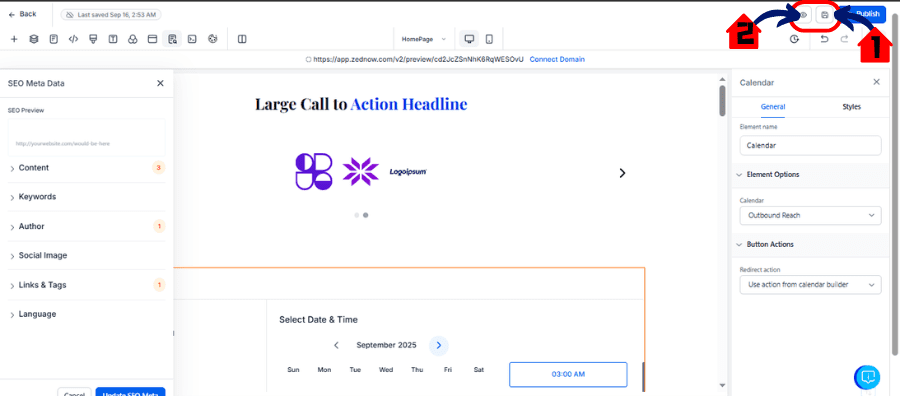
- Hit “Save” in the top right, then preview your page. Test the flow yourself by filling out the form and booking a time. Make sure confirmation emails and workflows fire correctly.
4.1 Click Save
4.2 Click Preview
In under five minutes, you’ve got a live calendar form inside your funnel—ready to capture leads and book appointments automatically.
Using the Calendar Element vs. Embed Code
There are two main ways to add a calendar form to your funnel:
Option 1: Using the Calendar Element (Recommended)
- Fastest method just drag and drop
- Automatically connects the form fields and booking flow
- Perfect for most funnels and client projects
- Minimal setup, no coding needed
Option 2: Using Embed Code (For Advanced Needs)
- Use this if you want to embed the calendar outside of the GHL builder or need advanced styling
- Go to Calendars inside your GHL account
- Select the calendar you want → click the three dots → choose Share → then copy the Embed Code
- In your funnel, add a Custom JS/HTML element and paste the code
- Save and preview to test
So, which should you choose?
- If you’re building inside GHL funnels → use the native element.
- If you’re embedding calendars into external websites or need custom design tweaks → go with embed code.
Most agencies will find the drag-and-drop element more than enough. But it’s good to know you’ve got options if you want more control.
Quick Tips for Better Results
Dropping a calendar form into your funnel is step one. Getting it to perform at its best takes a little extra polish. Here are a few quick wins:
Keep it short and simple
Only ask for the essentials name, email, phone. The fewer fields, the more bookings.
Match your branding
Update colors, fonts, and button styles so the form blends seamlessly with your funnel design. A consistent look builds trust.
Use automations
Trigger workflows the moment someone books. Send reminders, add them to an email nurture, or push them into your CRM pipeline automatically.
Test mobile first
Most bookings will come from phones. Always preview the funnel on mobile to make sure the form looks good and works without awkward scrolling.
Confirm the experience
After a test booking, check that confirmation emails and reminders are firing correctly. This reassures leads and reduces no-shows.
By tightening up these details, you’ll turn a simple booking form into a frictionless scheduling machine.
FAQs About the Calendar Form
Conclusion
The calendar form is one of those small updates in GoHighLevel that makes a big difference. Instead of juggling separate forms and schedulers, you now have a native, streamlined way to capture details and book appointments directly inside your funnel.
Here’s the bottom line:
- Use the drag-and-drop calendar element when speed and simplicity matter.
- Switch to embed code if you need deeper customization or want to add a calendar outside GHL.
- Keep your form lean, branded, and connected to workflows for maximum impact.
If you haven’t added a calendar form to your funnels yet, test it today. Start with one funnel, run a few bookings through it, and see how much smoother the process feels—for you and your prospects.
The faster you make it for leads to book, the faster your calendar fills up. And that’s the kind of funnel optimization that drives real results.
Scale Your Business Today.
Streamline your workflow with GoHighLevel’s powerful tools.
