- Now you can enable chat in Communities, Courses, and Affiliates right inside your client portal.
- Quick Summary – Client Portal Chat Essentials
- Chat Widgets in Client Portal Child Apps
- Better In-App Communication
- Enable Chat Widgets in the Client Portal
- Pro/Quick Tips – Maximize Your Client Portal Chat
- Real Agency Impact
- Frequently Asked Questions – Client Portal Chat Widgets
- GHL Client Chat Is Finally Where It Belongs
Now you can enable chat in Communities, Courses, and Affiliates right inside your client portal.
GHL Adds Client Portal Chat Widgets to Boost Engagement
The new client portal chat update makes it easier to help users right where they are.
Now in GHL, you can add chat widgets directly inside your Client Portal across Communities, Courses, and Affiliates. No more switching tabs or sending users off to find support. Everything happens inside the same space they’re already using.
Client Portal Chat gives you full control. You can choose which parts of the portal show chat and keep it off where it’s not needed. It’s simple, smart, and focused on real support.
If your agency handles course delivery, runs communities, or manages affiliate programs, this helps you stay connected with less effort.
Now you can put live chat exactly where it matters. The client portal chat update helps agencies give support inside the apps clients already use. It saves time, improves the experience, and keeps conversations flowing in real time.
Quick Summary – Client Portal Chat Essentials
Purpose: This update lets you add real-time chat support directly inside GHL’s Client Portal.
Why It Matters: Clients can now ask for help without leaving Communities, Courses, or Affiliates saving time and reducing confusion.
What You Get: One chat widget that can be shown or hidden in each portal section with simple toggle settings.
Time To Complete: 5 minutes or less to activate and assign chat widget visibility.
Difficulty Level: Beginner-friendly. No coding or advanced setup required.
Key Outcome: A smoother, more responsive support experience inside your portal that keeps clients engaged where it counts.
Chat Widgets in Client Portal Child Apps
The client portal chat feature just got a solid upgrade.
You can now turn on chat support inside the Communities, Courses, and Affiliates sections of your GHL Client Portal. Each one can be switched on or off, so you control where the widget shows up.
Automate marketing, manage leads, and grow faster with GoHighLevel.
This helps you focus support where it’s needed most. If you want chat only in Courses, you can do that. If you want it across all three, that’s possible too.
Right now, you can only use one chat widget across the portal. You choose where it appears, but you can’t run separate widgets in different spots.
It’s a small tweak that opens up more ways to support your users without adding extra tools.
Better In-App Communication
The more your users can do inside the portal, the better their experience. That’s where the client portal chat feature makes a real difference.
Instead of jumping between tabs or sending support emails, clients can ask for help right inside the same place they’re working. It saves them time and cuts down on confusion.
For agencies, this means fewer dropped conversations and faster response times. It also keeps clients more engaged with your content, whether that’s a course, a community, or an affiliate program.
Here’s where this works best:
- Course creators who want to answer questions without pulling users out of the lesson
- Community managers who need a quick way to guide users
- Agencies who support affiliate partners with onboarding or updates
This update doesn’t change the tools you use. It just helps them do more.
Enable Chat Widgets in the Client Portal
This update is simple to set up. In just a few steps, you can turn on client portal chat and choose where it shows up. You’ll be adding real-time support without touching code or building new pages.
To start, make sure you’re logged into your GoHighLevel sub-account.
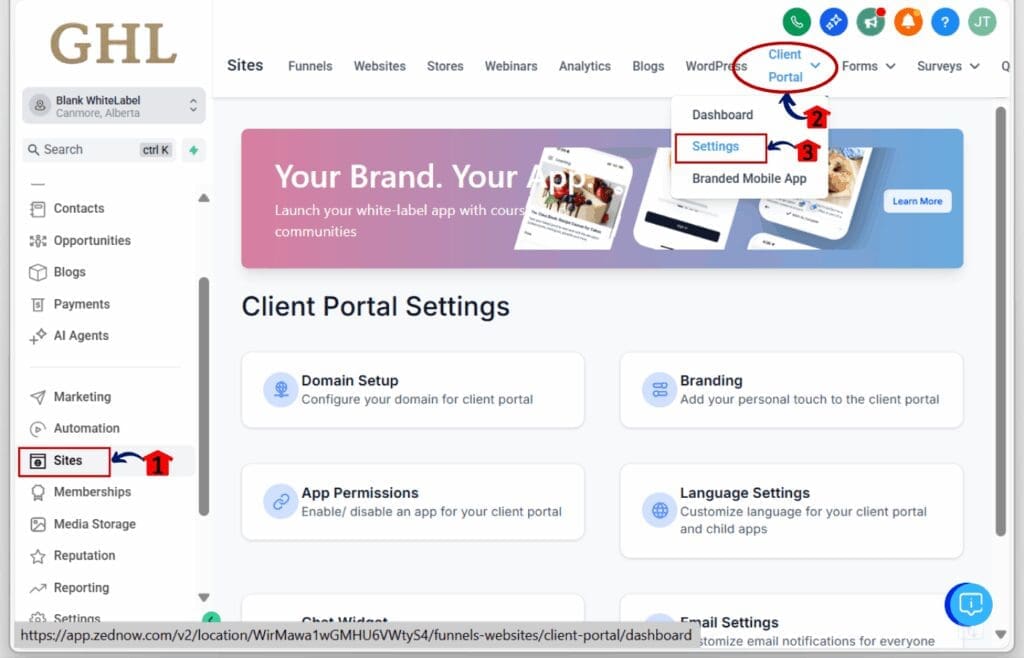
Step 01 – Access the Main Left Hand Menu in GoHighLevel
- The Main Menu on the Left side of your screen has all the main areas that you work in when using GHL
1.1 Click on the Sites Menu Item.
- Access the ‘Sites’ section of GoHighLevel
- You’ll now be in the ‘Sites’ section of GHL, where you can access the Client Portal section from the top menu:
1.2 Click on the Client Portal menu link.
- a drop-down menu will appear, then select ‘Settings’
Step 02 – Open the Chat Widgets Settings in the Client Portal
- You’re now in the Client Portal Settings dashboard.
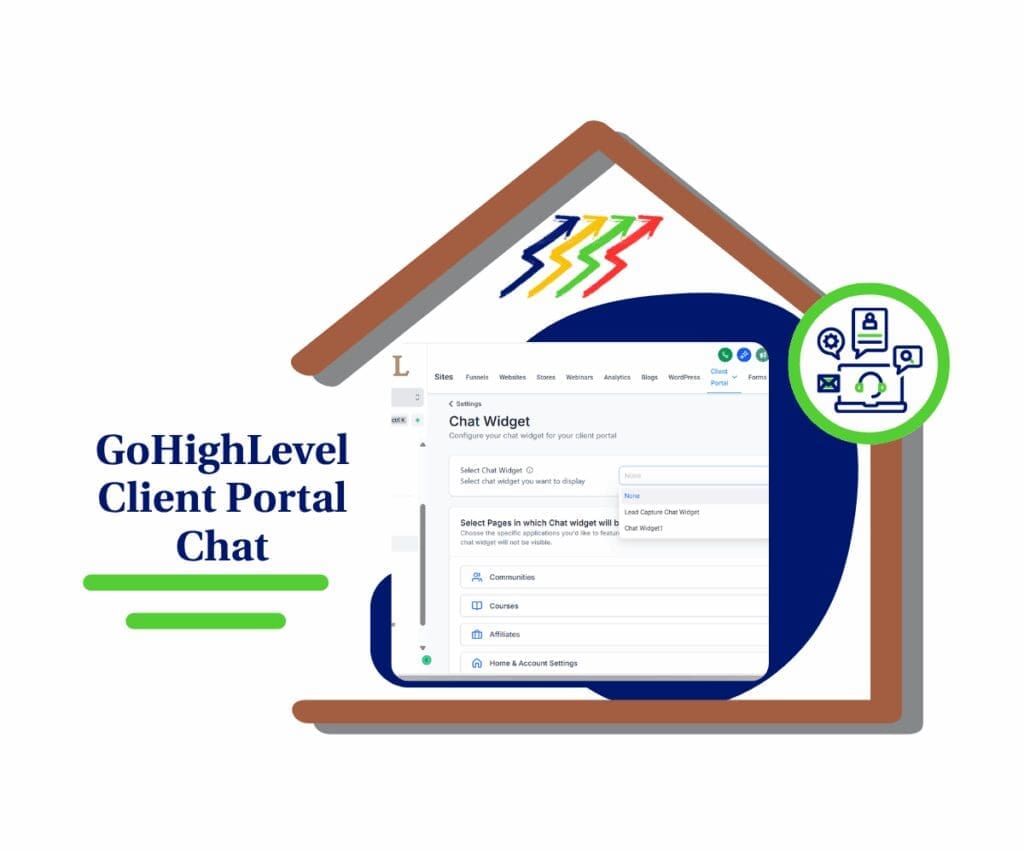
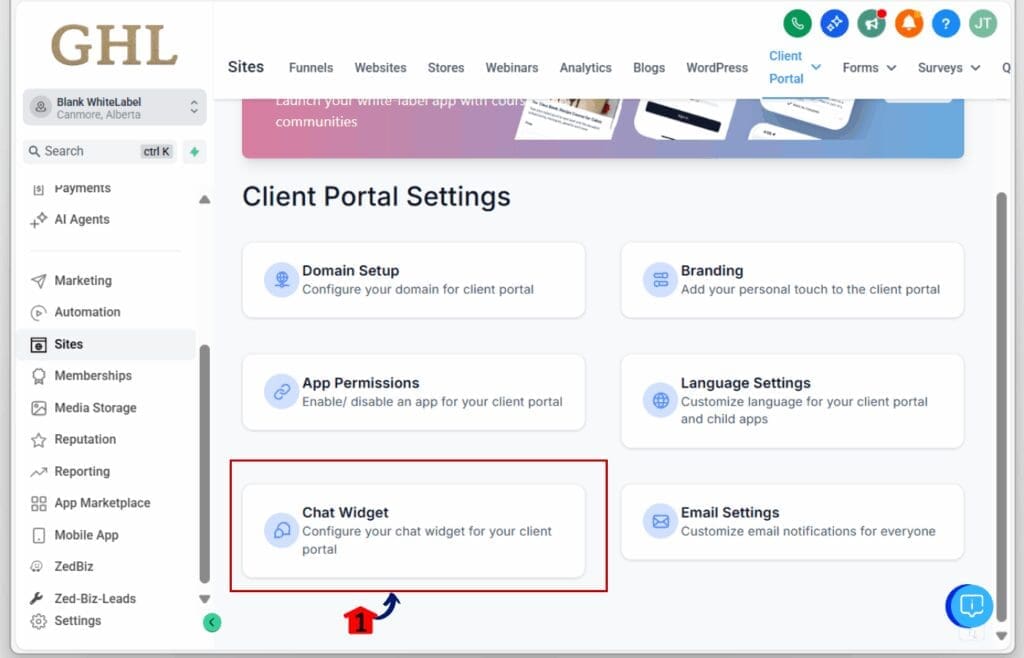
2.1 In the Client Portal Settings menu, find and click on “Chat Widget.”
- a new window will open
Step 03 – Choose Your Widget
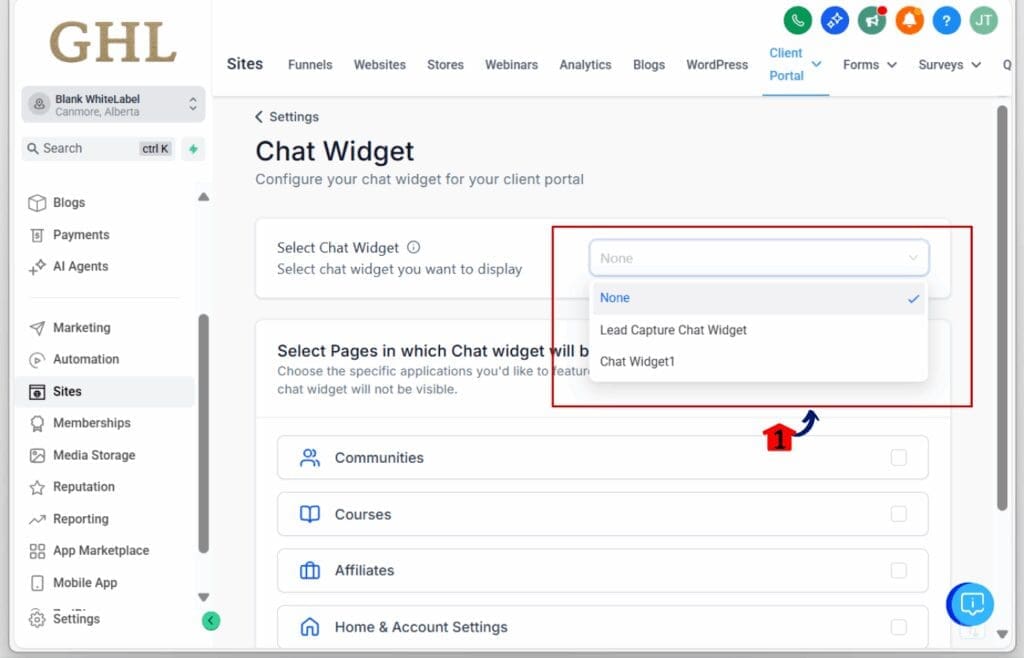
3.1 From the dropdown, pick the chat widget you want to use.
3.2 This widget will appear inside the Client Portal sections you choose.
Step 04 – Set Widget Visibility by Child App
4.1 You’ll see options for Communities, Courses, and Affiliates.
4.2 Use the check box to turn the widget on or off for each one.
4.3 You can enable it in all, some, or just one area based on your setup.
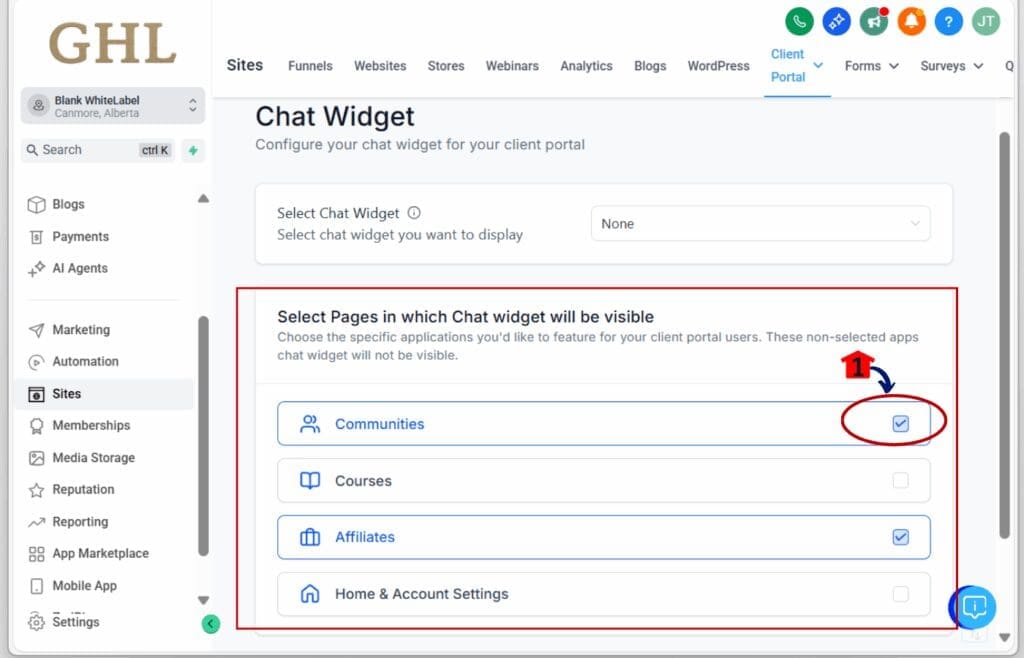
Step 05 – Save Your Settings
5.1 After selecting your apps, click the “Save Settings” button.
5.2 Your widget will now show up live inside the Client Portal and GoKollab app.

That’s it. You’ve now made it easier for clients to reach out without ever leaving the page.
Pro/Quick Tips – Maximize Your Client Portal Chat
Getting the client portal chat widget set up is easy. But making it work well for your users takes a little more thought. Here are some ways to get more value out of it:
- Only show chat where it helps. If your course runs fine without support, turn it off there. Focus on the parts where clients are more likely to have questions.
- Set clear response expectations. Add an auto-reply that lets users know when they can expect a reply. This helps reduce confusion and sets a better tone.
- Use workflows for smarter replies. You can connect the chat to automations, like routing messages to the right team or sending links to common resources.
- Match your brand. Update the widget’s colors and greeting so it feels like part of your portal, not a separate tool.
- Keep it simple. Don’t overload the widget with forms or menus. Make it easy for clients to say what they need and get a quick response.
Used the right way, this small feature can cut down on tickets, keep users engaged, and build trust one chat at a time.
Real Agency Impact
This client portal chat update isn’t just about adding another feature. It’s about giving your clients better access to support right where they need it.
Think about how your agency runs. If you manage online courses, you can now answer student questions without pulling them out of the lesson. If you run a private community, users can ask for help without switching platforms. If you onboard affiliates, you can offer help without sending them elsewhere.
It’s smoother for them and easier for you.
Here’s what this could look like in practice:
- A course creator adds chat to the lesson area. Students ask questions and get answers faster, without sending emails or getting stuck.
- A community manager turns on chat for members. This builds a better experience and encourages users to stay active.
- An agency uses chat for affiliate onboarding. New partners get help quickly and stay more engaged during setup.
In short, this gives your team more ways to connect without creating more work.
Frequently Asked Questions – Client Portal Chat Widgets
GHL Client Chat Is Finally Where It Belongs
Client Portal Chat might be simple, but it unlocks a better way to serve your clients.
With the new client portal chat feature, support can now happen right inside the tools your users already use, whether that’s a course, a community, or an affiliate dashboard.
It’s easy to set up, easy to manage, and it saves everyone time.
If you’re using the Client Portal to deliver value, now you can stay connected without extra clicks or extra tools. It’s one of those updates that quietly makes everything work better.
Ready to try it out? Head into your GHL settings, pick your chat widget, and choose where you want it live.
Have you added chat to your Client Portal yet? Let me know how it’s working for you.
Scale Your Business Today.
Streamline your workflow with GoHighLevel’s powerful tools.
