- Introduction – GHL Workflow Wait Action Just Got Smarter
- Quick Summary – Workflow Wait Action
- Here are this weeks HighLevel Updates
- What’s New in the Workflow Wait Action
- What Changed From the Old Workflow Wait Action
- Why the Workflow Wait Action Upgrade Matters
- How to Use the Workflow Wait Action in GHL
- Pro Tips to Maximize the Workflow Wait Action
- What the Workflow Wait Action Means for Your Business
- Real-World Examples of the Workflow Wait Action
- FAQs About the Workflow Wait Action
- Conclusion – The Workflow Wait Action Is Finally Fixed
Introduction – GHL Workflow Wait Action Just Got Smarter
Workflow Wait Action is powerful. Until it’s confusing. You’ve seen it. Nested dropdowns. Extra steps just to wait for a date. “Contact Reply” buried under CRM events. Time delays everywhere by default.
The workflow works. But building it? Slower than it should be.
If you’ve spent any time building automations in GHL, you’ve probably run into this. You drop in a Wait step… then you start clicking around trying to find the right setting. Then you realize waiting for a specific date means adding another action entirely. So you backtrack. Double-check everything. And hope you didn’t miss something.
That’s not a clean system. It creates setup errors. It creates support tickets. It slows down automation building. The redesigned Workflow Wait Action fixes that gap.
You now choose intent first. What should the contact wait for? A reply. A specific date. A recurring schedule. A time delay. Click the card. Configure the settings. Done.
You can now build weekly check-ins, monthly billing reminders, yearly renewals, or dynamic waits pulled from custom fields. Even seconds-level timing for rapid-fire sequences.
Right at the top, you’ll see something new, Wait AI. Just type what you’re trying to do in plain English. The system builds the wait logic for you. No digging through menus. No adding extra date actions. No second-guessing yourself.
Cleaner structure. Smarter automations. Faster builds.
The latest GoHighLevel Changelog includes several other GHL feature updates that round out your daily workflow:
- New QR Code Styling Options: Shapes, Borders, and Rim Text
- Collapse & Resize Pipeline Stages in Kanban View
- Notes just got smarter for the contacts page!
- New Asana actions in workflows – Find Project and Find section
- Email AI + Knowledge Base Integration 🚀
- Dialer: Auto-minimize, Pin & Drag
- Schema Markup Using AI
Keep reading for much more on all these updates and a deep dive into the Workflow Wait Action feature!

Quick Summary – Workflow Wait Action
Purpose
This update redesigns the Workflow Wait Action in GHL to make automation timing clearer, smarter, and easier to configure using an intent-based layout and AI-powered setup.
Why It Matters
The old wait logic caused confusion, extra steps, and unnecessary support tickets. The new Workflow Wait Action eliminates hidden options, removes the need for separate date actions, and reduces setup errors.
What You Get
You now get recurring schedules, seconds-level timing, dynamic wait durations, contextual option surfacing, grouped wait types, and a natural language Wait AI builder.
Time To Complete
Most users can configure the new Workflow Wait Action in under 5 minutes once they understand the intent-first layout.
Difficulty Level
Beginner to intermediate. The redesign makes setup easier, but advanced users can unlock powerful dynamic and recurring logic.
Key Outcome
Cleaner automations, smarter timing, faster workflow builds, and fewer mistakes across your GHL accounts.
Here are this weeks HighLevel Updates
New QR Code Styling Options: Shapes, Borders, and Rim Text
What it does:
Lets you stop using boring QR codes. You can now tweak the shape, style the border, and add text around the edge.
Where in GHL:
Accessible via Sites → QR Codes and within QR tools embedded in Funnel and Website builders.
Automate marketing, manage leads, and grow faster with GoHighLevel.

Impact:
Improves visual presentation and brand alignment while increasing scan appeal.
Best suited for:
Agencies that care about branding, small businesses running local promotions, online stores, and teams pushing QR campaigns.
Collapse & Resize Pipeline Stages in Kanban View
What it does:
Lets you hide pipeline stages you’re not actively using and adjust column widths so your board fits the way you work.
Where in GHL:
Inside Opportunities when you’re viewing your pipeline in Kanban mode.
Impact:
No more dragging your screen forever just to find the deals that matter.
Best suited for:
Owners running multi-stage pipelines, reps working deals every day, and anyone fed up with a messy board.
Notes Just Got Smarter for the Contacts Page
What it does:
Upgrades the notes area so it’s easier to write, review, and keep things organized inside a contact record.
Where in GHL:
Found directly within each contact’s profile under Notes.
Impact:
Makes it simpler to see what’s been discussed and who added what — without digging through clutter.
Best suited for:
Teams collaborating on accounts and businesses that document every client touchpoint.
New Asana Actions in Workflows – Find Project & Find Section
What it does:
Lets your workflow check what already exists in Asana before adding anything new.
Where in GHL:
Go to Workflows, add an action, and choose the Asana integration.
Impact:
No more duplicate projects. No more messy task boards. Just cleaner automation.
Best suited for:
Operations teams and agencies that rely on Asana to manage client delivery.
Email AI + Knowledge Base Integration
- What it does:
Allows Email AI to reference your Knowledge Base for smarter, more accurate responses. - Where in GHL:
Found in Conversations → Email composer with AI enabled and Knowledge Base settings under AI configuration. - Impact:
Smarter email suggestions that understand your business and help you reply quicker. - Best suited for:
Support teams, agencies managing inboxes, and businesses scaling communication with AI.
Dialer: Auto-Minimize, Pin & Drag
- What it does:
Lets you auto-minimize the dialer during calls, pin it in place, and drag it anywhere on screen. - Where in GHL:
Found in Conversations → Dialer. - Impact:
Cleaner workspace and easier multitasking during sales or support calls. - Best suited for:
Sales teams, outbound callers, appointment setters, and agencies making daily calls.
Schema Markup Using AI
- What it does:
Generates structured schema markup automatically using AI for SEO enhancement. - Where in GHL:
Found in Sites → Website or Funnel settings within AI or SEO sections. - Impact:
Improves search visibility without manual coding. - This works well for:
Teams building websites that need stronger search visibility, from agencies to small local businesses.
What’s New in the Workflow Wait Action
The Workflow Wait Action didn’t just get a visual refresh. It was rebuilt around intent.
Here’s what’s new — and why it matters.
Intent-Based Card Selection
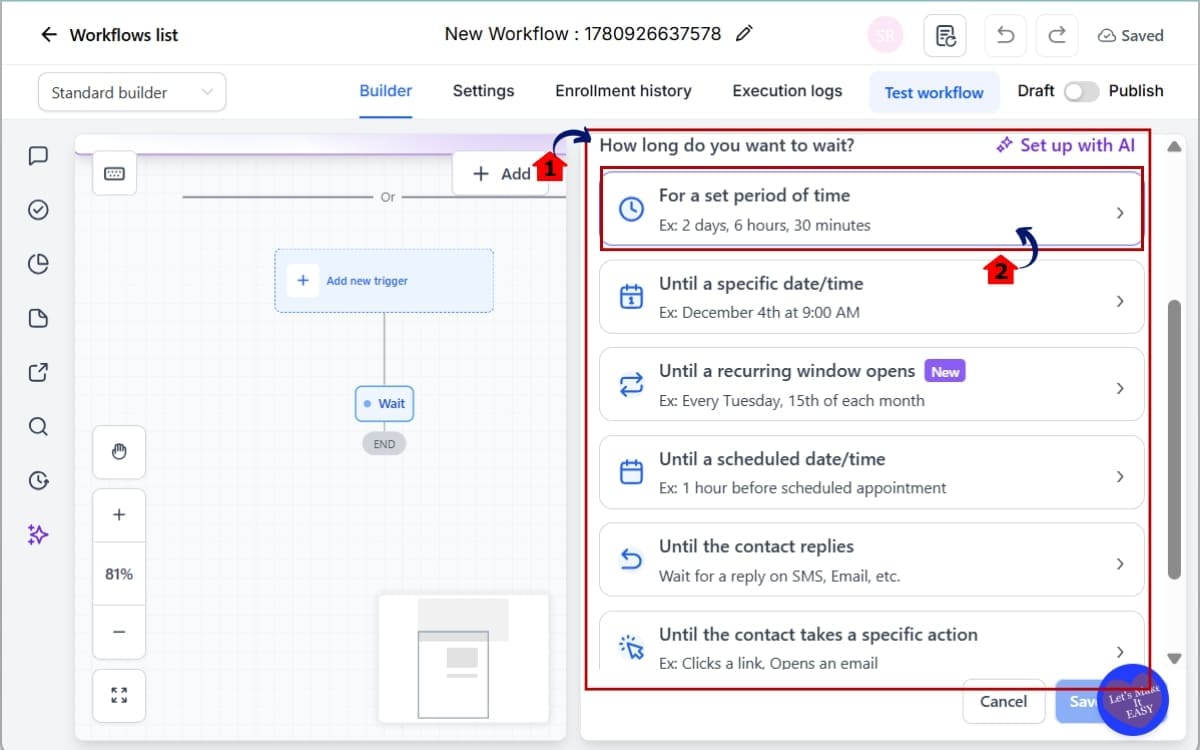
The old dropdown is gone. Now when you add a Workflow Wait Action, you see a simple question: “What should the contact wait for?”
Instead of digging through nested options, you choose your goal first. Reply. Time delay. Specific date. Recurring schedule. Contact action. Click the card. Configure it. Done. No more hunting.
Recurring Wait Schedules
This is huge. You can now create recurring waits directly inside the Workflow Wait Action.
Weekly:
- Choose specific days
- Just pick the days and plug in the time — maybe 9 AM on Sunday, Tuesday, and Wednesday.
Monthly:
- Drop in the exact date and move on.
- You can also choose a pattern, like the second Tuesday or third Friday.
Yearly
- Perfect for renewals
- Annual check-ins
- Holiday campaigns
Before? You had to build workarounds. Now? It’s built-in.
Wait for a Specific Date – Single Step
Previously, waiting for a specific date required:
- Set Event Start Date
- Then add Wait
That’s gone. Now you select “Wait for a Specific Date” directly inside the Workflow Wait Action. You can choose:
- A fixed calendar date
- Or pull a date from a custom field
One action. Not two.
Seconds as a Wait Unit
You can now wait in seconds. Two seconds. Five seconds. Ten seconds. This unlocks rapid-fire automation sequences without awkward minute-based delays.
Dynamic Wait Duration
Hardcoding time is old-school. Now you can pull the wait duration from:
- Custom fields
- Contact fields
- Supported variables
This means automation timing can adjust per contact. Smarter personalization. Less manual setup.
Grouped Wait Types
Related waits are now bundled together.
For example:
“Wait for a Contact Action” now includes:
- Trigger link clicks
- Email events
- Related engagement triggers
Appointment and service booking waits are unified too. Cleaner layout. Less clutter.
Contextual Option Reordering
Here’s a subtle but powerful upgrade. If your Workflow Wait Action follows a Send SMS, Email, or WhatsApp action…
“Wait for contact reply” automatically moves to the top. The system adapts to what you’re building.
It guides you instead of forcing you to think through every possibility.
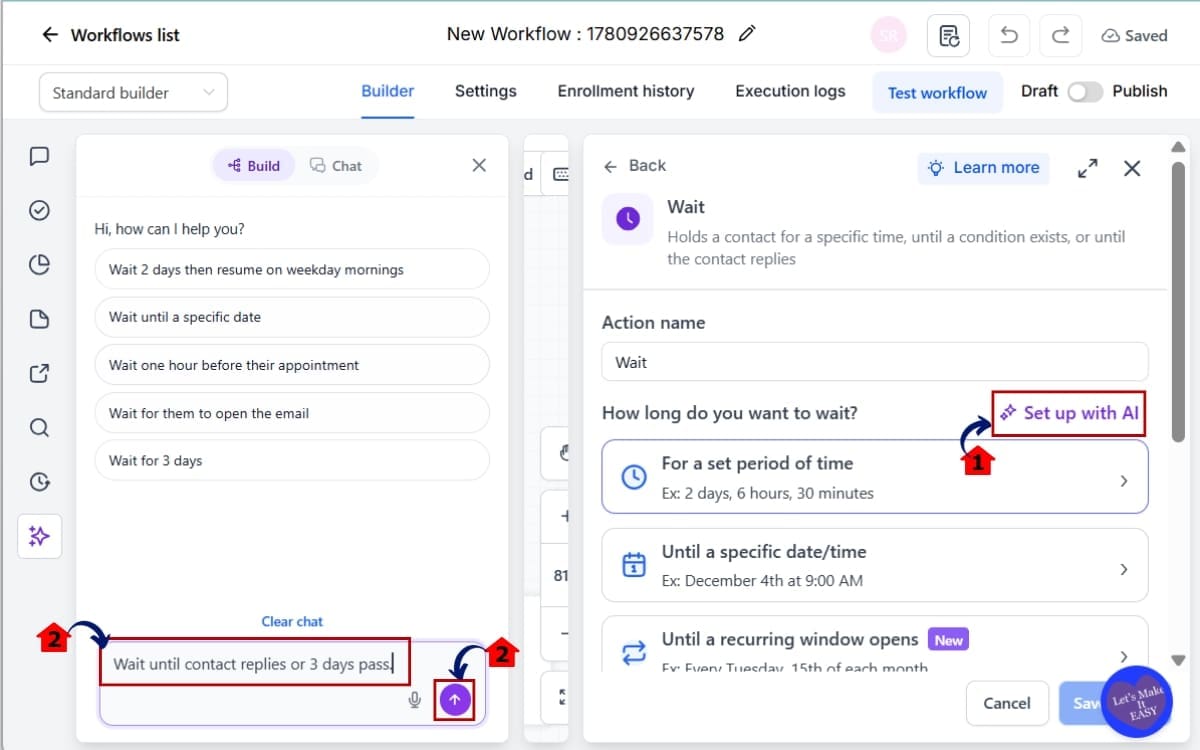
Wait AI
At the top of the Workflow Wait Action, you’ll see a new CTA. Describe what you want.
Example: “Wait until the contact replies or 3 days pass.”
The AI Builder generates the configured wait card instantly. You can add it as-is or refine it through conversation. Natural language. Structured automation.
What Changed From the Old Workflow Wait Action
The old Workflow Wait Action wasn’t broken. But it wasn’t intuitive.
Here’s what caused most of the confusion.
Dropdown-First Configuration
Before, you added a Wait action and immediately saw a dropdown. Time Delay was the default. If you wanted something else, you had to dig.
“Wait for Contact Reply” was buried under CRM Events. Many users didn’t even know it existed.
That led to mistakes.
Waiting for a Specific Date Required Two Actions
This one caused serious friction.
To wait until a specific date, you had to:
- Add “Set Event Start Date”
- Then add a separate Wait step
If you didn’t know that? Your workflow failed. This alone drove a huge chunk of support tickets.
Time Delay Was Overused
Because Time Delay was the default option, users often selected it without realizing there were better logic-based waits available.
This created:
- Overcomplicated workflows
- Extra conditional logic
- Manual adjustments later
Not ideal.
Scattered Wait Types
Reply waits, trigger link clicks, appointment waits — they lived in different areas. The logic was there. The structure wasn’t.
Now Compare That to the New Workflow Wait Action
Intent comes first. You choose what the contact should wait for before you configure anything.
Specific dates are built-in. Recurring schedules are native. Reply detection surfaces automatically after Send actions. Related waits are grouped.
The system now guides you instead of hiding options behind menus. This is not just a visual redesign. It’s a logic redesign.
And it directly eliminates the two biggest pain points that made Wait one of the highest support-ticket drivers in Workflows.
Cleaner. Clearer. Harder to misuse.
Why the Workflow Wait Action Upgrade Matters
The Workflow Wait Action used to slow people down. Now it speeds everything up.
This matters because workflows are the backbone of GHL. Every SMS sequence. Every nurture campaign. Every renewal reminder. Every automation you build depends on timing.
And timing has to be right. When the Workflow Wait Action is confusing, three things happen:
- You build slower.
- You second-guess your setup.
- You create logic mistakes without realizing it.
That costs time. For agencies managing multiple sub-accounts, that cost multiplies fast.
The setup now starts with your goal. You’re not digging around asking where something lives. You’re deciding what you actually want the contact to do.
That mental shift is huge. It reduces setup errors. It reduces support tickets. It reduces retraining new team members. It also unlocks smarter automation strategies.
Recurring waits mean you can build annual renewals without complicated loops. Dynamic wait durations mean your automation adapts to each contact. Seconds-level timing means tighter follow-up flows.
Wait AI means faster implementation for beginners and faster builds for power users.
This update benefits:
- Agency owners building scalable systems
- Virtual assistants creating workflows daily
- SaaS resellers onboarding new clients
- Marketing teams running nurture campaigns
- Anyone tired of digging through dropdowns
The Workflow Wait Action now feels modern. It feels guided. It feels harder to mess up.
And when your automation timing improves, your follow-up improves. When your follow-up improves, conversions improve. That’s why this update matters.
How to Use the Workflow Wait Action in GHL
The Workflow Wait Action is now configured directly inside your Workflow builder using an intent-first layout. Instead of selecting a delay type and searching for options, you start by choosing what the contact should wait for. From there, you adjust the timing, recurrence, or reply logic based on your goal.
In the steps below, you will add the new Workflow Wait Action, choose the correct wait type, configure recurring or dynamic timing, use Wait AI if needed, and properly test your workflow. Follow each step carefully to ensure your automation runs exactly as expected.
- Access the Automation Menu in GoHighLevel.
- Add the Workflow Wait Action.
- Choose What the Contact Should Wait For.
- Configure Time Delay (Including Seconds).
- Set a Specific Date (Single Step Setup).
- Use Setup Wait AI in Action.
- Save and Test the Workflow
To start make sure you are logged in to your GoHighLevel sub-account.
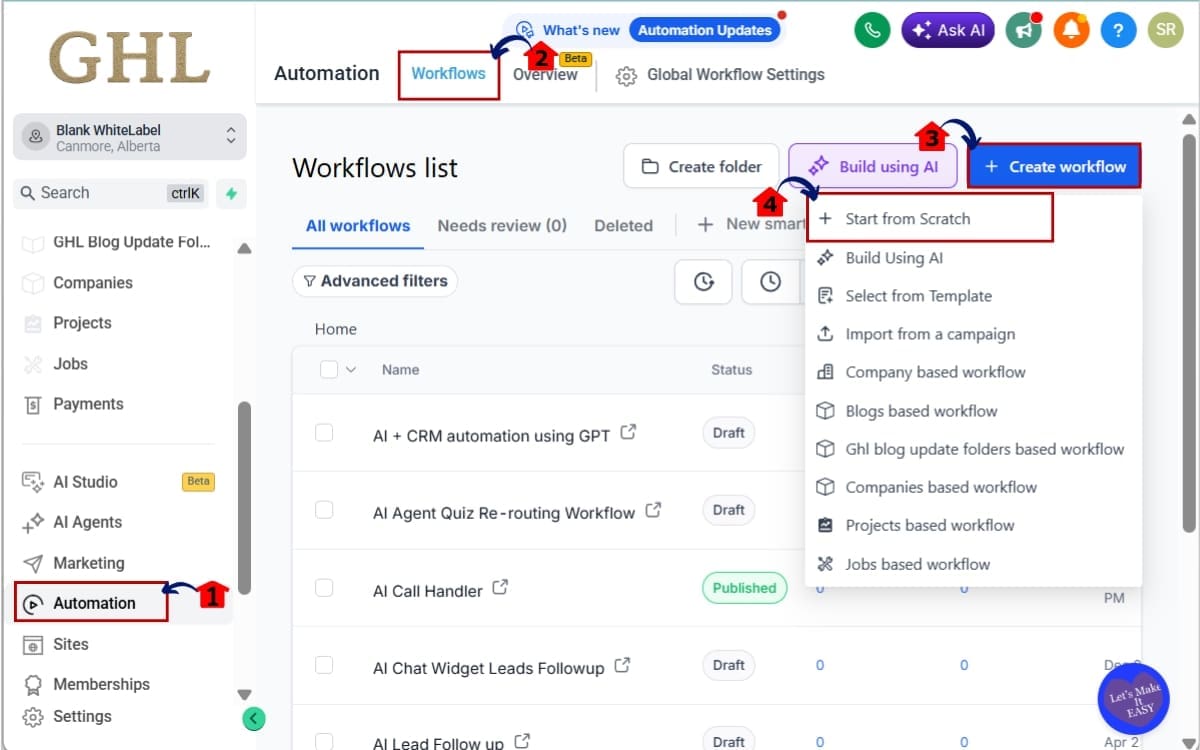
Step 01 – Access the Automation Menu in GoHighLevel
- The Main Menu on the left side of your screen has all the main areas you work in when using GHL.
1.1 Click on the Automation menu item.
- This is where all Workflows are managed.
1.2 Click on “Workflows” from the top navigation.
- You’ll now see your existing workflows or the option to create a new one.
1.3 Click “Create Workflow” to build a new automation
- This starts the process of creating a brand-new workflow from scratch or from a template.
1.4 Click Start from scratch
- This opens a blank workflow canvas so you can build your automation step-by-step using the new Workflow Wait Action.
Step 02 – Add the Workflow Wait Action
- This step adds the redesigned Workflow Wait Action to your automation.
2.1 Click the “+” icon below your trigger or previous action
- This opens the action menu where you can add the next step in your automation sequence.
2.2 Select “Wait” from the list of available actions
- This inserts the new Workflow Wait Action into your workflow.
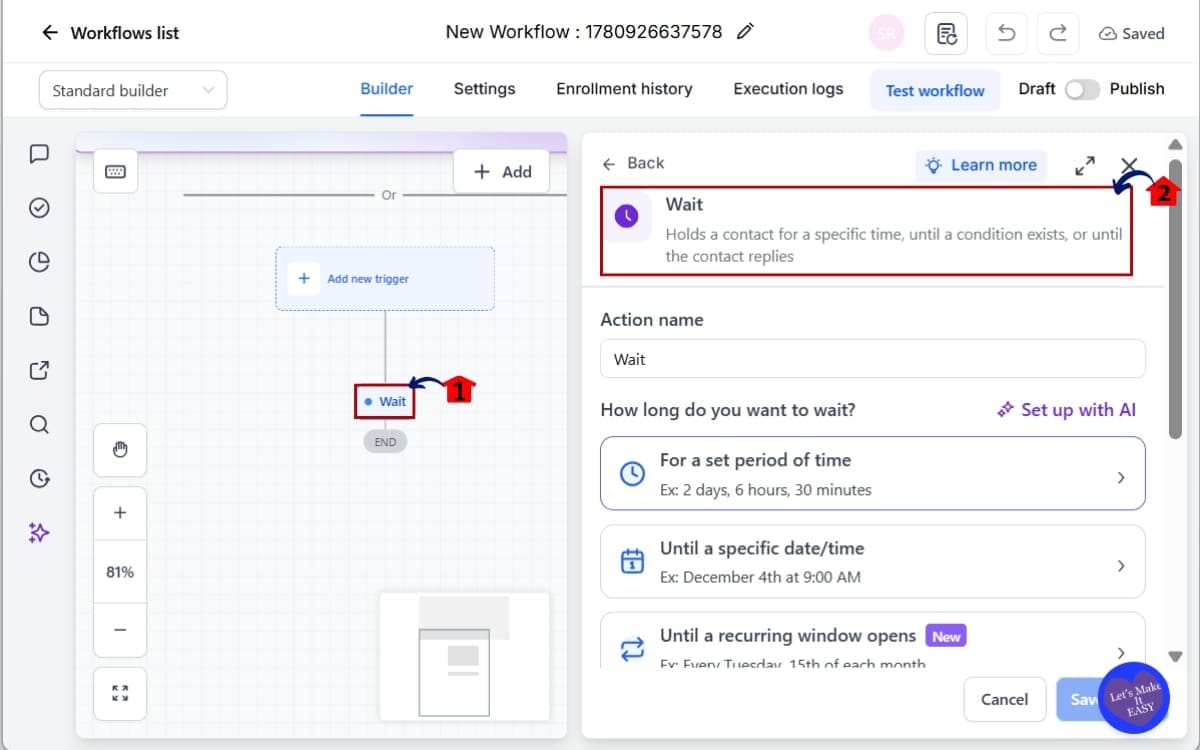
Step 03 – Choose What the Contact Should Wait For
- Instead of a dropdown, you’ll see cards.
3.1 Choose one of the available options:
- Time Delay
- Contact Reply
- Specific Date
- Recurring Schedule
- Contact Action (Trigger Link, Email Event, etc.)
- Appointment or Service Booking
3.2 Click the card that matches your goal
- The configuration panel will open
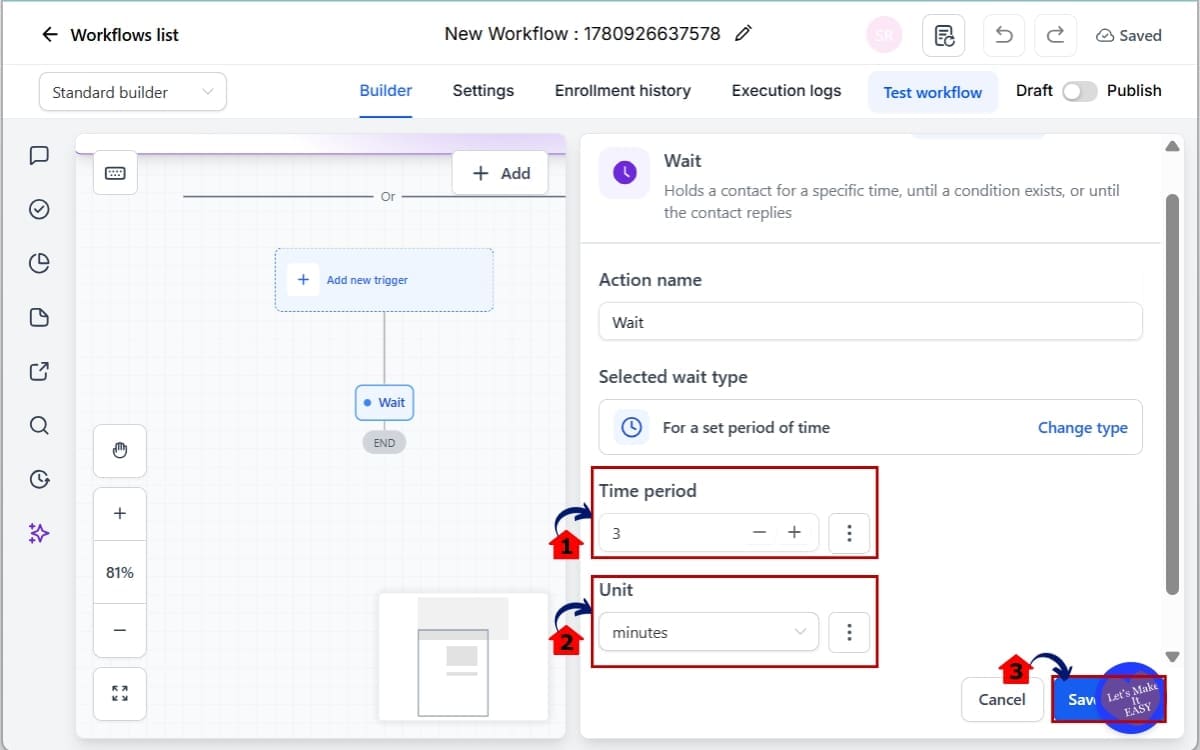
Step 04 – Configure Time Delay (Including Seconds)
- If you selected Time Delay:
4.1 Enter the number value
- Type the amount of time you want the workflow to pause before continuing.
4.2 Choose the unit:
- Seconds
- Minutes
- Hours
- Days
4.3 Click Save
- This confirms your delay settings and applies the time-based wait to your workflow.
Step 05 – Set a Specific Date (Single Step Setup)
- If you selected Specific Date:
5.1 Choose a fixed calendar date
- No more “Set Event Start Date” action needed
5.2 Click Save
- This confirms your selected date and applies the wait condition to your workflow.

Step 06 – Use Setup Wait AI in Action
- At the top of the Workflow Wait Action screen:
6.1 Click the Setup with AI
- This opens the AI Builder interface inside the Wait action panel.
6.2 Describe what you want in natural language
- Example: “Wait until contact replies or 3 days pass.”
6.3 Click Generate
- The system will create a configured wait action that you can review, adjust if needed, and insert into your workflow.
Step 07 – Save and Test the Workflow
- After configuring your Workflow Wait Action, you should always confirm and test your setup.
7.1 Run a test contact through the workflow
- Add a test contact that meets the trigger conditions and monitor how the wait step executes inside the workflow history.
7.2 Click Publish
- This applies all changes to your workflow and locks in the wait configuration.
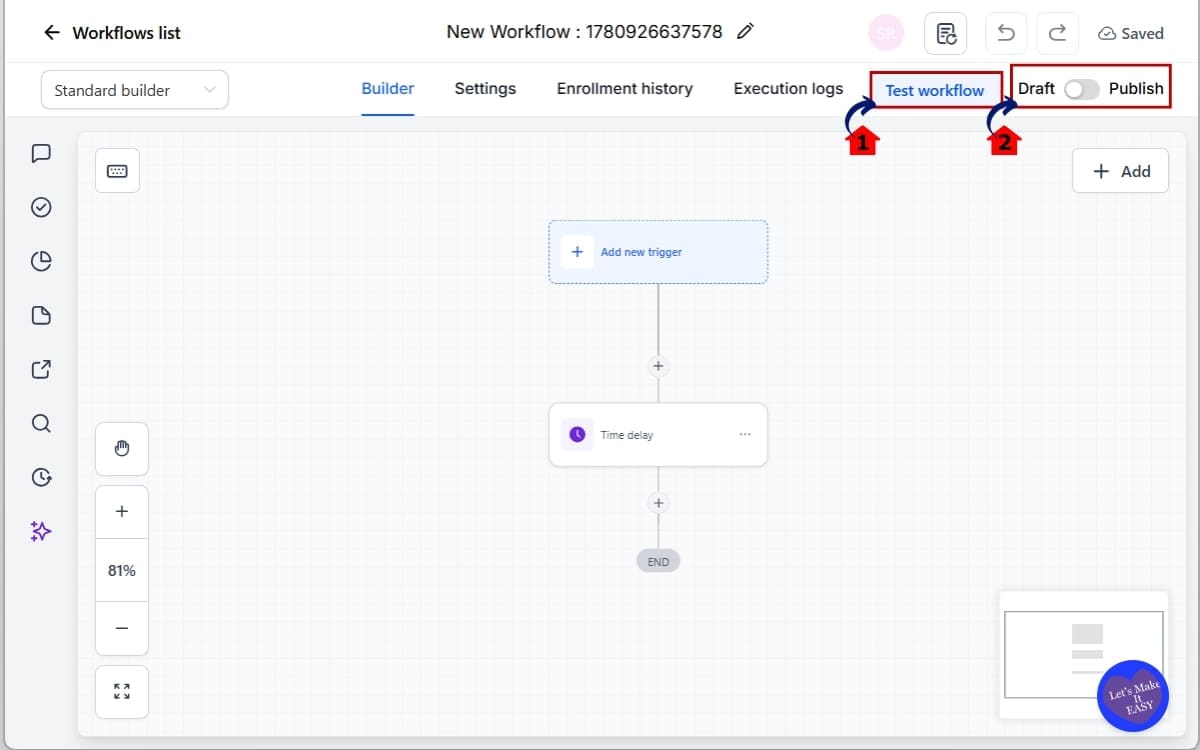
You’ve now fully configured the new Workflow Wait Action. No extra actions. No buried options. No guesswork.
Pro Tips to Maximize the Workflow Wait Action
The new Workflow Wait Action is powerful. But if you use it strategically, it becomes a serious automation weapon.
Here’s how to get the most out of it.
Use Seconds for Tight Follow-Up Sequences
Most users think in minutes or days. But seconds matter.
If you’re stacking actions like:
- Send SMS
- Add tag
- Send internal notification
Use 2–5 second waits between them. This keeps execution clean and prevents system overlap, especially in high-volume workflows.
Leverage Recurring Waits for Retention Campaigns
Recurring schedules are not just for reminders. Use them for:
- Monthly check-ins
- Quarterly value emails
- Annual renewal reminders
- Birthday campaigns
- Holiday reactivation flows
Before this update, you needed loop logic. Now it’s native.
Use Dynamic Wait Duration for Personalization
Hardcoded timing is generic. Dynamic wait durations allow:
- Custom onboarding timelines
- Variable membership expiration logic
- Payment-based delays
- Contact-specific follow-up pacing
If your workflow treats every contact the same, you’re leaving performance on the table.
Combine Reply Detection With Fallback Timing
A powerful combo:
Wait for contact reply OR Wait 3 days
Then branch logic. This prevents workflows from stalling forever. Always build fallback logic into reply-based waits.
Understand Contextual Reordering
After a Send SMS, Email, or WhatsApp action… The Workflow Wait Action automatically prioritizes “Wait for Contact Reply.”
That’s not random. That’s contextual guidance. Let the system help you build smarter.
Test Recurring Waits Carefully
Recurring logic can behave differently than one-time delays.
Always:
- Run test contacts
- Check execution logs
- Confirm timezone settings
Especially for yearly or monthly workflows.
Avoid Overstacking Waits
Cleaner workflows convert better. If you see three consecutive Wait steps, ask: Can this be simplified?
The redesign makes it easier to build clean logic. Don’t overcomplicate it.
Use Wait AI for Drafting, Not Blind Trust
Wait AI is powerful. But always review what it generates.
Treat it like a junior assistant. Let it draft. You refine.
What the Workflow Wait Action Means for Your Business
The Workflow Wait Action isn’t just cleaner. It’s more strategic. Timing drives conversions.
Follow up too early? You annoy people. Follow up too late? You lose them. Now you have precision.
Appointment Reminder Systems
You can build:
- SMS reminder
- Wait for reply
- Give it a day. If they still haven’t replied, send another message.
- If still no reply, notify staff
All without clunky workarounds. Cleaner logic means fewer missed appointments.
Annual Renewal Automations
Use yearly recurring waits for:
- Contract renewals
- Membership renewals
- SaaS subscription reminders
No more looping workflows. Set it once. Let it run every year.
Lead Nurture Sequences
Instead of:
- Wait 3 days
- Wait 3 days
- Wait 3 days
You can now:
- Dynamically adjust timing
- Personalize pacing
- Branch based on reply
That increases engagement. And engagement increases conversions.
Sales Follow-Up Systems
After sending an SMS or email: Wait for contact reply.
If they respond? Move to pipeline stage. If they don’t? Send a follow-up. This removes manual chasing.
Holiday & Event Campaigns
Monthly or yearly recurring waits allow:
- Black Friday campaigns
- Client anniversaries
- Birthday promotions
- Quarterly check-ins
You build it once. The system handles the timing.
Agency Scalability
If you manage 10, 20, 50 sub-accounts… This matters even more.
Cleaner Workflow Wait Action logic means:
- Faster builds
- Easier onboarding for new team members
- Fewer support tickets
- Less troubleshooting
Multiply that time savings across every account. That’s leverage.
Automation is about removing friction. This update removes friction at the timing level. And timing is everything.
Real-World Examples of the Workflow Wait Action
You’ve seen what it does. Now let’s see how to use the Workflow Wait Action in real automation scenarios.
Example 1 – SMS Follow-Up With Reply Detection
Scenario: You send a lead an SMS after they fill out a form.
Workflow Logic:
- Send SMS
- Workflow Wait Action → Wait for Contact Reply
- If reply received → Move to pipeline stage
- If no reply after 2 days → Send follow-up SMS
Why this works: The Workflow Wait Action now surfaces “Wait for Contact Reply” automatically after a Send action.
No digging. No CRM event hunting. Cleaner follow-up. Faster response tracking.
Example 2 – Annual Contract Renewal Reminder
Scenario: You manage client contracts that renew yearly.
Workflow Logic:
- Trigger: Contract Signed
- Workflow Wait Action → Yearly Recurring Schedule
- Set to renew 30 days before contract anniversary
- Send renewal reminder email
- Wait for reply or payment
Instead of rebuilding this every year… You build it once. The recurring wait handles the rest.
Example 3 – Dynamic Onboarding Timeline
Scenario: Each client has a different onboarding timeline stored in a custom field.
Workflow Logic:
- Trigger: Client Added
- Workflow Wait Action → Dynamic Duration
- Pull number from “Onboarding Days” custom field
- After wait → Send onboarding email
Now your automation adapts per contact. Some wait 3 days. Some wait 7 days. Some wait 14 days. One workflow. Personalized timing.
Example 4 – Weekly Check-In Campaign
Imagine you’re planning to send a weekly check-in every Tuesday at 9 AM.
Workflow Logic:
- Trigger: Tag Added
- Workflow Wait Action → Weekly Recurring
- Select Tuesday
- Set 9:00 AM
- Send check-in message
No loops. No hacks. Native recurring logic.
Example 5 – Rapid Action Stack With Seconds
Scenario: You need quick internal notifications after a lead opts in.
Workflow Logic:
- Tag Contact
- Wait 3 seconds
- Send Internal Notification
- Wait 2 seconds
- Add Opportunity
Using seconds keeps the system from stacking actions at the exact same millisecond. It’s subtle. But it makes execution smoother.
These examples show one thing clearly: The Workflow Wait Action isn’t just easier. It’s more flexible. More strategic. More scalable.
FAQs About the Workflow Wait Action
Conclusion – The Workflow Wait Action Is Finally Fixed
The Workflow Wait Action used to be functional. Now it’s strategic.
This redesign removes the biggest friction points that slowed users down. No more buried reply options. No more two-step date setups. No more clunky dropdown hunting.
Instead, you get:
- Intent-first logic.
- Built-in recurring schedules.
- Dynamic wait durations.
- Seconds-level precision.
- AI-powered configuration.
That’s not a cosmetic update. That’s a workflow upgrade.
If you build automations daily, this will save you time. If you manage client accounts, this will reduce errors. If you train team members, this will shorten onboarding.
Cleaner structure leads to cleaner automations. Cleaner automations lead to better timing.
Better timing leads to more replies, more bookings, and more conversions. The Workflow Wait Action now feels modern. Guided. Harder to misuse.
That’s what good automation software should feel like.
Now here’s the move. Open one of your existing workflows. Replace an old Wait step. Test the new setup.
You’ll feel the difference immediately.
And if you want more step-by-step breakdowns like this, check back to the GHL Growth Garage blog for more GoHighLevel feature guides.
Have you tested the new Workflow Wait Action yet? What’s the first workflow you’re upgrading?
Scale Your Business Today.
Streamline your workflow with GoHighLevel’s powerful tools.