

- Master Workflow Default Path in GHL
- Quick Summary – Workflow Default Path Essentials
- Here are this weeks HighLevel Updates
- Workflow Default Path Enhancements in GHL
- Smarter Workflow Default Path Control in GHL
- Better Control with Workflow Default Path in GHL
- How to Use Set Workflow Default Path in GHL
- Pro Tips Maximize Workflow Default Path in GHL
- What This Means for Your Business
- Results You Can Expect
- Frequently Asked Questions about workflow default path
- Take Full Control with Workflow Default Path in GHL
Master Workflow Default Path in GHL
Parallel Workflow Default Path in GHL worked. You could build multiple branches, split logic, and send contacts down different paths based on conditions. On paper, it looked powerful. But when it came to testing those branches, or sending contacts in from another Workflow Default Path, everything GHL Workflow Default Path to the same root path. Not the branch you were actively working on. Not the one you wanted to validate. Just the original root.
That created friction.
If you wanted to properly test a specific branch, you had to rearrange structure, add temporary “Go To” connectors, or adjust logic just to force contacts into the path you were reviewing. Miss one small detail? You’d end up testing the wrong sequence. Worse, contacts coming from another workflow could enter a branch you didn’t intend.
Agencies felt this the most. Reminder systems with parallel SMS and Email branches. Nurture flows split by behavior. Campaigns with conditional paths based on tags or triggers. Testing one branch without disrupting the others wasn’t simple. Automation required workarounds. Structure required temporary edits. And something designed to give you control still demanded manual adjustments.
It worked. But it wasn’t flexible.
GHL has now fixed that.
You can now set a workflow default path inside Advanced Builder. That means you choose exactly which parallel branch contacts enter by default — whether you’re running a workflow test or sending contacts in from another automation. No restructuring. No temporary rewiring. Just controlled routing.
The root node is now clearly labeled Default Path, and you can assign any parallel branch as the workflow default path using the branch icon on its first action. It’s a small update on the surface, but for anyone building complex automations, it’s a serious upgrade in control.
The latest GoHighLevel Changelog includes several other GHL feature updates that round out your daily workflow:
- New QR Code Styling Options: Shapes, Borders, and Rim Text
- Collapse & Resize Pipeline Stages in Kanban View
- Notes just got smarter for the contacts page!
- New Asana actions in workflows – Find Project and Find section
- Email AI + Knowledge Base Integration 🚀
- Dialer: Auto-minimize, Pin & Drag
- Schema Markup Using AI
Keep reading for much more on all these updates and a deep dive into the Workflow path feature!
Quick Summary – Workflow Default Path Essentials
Purpose:
This update allows you to set a workflow default path in GHL’s Advanced Builder, giving you full control over which parallel branch contacts enter during testing and cross-workflow triggers.
Why It Matters:
Testing multi-branch workflows used to require structural workarounds. The workflow default path eliminates that friction and ensures accurate routing without rearranging your automation.
What You Get:
You gain precise branch-level control, visual routing clarity with solid and dashed connectors, and cleaner workflow validation without duplicating or modifying existing logic.
Time to Complete:
Setting or changing a workflow default path takes less than one minute once you are inside the Advanced Builder.
Difficulty Level:
Beginner to Intermediate. If you can build a workflow with parallel branches, you can configure the workflow default path.
Key Outcome:
You deploy cleaner automations, reduce routing errors, and test complex workflows with confidence and precision inside GHL.
Here are this weeks HighLevel Updates
New QR Code Styling Options: Shapes, Borders, and Rim Text
What it does:
Lets you stop using boring QR codes. You can now tweak the shape, style the border, and add text around the edge.
Where in GHL:
Accessible via Sites → QR Codes and within QR tools embedded in Funnel and Website builders.
Automate marketing, manage leads, and grow faster with GoHighLevel.

Impact:
Improves visual presentation and brand alignment while increasing scan appeal.
Best suited for:
Agencies that care about branding, small businesses running local promotions, online stores, and teams pushing QR campaigns.
Collapse & Resize Pipeline Stages in Kanban View
What it does:
Lets you hide pipeline stages you’re not actively using and adjust column widths so your board fits the way you work.
Where in GHL:
Inside Opportunities when you’re viewing your pipeline in Kanban mode.
Impact:
No more dragging your screen forever just to find the deals that matter.
Best suited for:
Owners running multi-stage pipelines, reps working deals every day, and anyone fed up with a messy board.
Notes Just Got Smarter for the Contacts Page
What it does:
Upgrades the notes area so it’s easier to write, review, and keep things organized inside a contact record.
Where in GHL:
Found directly within each contact’s profile under Notes.
Impact:
Makes it simpler to see what’s been discussed and who added what — without digging through clutter.
Best suited for:
Teams collaborating on accounts and businesses that document every client touchpoint.
New Asana Actions in Workflows – Find Project & Find Section
What it does:
Lets your workflow check what already exists in Asana before adding anything new.
Where in GHL:
Go to Workflows, add an action, and choose the Asana integration.
Impact:
No more duplicate projects. No more messy task boards. Just cleaner automation.
Best suited for:
Operations teams and agencies that rely on Asana to manage client delivery.
Email AI + Knowledge Base Integration
- What it does:
Allows Email AI to reference your Knowledge Base for smarter, more accurate responses. - Where in GHL:
Found in Conversations → Email composer with AI enabled and Knowledge Base settings under AI configuration. - Impact:
Smarter email suggestions that understand your business and help you reply quicker. - Best suited for:
Support teams, agencies managing inboxes, and businesses scaling communication with AI.
Dialer: Auto-Minimize, Pin & Drag
- What it does:
Lets you auto-minimize the dialer during calls, pin it in place, and drag it anywhere on screen. - Where in GHL:
Found in Conversations → Dialer. - Impact:
Cleaner workspace and easier multitasking during sales or support calls. - Best suited for:
Sales teams, outbound callers, appointment setters, and agencies making daily calls.
Schema Markup Using AI
- What it does:
Generates structured schema markup automatically using AI for SEO enhancement. - Where in GHL:
Found in Sites → Website or Funnel settings within AI or SEO sections. - Impact:
Improves search visibility without manual coding. - This works well for:
Teams building websites that need stronger search visibility, from agencies to small local businesses.
Workflow Default Path Enhancements in GHL
GoHighLevel has introduced a powerful new enhancement to the Advanced Builder: the ability to set a workflow default path for workflows that use parallel branches. This update gives users direct control over which branch contacts enter by default when running workflow tests or when contacts are passed in from another workflow.
At the core of this update is a simple but impactful change. The root node in workflows with multiple parallel branches is now clearly labeled Default Path. This visual update makes it immediately obvious which branch is currently set as the primary entry point, reducing confusion and improving workflow clarity during both setup and testing.
Setting the workflow default path is quick and intuitive. On the first action of any parallel branch, you’ll now see a branch icon. By clicking this icon, you can designate that specific branch as the Default Path. Once selected, GHL visually confirms your choice using connector styles, solid lines indicate the default path, while dashed lines show branches reached through “Go To” actions and not set as default.
This enhancement is especially valuable for testing and cross-workflow automation. Previously, users had limited control over which branch was used during workflow tests or when contacts entered from another workflow. Now, with the workflow default path feature, you can confidently direct contacts into the exact branch you want to validate, without modifying your workflow structure.
Smarter Workflow Default Path Control in GHL
Before this update, workflows in GHL’s Advanced Builder with parallel branches had a fixed behavior when it came to testing and cross-workflow entries. No matter how many branches you created, workflow tests and contacts entering from another workflow would always follow the original root path. This made it difficult to validate specific branches without temporarily modifying your workflow structure.
If you wanted to check a different branch, you usually had to shuffle actions around, drop in temporary “Go To” steps, or copy parts of the workflow just to make it work. It wasn’t hard, but it wasn’t efficient either. And in larger automations, especially for agencies juggling multiple campaigns, those extra edits increased the chances of something breaking.
With the introduction of the workflow default path feature, this limitation is now removed. You can designate any parallel branch as the default entry point directly from the first action within that branch. This means workflow tests and contacts entering from other workflows will now follow the branch you intentionally select, without any structural changes.
There’s also a noticeable visual upgrade. The starting point now clearly shows as “Default Path,” so you instantly know which branch is the primary entry. Solid lines show the active default branch, while dashed lines mark branches reached through “Go To” steps. You can scan the workflow and understand the routing without digging around.
No more editing just to test. No more guessing where contacts will land. You set the path, run the test, and move forward with confidence.
Better Control with Workflow Default Path in GHL
This update gives you real control over how contacts enter a workflow. If you’re running parallel branches, you no longer have to accept whatever the root path decides. You choose the starting point. That alone makes testing more predictable and your automation logic easier to trust.
Testing becomes simpler. Instead of reshuffling steps or adding temporary routing just to check one branch, you can point traffic exactly where you want it. Whether it’s an SMS reminder path, an email sequence, or a behavior-based split, you test it directly. No detours required.
For agencies managing layered systems across multiple clients, this removes a lot of friction. Onboarding flows, appointment reminders, upsell campaigns, everything becomes easier to validate before going live. You’re not patching the system anymore. You’re configuring it properly from the start.
It also helps when workflows trigger other workflows. Contacts don’t just “land somewhere.” They land where you decide. That kind of routing clarity reduces errors and keeps the customer journey tight.
Bottom line, this makes workflow management feel intentional instead of reactive.
How to Use Set Workflow Default Path in GHL
The workflow default path is configured inside the Advanced Builder of a workflow that contains parallel branches. You will access the workflow, identify the available branches, and choose which one should act as the default entry point.
In the steps below, you will learn exactly where to click, how to set the default path, and how to confirm that routing is working correctly during testing and cross-workflow triggers.
- Access the Automation Workflows in GHL.
- Make the workflow Advanced Builder.
- Identify Parallel Branches and the Default Path.
- Set a Branch as the Workflow Default Path.
- Test the Workflow Default Path.
To start, make sure you are logged in to your GoHighLevel sub-account.
Step 01 – Access the Automation Workflows in GHL
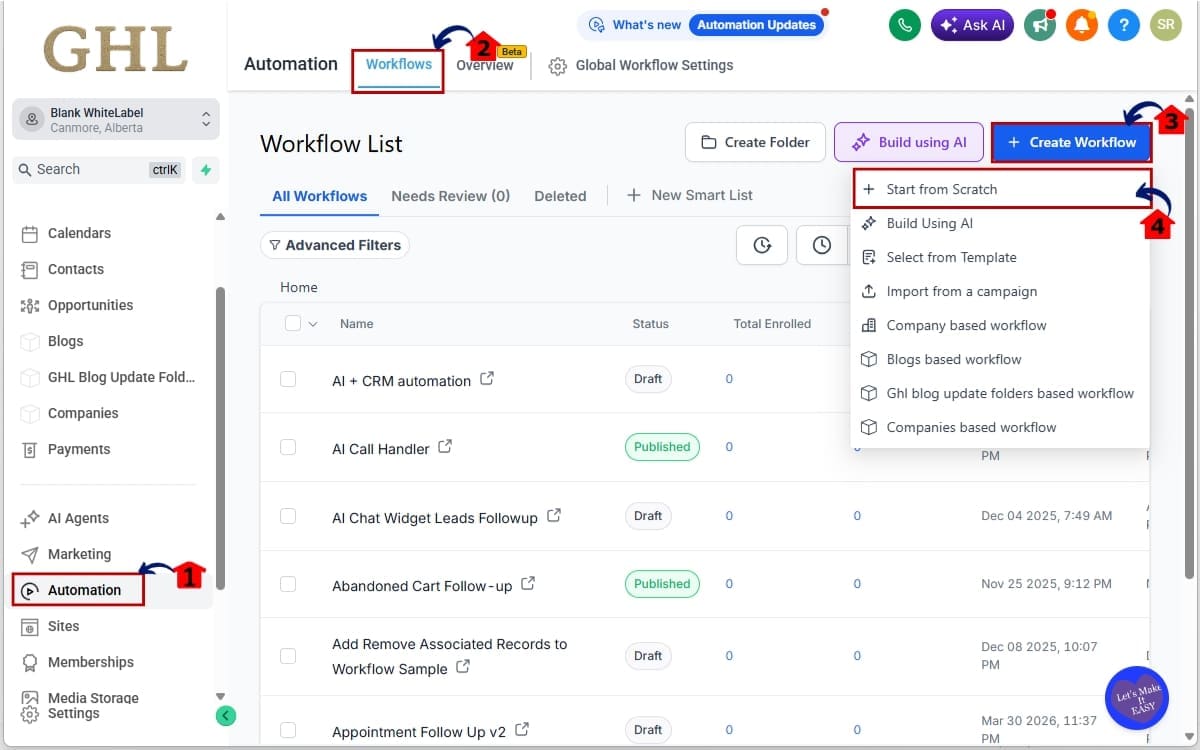
- This step guides you to the Workflows area in GoHighLevel, where you can create and manage automations using the Advanced Builder.
1.1 From the left-hand menu, click on Automation.
- This opens the main automation hub where all workflow-related tools and settings are located.
1.2 Select Workflows from the submenu to open your workflow list.
- You’ll see a complete list of your existing workflows, including active, draft, and paused automations.
1.3 Click +Create Workflow.
- This option allows you to start building a new workflow, either from scratch or by using a pre-built template.
1.4 Click Start from scratch.
- This opens a blank workflow canvas in the builder, giving you full flexibility to create custom logic and set up parallel branches.
Step 02 – Make the Workflow Advanced Builder
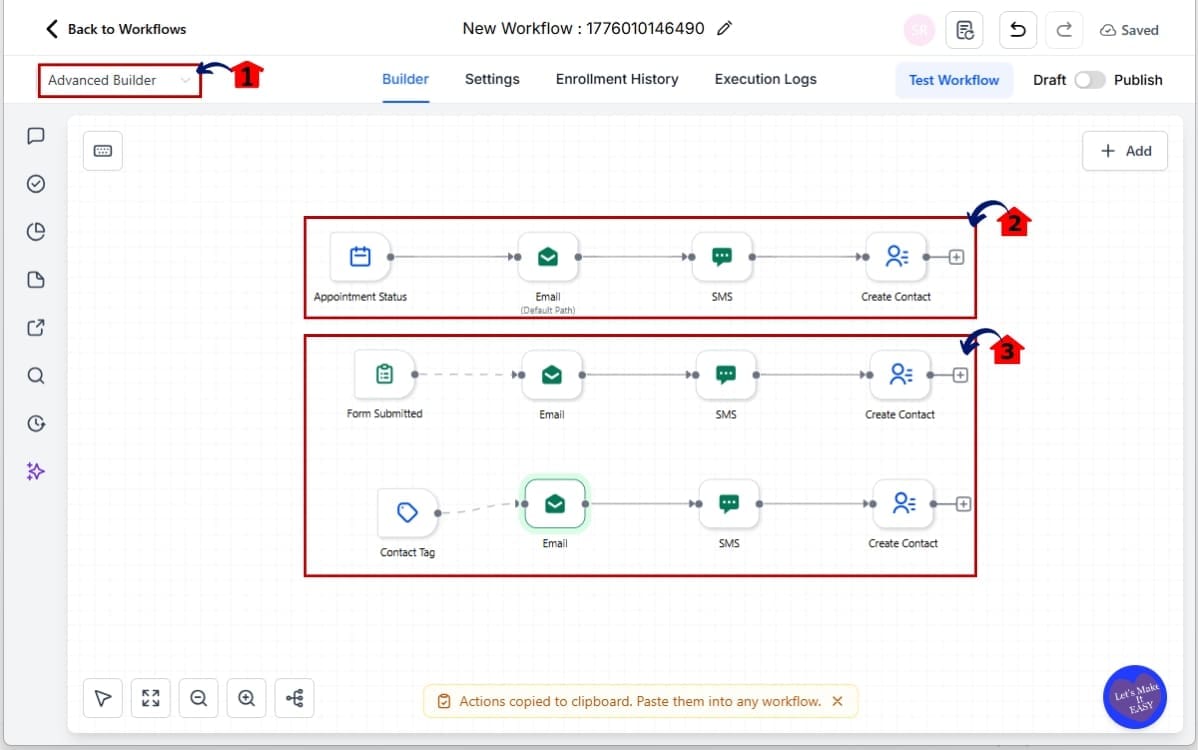
- This step ensures your workflow is built using the Advanced Builder and sets up multiple parallel paths required to enable the Default Path feature.
2.1 Click on the workflow name to open it in the Advanced Builder.
- This opens the workflow canvas where you can visually build and manage triggers, actions, and parallel branches.
2.2 Add a trigger and an action (for example, Form Submitted → Send SMS).
- The trigger starts the workflow, and the first action creates the initial branch connected directly to the root node.
2.3 Add another workflow path directly from the root node.
- Click the + Add Action from the root node again (not from the first branch) to create a second parallel branch, which is required to enable the branch icon and default path selection.
Step 03 – Identify Parallel Branches and the Default Path
- This step helps you confirm that your workflow has parallel branches and that the Default Path feature is active and visible.
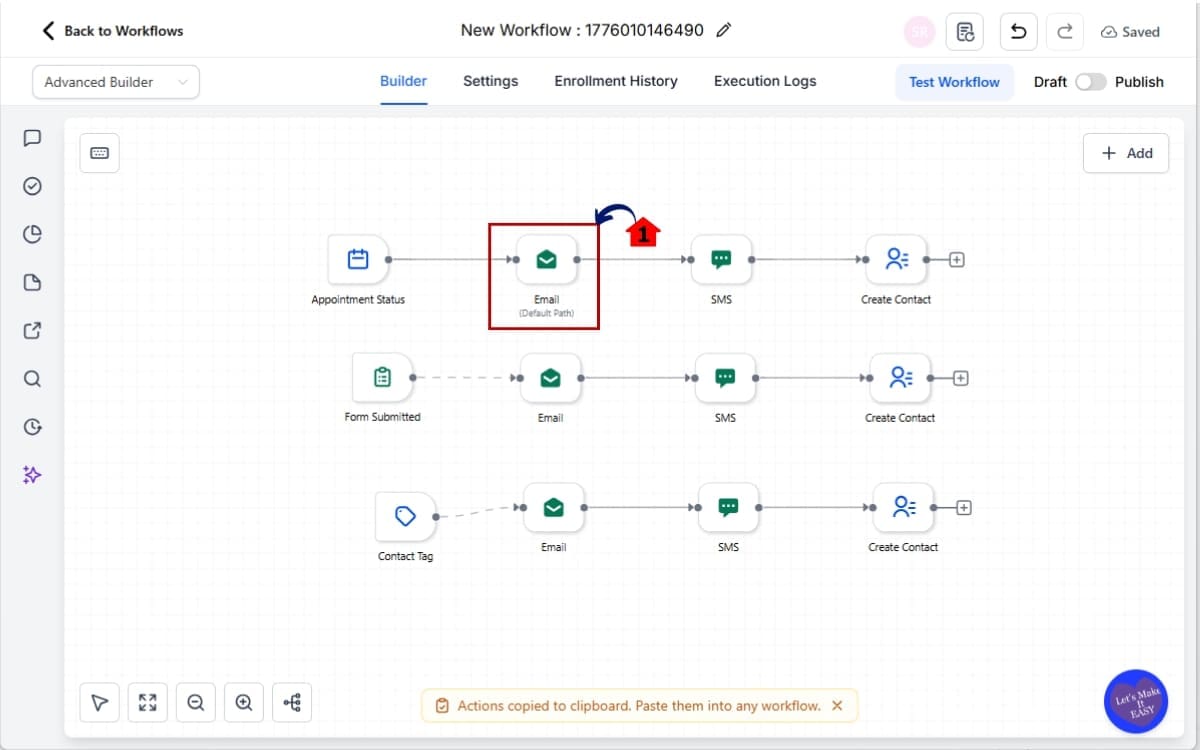
3.1 In workflows with multiple parallel branches, the root node will now be labeled Default Path.
- This label appears at the top of the workflow and indicates that one of the connected parallel branches is set as the default entry point for workflow tests and contacts entering from other workflows.
Step 04 – Set a Branch as the Workflow Default Path
- This step allows you to choose which parallel branch contacts will enter by default during workflow tests and when they are sent from another workflow.
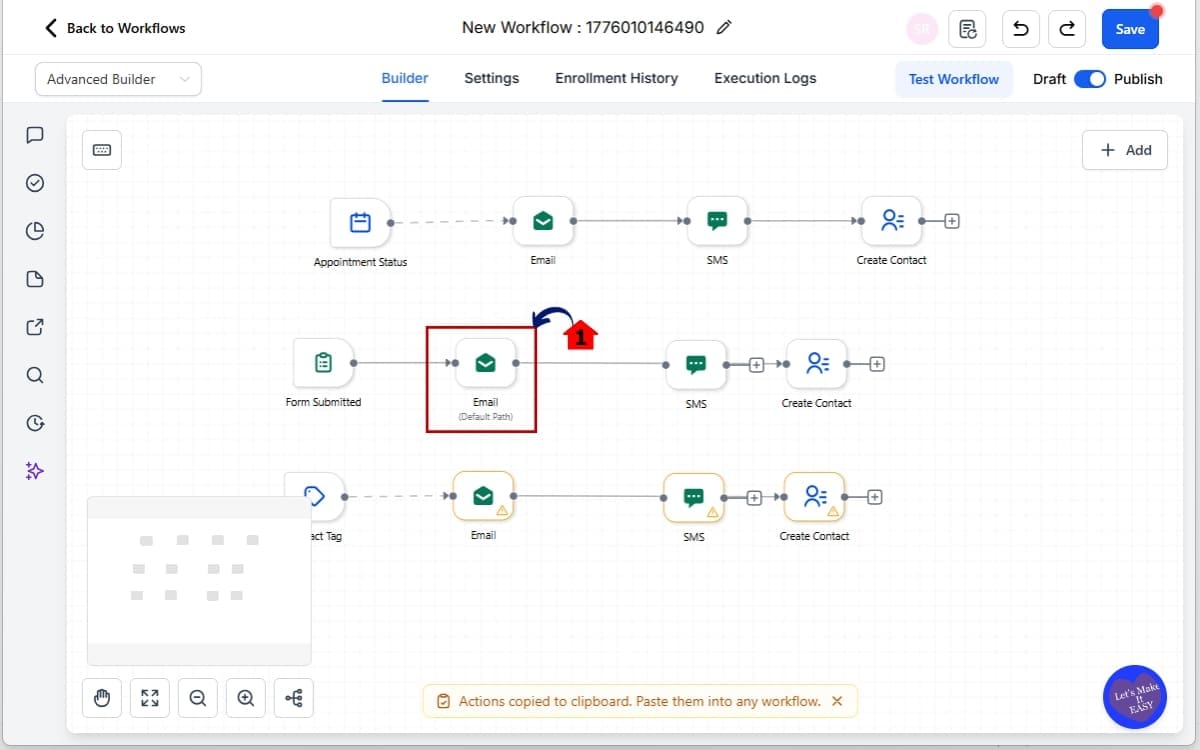
4.1 Click the branch icon to open the default path option. Select the option to Set as Default Path.
Once selected, GHL will visually confirm the change:
- A solid connector line indicates the branch is now the workflow default path.
- Dashed connector lines indicate branches that are not set as the default and are typically accessed via “Go To” actions.
Step 05 – Test the Workflow Default Path
- This step ensures that the selected default branch is working correctly when the workflow is tested or triggered from another workflow.
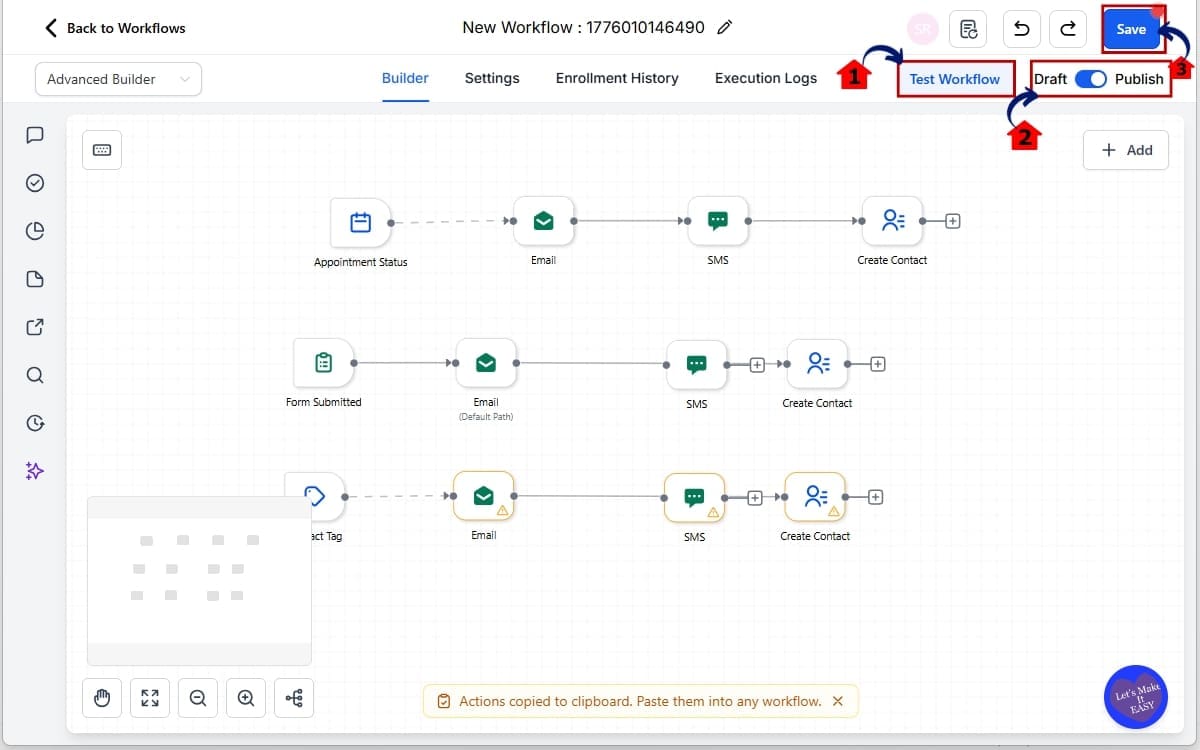
5.1 Use the Test Workflow feature within the Advanced Builder.
- Click the Test Workflow button to run a test contact through the workflow and verify that it enters the branch set as the Default Path.
5.2 Click Publish.
- Publishing the workflow applies your changes, including the newly selected default path, so it functions correctly in live conditions and cross-workflow triggers.
5.3 Then click Save.
- Saving ensures all recent updates are securely stored, preventing any loss of configuration before exiting the workflow.
By using the workflow default path feature, you can quickly switch between branches for testing, validation, and optimization, without modifying your workflow structure. This keeps your automations clean, efficient, and easy to manage.
Pro Tips Maximize Workflow Default Path in GHL
Using the workflow default path is straightforward. Using it strategically is what improves your build process.
When testing, switch the default to the branch you’re currently reviewing. That allows you to validate that sequence without shifting other elements around. No temporary connectors. No structural edits.
Naming also matters more than people think. Instead of generic labels, name branches clearly so you don’t hesitate when selecting the default path. The clearer your labels, the faster you move, especially in workflows with five or six parallel routes.
When you’re developing a new workflow, it’s smart to keep your primary branch set as default until everything else is finalized. It reduces confusion during testing and keeps your most important sequence front and center.
And every time you change the default path, run a quick test. It only takes a minute and confirms everything, emails, texts, tags, internal alerts, is triggering properly.
If you’re packaging workflows into snapshots or templates, set a logical default path before exporting. It makes life easier for the next person using it.
Simple habits. Cleaner builds. Fewer surprises.
What This Means for Your Business
This isn’t just a minor tweak in the builder. It changes how you approach workflow design. When you can control exactly where contacts enter, testing becomes intentional instead of reactive. You’re no longer working around the system, you’re configuring it properly from the start.
Agencies will feel this immediately. No more copying workflows or adjusting structure just to review a single branch. You test it directly and move on. Fewer edits. Fewer errors.
If your business depends on structured journeys, onboarding flows, reminders, nurture sequences, predictable entry points matter. Contacts land where they’re supposed to. Messaging stays aligned. Timing stays tight.
It also makes QA easier. You can test branch by branch without touching live logic. That’s a safer way to refine automation.
Overall, it makes complex workflows easier to manage and easier to scale.
Results You Can Expect
The workflow default path feature in GHL delivers immediate, practical results, especially for agencies and automation-heavy businesses. This isn’t just a cosmetic update inside Advanced Builder. It directly improves how fast, safely, and confidently you can deploy workflows.
First, you’ll save time.
Instead of restructuring branches just to test a single path, you can switch the workflow default path in seconds. That means faster build cycles. Faster QA. Faster client launches. When you’re managing multiple accounts or complex automation systems, those minutes add up quickly.
Second, you reduce errors.
Testing the wrong branch is a common mistake in multi-branch workflows. With a clearly defined workflow default path, you know exactly where contacts will enter during testing and cross-workflow triggers. That clarity reduces automation misfires, incorrect follow-ups, and routing confusion.
Third, you improve automation confidence.
When workflows trigger other workflows, routing matters. Now, instead of hoping contacts land where expected, you control the entry point. That makes your automation systems more predictable and scalable, especially in layered campaign structures.
Fourth, you simplify maintenance.
As workflows grow over time, branches multiply. Without clear routing control, troubleshooting becomes frustrating. With the workflow default path clearly labeled and visually confirmed through solid connectors, you can quickly understand and adjust behavior without digging through logic.
The real result? Cleaner workflows. Safer testing. Better client outcomes. And automation that works the way you designed it.
Frequently Asked Questions about workflow default path
Take Full Control with Workflow Default Path in GHL
The workflow default path update in GHL’s Advanced Builder solves a real problem for anyone building parallel workflow branches. Instead of relying on a fixed root entry or restructuring your automation just to test a specific branch, you now control exactly where contacts begin.
That means cleaner testing. Clearer routing. And fewer automation mistakes.
With the ability to set a workflow default path, agencies can validate each branch without duplicating workflows. Marketers can confidently test SMS paths, email nurture flows, or conditional sequences independently. And businesses using cross-workflow triggers can ensure contacts always enter the intended branch.
It’s a small interface change. But it’s a major operational upgrade.
When your automations are structured properly, testing becomes predictable. When testing is predictable, deployment becomes faster. And when deployment is faster and cleaner, your entire client delivery system improves.
If you’re running multi-branch workflows inside GHL, take a few minutes to review them. Set the correct workflow default path. Run tests intentionally. Tighten up your automation structure.
You’ll notice the difference immediately.
Have you started using the workflow default path in your Advanced Builder workflows yet? Test it inside one of your complex automations and see how much smoother your QA process becomes.
And check back to the GHL Growth Garage blog for more step-by-step GoHighLevel feature guides designed to help you build smarter, stronger automation systems.
Scale Your Business Today.
Streamline your workflow with GoHighLevel’s powerful tools.


